Unit 9 Wall and Ceiling Framing Wall construction


- Slides: 36
Unit 9 Wall and Ceiling Framing
Wall construction • Wall framing includes the assembly of horizontal and vertical members that make up exterior walls and interior partitions. • Theses walls support the ceilings and roof of a house and sometimes support a second floor as well. • Walls can be framed using 2”X 4” lumber for garages and other non-residential construction. • For residential construction walls are framed using 2”X 6” material.
Wall construction Cont. • In platform framing, walls are constructed laying down on the platform and then raised into position. • Interior walls are called partitions and are constructed in a similar manner to exterior walls. • Interior load bearing walls construction is identical to exterior walls as they are designed to carry loads from the roof, ceiling and upper floors.
Parts of the wall framing • • Sole plate Top plate Studs Cripple studs Sill Jack studs or trimmer Headers or Lintels
Sole plate • This is the part at the bottom of a wall that rests on the platform. • The studs attach to the sole plate using 3 1/2” nails. • Once the wall is in place, it is attached to the platform by driving nails through the sole plate and in to the platform.
Top Plate • This is the part at the top of the wall. • The studs attach to the top plate using 3 1/2” nails. • The top plate may be doubled to provide adequate support for the top of the wall. • The ceiling or upper floor will sit on the top plate.
Studs • Wall studs provide a place to attach interior and exterior finishing. • Usually spaced 16” O. C. but can be 24” on some one story older homes. • On exterior walls, the void between studs provide an area for the installation of insulation.
Studs Cont. • Extra studs are used in the corners, around openings in the wall for doors and windows and where interior partitions attach to exterior walls. • The height of exterior wall is generally 8’ but it is not uncommon to find wall 10’ or higher. • Stud length lumber measures 92 5/8” long.
Cripple studs • Full length studs become cripple studs when they end because of an opening such as a window
Sill • The sill makes up the bottom of a rough window opening. • It provides support for the window when it is installed as well as a place for the top of the cripple studs to attach.
Jack or Trimmer Studs • Shortened studs that stiffen the sides of a rough opening. • They bear the weight of the header.
• Figure 9 -10 p 209 text
Important things to remember about wall framing • Stud spacing remains the same regardless of openings for doors or windows. This is so that sheathing can be installed with little cutting or waste. • Wall framing lumber must be straight. This is especially true for interior partitions. • Be sure to turn the crown of the lumber all the same way, either all facing in or all facing out.
Framing for corners • Corners are formed when two walls intersect in a building. • Only straight lumber should be used for framing corners. • Usually a second stud is spaced the thickness of a 2”X 4” and blocks are installed in 3 or 4 places from top to bottom to keep spacing consistent. • The blocks allow the extra stud to stick out past the end wall giving an area to fasten interior finishes. • This type of corner requires insulation to be installed before they are attached together.
Framing for corners • Another method commonly used is to place a stud at a 90 o to the stud at the end of the wall. • This stud is placed so it will be closest to the interior side of the wall. • This stud will stick out past the inside of the end wall providing a place to fasten interior finishes. • This type of corner construction allows for the corner to be insulated after the walls are erected.
• Fig 9 -4 p 207 text
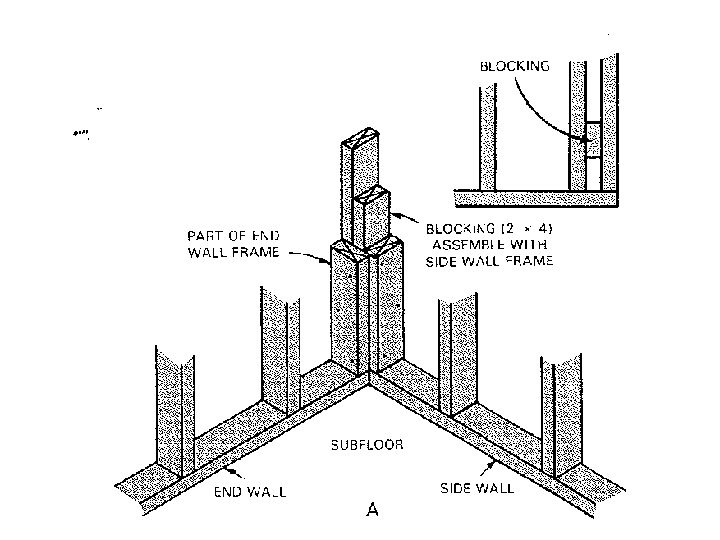
Framing required for Partition Intersections. • Partitions need to be fastened firmly to the exterior walls. This requires some extra framing. • The extra framing must not only provide a surface to securely fasten the partition but also provide a nailing surface for interior finishing.
Framing required for Partition Intersections. Cont. This can be accomplished by several methods • Install extra studs in the outside and attach the partition to them. • Insert blocking and nailers between the regular studs.
• Fig 9 -6 page 208 text
Rough Openings • A rough opening is the opening left in a wall that will contain a window or a door in most cases. • It is called a rough opening because it is larger than the true size of the window or door to be installed. • It is usually 1 1/2” larger to allow for shimming of the door or window to be installed.
Rough Openings Cont. • Generally the height of all rough openings are the same from one floor to the next. • This information can be found on the elevation drawings and sectioning view. • The size of the opening can be found on the plan view and window/door schedule.
Rough Openings Cont. • Rough openings must contain a header or lintel. • The header carries any weight placed over the opening and transfers it to the framing on either side of the opening. • Headers are constructed by nailing two framing members together on edge. • The longer the span, the larger the header must be. • Plywood spacers make the header the same thickness as the wall.
Rough Openings Cont. • The header length is equal to the size of the rough opening plus the thickness of two trimmer studs (3”). • The studs and trimmer support the header and provide a nailing surface for the door and window casings. • In some cases the sill may be doubled to provide a nailing surface for trim.
• Figure 9 -8 page 209 text
• Figure 9 -11 p 210 text
Plate layout • Use only straight 2”X 4” or 2”X 6” for plate material. • Lay two pieces of the same length along the area being constructed. • Caution; do not construct a wall any longer than can be easily lifted in to place.
Steps to laying out plates 1. Align both the top and bottom plate together and mark the location of all the studs. 2. Check the architectural plan and mark the center location of all windows and doors. 3. Mark off one half of the rough opening on either side of the center line. To the outside of these, mark the location of the trimmer and outside stud. Mark the trimmer with a “T” and the stud with an “X”.
Steps to laying out plates 4. Mark all the stud spaces between the two trimmers with a “C”, this designates them as crippled studs. 5. Layout the center line of intersecting partitions and where they will but. Add full length studs or blocking depending on method used.
• Fig 9 -12 p 211 text
Story Pole • A story pole is a long measuring stick made up by the carpenter on the job. • It represents the actual height of the wall and contains information about header height and sill locations for all windows.
• Fig 9 -13 p 221 text
Wall sections • It is not uncommon for sheathing to be nailed in place before the wall is raised into place. • Blocks may be nailed to the platform to prevent the wall from sliding off the platform when raised. • Walls with no sheathing should have diagonal bracing to help hold the wall square. • Be sure to have temporary bracing to hold the walls in place until securely fastened.
Partitions • After all of the exterior walls, load bearing walls, and roof has been erected the partition can be installed. • Partitions are the walls inside a house that divide off one room from another. • Partitions are non load bearing walls and are not intended to carry any of the buildings load.
Partitions Cont. • Non bearing partitions do not require any headers above door openings. • Partitions are most often constructed using 2”X 4” lumber. • Studs are space at 16”o. c. • Rough door openings are generally made 2 ½ “ wider than the finished door size.
Knee walls • Knee walls are constructed in a similar manner to other wall with the exception of their height. • A knee wall is usually about 4’ in height but it depends on the construction. • They are common in split level construction.