Unit 1 Java and Eclipse The Eclipse Development


. There are many,")


- Slides: 23
Unit 1: Java and Eclipse The Eclipse Development Environment
• These notes are based on the assumption that you will have available to you a development machine that already has the Eclipse environment installed on it. • More details on installing the environment are given later, assuming that you might want to set this up at home. • For the time being you just need to be familiar with several things in order to begin using Eclipse.
• When you start Eclipse it will prompt you regarding the workspace that you want to use. • This is where your programs will be stored. Unless directed otherwise, just accept the default. • In simple terms, when Eclipse is up and running, the screen will be divided into 4 areas:
• Across the top: This is the menu (no surprises). There are many, many menu options. Initially we will just be interested in a few. • Down the left: This is the Explorer. In effect, this shows the contents of your workspace. In other words, it shows folders containing the programs you’ve written. • In the center: This is the editor. This is where you can see and type in the contents of programs. • Below the editor: There are several tabbed items here. The tab that will be of initial interest is the Console. This is where program output will be shown.
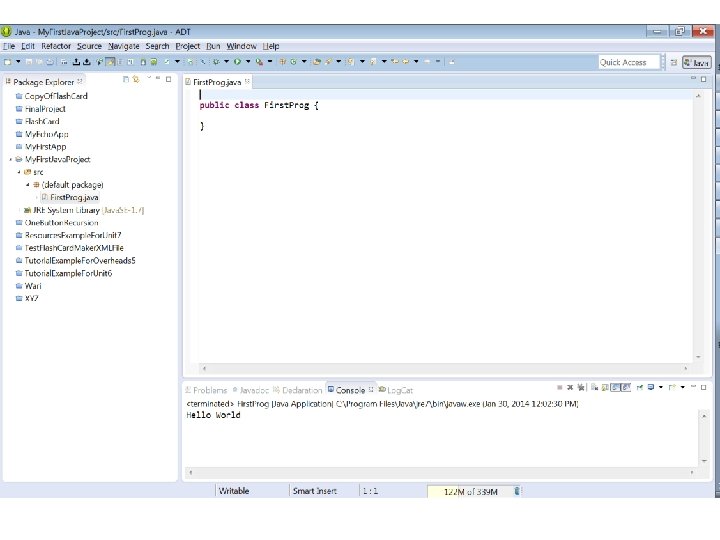
• The process of loading and running a program will be described shortly. • In order to illustrate the areas mentioned above, a screenshot of the first program open in the editor, after having run, is shown below:
• 1. In Eclipse, each program you write will be saved as a project in a folder of its own. • 2. At the top of every program there will be a line of code of this form: • • public class Name_of_program
• The name of the file that the program is saved in has to agree exactly with the name that appears in this line of code within the program. • The first letter of the name is capitalized within the program, and the first letter of the name of the file also has to be capitalized. • In other words, in order to be valid, a program that started with the line of code given above would have to be saved with this name: • • Name_of_program
• 3. Java is completely case sensitive. • Microsoft Windows is not fully case sensitive. • If you are accustomed to working in Windows and naming files there, this can lead to problems. • You can largely avoid problems if you only work with your program code through Eclipse.
• 4. There is one last bit of information that might be of interest. • If you were curious you could find the workspace folder on your machine and find its /src subfolder. • This is where your Java files are stored. • If you used Windows to look at their properties, you should find that they are in fact Java files.
• Depending on how your system is set up, you would find that the file names actually have an extension, . java. • Because the Eclipse environment is taking care of the details, in practice you shouldn't have to worry about these facts. • They are just presented for your information.
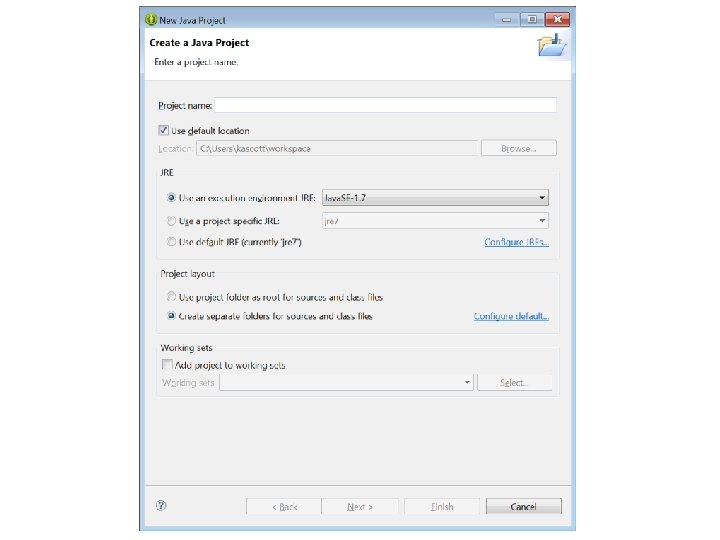
• Now the process of using Eclipse to load and run your first example program will be explained. • This is the process that resulted in the screenshot shown above. • 1. Having started Eclipse and accepted the workspace take the following menu option: • File, New, Java Project. • The resulting dialog is shown below. • Enter a Project Name value of My. First. Java. Project and accept the default values for all of the other fields as given.
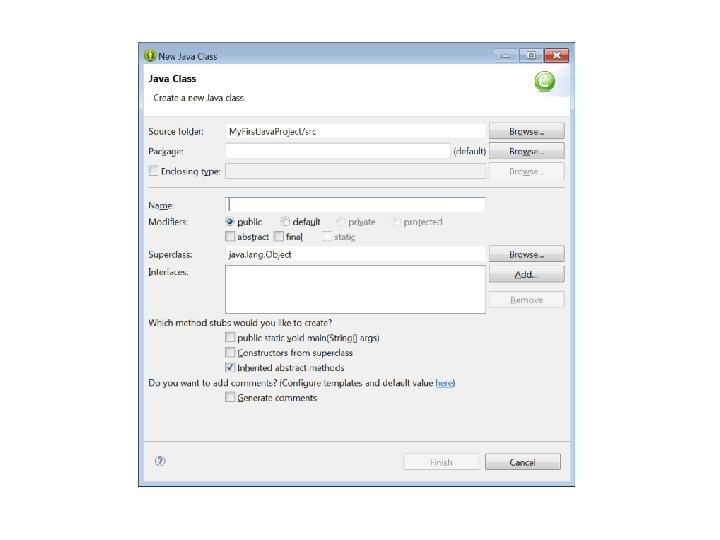
• After filling in the Project Name, the Finish button will become active. • After you click it, the My. First. Java. Project folder should appear in the Explorer on the left hand side of the Eclipse interface. • 2. Having successfully created the project, take the following menu option: • File, New, Class. • The resulting New Java Class dialog is shown below. • Enter a Name for the class, for example, First. Prog. Accept the default values for all of the other fields as given.
• After filling in the class Name, the Finish button will become active. • After you click it, the First. Prog file will appear under the My. First. Java. Project folder in the Explorer and the editor screen of Eclipse will show the empty outline of the First. Prog class, as shown in the screenshot below.
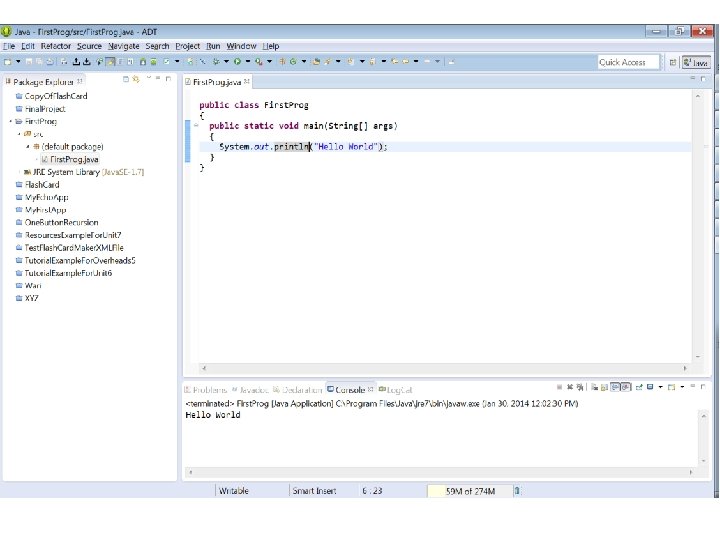
• 3. On the Web site for these notes in the Unit 1 folder there is a file named First. Prog. java. • If you open it using the browser, this is what you’ll see: • • public class First. Prog • { • public static void main(String[] args) • { • System. println("Hello World"); • }
• Copy this and paste it into the Eclipse editor, replacing the blank template for the First. Prog class. • If this was successful, there should be no red marks on any line in the code. • Eclipse automatically compiles any code placed in the editor, so the lack of red marks means that the code compiled successfully and is ready to run.
• 4. Having come this far, take the following menu option: • Run, Run. • If there are no runtime problems, the program will generate output, namely the message “Hello World”, and this will be shown at the bottom of the Eclipse interface. • The screenshot of this successful sequence of events is repeated below.
Section Summary • Java program files have to match the class name within them. • Java is fully case sensitive. • The Eclipse environment automates the creation of projects and program files, allowing programs to be compiled and run
Vocabulary • • Project. Capitalized. Case sensitive. Extension.