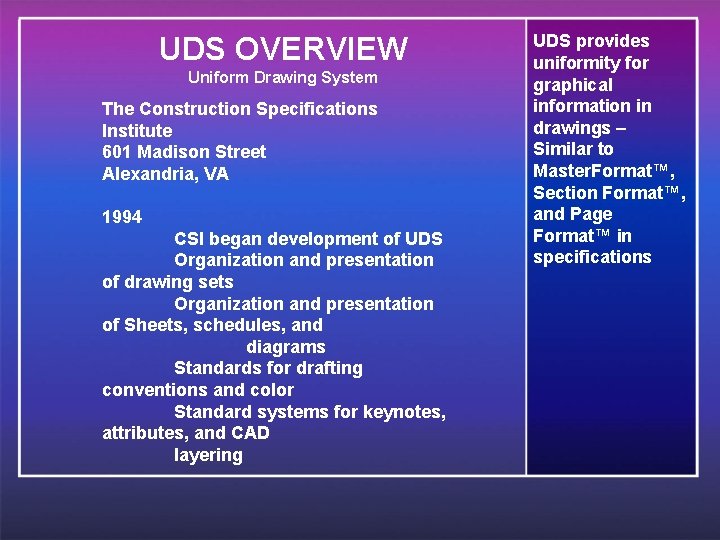
UDS OVERVIEW Uniform Drawing System The Construction Specifications
![LAYER NAME EXAMPLES Layer Name Examples: L-SITE-PLAY [Site Improvements: Play Structures] A-FLOR-TPTN Q-CASE-UPPR D-PGAS-H LAYER NAME EXAMPLES Layer Name Examples: L-SITE-PLAY [Site Improvements: Play Structures] A-FLOR-TPTN Q-CASE-UPPR D-PGAS-H](https://slidetodoc.com/presentation_image_h2/51099809c5e0f21af0c433ea624d5ab8/image-8.jpg)

- Slides: 55

UDS OVERVIEW Uniform Drawing System The Construction Specifications Institute 601 Madison Street Alexandria, VA 1994 CSI began development of UDS Organization and presentation of drawing sets Organization and presentation of Sheets, schedules, and diagrams Standards for drafting conventions and color Standard systems for keynotes, attributes, and CAD layering UDS provides uniformity for graphical information in drawings – Similar to Master. Format™, Section Format™, and Page Format™ in specifications

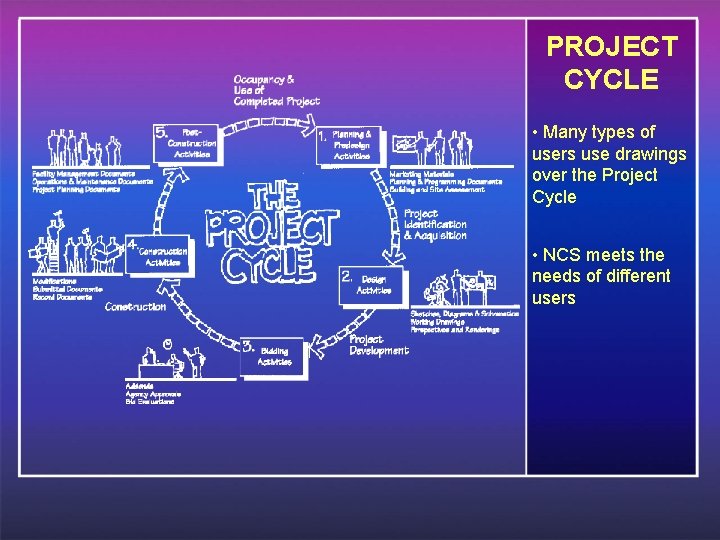
PROJECT CYCLE • Many types of users use drawings over the Project Cycle • NCS meets the needs of different users

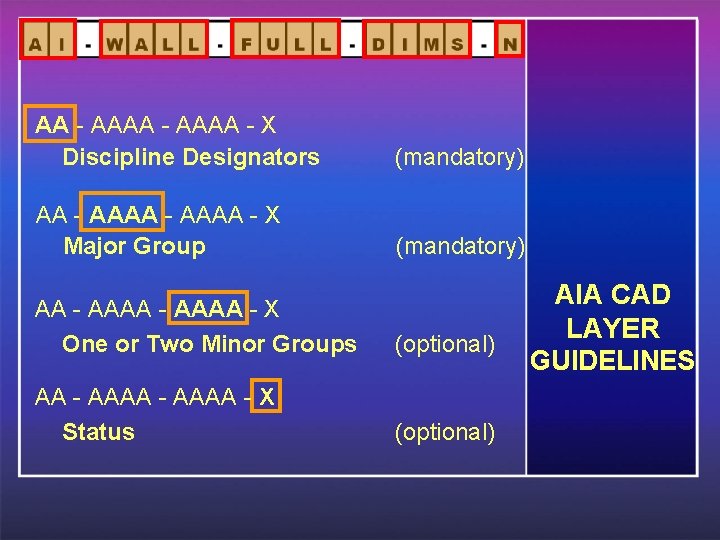
AA - AAAA - X Discipline Designators (mandatory) AA - AAAA - X Major Group (mandatory) AA - AAAA - X One or Two Minor Groups (optional) AA - AAAA - X Status (optional) AIA CAD LAYER GUIDELINES

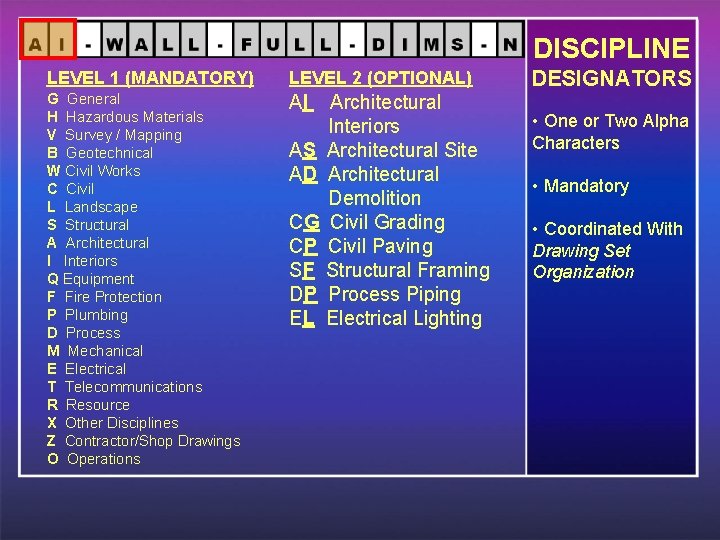
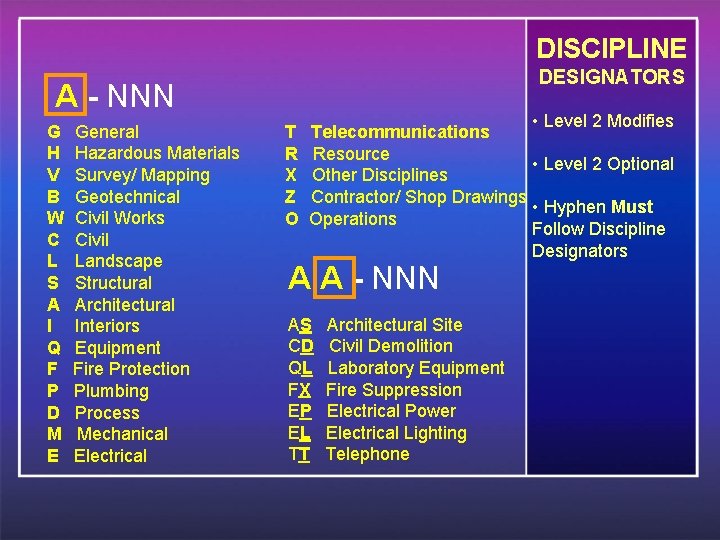
DISCIPLINE LEVEL 1 (MANDATORY) LEVEL 2 (OPTIONAL) G General H Hazardous Materials V Survey / Mapping B Geotechnical W Civil Works C Civil L Landscape S Structural A Architectural I Interiors Q Equipment F Fire Protection P Plumbing D Process M Mechanical E Electrical T Telecommunications R Resource X Other Disciplines Z Contractor/Shop Drawings O Operations AI AS AD CG CP SF DP EL Architectural Interiors Architectural Site Architectural Demolition Civil Grading Civil Paving Structural Framing Process Piping Electrical Lighting DESIGNATORS • One or Two Alpha Characters • Mandatory • Coordinated With Drawing Set Organization

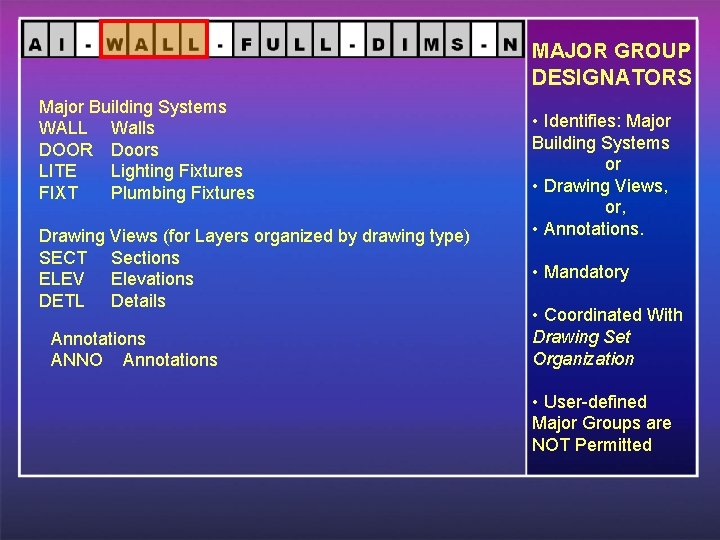
MAJOR GROUP DESIGNATORS Major Building Systems WALL Walls DOOR Doors LITE Lighting Fixtures FIXT Plumbing Fixtures Drawing Views (for Layers organized by drawing type) SECT Sections ELEV Elevations DETL Details Annotations ANNO Annotations • Identifies: Major Building Systems or • Drawing Views, or, • Annotations. • Mandatory • Coordinated With Drawing Set Organization • User-defined Major Groups are NOT Permitted

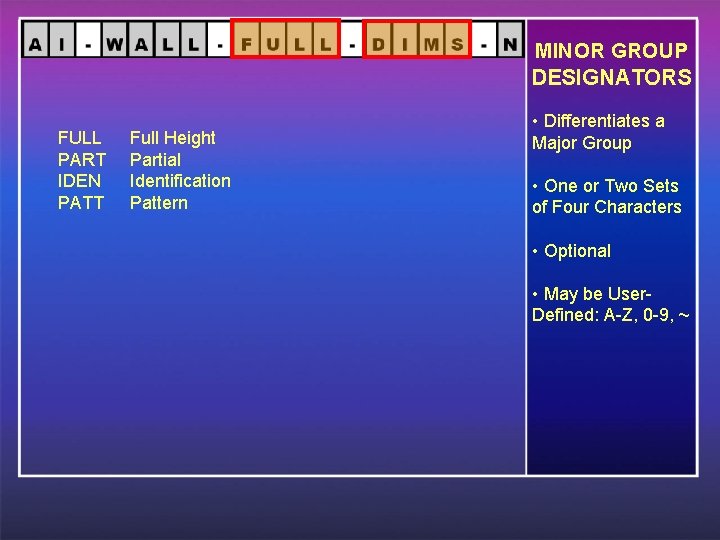
MINOR GROUP DESIGNATORS FULL PART IDEN PATT Full Height Partial Identification Pattern • Differentiates a Major Group • One or Two Sets of Four Characters • Optional • May be User. Defined: A-Z, 0 -9, ~

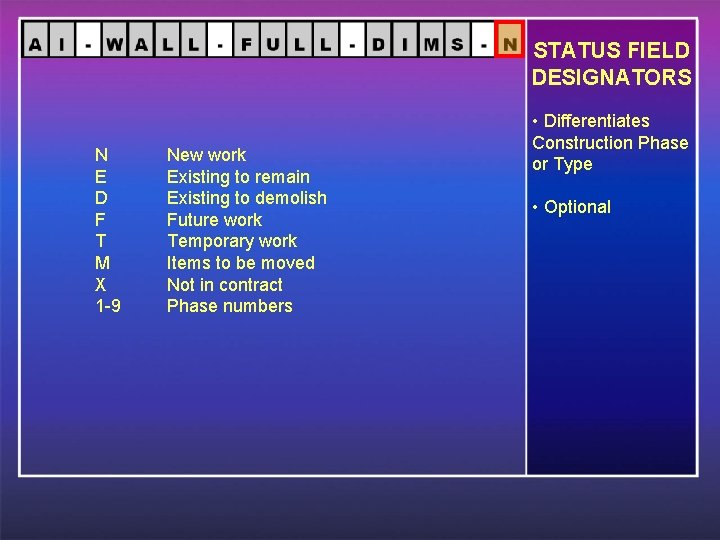
STATUS FIELD DESIGNATORS N E D F T M X 1 -9 New work Existing to remain Existing to demolish Future work Temporary work Items to be moved Not in contract Phase numbers • Differentiates Construction Phase or Type • Optional
![LAYER NAME EXAMPLES Layer Name Examples LSITEPLAY Site Improvements Play Structures AFLORTPTN QCASEUPPR DPGASH LAYER NAME EXAMPLES Layer Name Examples: L-SITE-PLAY [Site Improvements: Play Structures] A-FLOR-TPTN Q-CASE-UPPR D-PGAS-H](https://slidetodoc.com/presentation_image_h2/51099809c5e0f21af0c433ea624d5ab8/image-8.jpg)
LAYER NAME EXAMPLES Layer Name Examples: L-SITE-PLAY [Site Improvements: Play Structures] A-FLOR-TPTN Q-CASE-UPPR D-PGAS-H 2 E-LITE-CIRC-EMER [Floor: Toilet Partitions] M-FUME-E [Fume Hood: Existing to Remain] [Casework: Upper Cabinets] [Gas: Hydrogen – System] [Lighting Circuits: Emergency] • Know How to Flexible

DRAWING SET ORGANIZATION

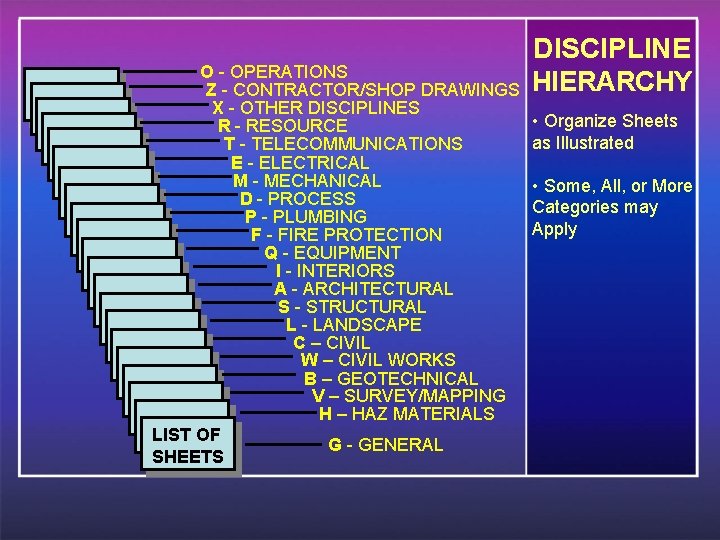
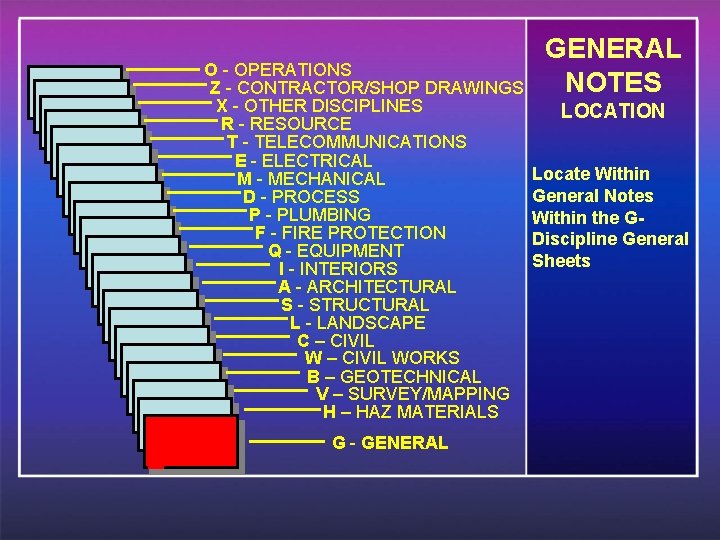
O - OPERATIONS Z - CONTRACTOR/SHOP DRAWINGS X - OTHER DISCIPLINES R - RESOURCE T - TELECOMMUNICATIONS E - ELECTRICAL M - MECHANICAL D - PROCESS P - PLUMBING F - FIRE PROTECTION Q - EQUIPMENT I - INTERIORS A - ARCHITECTURAL S - STRUCTURAL L - LANDSCAPE C – CIVIL WORKS B – GEOTECHNICAL V – SURVEY/MAPPING H – HAZ MATERIALS LIST OF G - GENERAL SHEETS DISCIPLINE HIERARCHY • Organize Sheets as Illustrated • Some, All, or More Categories may Apply

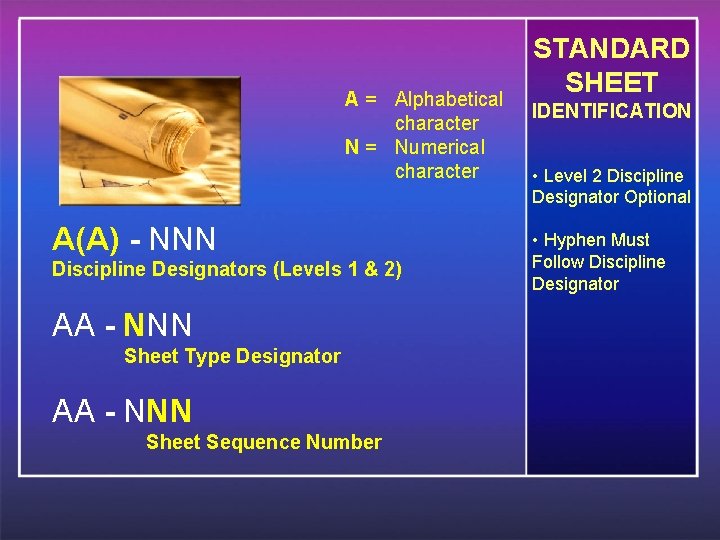
A = Alphabetical character N = Numerical character A(A) - NNN Discipline Designators (Levels 1 & 2) AA - NNN Sheet Type Designator AA - NNN Sheet Sequence Number STANDARD SHEET IDENTIFICATION • Level 2 Discipline Designator Optional • Hyphen Must Follow Discipline Designator

DISCIPLINE DESIGNATORS A - NNN G H V B W C L S A I Q F P D M E General Hazardous Materials Survey/ Mapping Geotechnical Civil Works Civil Landscape Structural Architectural Interiors Equipment Fire Protection Plumbing Process Mechanical Electrical T R X Z O • Level 2 Modifies Telecommunications Resource • Level 2 Optional Other Disciplines Contractor/ Shop Drawings • Hyphen Must Operations Follow Discipline Designators A A - NNN AS CD QL FX EP EL TT Architectural Site Civil Demolition Laboratory Equipment Fire Suppression Electrical Power Electrical Lighting Telephone

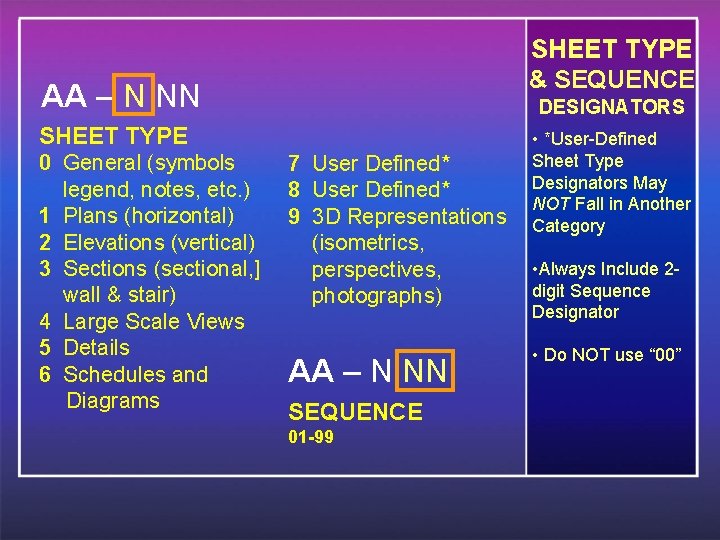
SHEET TYPE & SEQUENCE AA – N NN DESIGNATORS SHEET TYPE 0 General (symbols legend, notes, etc. ) 1 Plans (horizontal) 2 Elevations (vertical) 3 Sections (sectional, ] wall & stair) 4 Large Scale Views 5 Details 6 Schedules and Diagrams 7 User Defined* 8 User Defined* 9 3 D Representations (isometrics, perspectives, photographs) AA – N NN SEQUENCE 01 -99 • *User-Defined Sheet Type Designators May NOT Fall in Another Category • Always Include 2 digit Sequence Designator • Do NOT use “ 00”

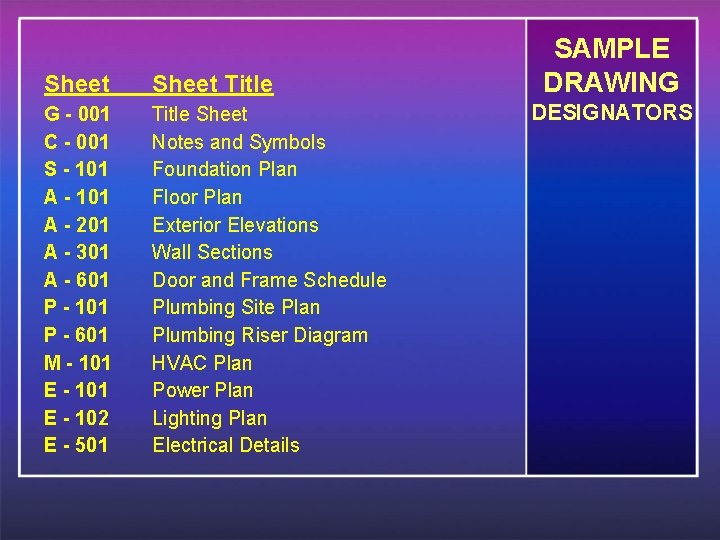
Sheet Title G - 001 C - 001 S - 101 A - 201 A - 301 A - 601 P - 101 P - 601 M - 101 E - 102 E - 501 Title Sheet Notes and Symbols Foundation Plan Floor Plan Exterior Elevations Wall Sections Door and Frame Schedule Plumbing Site Plan Plumbing Riser Diagram HVAC Plan Power Plan Lighting Plan Electrical Details SAMPLE DRAWING DESIGNATORS

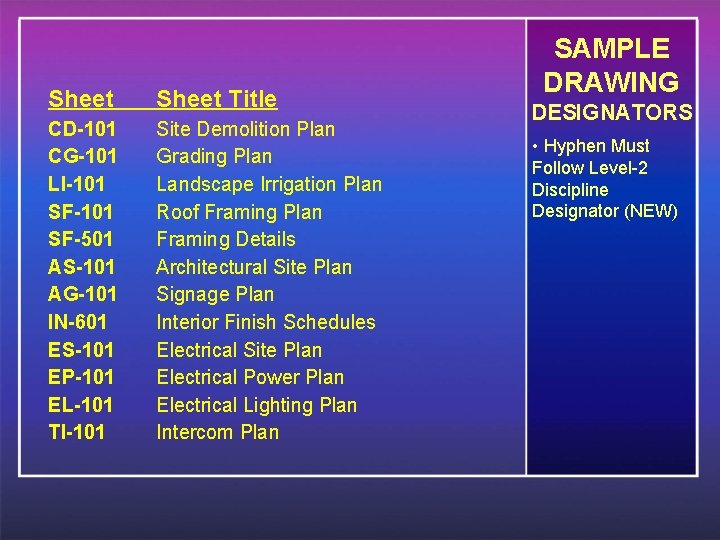
Sheet Title CD-101 CG-101 LI-101 SF-501 AS-101 AG-101 IN-601 ES-101 EP-101 EL-101 TI-101 Site Demolition Plan Grading Plan Landscape Irrigation Plan Roof Framing Plan Framing Details Architectural Site Plan Signage Plan Interior Finish Schedules Electrical Site Plan Electrical Power Plan Electrical Lighting Plan Intercom Plan SAMPLE DRAWING DESIGNATORS • Hyphen Must Follow Level-2 Discipline Designator (NEW)

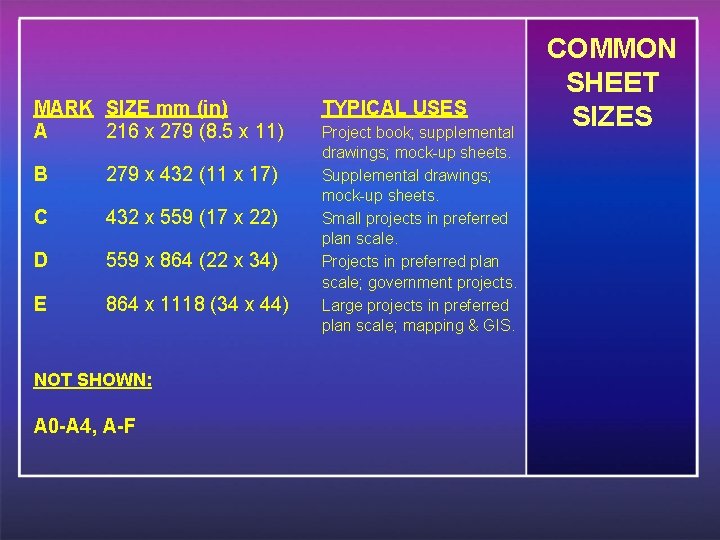
MARK SIZE mm (in) A 216 x 279 (8. 5 x 11) B 279 x 432 (11 x 17) C 432 x 559 (17 x 22) D 559 x 864 (22 x 34) E 864 x 1118 (34 x 44) NOT SHOWN: A 0 -A 4, A-F TYPICAL USES Project book; supplemental drawings; mock-up sheets. Small projects in preferred plan scale. Projects in preferred plan scale; government projects. Large projects in preferred plan scale; mapping & GIS. COMMON SHEET SIZES

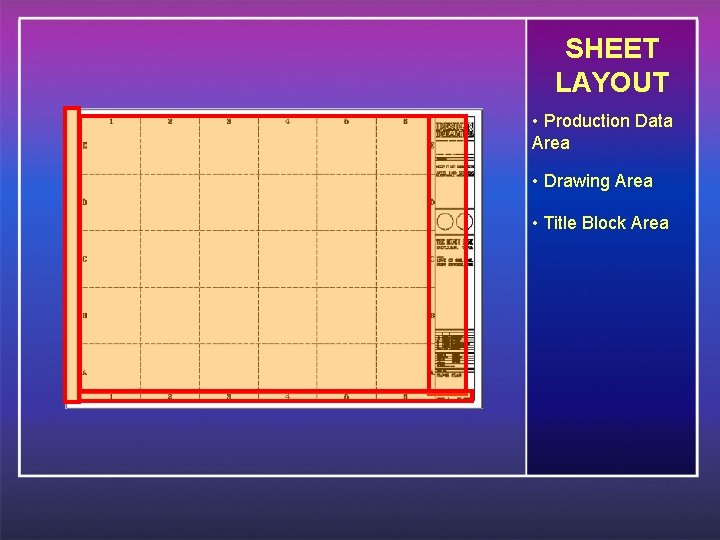
SHEET LAYOUT • Production Data Area • Drawing Area • Title Block Area

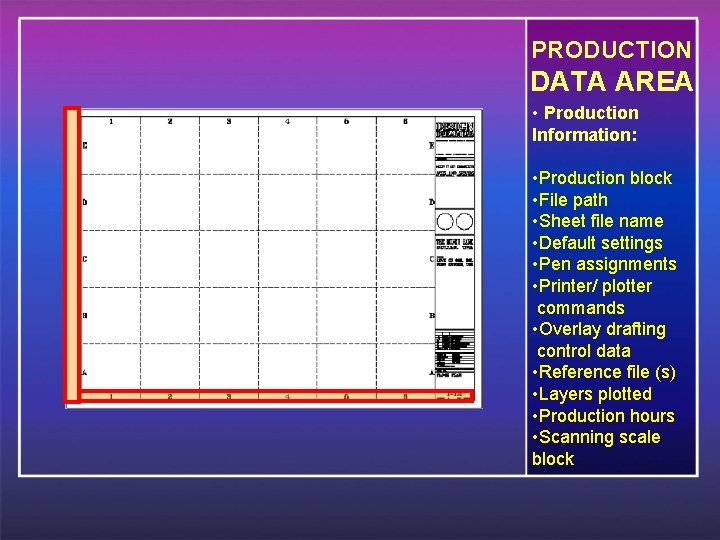
PRODUCTION DATA AREA • Production Information: • Production block • File path • Sheet file name • Default settings • Pen assignments • Printer/ plotter commands • Overlay drafting control data • Reference file (s) • Layers plotted • Production hours • Scanning scale block

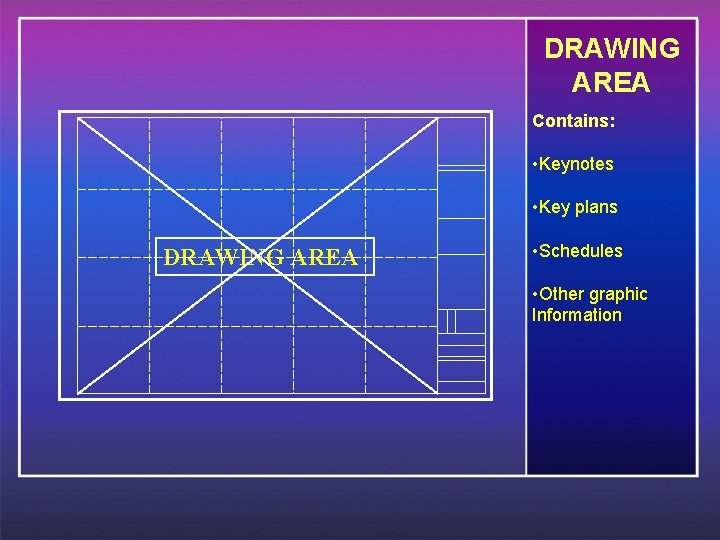
DRAWING AREA Contains: • Keynotes • Key plans DRAWING AREA • Schedules • Other graphic Information

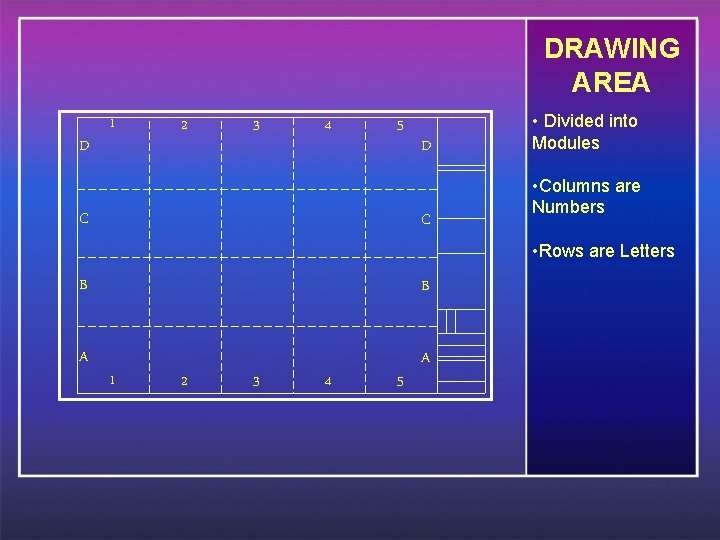
DRAWING AREA D 1 2 3 4 5 C D C • Divided into Modules • Columns are Numbers • Rows are Letters B B A A 1 2 3 4 5

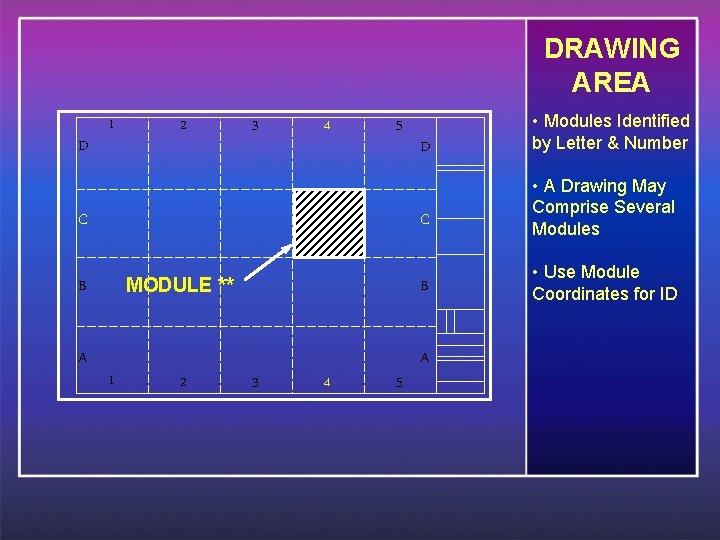
DRAWING AREA D 1 2 3 4 5 C MODULE ** B A 1 2 3 4 5 D • Modules Identified by Letter & Number C • A Drawing May Comprise Several Modules B • Use Module Coordinates for ID A

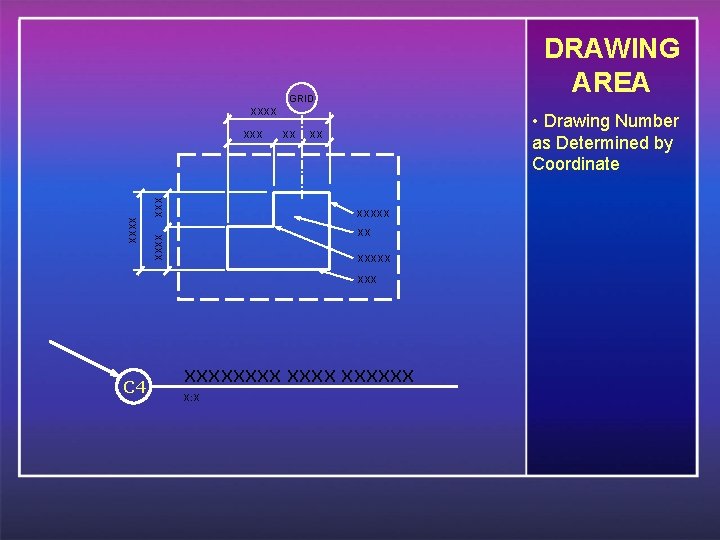
DRAWING AREA GRID XXXX XX • Drawing Number as Determined by Coordinate XX XXXXX XXXXX C 4 XXXXXX X: X

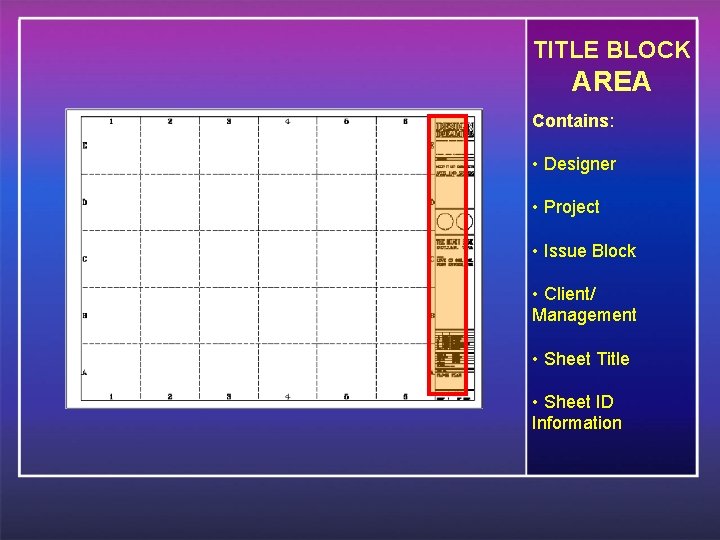
TITLE BLOCK AREA Contains: • Designer • Project • Issue Block • Client/ Management • Sheet Title • Sheet ID Information

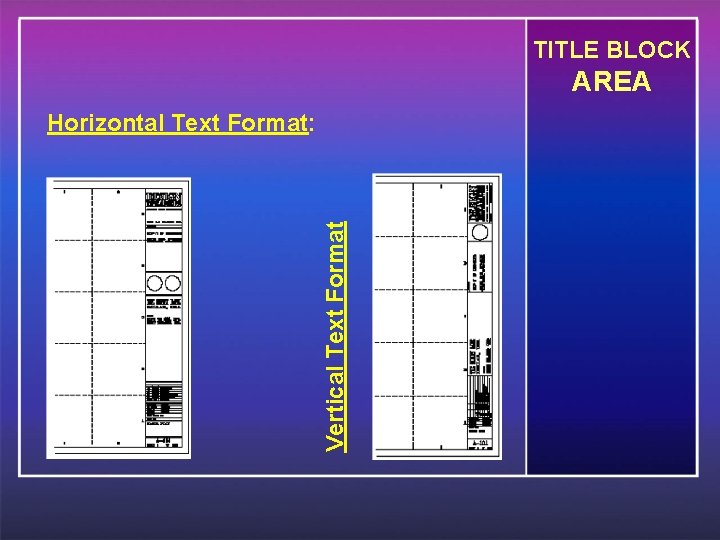
TITLE BLOCK AREA Vertical Text Format Horizontal Text Format:

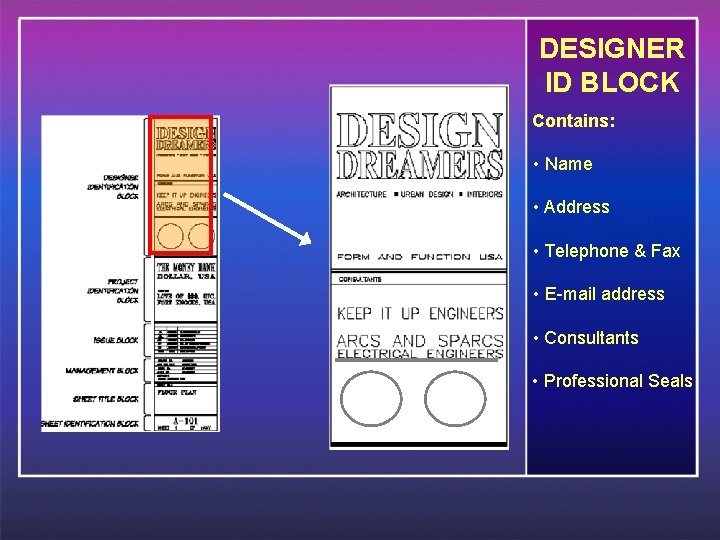
DESIGNER ID BLOCK Contains: • Name • Address • Telephone & Fax • E-mail address • Consultants • Professional Seals

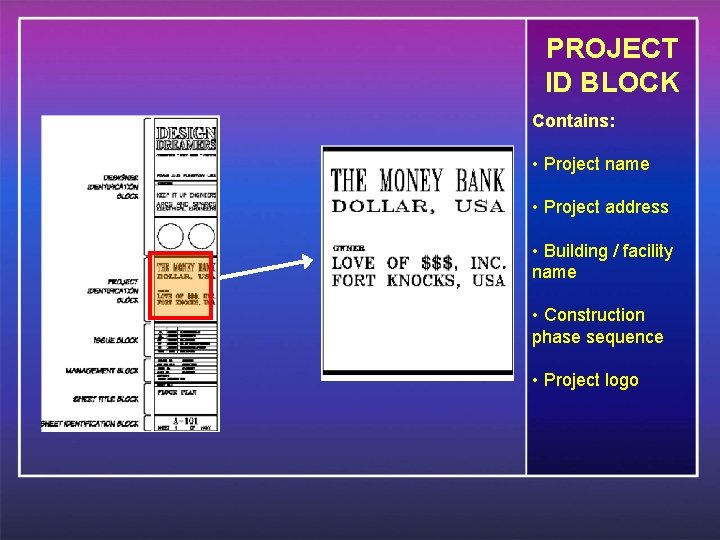
PROJECT ID BLOCK Contains: • Project name • Project address • Building / facility name • Construction phase sequence • Project logo

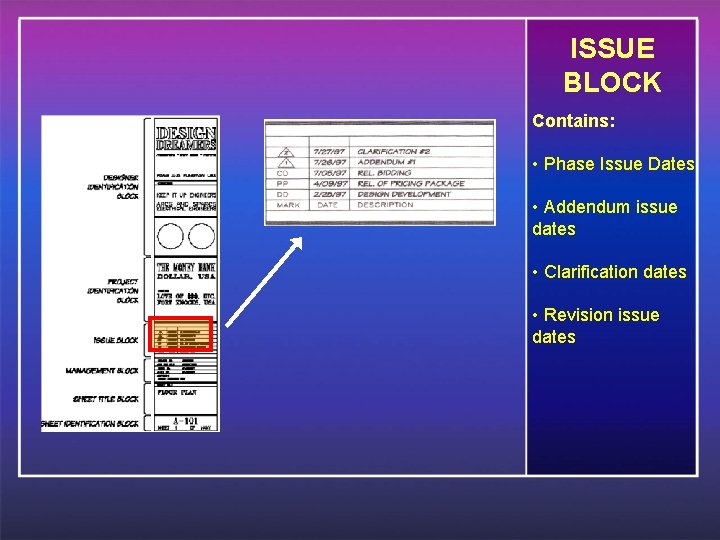
ISSUE BLOCK Contains: • Phase Issue Dates • Addendum issue dates • Clarification dates • Revision issue dates

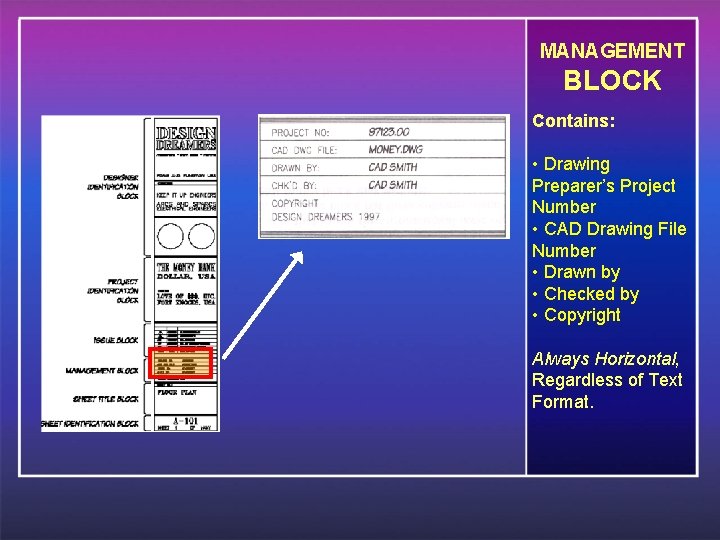
MANAGEMENT BLOCK Contains: • Drawing Preparer’s Project Number • CAD Drawing File Number • Drawn by • Checked by • Copyright Always Horizontal, Regardless of Text Format.

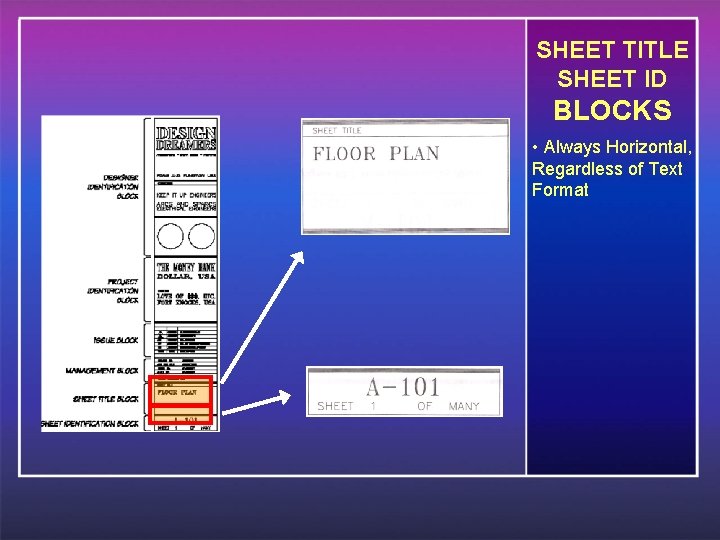
SHEET TITLE SHEET ID BLOCKS • Always Horizontal, Regardless of Text Format

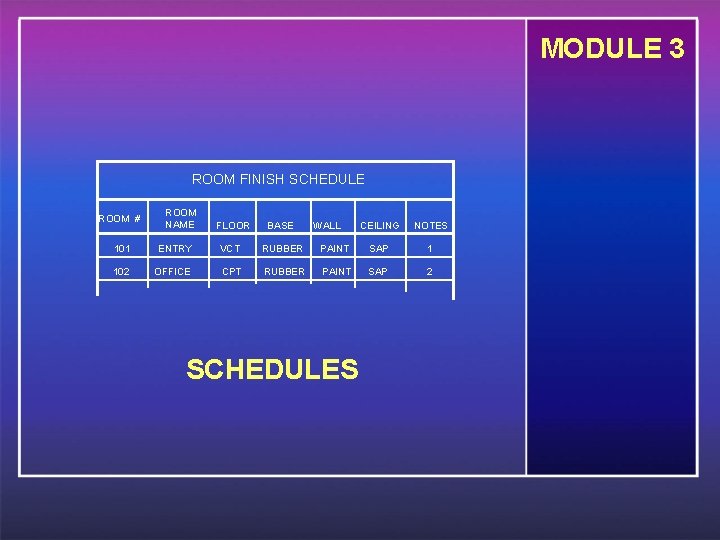
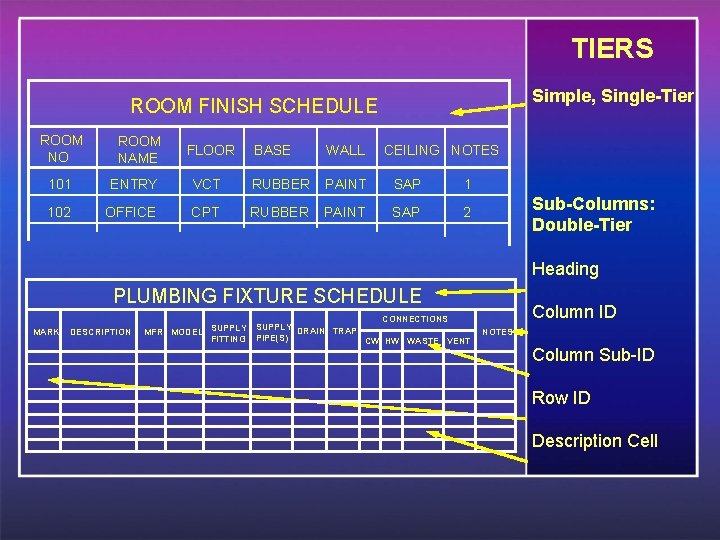
MODULE 3 ROOM FINISH SCHEDULE ROOM # ROOM NAME FLOOR BASE WALL CEILING NOTES 101 ENTRY VCT RUBBER PAINT SAP 1 102 OFFICE CPT RUBBER PAINT SAP 2 SCHEDULES

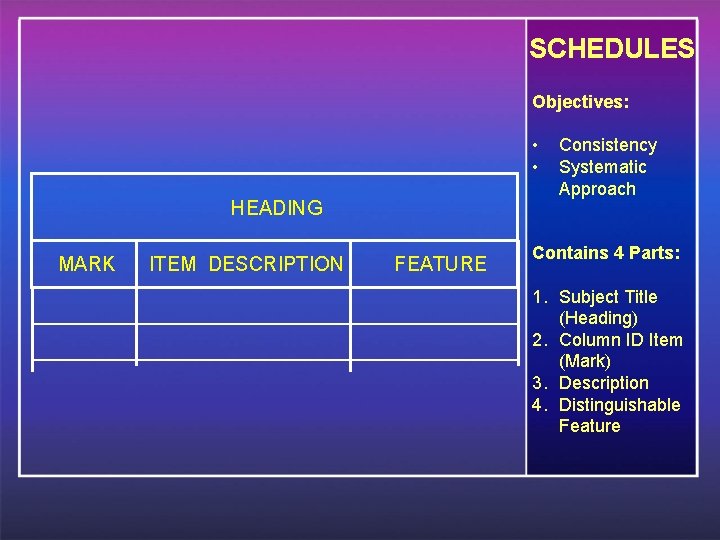
SCHEDULES Objectives: • • HEADING MARK ITEM DESCRIPTION FEATURE Consistency Systematic Approach Contains 4 Parts: 1. Subject Title (Heading) 2. Column ID Item (Mark) 3. Description 4. Distinguishable Feature

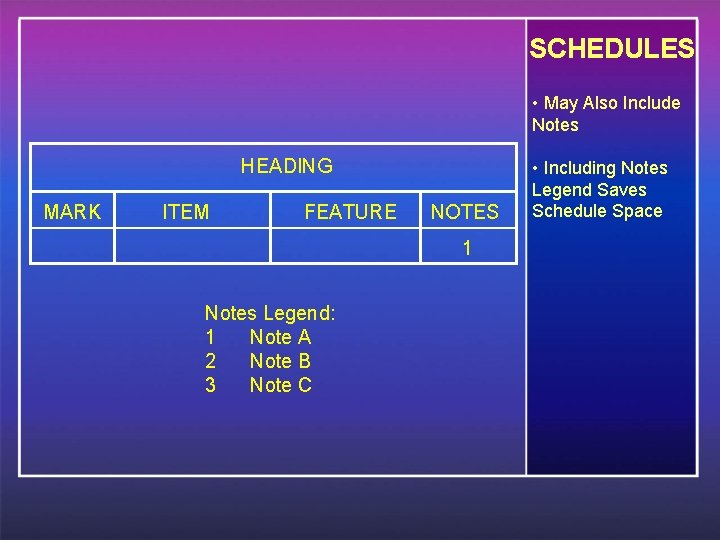
SCHEDULES • May Also Include Notes HEADING MARK ITEM FEATURE NOTES 1 Notes Legend: 1 Note A 2 Note B 3 Note C • Including Notes Legend Saves Schedule Space

TIERS Simple, Single-Tier ROOM FINISH SCHEDULE ROOM NO ROOM NAME FLOOR BASE WALL CEILING NOTES 101 ENTRY VCT RUBBER PAINT SAP 1 102 OFFICE CPT RUBBER PAINT SAP 2 Sub-Columns: Double-Tier Heading PLUMBING FIXTURE SCHEDULE MARK DESCRIPTION MFR MODEL SUPPLY FITTING CONNECTIONS SUPPLY DRAIN TRAP PIPE(S) CW HW WASTE VENT Column ID NOTES Column Sub-ID Row ID Description Cell

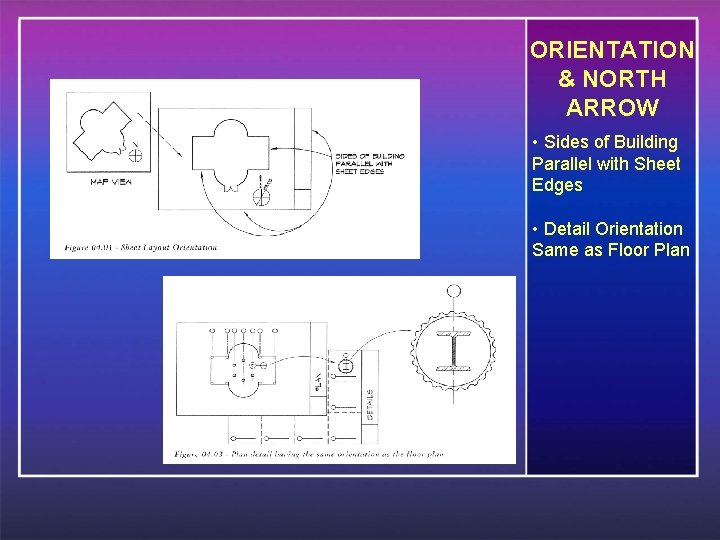
ORIENTATION & NORTH ARROW • Sides of Building Parallel with Sheet Edges • Detail Orientation Same as Floor Plan

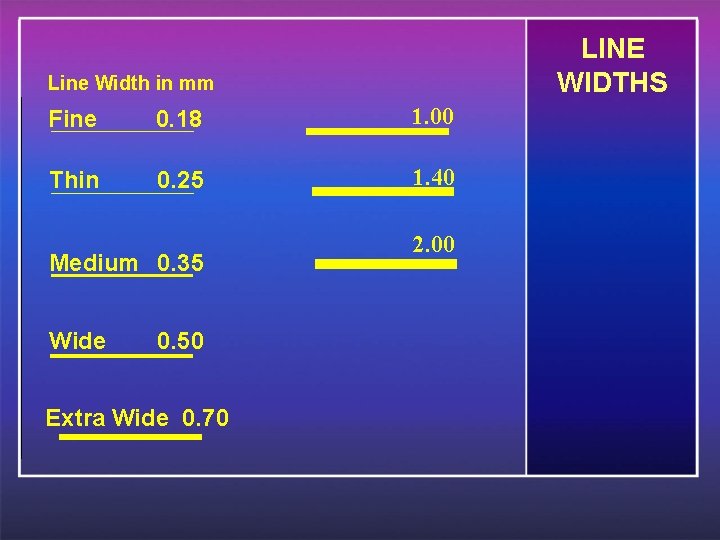
LINE WIDTHS Line Width in mm Fine 0. 18 1. 00 Thin 0. 25 1. 40 Medium 0. 35 Wide 0. 50 Extra Wide 0. 70 2. 00

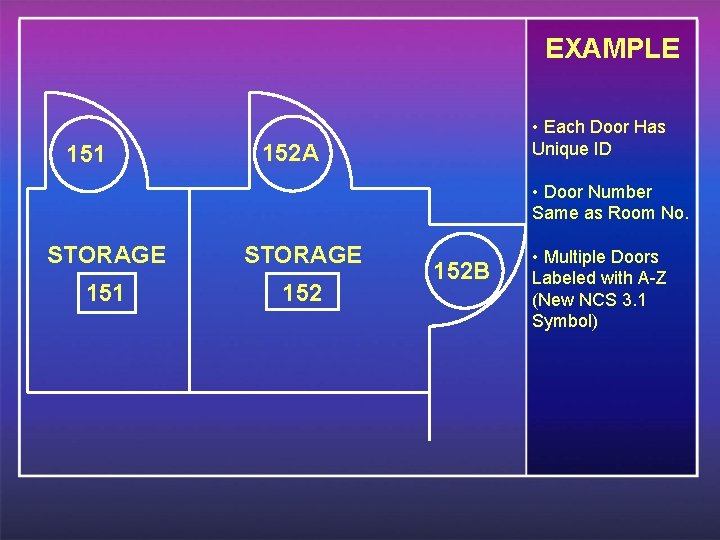
EXAMPLE 151 • Each Door Has Unique ID 152 A • Door Number Same as Room No. STORAGE 151 152 B • Multiple Doors Labeled with A-Z (New NCS 3. 1 Symbol)

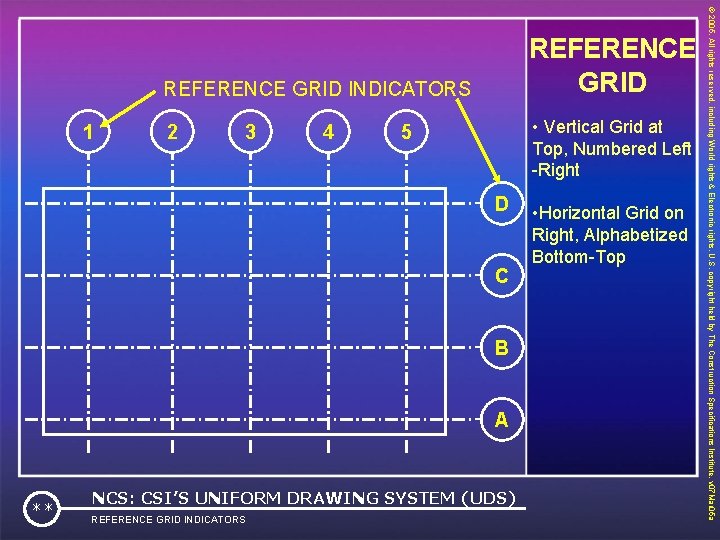
REFERENCE GRID INDICATORS 1 2 3 4 • Vertical Grid at Top, Numbered Left -Right 5 D C B A ** NCS: CSI’S UNIFORM DRAWING SYSTEM (UDS) REFERENCE GRID INDICATORS • Horizontal Grid on Right, Alphabetized Bottom-Top © 2005. All rights reserved, including World rights & Electronic rights. U. S. copyright held by The Construction Specifications Institute. v 07 Mar 05 a REFERENCE GRID

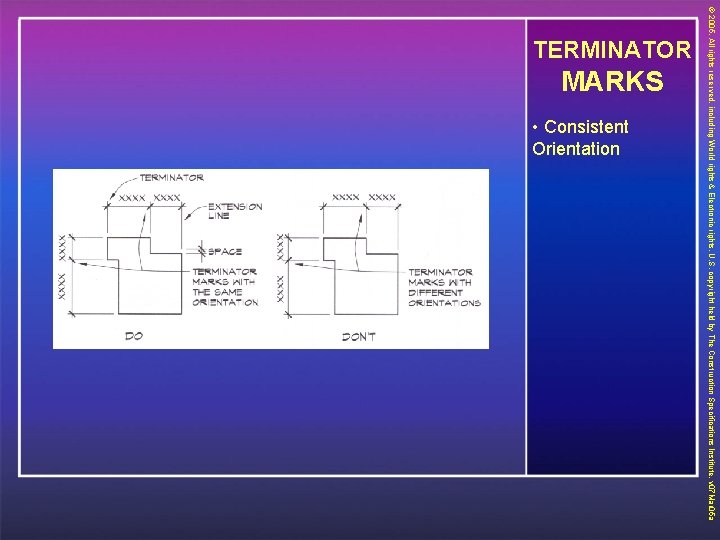
MARKS • Consistent Orientation © 2005. All rights reserved, including World rights & Electronic rights. U. S. copyright held by The Construction Specifications Institute. v 07 Mar 05 a TERMINATOR

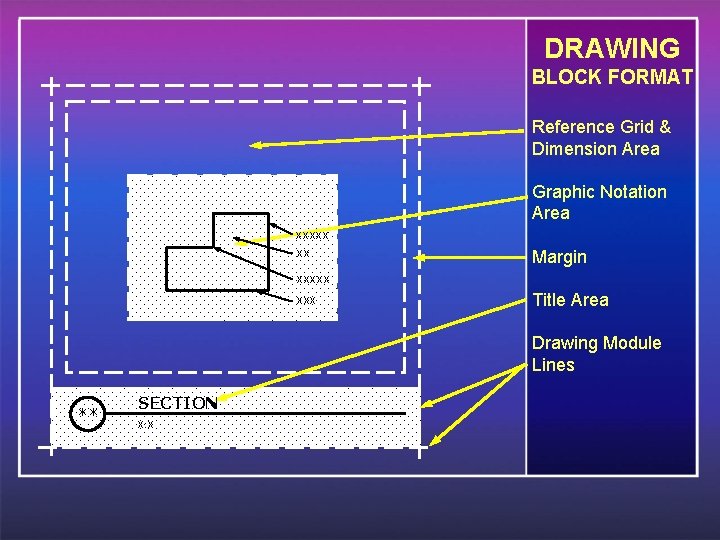
DRAWING BLOCK FORMAT Reference Grid & Dimension Area Graphic Notation Area XXXXX XX Margin XXXXX Title Area Drawing Module Lines ** SECTION X: X

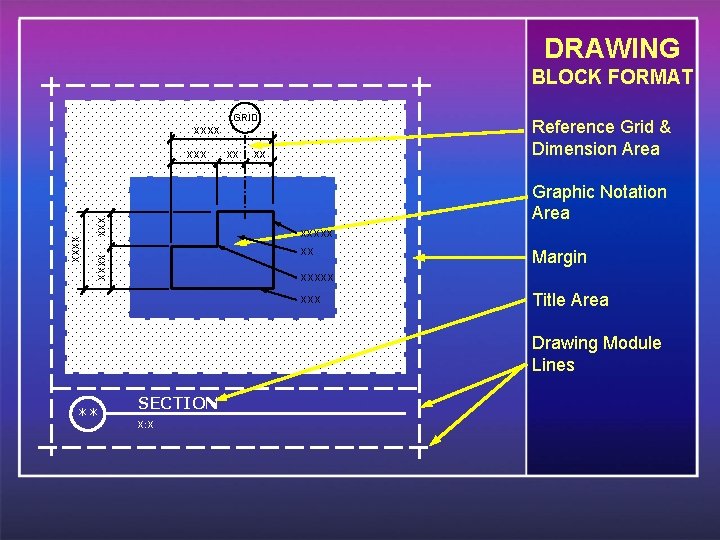
DRAWING BLOCK FORMAT GRID Reference Grid & Dimension Area XXXX XXX Graphic Notation Area XXXXX XXX Margin XXXXX Title Area Drawing Module Lines ** SECTION X: X

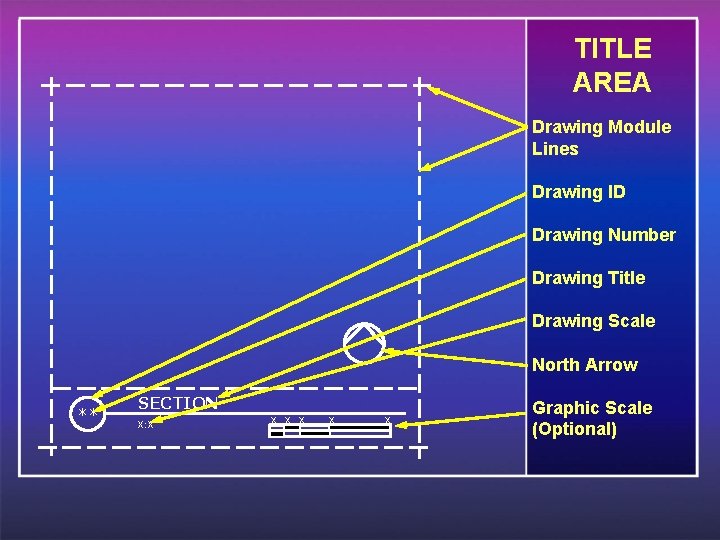
TITLE AREA Drawing Module Lines Drawing ID Drawing Number Drawing Title Drawing Scale North Arrow ** SECTION X: X X X Graphic Scale (Optional)

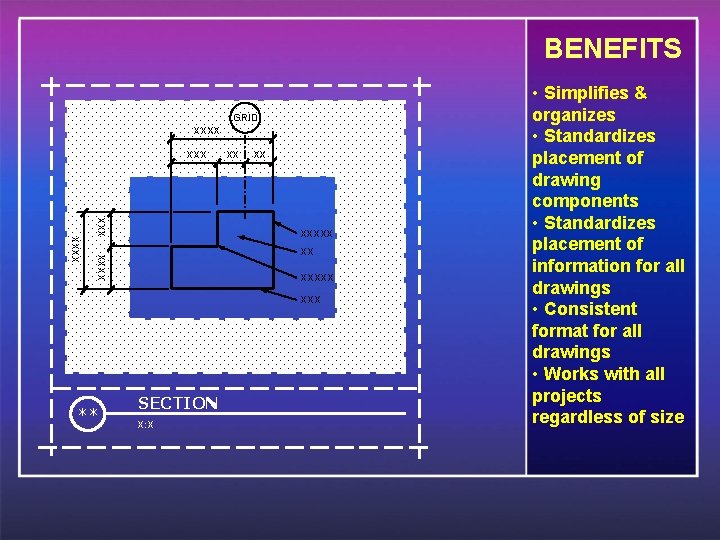
BENEFITS GRID XXXX XXXX XXX XXXXX ** SECTION X: X • Simplifies & organizes • Standardizes placement of drawing components • Standardizes placement of information for all drawings • Consistent format for all drawings • Works with all projects regardless of size

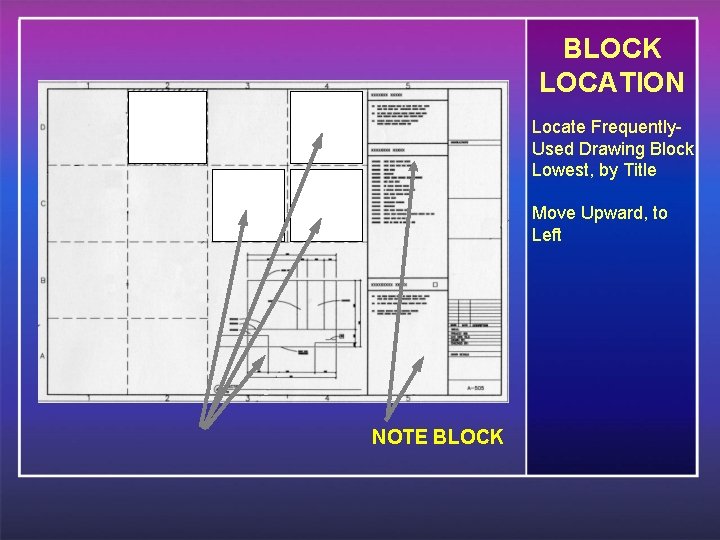
BLOCK LOCATION Locate Frequently. Used Drawing Block Lowest, by Title Move Upward, to Left NOTE BLOCK

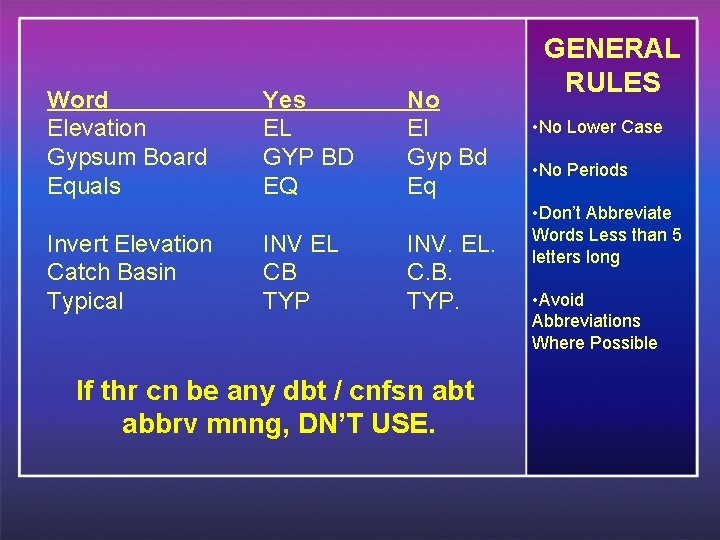
Word Elevation Gypsum Board Equals Invert Elevation Catch Basin Typical Yes EL GYP BD EQ INV EL CB TYP No El Gyp Bd Eq INV. EL. C. B. TYP. If thr cn be any dbt / cnfsn abt abbrv mnng, DN’T USE. GENERAL RULES • No Lower Case • No Periods • Don’t Abbreviate Words Less than 5 letters long • Avoid Abbreviations Where Possible

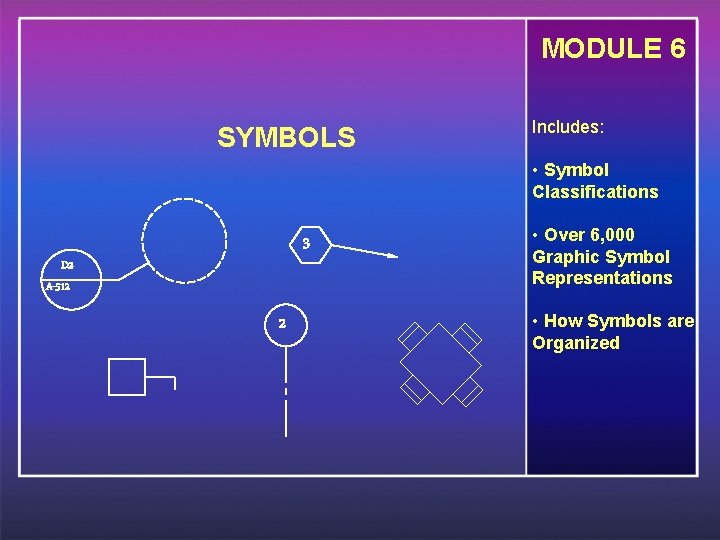
MODULE 6 SYMBOLS Includes: • Symbol Classifications 3 D 2 A-512 2 • Over 6, 000 Graphic Symbol Representations • How Symbols are Organized

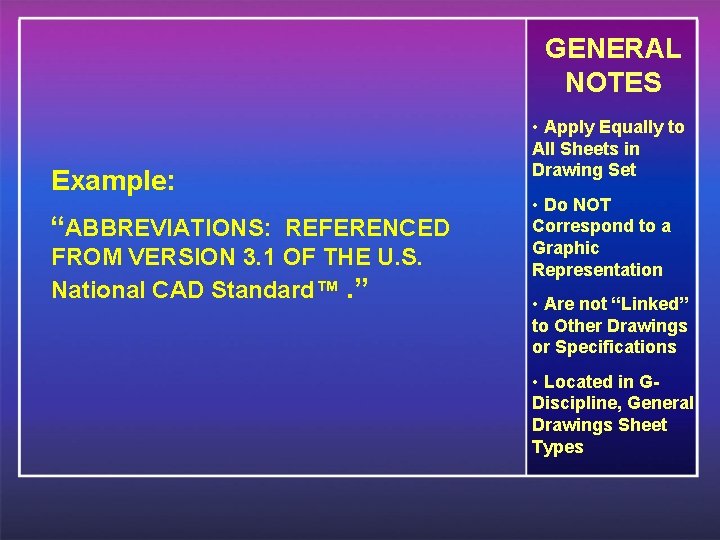
GENERAL NOTES Example: “ABBREVIATIONS: REFERENCED FROM VERSION 3. 1 OF THE U. S. National CAD Standard™. ” • Apply Equally to All Sheets in Drawing Set • Do NOT Correspond to a Graphic Representation • Are not “Linked” to Other Drawings or Specifications • Located in GDiscipline, General Drawings Sheet Types

O - OPERATIONS Z - CONTRACTOR/SHOP DRAWINGS X - OTHER DISCIPLINES R - RESOURCE T - TELECOMMUNICATIONS E - ELECTRICAL M - MECHANICAL D - PROCESS P - PLUMBING F - FIRE PROTECTION Q - EQUIPMENT I - INTERIORS A - ARCHITECTURAL S - STRUCTURAL L - LANDSCAPE C – CIVIL WORKS B – GEOTECHNICAL V – SURVEY/MAPPING H – HAZ MATERIALS G - GENERAL NOTES LOCATION Locate Within General Notes Within the GDiscipline General Sheets

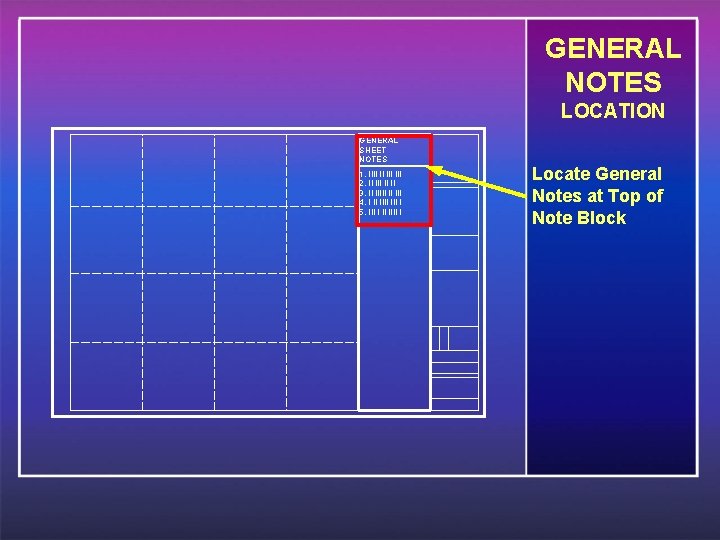
GENERAL NOTES LOCATION GENERAL SHEET NOTES 1. IIII II III 2. II II II 3. II IIIII II III 4. I II III I 5. III IIII I Locate General Notes at Top of Note Block

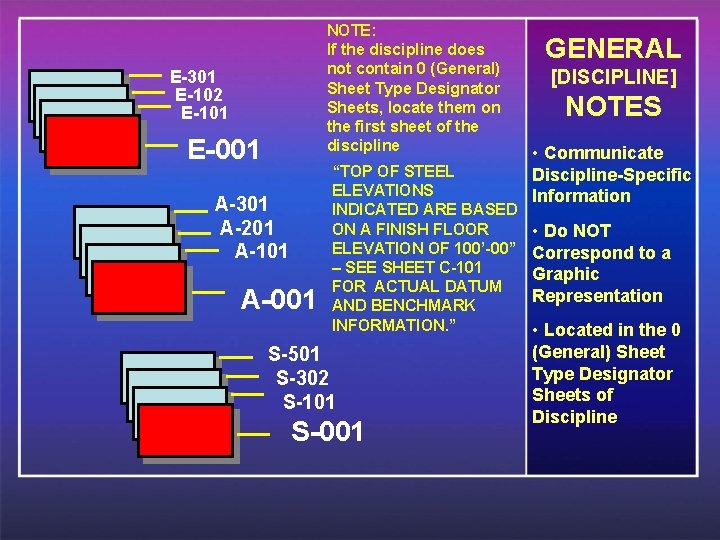
NOTE: If the discipline does not contain 0 (General) Sheet Type Designator Sheets, locate them on the first sheet of the discipline E-301 E-102 E-101 E-001 A-301 A-201 A-101 A-001 “TOP OF STEEL ELEVATIONS INDICATED ARE BASED ON A FINISH FLOOR ELEVATION OF 100’-00” – SEE SHEET C-101 FOR ACTUAL DATUM AND BENCHMARK INFORMATION. ” S-501 S-302 S-101 S-001 GENERAL [DISCIPLINE] NOTES • Communicate Discipline-Specific Information • Do NOT Correspond to a Graphic Representation • Located in the 0 (General) Sheet Type Designator Sheets of Discipline

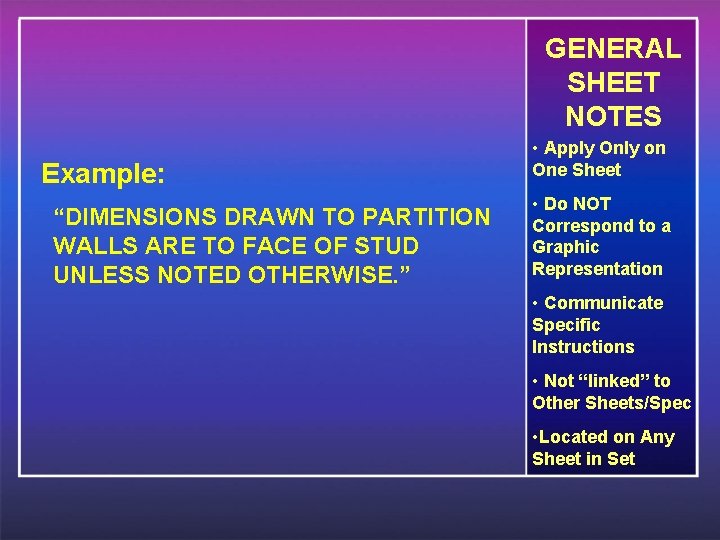
GENERAL SHEET NOTES Example: “DIMENSIONS DRAWN TO PARTITION WALLS ARE TO FACE OF STUD UNLESS NOTED OTHERWISE. ” • Apply Only on One Sheet • Do NOT Correspond to a Graphic Representation • Communicate Specific Instructions • Not “linked” to Other Sheets/Spec • Located on Any Sheet in Set

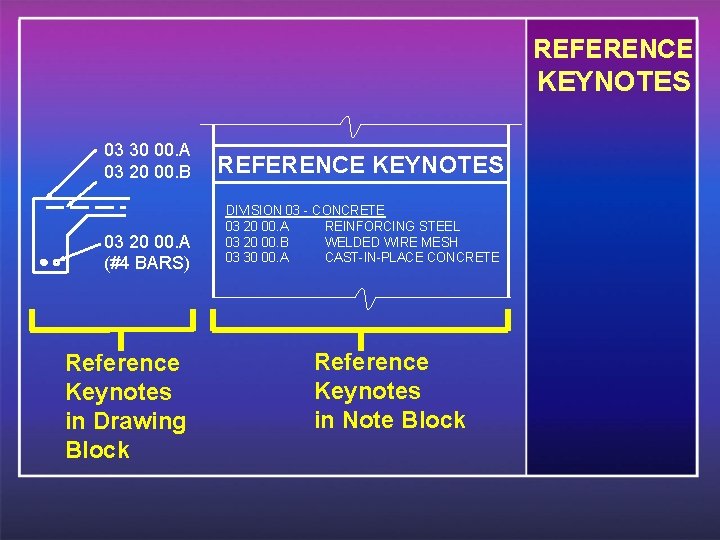
REFERENCE KEYNOTES 03 30 00. A 03 20 00. B 03 20 00. A (#4 BARS) Reference Keynotes in Drawing Block REFERENCE KEYNOTES DIVISION 03 - CONCRETE 03 20 00. A REINFORCING STEEL 03 20 00. B WELDED WIRE MESH 03 30 00. A CAST-IN-PLACE CONCRETE Reference Keynotes in Note Block

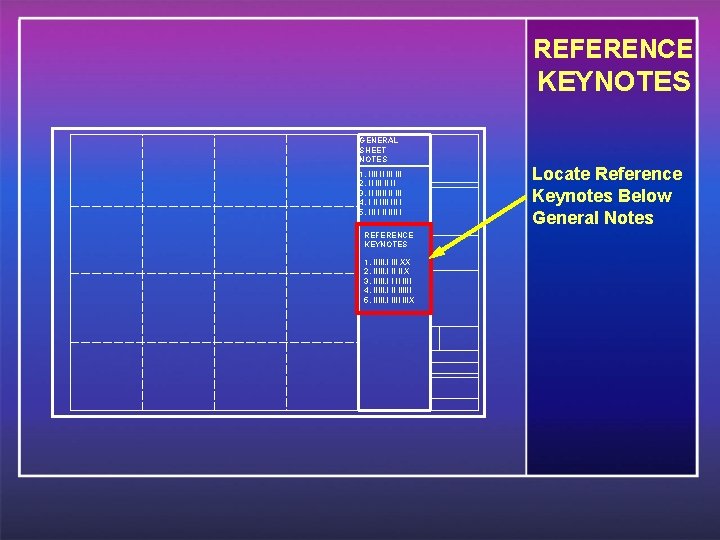
REFERENCE KEYNOTES GENERAL SHEET NOTES 1. IIII II III 2. II II II 3. II IIIII II III 4. I II III I 5. III IIII I REFERENCE KEYNOTES 1. IIIII. I III XX 2. IIIII. I II II X 3. IIIII. I I II IIII 4. IIIII. I II IIIIII 5. IIIII. I IIIX Locate Reference Keynotes Below General Notes

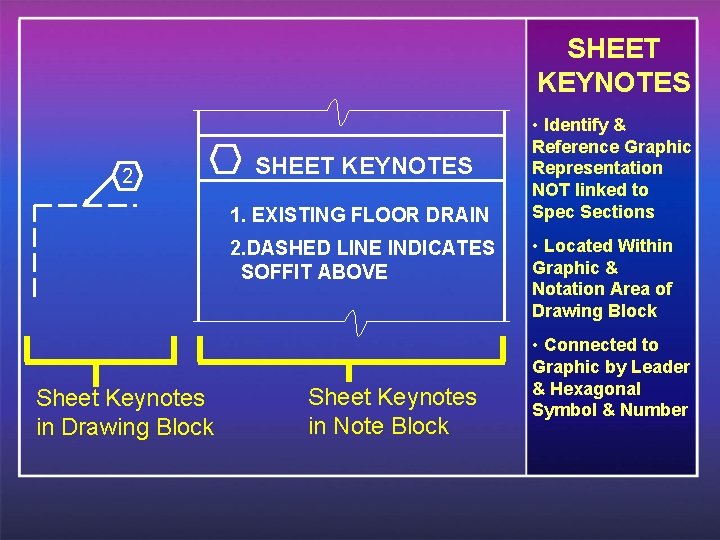
SHEET KEYNOTES 2 SHEET KEYNOTES 1. EXISTING FLOOR DRAIN 2. DASHED LINE INDICATES SOFFIT ABOVE Sheet Keynotes in Drawing Block Sheet Keynotes in Note Block • Identify & Reference Graphic Representation NOT linked to Spec Sections • Located Within Graphic & Notation Area of Drawing Block • Connected to Graphic by Leader & Hexagonal Symbol & Number

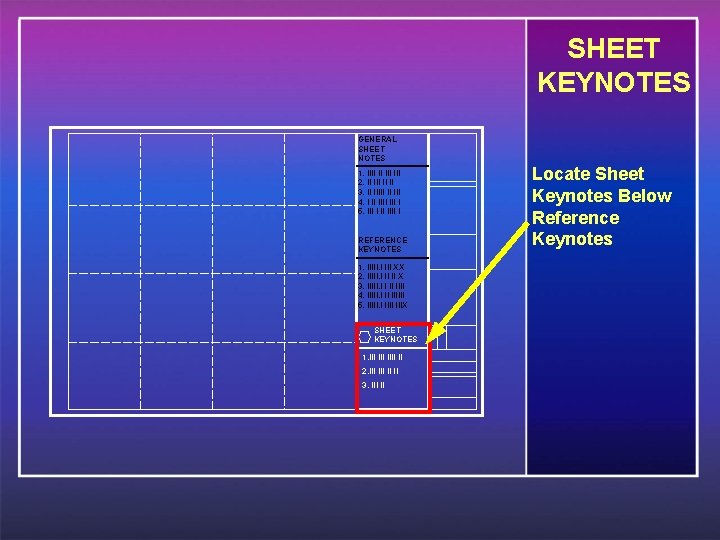
SHEET KEYNOTES GENERAL SHEET NOTES 1. IIII II III 2. II II II 3. II IIIII II III 4. I II III I 5. III IIII I REFERENCE KEYNOTES 1. IIIII. I III XX 2. IIIII. I II II X 3. IIIII. I I II IIII 4. IIIII. I II IIIIII 5. IIIII. I IIIX SHEET KEYNOTES 1. III IIII II 2. III II II 3. III II Locate Sheet Keynotes Below Reference Keynotes

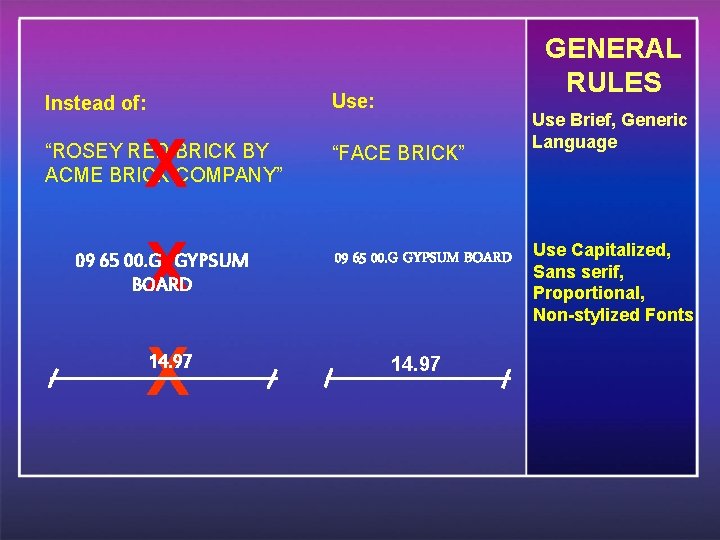
GENERAL RULES Use: Instead of: X “ROSEY RED BRICK BY ACME BRICK COMPANY” X 09 65 00. G GYPSUM BOARD X 14. 97 “FACE BRICK” 09 65 00. G GYPSUM BOARD 14. 97 Use Brief, Generic Language Use Capitalized, Sans serif, Proportional, Non-stylized Fonts