Tutorial Design Fabrication and Testing of Aspheric Surfaces
Tutorial: Design, Fabrication, and Testing of Aspheric Surfaces Chia-Ling Li College of Optical Sciences, University of Arizona Dec. 12. 2013
Outline � Introduction � Design ◦ Mathematical representation of aspherical surfaces ◦ Aspheric shape design guide ◦ Tolerances for aspherical optical elements � Fabrication � Testing ◦ Profilometry ◦ Interferometry in reflection ◦ Interferometry in transmission � Summary 1

Introduction 2
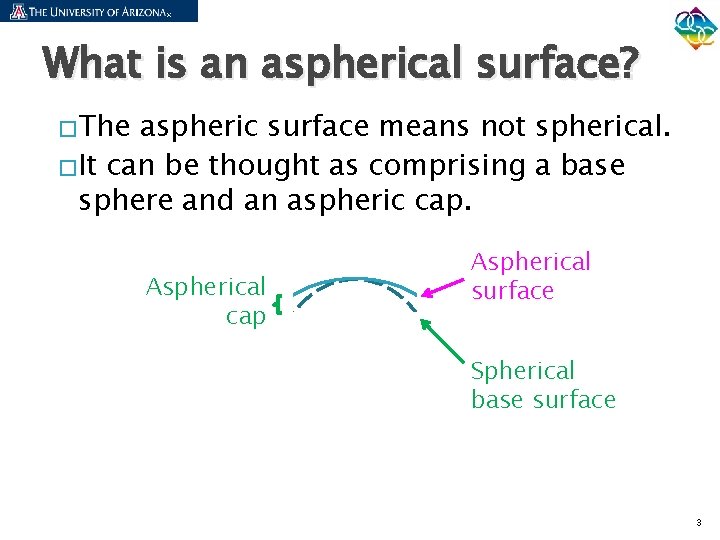
What is an aspherical surface? �The aspheric surface means not spherical. �It can be thought as comprising a base sphere and an aspheric cap. Aspherical cap Aspherical surface Spherical base surface 3
Why is it important? � It can correct aperture dependent aberrations, like spherical aberration. � It can correct field dependent aberrations, like distortion and field curvature. � It can reduce lens weight, make optical systems more compact, and in some cases reduce cost. � Fewer elements are needed in a system with aspherical surfaces: making systems smaller, lighter and shorter. 4
Design 5
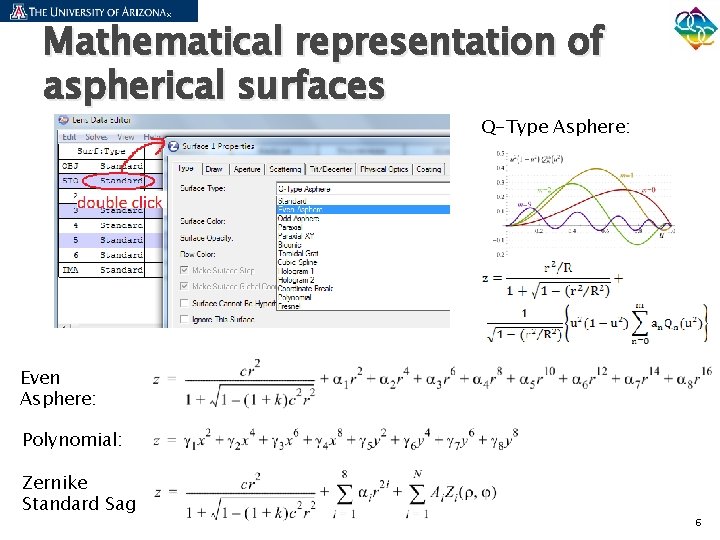
Mathematical representation of aspherical surfaces Q-Type Asphere: Even Asphere: Polynomial: Zernike Standard Sag 6
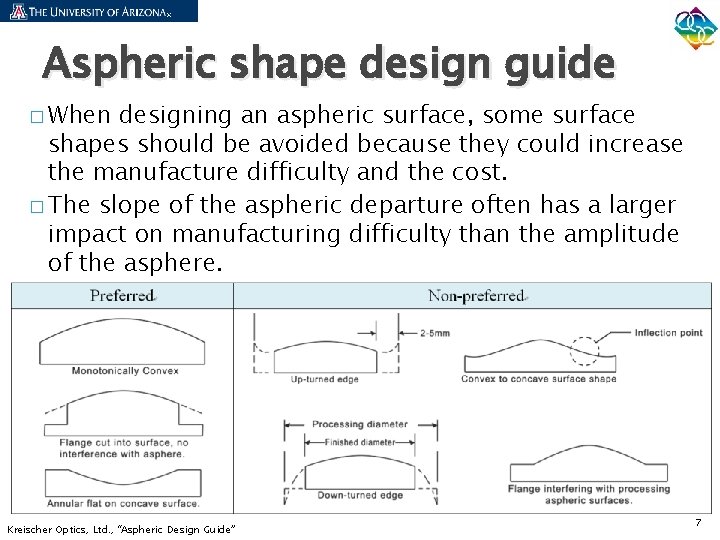
Aspheric shape design guide � When designing an aspheric surface, some surface shapes should be avoided because they could increase the manufacture difficulty and the cost. � The slope of the aspheric departure often has a larger impact on manufacturing difficulty than the amplitude of the asphere. Kreischer Optics, Ltd. , “Aspheric Design Guide” 7
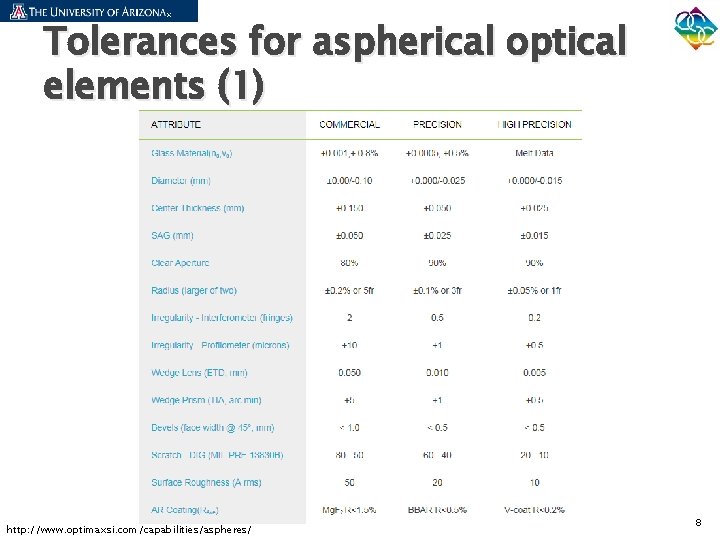
Tolerances for aspherical optical elements (1) http: //www. optimaxsi. com/capabilities/aspheres/ 8
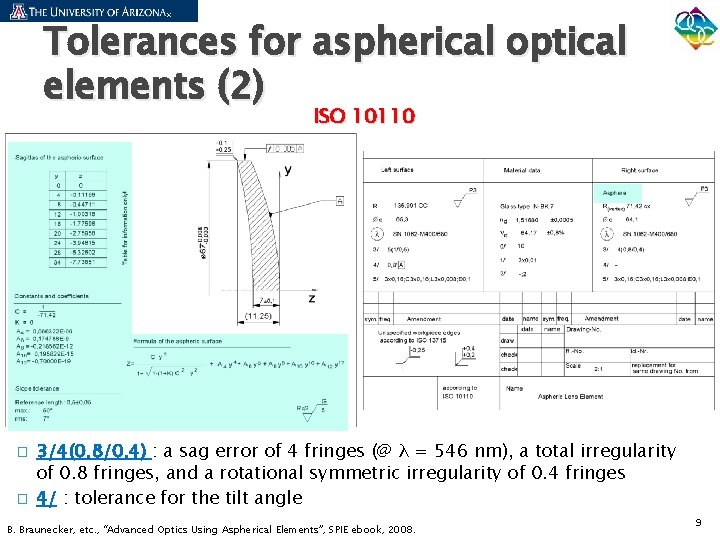
Tolerances for aspherical optical elements (2) ISO 10110 � � 3/4(0. 8/0. 4) : a sag error of 4 fringes (@ λ = 546 nm), a total irregularity of 0. 8 fringes, and a rotational symmetric irregularity of 0. 4 fringes 4/ : tolerance for the tilt angle B. Braunecker, etc. , “Advanced Optics Using Aspherical Elements”, SPIE ebook, 2008. 9
Fabrication 10
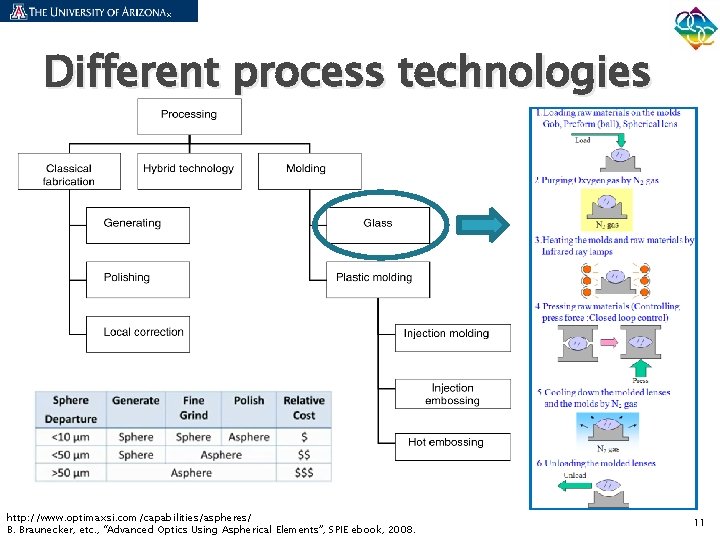
Different process technologies http: //www. optimaxsi. com/capabilities/aspheres/ B. Braunecker, etc. , “Advanced Optics Using Aspherical Elements”, SPIE ebook, 2008. 11
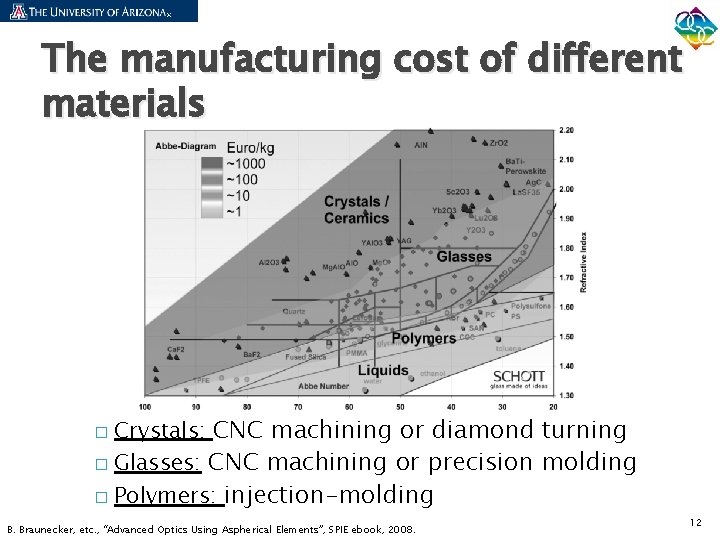
The manufacturing cost of different materials Crystals: CNC machining or diamond turning � Glasses: CNC machining or precision molding � Polymers: injection-molding � B. Braunecker, etc. , “Advanced Optics Using Aspherical Elements”, SPIE ebook, 2008. 12
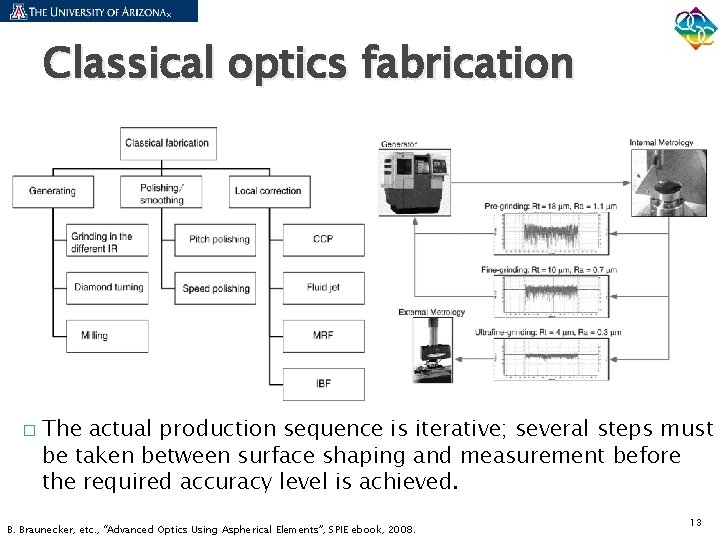
Classical optics fabrication � The actual production sequence is iterative; several steps must be taken between surface shaping and measurement before the required accuracy level is achieved. B. Braunecker, etc. , “Advanced Optics Using Aspherical Elements”, SPIE ebook, 2008. 13
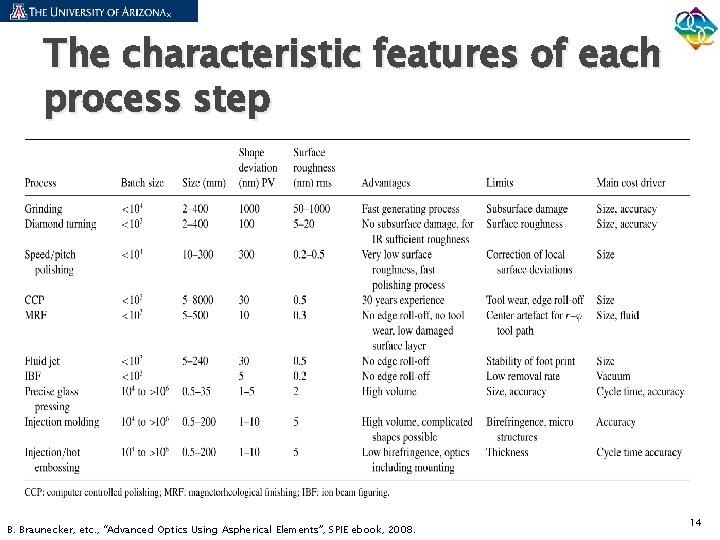
The characteristic features of each process step B. Braunecker, etc. , “Advanced Optics Using Aspherical Elements”, SPIE ebook, 2008. 14
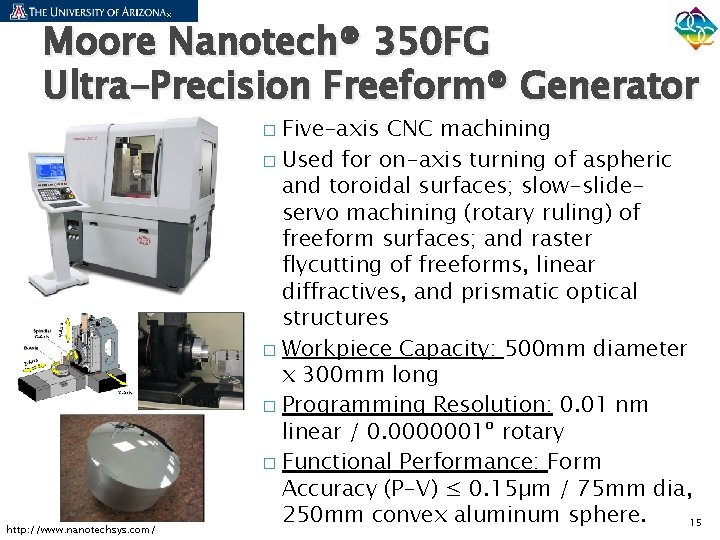
Moore Nanotech® 350 FG Ultra-Precision Freeform® Generator Five-axis CNC machining � Used for on-axis turning of aspheric and toroidal surfaces; slow-slideservo machining (rotary ruling) of freeform surfaces; and raster flycutting of freeforms, linear diffractives, and prismatic optical structures � Workpiece Capacity: 500 mm diameter x 300 mm long � Programming Resolution: 0. 01 nm linear / 0. 0000001º rotary � Functional Performance: Form Accuracy (P-V) ≤ 0. 15µm / 75 mm dia, 250 mm convex aluminum sphere. 15 � http: //www. nanotechsys. com/
Testing 16
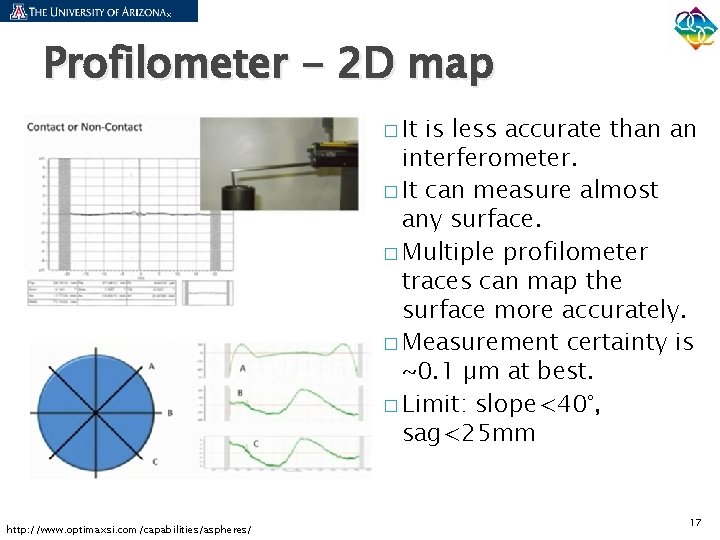
Profilometer - 2 D map � It is less accurate than an interferometer. � It can measure almost any surface. � Multiple profilometer traces can map the surface more accurately. � Measurement certainty is ~0. 1 µm at best. � Limit: slope<40°, sag<25 mm http: //www. optimaxsi. com/capabilities/aspheres/ 17
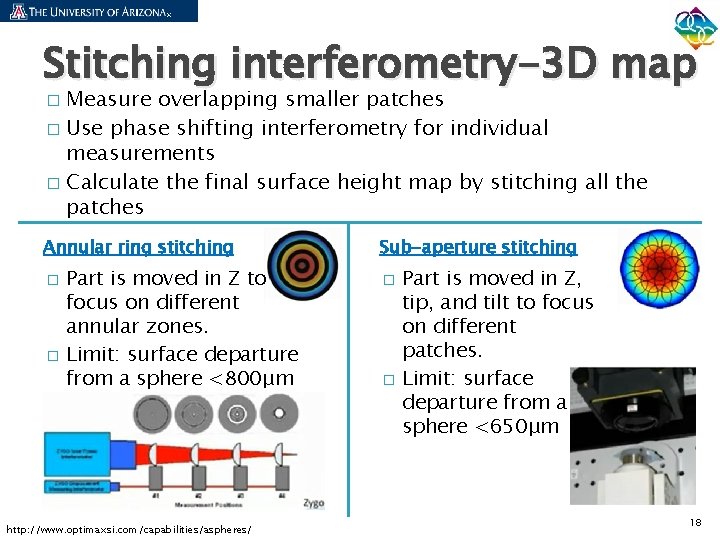
Stitching interferometry-3 D map Measure overlapping smaller patches � Use phase shifting interferometry for individual measurements � Calculate the final surface height map by stitching all the patches � Annular ring stitching � � Part is moved in Z to focus on different annular zones. Limit: surface departure from a sphere <800μm http: //www. optimaxsi. com/capabilities/aspheres/ Sub-aperture stitching � � Part is moved in Z, tip, and tilt to focus on different patches. Limit: surface departure from a sphere <650μm 18
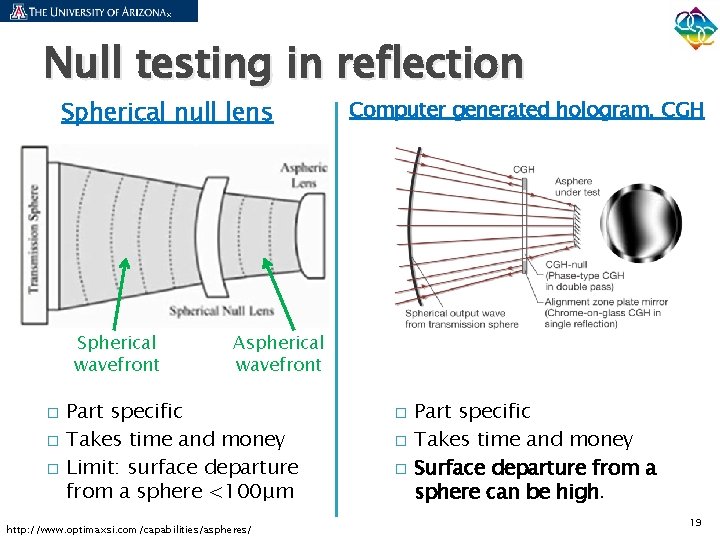
Null testing in reflection Spherical null lens Spherical wavefront � � � Computer generated hologram, CGH Aspherical wavefront Part specific Takes time and money Limit: surface departure from a sphere <100μm http: //www. optimaxsi. com/capabilities/aspheres/ � � � Part specific Takes time and money Surface departure from a sphere can be high. 19
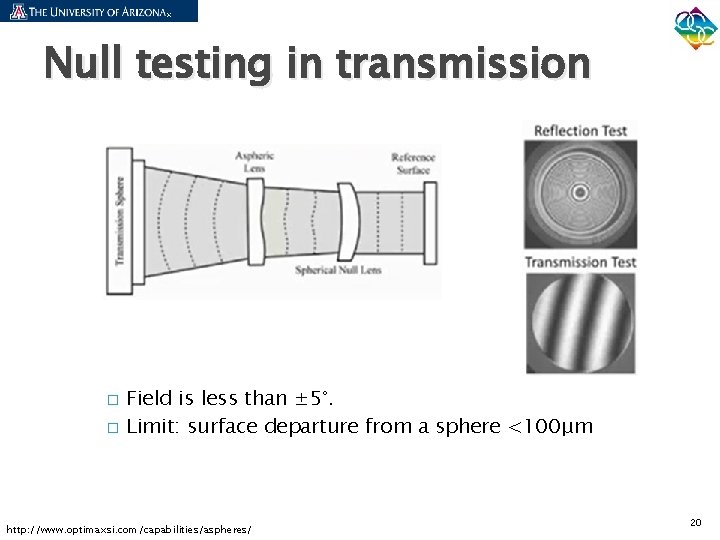
Null testing in transmission � � Field is less than ± 5°. Limit: surface departure from a sphere <100μm http: //www. optimaxsi. com/capabilities/aspheres/ 20
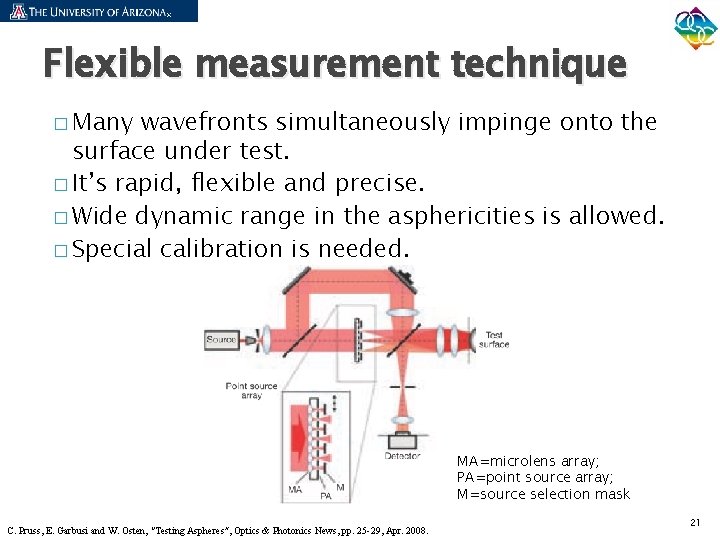
Flexible measurement technique � Many wavefronts simultaneously impinge onto the surface under test. � It’s rapid, flexible and precise. � Wide dynamic range in the asphericities is allowed. � Special calibration is needed. MA=microlens array; PA=point source array; M=source selection mask C. Pruss, E. Garbusi and W. Osten, “Testing Aspheres”, Optics & Photonics News, pp. 25 -29, Apr. 2008. 21
Summary � Aspheres, which are designed to null out a unique set of aberrations, are specified using the aspheric equation. � A suitable manufacturing method is chosen according to the lens materials and the required accuracy. � There are many metrology options, with selection driven by surface departure, form error and cost objectives. 22

Thank you! 23
- Slides: 24