Tulane Purchasing Card Online Transaction Processing Training Manual


")

- Slides: 35
Tulane Purchasing Card Online Transaction Processing Training Manual
Purchasing Card Overview • This training manual provides the cardholder with the necessary steps to: – Review purchasing card transactions – Approve purchasing card transactions – Generate reports from the Paymentnet 4 web site – Query prior account activity • These procedures are in compliance with the requirements set forth in the Purchasing Card Policies and Procedures Manual. • The Purchasing Card Program has additional requirements for procedures and documentation that are not applicable to the online processing system. Each cardholder is responsible for adhering to these policies and procedures. • If you have any questions or need additional information, please contact: Phyllis Douglas Purchasing Card Administrator 314 -2675 pdougla 1@tulane. edu
Set Password For the First Time Log In Setup screen, you must complete four steps. The first step is to create and confirm your day to day password. As you are creating your new password, keep in the mind the Password Requirements. There are standards for creating passwords as indicated on the screen itself. Once you are finished creating your new password, click on Next to submit and complete the first step.
Confirm E-mail Address Step two is to confirm your email address with Payment. Net 4. This step will ensure that you will be able to use the self-service recovery features. These include the: • Forgotten password • Access code for registering computer • Forgotten User ID and Organization ID
Log In for the First Time This is the Log In Screen. Anytime you launch a Payment. Net session, you will be taken here. The first time you log in, you will need the two emails you will receive, the first from our office and the second from JPMorgan. Chase: • The Organization ID and your User ID • Your temporary Password and website URL Once you have successfully entered your Organization ID, User ID and Password, you will be taken to the next screen where you will be begin the First Time Log In Setup.
Security Questions Step three for the First Time Log In Setup is Setting your Security Questions. The answers to these questions will be used when you go through the Forgot your Password process. You must answer at least three of the following questions when setting up your profile - although it is recommended that you answer all five. Responses to Security Questions are not case sensitive. Note that after you’ve been set up the first time, this screen will never trigger again.
Register your Computer Step four is Register Computer. As a first time user, your computer will automatically be registered to your user ID. At this point just click on Next to complete the process. Note that there will be a checkbox towards the bottom left corner of the screen. If the computer being registered is a Public or Shared computer, uncheck the checkbox. The computer will not be registered, but the user will still be able to perform work within Payment. Net 4. Note: Program works more efficient when using Internet Explorer.
Request for Access Code If subsequently, you are logging in with a different computer (usually another personal computer), you will be guided through a quick registration process. The use of public computers is strongly discouraged. In order to register your computer, you need to request an Access Code by clicking on Get Access Code. The Access Code will be sent to the email that is on file in Payment. Net.
Entering Access Code Enter the Access Code and your password. You will then need to choose one of the Registration Options located on the bottom left. Once you have chosen one, click Next to complete the registration. Certain common events may also cause you to re-register your computer. They include: Using a different computer(home/office) or Internet browser Clearing the browser cookies, cache, or temporary files Software or hardware profile changes
Home Page
Required Action in My Profile for Notifications The General Information tab allows you to enable e-mail notifications, change password or security questions. Enable e-mail Notification: Options must be checked to be notified when there are transactions to review, approve if applicable and reports or exports for downloading. NOTE: Any grayed out items will not be able to be chosen so disregard. BE SURE ALL BOXES APPLICABLE TO YOUR ROLE AND NEEDS ARE CHECKED. Otherwise, no e-mails will be received from the site.
Screen Views Under Screen Views, you can change the layout of your Transaction List from the default setting. You can re-configure viewable columns, column order, and number of items to be displayed on the list screen. Note that if the word Required is listed after the column name, that item cannot be removed, however you can change the column order according to your viewing preference. REMEMBER: Make sure to always click on Save whenever you change anything on any screen. A green confirmation message will appear after the Save button has been clicked if it has been successful. If not, a red-printed message will appear indicating where an error occurred.
Allocation and Transaction • After Transaction Note and correct accounting allocations are entered, check the reviewed box and choose your Approver if ANY is shown. Otherwise, your default approver should be listed. • Only the cardholder can mark the Reviewed box and the Approved box cannot be checked unless reviewed. • Billing cycle generally ends on the NIGHT of the 25 th so the 26 th (or the first business after cycle ends) is the cardholder deadline for review. • No changes can be made after approval so be sure
Transaction Submenus Under the Transactions Header, you will find: • Manage: This takes you to the list of recent transactions. There are different lists available from this screen view. • Mass Update Requests (Optional): Currently only review and approve are available with the mass update. Extreme caution should be exercised if using this function. • Authorizations/Declines: This lists any declined transactions and pending authorizations. This screen displays real-time information. Why a transaction was declined within the last 7 days is listed. • Query: The Query Submenu takes you to the Advanced Query screen to conduct specific queries for transactions. • Statements: The Statement submenu takes you to the Statement Details screen where current and past statements can be viewed by you.
Transaction Page Choose Manage and the Transaction List screen will populate. The Transaction List is your starting point to: • Make allocation changes, enter note and mark reviewed • View Statements • Perform Mass Updates (if applicable) • View Addendum Information • Advanced Queries https: //counsel. tulane. edu/node/2481 (Tax Exemption Certificates) Click a field on the transaction to open the detail record.
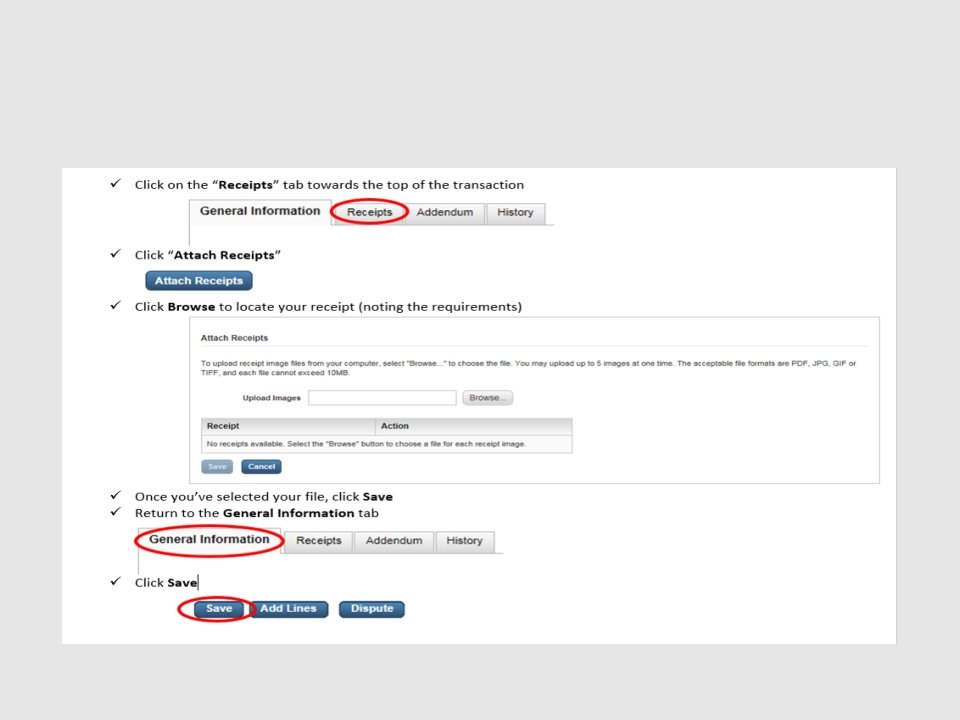
Receipt Attachment
Allocation and Transaction Note Change the account allocation as needed making sure there are no “None”s. In Natural Account field, you clear the field and start to manually type in the descriptive name, the drop down begins to populate with matching values. Or click on “None” and drag the scroll bar down to the desired expense type. Add the business purpose in the Transaction Note field along with any other pertinent info. Type info and allow to wrap without tab or entering to next line. Do not copy and paste or use any special symbols. Note should be concise and provide an adequate description of purchase. Attach and upload receipt…Required.
Distribution Splitting
Opening on Allocation on Split Click the arrow on the left side of each row to show drop down boxes to edit the accounting allocations. Each row can be opened for full viewing - Rows are not saved independently. Description field should not be changed. Transaction Note field is used for this purpose.
Allocation on Split Enter any account allocation changes making sure None is not listed. Transaction amount can be split by % or $. You can add or delete rows lines entered in error. After adding or deleting an accounting line, be sure to check the % field for each line, especially the last line since it will always be effected by any changes. No row show list 00% or $00.
Selecting Reviewer and Approver
Approval Each purchasing card transaction must be approved by the cardholder’s designated approver. See the Purchasing Card Policies and Procedures Manual for documentation information. • • • The Approver can access transactions to approve from the Items Awaiting Your Action or with Manage under the Transaction header. Approvers will: – Confirm that supporting documentation for all transactions is retained with the Electronic Statement – Confirm all transactions have been reviewed by the cardholder and if not, address accordingly. – Confirm that the purchases are allowed under Purchasing Card policies – Verify the correctness and appropriateness of the account distribution as relates to the cardholder – Check for sales tax incurred and take appropriate action for any recovery. A copy of the University’s tax exempt status document is included in this manual and found in the General Counsel’s website. Click on the Approved box and Save. Transactions must be approved by the last working day of the month.
Multi-Select for Mass Update or Export Multi-select allows you to choose and work with some or all transactions in a given view. Select All Pages link at the top of the List page will check every record of every screen of transactions. To select only a few transactions at once, click the checkbox next to each Transaction. From the bottom of this screen you can Review, Approve or Export the specific transactions you choose: • To Review or Approve, click on the applicable button and these transactions will be updated and marked accordingly. Extreme caution should be used with this function. • To Export, simply click on the Export button to be given an option for the type of resulting download needed.
Querying New Query is quick access to last 30 days limited to criteria listed. To include data older than 30 days, The Advanced link is used to process an Advanced Query can also be found under the Transaction header on the home page. 1. Enter a date range (Required) a. Use the Operation box to select different options for date ranges. b. Set criteria or delete any pre-populated line (optional) c. Limit by hierarchy (optional) d. Set the sort order of the columns (optional) 2. Process the query. 3. Save query, if desired. 4. Name the query, if desired.
Electronic Statement From the Transaction List you can select the View Statement link at the upper right top and you will be taken directly to your current statement. You can also access your Electronic Statement directly from the Transaction header. A printed copy of this Statement must be included with receipts, invoices, internet confirmations, etc. and any other supporting documentation for each monthly cycle. No statement is generated if there is no activity in that cycle.
Reports The Report List screen displays a list of reports that you have access to. You can change the Report Type to filter your report list by different categories – Transactions is most commonly needed. Click on the Report that you would like to process. You will be taken to a screen where you will be able to choose file format and criteria for your report.
Processing a Report Running a report is almost identical to running an advanced query. The fields available are: Name - You can name your report if you wish to save the criteria for future use. Report Format - You have a choice of Adobe PDF, Excel and CSV. Date Range – A Date Range is required to filter transactions to be included. Criteria – Adding Criteria will help further filter transactions to be included. (Optional) Hierarchy - Adding a Hierarchy will help further filter transactions to be included. (Optional) Order by – Adding Order By fields will sort transactions included in the report. (Optional) Once the report has been processed, it will be available for download via Reports > Downloads.
HELP !!! You will find the Help Module listed on your main task bar alongside the Transactions and Reports. • Help For This Page allows you to access the Help Guide from any page within Payment. Net. • Help Index takes you to the entire help information guide from which you can begin a search. For example, if you select Help For This Page from the Transactions > Manage screen as shown above, you will see an overview of the screen as well as links to each of the actions that can be performed from that screen.
Help Index The Help Index allows you to search in various ways. • Contents • Index • Search • Glossary • Also note that you will always see a Topic Tree on the left hand side for faster access to key topics found within Payment. Net. It is strongly encouraged that you always refer to the Help Index or Help For This Page whenever you have a question about a process, a procedure, a term or if you just need clarification of how to perform a task correctly.
Reference Corporate Card Administration Phyllis Douglas - Administrator Yolanda Thomas – Asst. Administrator Dixie Petty – Asst. Administrator Lisa Leblanc Manager Concur (T&E Cards) Expense Reports Assigning Approvers Nita Randolph Concur Access Setup and site navigation Laney Armstrong – Manger ………………. . 314 -2675. . . ……………… 314 -7364 ………………… 865 -5216 Accounts Payable Business System Analyst Travel ………………… 314 -2659 …………………. . 314 -2784 . . . . 314 -2578
https: //counsel. tulane. edu/node/2481 (Tax Exemption Certificates)
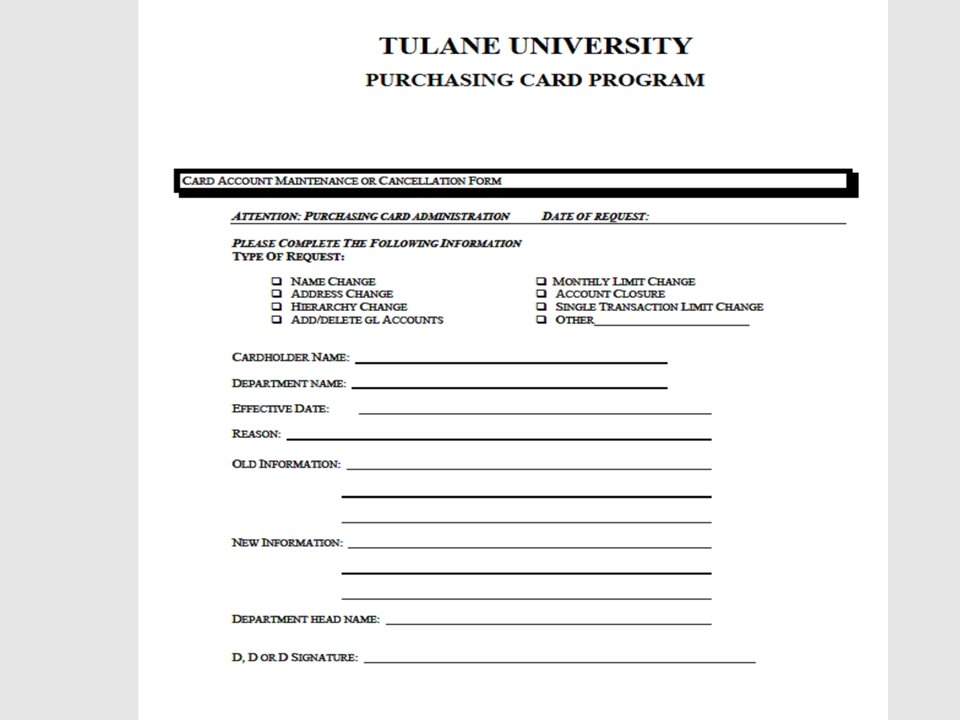
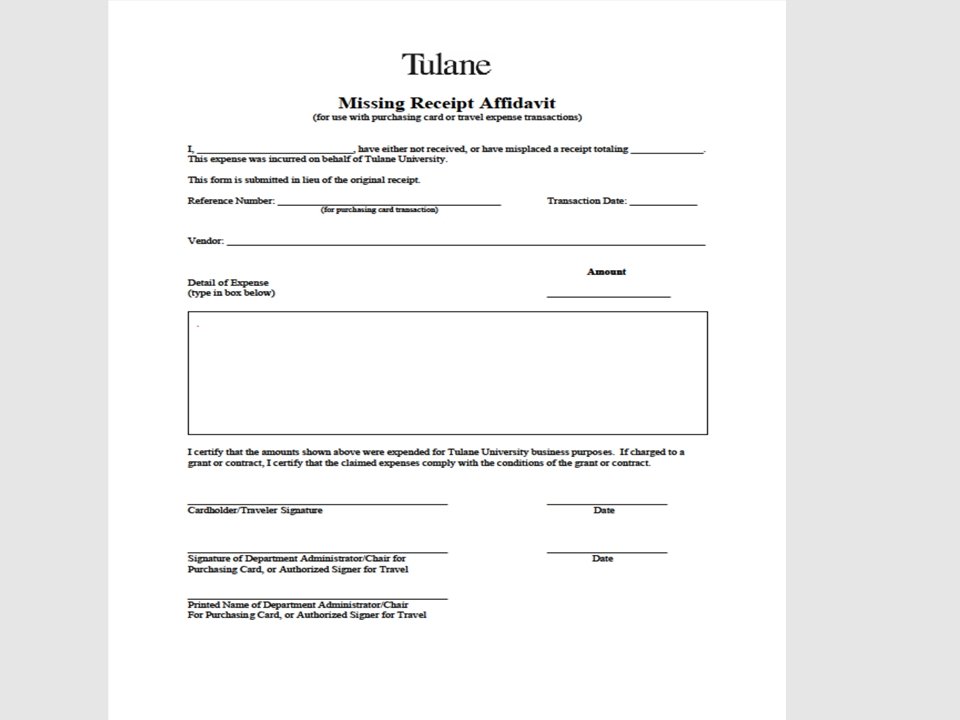
Corporate Card Administration https: //ccadmin. tulane. edu • • • Pcard Online Application T & E Online Application Policies and Procedures Forms Contact Information