TRIO Axis controller April 2014 1 23 April
- Slides: 44

TRIO Axis controller April 2014 1 | 23 April 2014 |

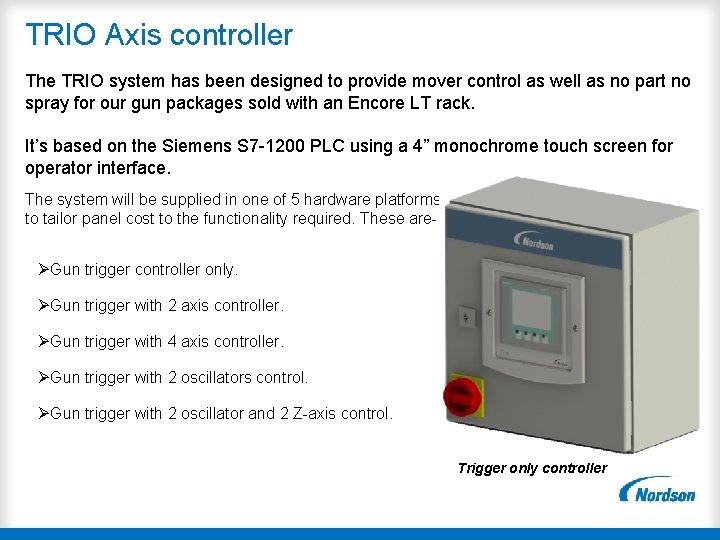
TRIO Axis controller The TRIO system has been designed to provide mover control as well as no part no spray for our gun packages sold with an Encore LT rack. It’s based on the Siemens S 7 -1200 PLC using a 4” monochrome touch screen for operator interface. The system will be supplied in one of 5 hardware platforms to tailor panel cost to the functionality required. These are- ØGun trigger controller only. ØGun trigger with 2 axis controller. ØGun trigger with 4 axis controller. ØGun trigger with 2 oscillators control. ØGun trigger with 2 oscillator and 2 Z-axis control. Trigger only controller

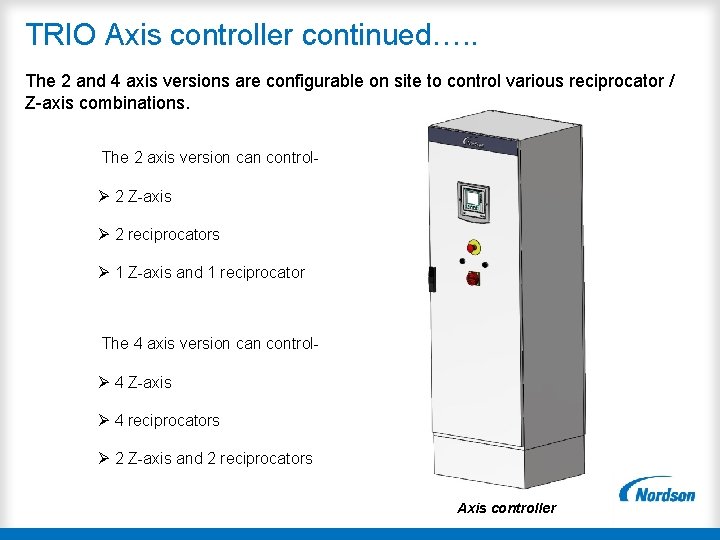
TRIO Axis controller continued…. . The 2 and 4 axis versions are configurable on site to control various reciprocator / Z-axis combinations. The 2 axis version can control Ø 2 Z-axis Ø 2 reciprocators Ø 1 Z-axis and 1 reciprocator The 4 axis version can control- Ø 4 Z-axis Ø 4 reciprocators Ø 2 Z-axis and 2 reciprocators Axis controller

TRIO Axis controller continued…. . Gun trigger Controller specificationØUp to 8 photocell / light curtain zone inputs freely assignable to any gun trigger output. ØUp to 8 gun trigger outputs available. ØThe system can track parts via an external encoder fitted to the conveyor, or via an internal clock signal which negates the need for an encoder. This option is only viable if the conveyor speed never changes. ØA conveyor running signal from the customer can also be used to further improve the operation of the internal conveyor clock feature. ØAuto detection of the conveyor encoder pulse width during configuration.

TRIO Axis controller continued…. . Axis controller specificationØThe system can accommodate horizontal beam array signals from either 1 array mounted over the conveyor, or 2 split beam arrays slung below it to allow the Zaxis to profile around the work pieces. ØReciprocator control provides for a fixed stroke mode of operation. Top turn, bottom turn & speed values are set by the operator. Ø 256 user programs are available to store recip stroke and speed settings as well as Z-axis pre and post move dimensions plus gun to part distances. This is limited to 200 programs in the 4 axis version. ØCleaning interface is included that can operate in one of 2 modes. q Stand alone mode to control the external gun cleaning sequence. q. Integrated mode to interface with our colour feed centres to perform the complete gun purge / external clean sequence automatically. ØOscillator control with park position sensing is also available as a standard option.

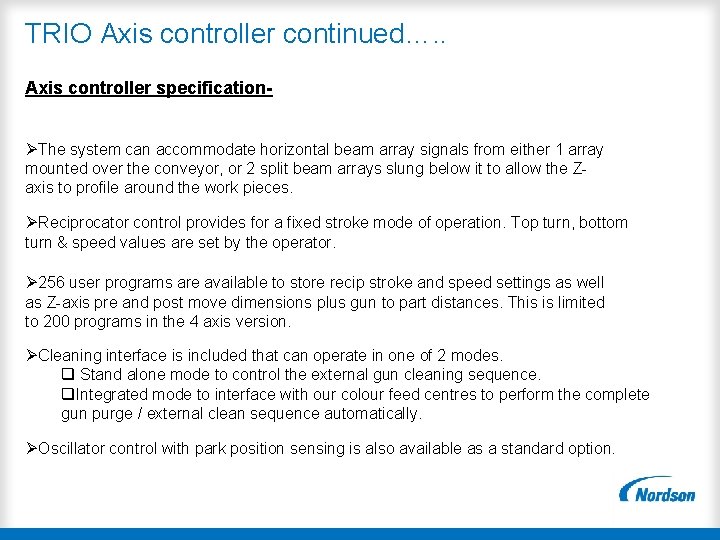
TRIO Axis controller continued…. . The system will be sold as a kit for 10 different configurations as follows. Gun trigger control only. Part detection via photocells

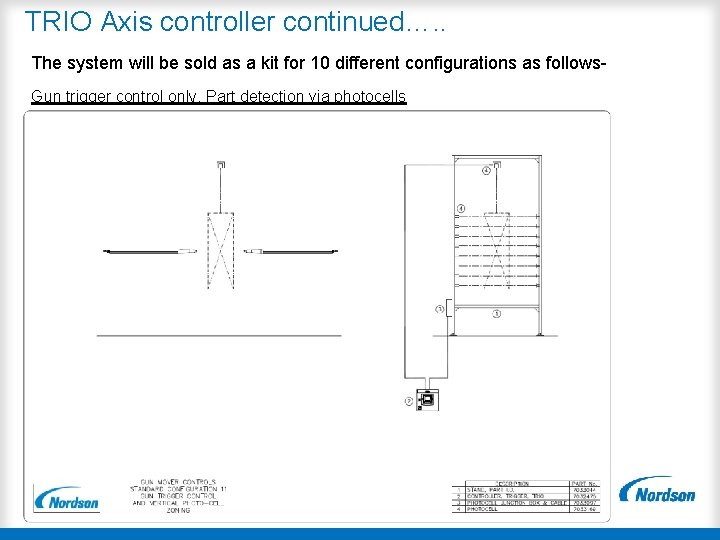
TRIO Axis controller continued…. . Gun trigger control only. Part detection via light curtain

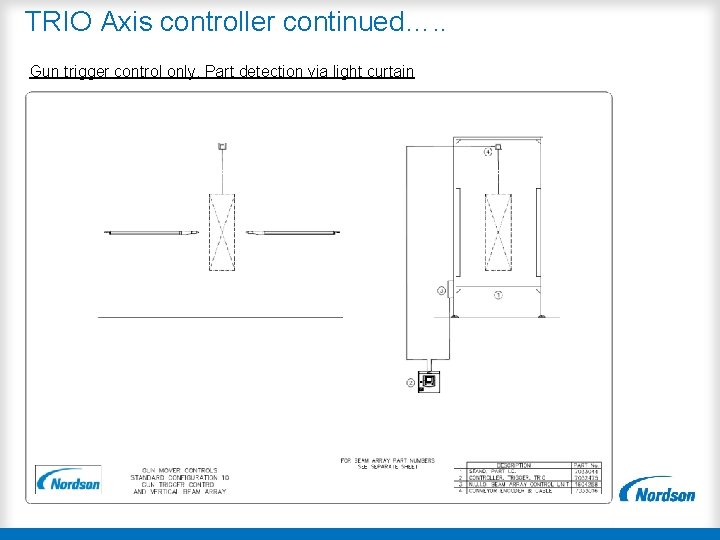
TRIO Axis controller continued…. . 2 Recips with trigger control. Part detection via light curtain

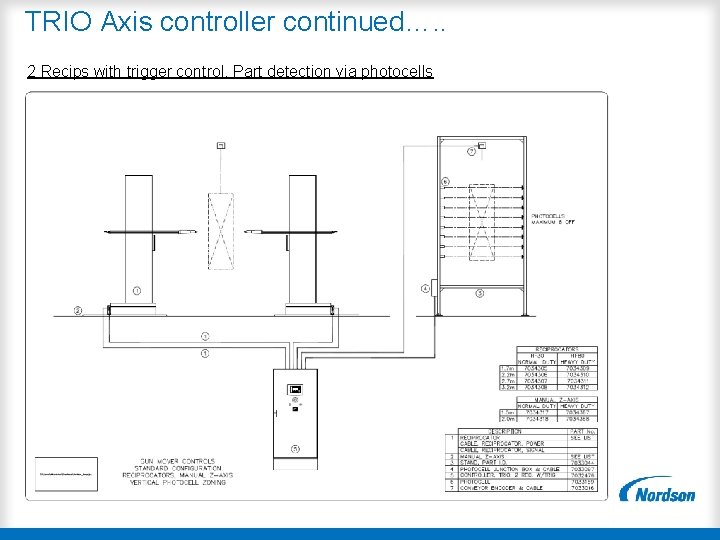
TRIO Axis controller continued…. . 2 Recips with trigger control. Part detection via photocells

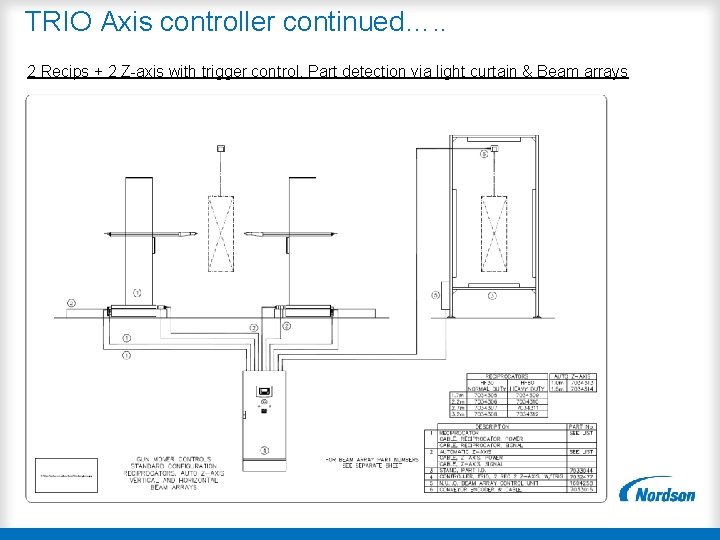
TRIO Axis controller continued…. . 2 Recips + 2 Z-axis with trigger control. Part detection via light curtain & Beam arrays

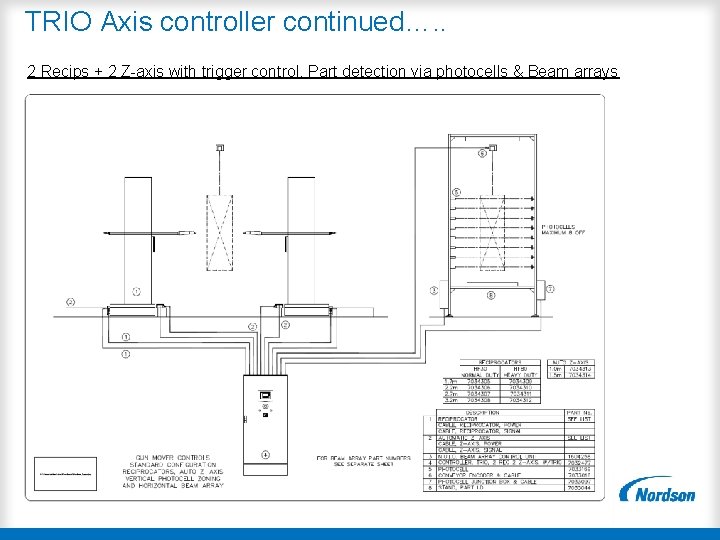
TRIO Axis controller continued…. . 2 Recips + 2 Z-axis with trigger control. Part detection via photocells & Beam arrays

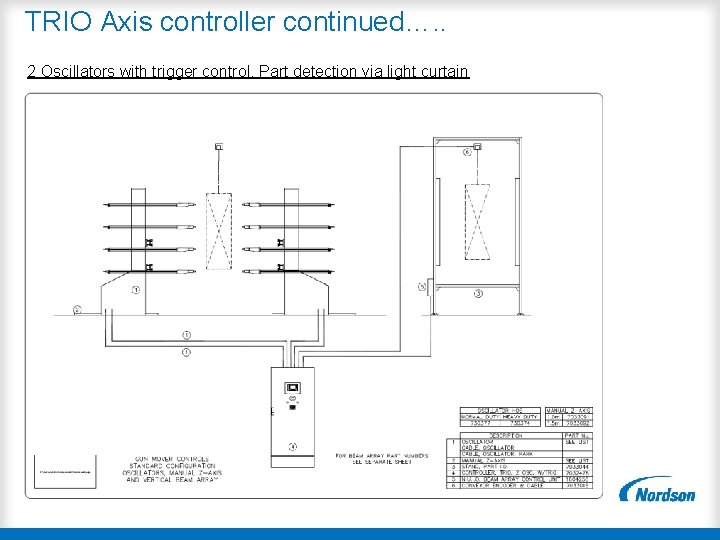
TRIO Axis controller continued…. . 2 Oscillators with trigger control. Part detection via light curtain

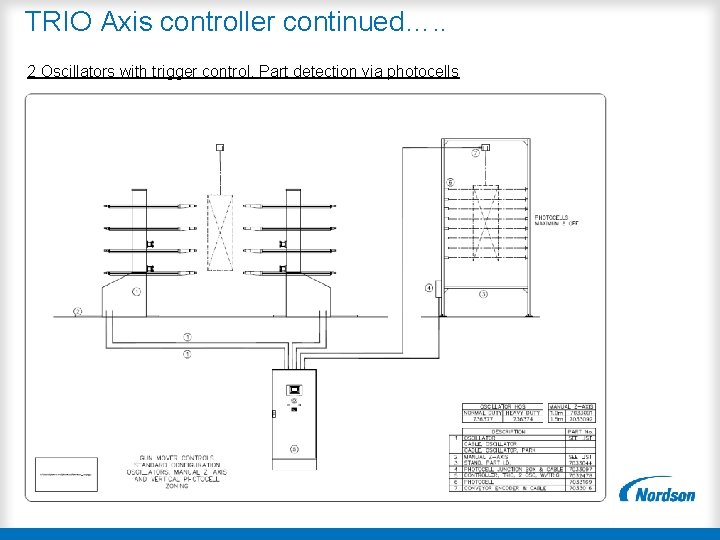
TRIO Axis controller continued…. . 2 Oscillators with trigger control. Part detection via photocells

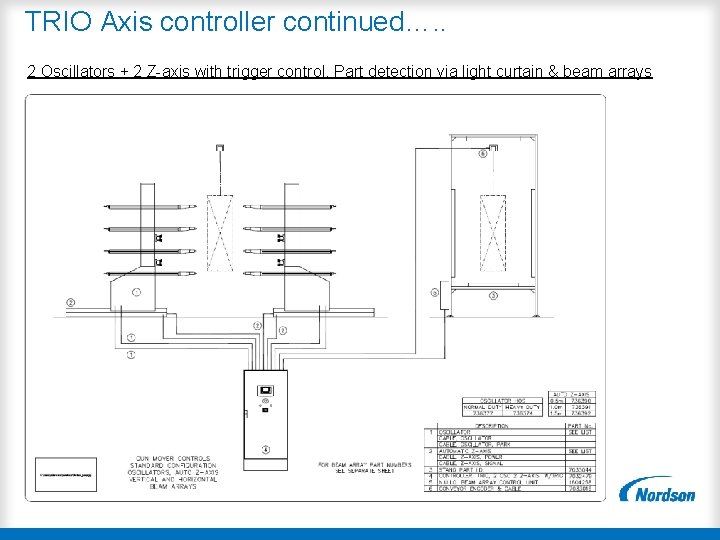
TRIO Axis controller continued…. . 2 Oscillators + 2 Z-axis with trigger control. Part detection via light curtain & beam arrays

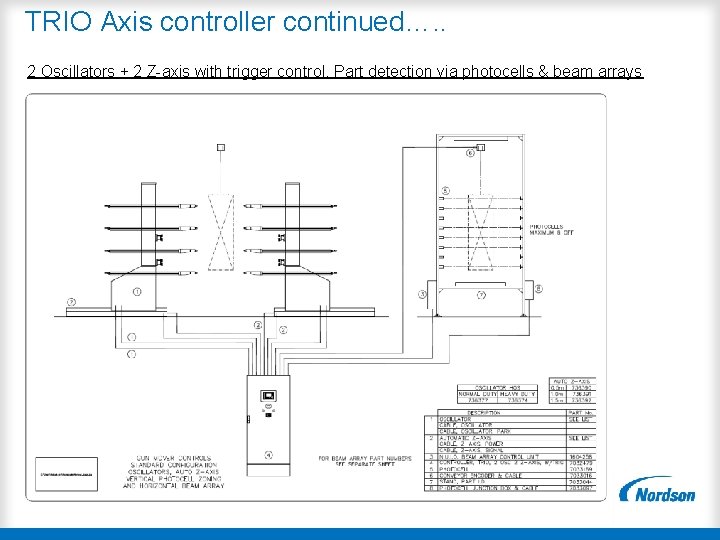
TRIO Axis controller continued…. . 2 Oscillators + 2 Z-axis with trigger control. Part detection via photocells & beam arrays

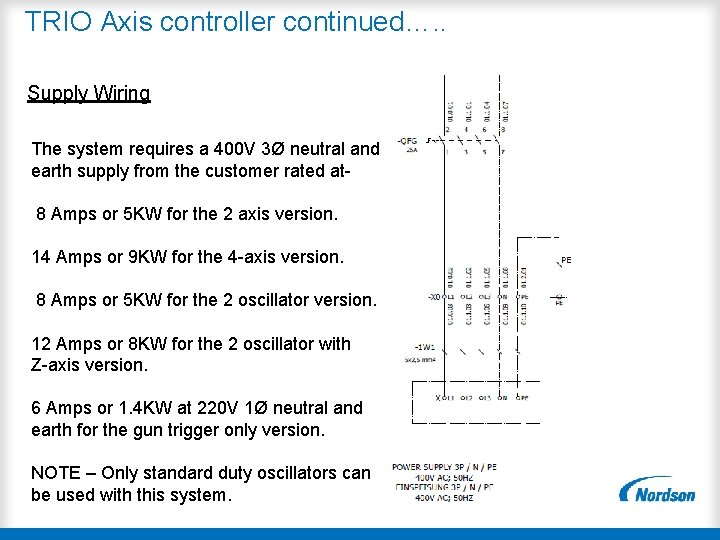
TRIO Axis controller continued…. . Supply Wiring The system requires a 400 V 3Ø neutral and earth supply from the customer rated at 8 Amps or 5 KW for the 2 axis version. 14 Amps or 9 KW for the 4 -axis version. 8 Amps or 5 KW for the 2 oscillator version. 12 Amps or 8 KW for the 2 oscillator with Z-axis version. 6 Amps or 1. 4 KW at 220 V 1Ø neutral and earth for the gun trigger only version. NOTE – Only standard duty oscillators can be used with this system.

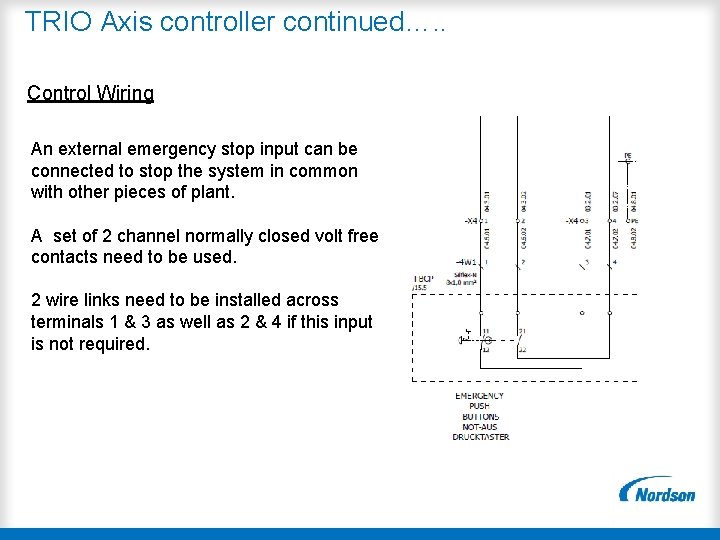
TRIO Axis controller continued…. . Control Wiring An external emergency stop input can be connected to stop the system in common with other pieces of plant. A set of 2 channel normally closed volt free contacts need to be used. 2 wire links need to be installed across terminals 1 & 3 as well as 2 & 4 if this input is not required.

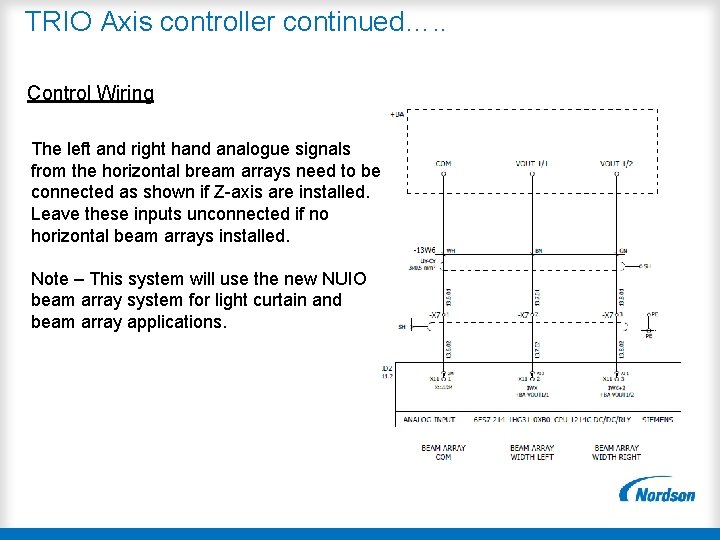
TRIO Axis controller continued…. . Control Wiring The left and right hand analogue signals from the horizontal bream arrays need to be connected as shown if Z-axis are installed. Leave these inputs unconnected if no horizontal beam arrays installed. Note – This system will use the new NUIO beam array system for light curtain and beam array applications.

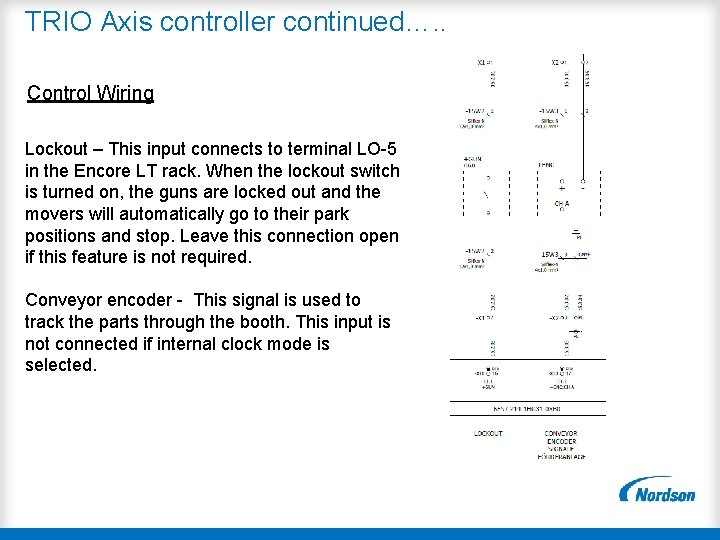
TRIO Axis controller continued…. . Control Wiring Lockout – This input connects to terminal LO-5 in the Encore LT rack. When the lockout switch is turned on, the guns are locked out and the movers will automatically go to their park positions and stop. Leave this connection open if this feature is not required. Conveyor encoder - This signal is used to track the parts through the booth. This input is not connected if internal clock mode is selected.

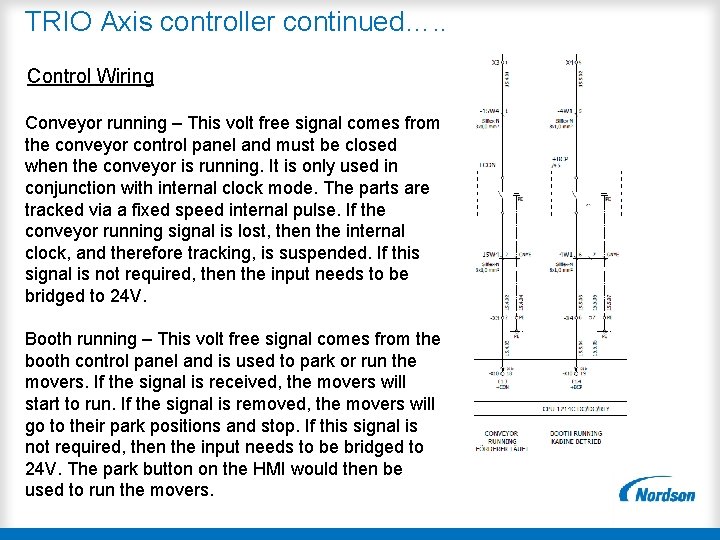
TRIO Axis controller continued…. . Control Wiring Conveyor running – This volt free signal comes from the conveyor control panel and must be closed when the conveyor is running. It is only used in conjunction with internal clock mode. The parts are tracked via a fixed speed internal pulse. If the conveyor running signal is lost, then the internal clock, and therefore tracking, is suspended. If this signal is not required, then the input needs to be bridged to 24 V. Booth running – This volt free signal comes from the booth control panel and is used to park or run the movers. If the signal is received, the movers will start to run. If the signal is removed, the movers will go to their park positions and stop. If this signal is not required, then the input needs to be bridged to 24 V. The park button on the HMI would then be used to run the movers.

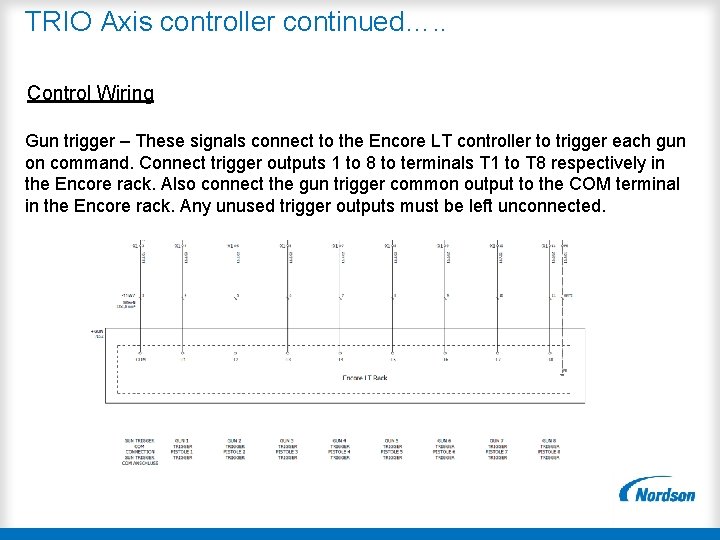
TRIO Axis controller continued…. . Control Wiring Gun trigger – These signals connect to the Encore LT controller to trigger each gun on command. Connect trigger outputs 1 to 8 to terminals T 1 to T 8 respectively in the Encore rack. Also connect the gun trigger common output to the COM terminal in the Encore rack. Any unused trigger outputs must be left unconnected.

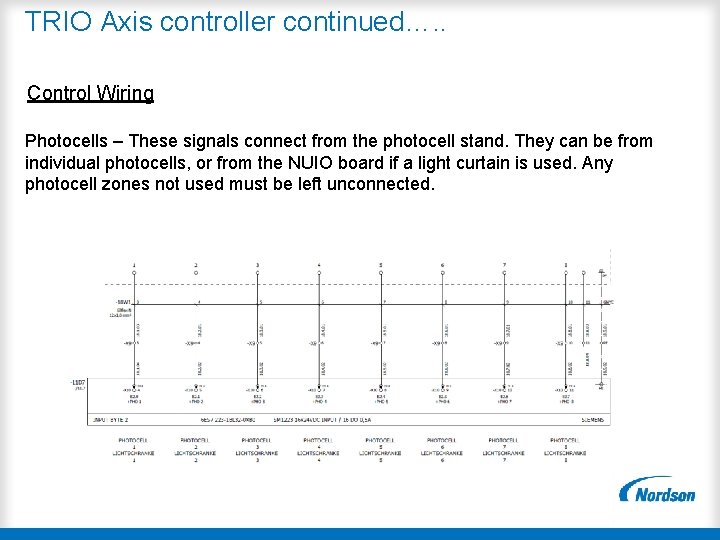
TRIO Axis controller continued…. . Control Wiring Photocells – These signals connect from the photocell stand. They can be from individual photocells, or from the NUIO board if a light curtain is used. Any photocell zones not used must be left unconnected.

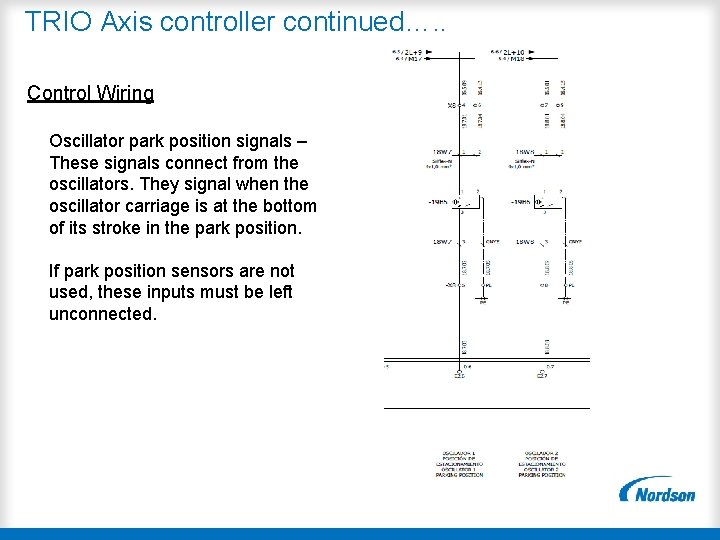
TRIO Axis controller continued…. . Control Wiring Oscillator park position signals – These signals connect from the oscillators. They signal when the oscillator carriage is at the bottom of its stroke in the park position. If park position sensors are not used, these inputs must be left unconnected.

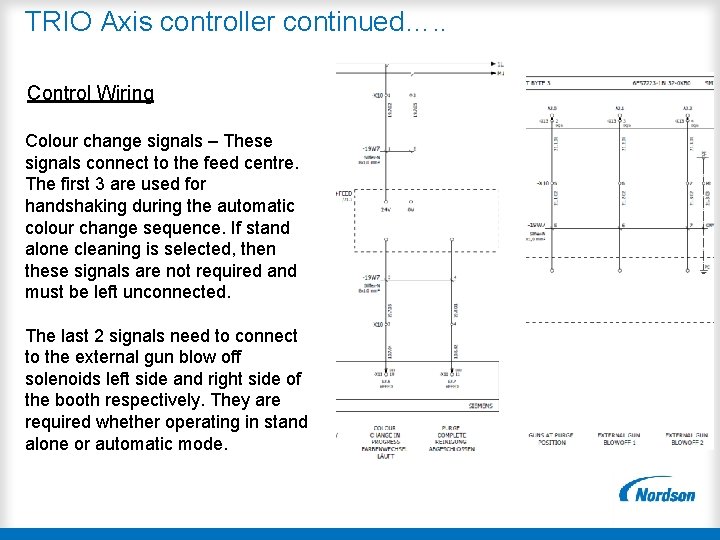
TRIO Axis controller continued…. . Control Wiring Colour change signals – These signals connect to the feed centre. The first 3 are used for handshaking during the automatic colour change sequence. If stand alone cleaning is selected, then these signals are not required and must be left unconnected. The last 2 signals need to connect to the external gun blow off solenoids left side and right side of the booth respectively. They are required whether operating in stand alone or automatic mode.

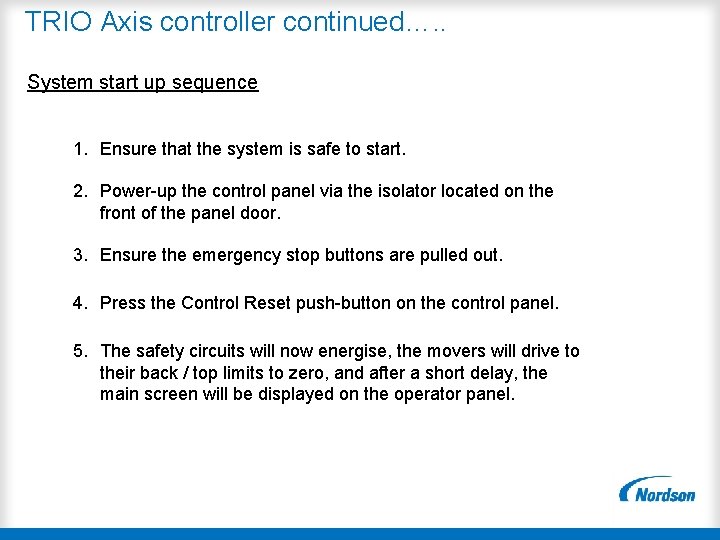
TRIO Axis controller continued…. . System start up sequence 1. Ensure that the system is safe to start. 2. Power-up the control panel via the isolator located on the front of the panel door. 3. Ensure the emergency stop buttons are pulled out. 4. Press the Control Reset push-button on the control panel. 5. The safety circuits will now energise, the movers will drive to their back / top limits to zero, and after a short delay, the main screen will be displayed on the operator panel.

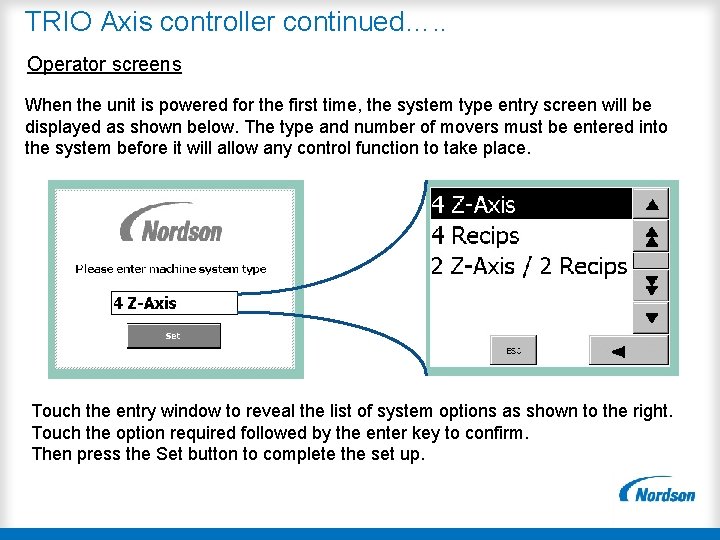
TRIO Axis controller continued…. . Operator screens When the unit is powered for the first time, the system type entry screen will be displayed as shown below. The type and number of movers must be entered into the system before it will allow any control function to take place. Touch the entry window to reveal the list of system options as shown to the right. Touch the option required followed by the enter key to confirm. Then press the Set button to complete the set up.

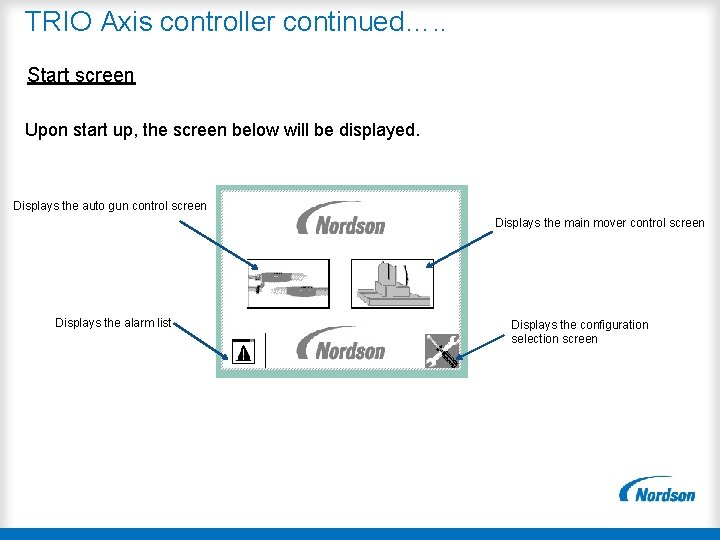
TRIO Axis controller continued…. . Start screen Upon start up, the screen below will be displayed. Displays the auto gun control screen Displays the main mover control screen Displays the alarm list Displays the configuration selection screen

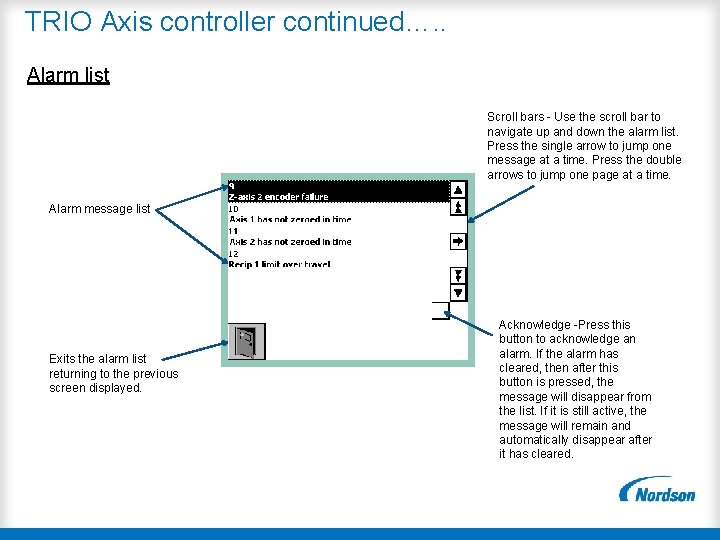
TRIO Axis controller continued…. . Alarm list Scroll bars - Use the scroll bar to navigate up and down the alarm list. Press the single arrow to jump one message at a time. Press the double arrows to jump one page at a time. Alarm message list Exits the alarm list returning to the previous screen displayed. Acknowledge -Press this button to acknowledge an alarm. If the alarm has cleared, then after this button is pressed, the message will disappear from the list. If it is still active, the message will remain and automatically disappear after it has cleared.

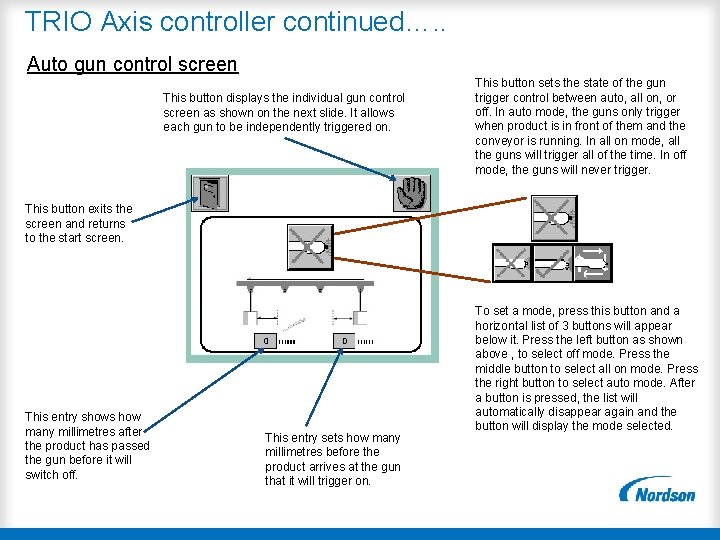
TRIO Axis controller continued…. . Auto gun control screen This button displays the individual gun control screen as shown on the next slide. It allows each gun to be independently triggered on. This button sets the state of the gun trigger control between auto, all on, or off. In auto mode, the guns only trigger when product is in front of them and the conveyor is running. In all on mode, all the guns will trigger all of the time. In off mode, the guns will never trigger. This button exits the screen and returns to the start screen. This entry shows how many millimetres after the product has passed the gun before it will switch off. This entry sets how many millimetres before the product arrives at the gun that it will trigger on. To set a mode, press this button and a horizontal list of 3 buttons will appear below it. Press the left button as shown above , to select off mode. Press the middle button to select all on mode. Press the right button to select auto mode. After a button is pressed, the list will automatically disappear again and the button will display the mode selected.

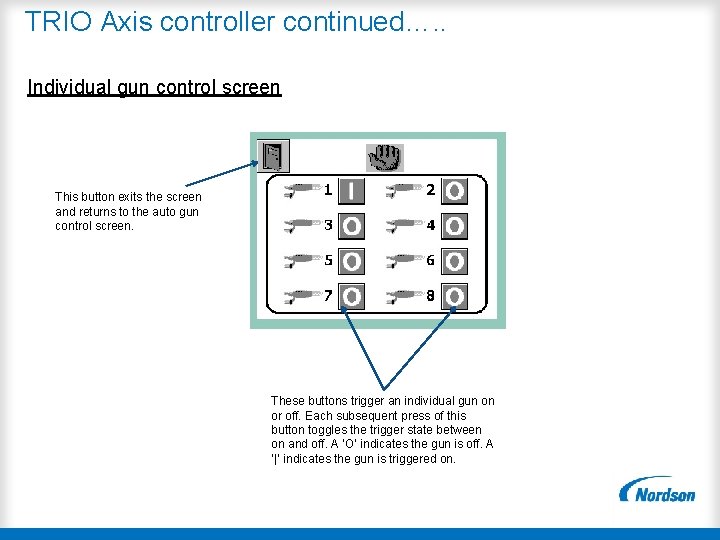
TRIO Axis controller continued…. . Individual gun control screen This button exits the screen and returns to the auto gun control screen. These buttons trigger an individual gun on or off. Each subsequent press of this button toggles the trigger state between on and off. A ‘O’ indicates the gun is off. A ‘|’ indicates the gun is triggered on.

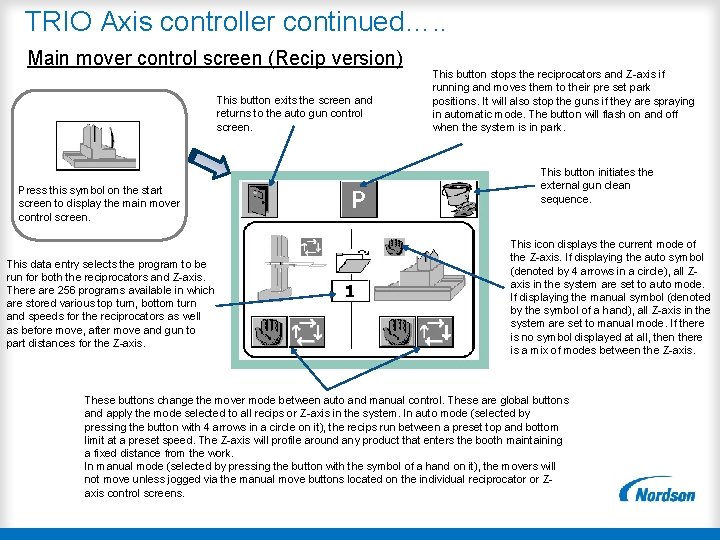
TRIO Axis controller continued…. . Main mover control screen (Recip version) This button exits the screen and returns to the auto gun control screen. Press this symbol on the start screen to display the main mover control screen. This data entry selects the program to be run for both the reciprocators and Z-axis. There are 256 programs available in which are stored various top turn, bottom turn and speeds for the reciprocators as well as before move, after move and gun to part distances for the Z-axis. This button stops the reciprocators and Z-axis if running and moves them to their pre set park positions. It will also stop the guns if they are spraying in automatic mode. The button will flash on and off when the system is in park. This button initiates the external gun clean sequence. This icon displays the current mode of the Z-axis. If displaying the auto symbol (denoted by 4 arrows in a circle), all Zaxis in the system are set to auto mode. If displaying the manual symbol (denoted by the symbol of a hand), all Z-axis in the system are set to manual mode. If there is no symbol displayed at all, then there is a mix of modes between the Z-axis. These buttons change the mover mode between auto and manual control. These are global buttons and apply the mode selected to all recips or Z-axis in the system. In auto mode (selected by pressing the button with 4 arrows in a circle on it), the recips run between a preset top and bottom limit at a preset speed. The Z-axis will profile around any product that enters the booth maintaining a fixed distance from the work. In manual mode (selected by pressing the button with the symbol of a hand on it), the movers will not move unless jogged via the manual move buttons located on the individual reciprocator or Zaxis control screens.

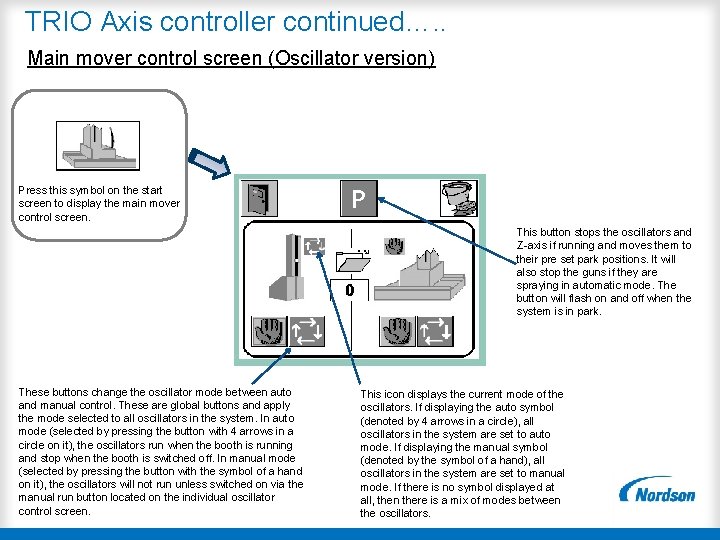
TRIO Axis controller continued…. . Main mover control screen (Oscillator version) Press this symbol on the start screen to display the main mover control screen. This button stops the oscillators and Z-axis if running and moves them to their pre set park positions. It will also stop the guns if they are spraying in automatic mode. The button will flash on and off when the system is in park. These buttons change the oscillator mode between auto and manual control. These are global buttons and apply the mode selected to all oscillators in the system. In auto mode (selected by pressing the button with 4 arrows in a circle on it), the oscillators run when the booth is running and stop when the booth is switched off. In manual mode (selected by pressing the button with the symbol of a hand on it), the oscillators will not run unless switched on via the manual run button located on the individual oscillator control screen. This icon displays the current mode of the oscillators. If displaying the auto symbol (denoted by 4 arrows in a circle), all oscillators in the system are set to auto mode. If displaying the manual symbol (denoted by the symbol of a hand), all oscillators in the system are set to manual mode. If there is no symbol displayed at all, then there is a mix of modes between the oscillators.

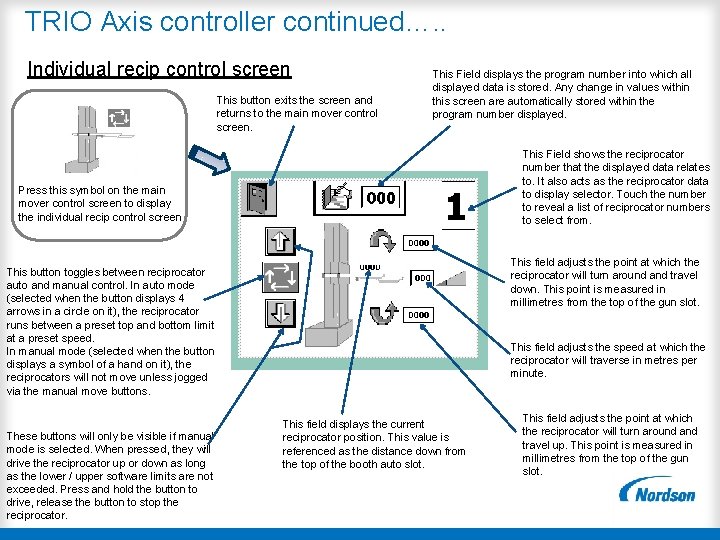
TRIO Axis controller continued…. . Individual recip control screen This button exits the screen and returns to the main mover control screen. This Field displays the program number into which all displayed data is stored. Any change in values within this screen are automatically stored within the program number displayed. This Field shows the reciprocator number that the displayed data relates to. It also acts as the reciprocator data to display selector. Touch the number to reveal a list of reciprocator numbers to select from. Press this symbol on the main mover control screen to display the individual recip control screen This field adjusts the point at which the reciprocator will turn around and travel down. This point is measured in millimetres from the top of the gun slot. This button toggles between reciprocator auto and manual control. In auto mode (selected when the button displays 4 arrows in a circle on it), the reciprocator runs between a preset top and bottom limit at a preset speed. In manual mode (selected when the button displays a symbol of a hand on it), the reciprocators will not move unless jogged via the manual move buttons. These buttons will only be visible if manual mode is selected. When pressed, they will drive the reciprocator up or down as long as the lower / upper software limits are not exceeded. Press and hold the button to drive, release the button to stop the reciprocator. This field adjusts the speed at which the reciprocator will traverse in metres per minute. This field displays the current reciprocator position. This value is referenced as the distance down from the top of the booth auto slot. This field adjusts the point at which the reciprocator will turn around and travel up. This point is measured in millimetres from the top of the gun slot.

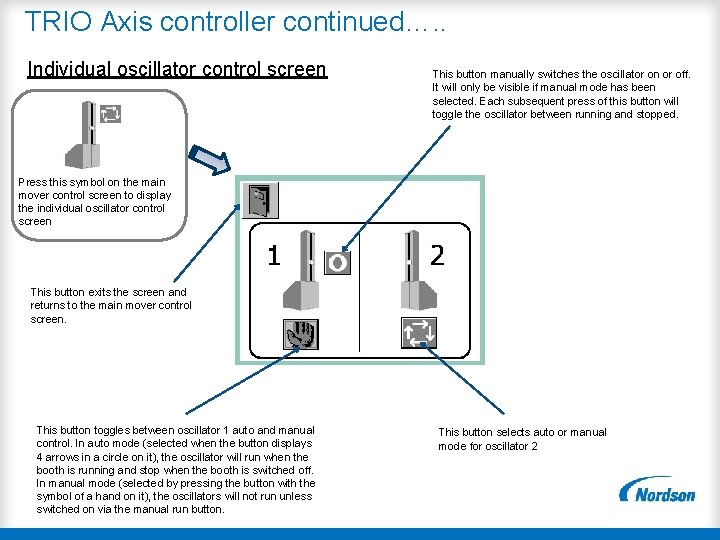
TRIO Axis controller continued…. . Individual oscillator control screen This button manually switches the oscillator on or off. It will only be visible if manual mode has been selected. Each subsequent press of this button will toggle the oscillator between running and stopped. Press this symbol on the main mover control screen to display the individual oscillator control screen This button exits the screen and returns to the main mover control screen. This button toggles between oscillator 1 auto and manual control. In auto mode (selected when the button displays 4 arrows in a circle on it), the oscillator will run when the booth is running and stop when the booth is switched off. In manual mode (selected by pressing the button with the symbol of a hand on it), the oscillators will not run unless switched on via the manual run button. This button selects auto or manual mode for oscillator 2

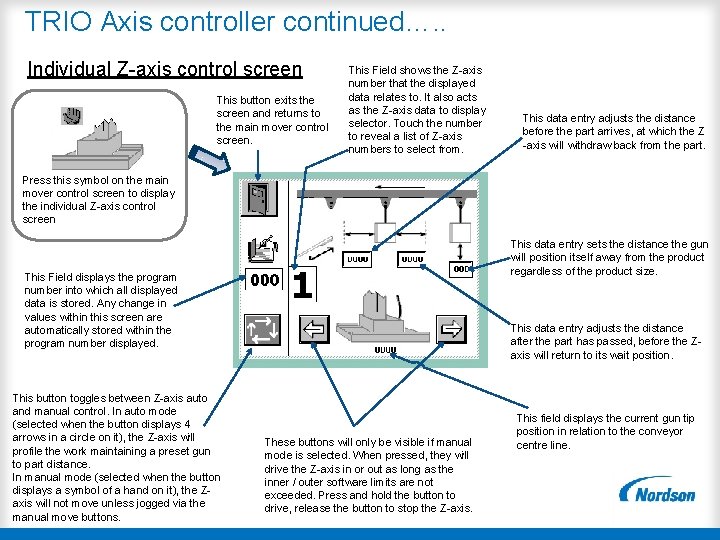
TRIO Axis controller continued…. . Individual Z-axis control screen This button exits the screen and returns to the main mover control screen. This Field shows the Z-axis number that the displayed data relates to. It also acts as the Z-axis data to display selector. Touch the number to reveal a list of Z-axis numbers to select from. This data entry adjusts the distance before the part arrives, at which the Z -axis will withdraw back from the part. Press this symbol on the main mover control screen to display the individual Z-axis control screen This data entry sets the distance the gun will position itself away from the product regardless of the product size. This Field displays the program number into which all displayed data is stored. Any change in values within this screen are automatically stored within the program number displayed. This button toggles between Z-axis auto and manual control. In auto mode (selected when the button displays 4 arrows in a circle on it), the Z-axis will profile the work maintaining a preset gun to part distance. In manual mode (selected when the button displays a symbol of a hand on it), the Zaxis will not move unless jogged via the manual move buttons. This data entry adjusts the distance after the part has passed, before the Zaxis will return to its wait position. These buttons will only be visible if manual mode is selected. When pressed, they will drive the Z-axis in or out as long as the inner / outer software limits are not exceeded. Press and hold the button to drive, release the button to stop the Z-axis. This field displays the current gun tip position in relation to the conveyor centre line.

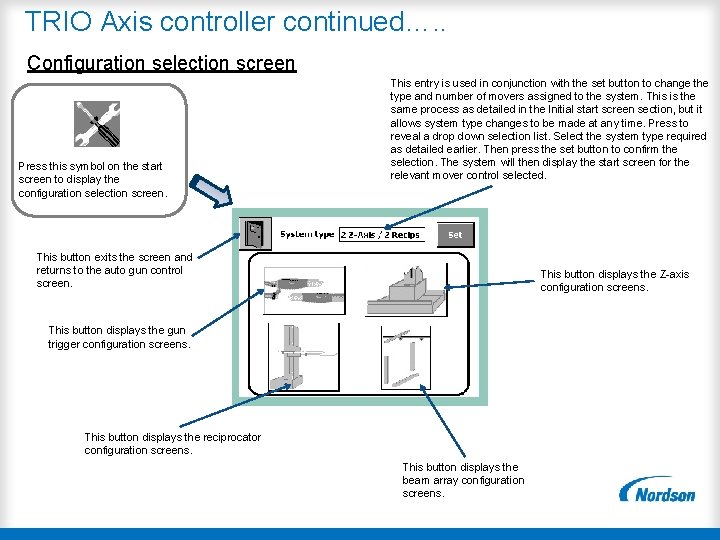
TRIO Axis controller continued…. . Configuration selection screen Press this symbol on the start screen to display the configuration selection screen. This entry is used in conjunction with the set button to change the type and number of movers assigned to the system. This is the same process as detailed in the Initial start screen section, but it allows system type changes to be made at any time. Press to reveal a drop down selection list. Select the system type required as detailed earlier. Then press the set button to confirm the selection. The system will then display the start screen for the relevant mover control selected. This button exits the screen and returns to the auto gun control screen. This button displays the Z-axis configuration screens. This button displays the gun trigger configuration screens. This button displays the reciprocator configuration screens. This button displays the beam array configuration screens.

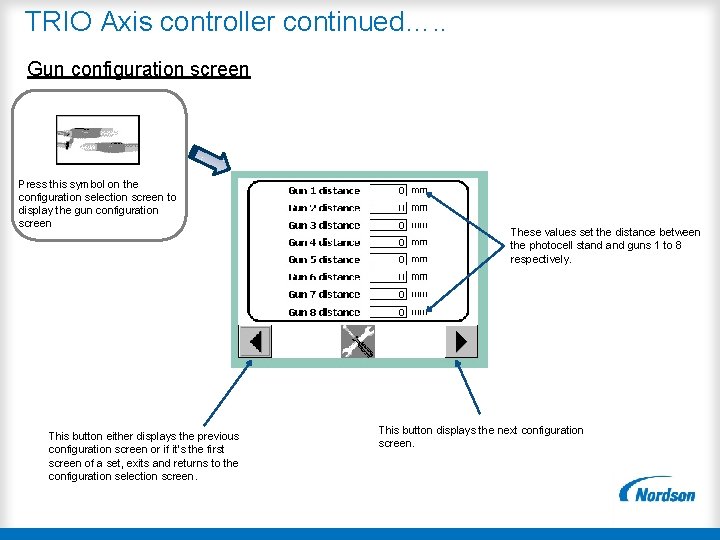
TRIO Axis controller continued…. . Gun configuration screen Press this symbol on the configuration selection screen to display the gun configuration screen This button either displays the previous configuration screen or if it’s the first screen of a set, exits and returns to the configuration selection screen. These values set the distance between the photocell stand guns 1 to 8 respectively. This button displays the next configuration screen.

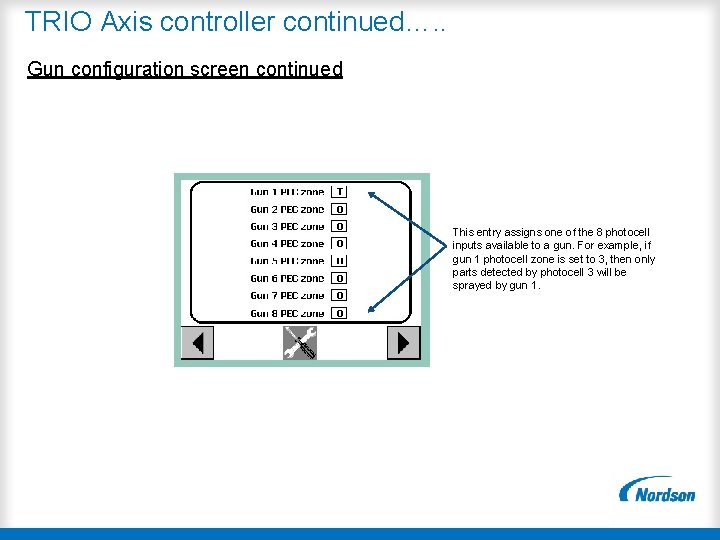
TRIO Axis controller continued…. . Gun configuration screen continued This entry assigns one of the 8 photocell inputs available to a gun. For example, if gun 1 photocell zone is set to 3, then only parts detected by photocell 3 will be sprayed by gun 1.

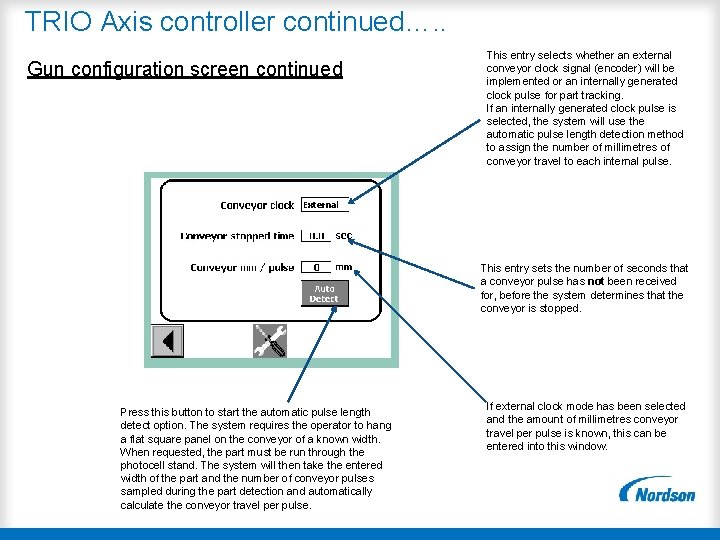
TRIO Axis controller continued…. . Gun configuration screen continued This entry selects whether an external conveyor clock signal (encoder) will be implemented or an internally generated clock pulse for part tracking. If an internally generated clock pulse is selected, the system will use the automatic pulse length detection method to assign the number of millimetres of conveyor travel to each internal pulse. This entry sets the number of seconds that a conveyor pulse has not been received for, before the system determines that the conveyor is stopped. Press this button to start the automatic pulse length detect option. The system requires the operator to hang a flat square panel on the conveyor of a known width. When requested, the part must be run through the photocell stand. The system will then take the entered width of the part and the number of conveyor pulses sampled during the part detection and automatically calculate the conveyor travel per pulse. If external clock mode has been selected and the amount of millimetres conveyor travel per pulse is known, this can be entered into this window.

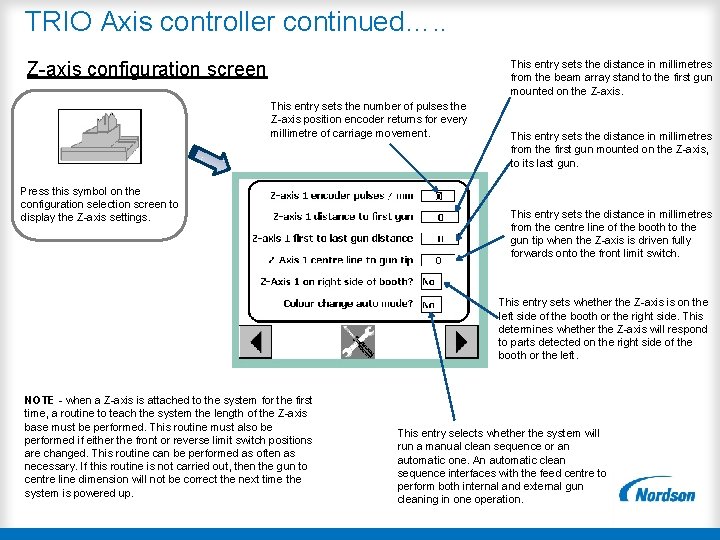
TRIO Axis controller continued…. . Z-axis configuration screen This entry sets the distance in millimetres from the beam array stand to the first gun mounted on the Z-axis. This entry sets the number of pulses the Z-axis position encoder returns for every millimetre of carriage movement. Press this symbol on the configuration selection screen to display the Z-axis settings. This entry sets the distance in millimetres from the first gun mounted on the Z-axis, to its last gun. This entry sets the distance in millimetres from the centre line of the booth to the gun tip when the Z-axis is driven fully forwards onto the front limit switch. This entry sets whether the Z-axis is on the left side of the booth or the right side. This determines whether the Z-axis will respond to parts detected on the right side of the booth or the left. NOTE - when a Z-axis is attached to the system for the first time, a routine to teach the system the length of the Z-axis base must be performed. This routine must also be performed if either the front or reverse limit switch positions are changed. This routine can be performed as often as necessary. If this routine is not carried out, then the gun to centre line dimension will not be correct the next time the system is powered up. This entry selects whether the system will run a manual clean sequence or an automatic one. An automatic clean sequence interfaces with the feed centre to perform both internal and external gun cleaning in one operation.

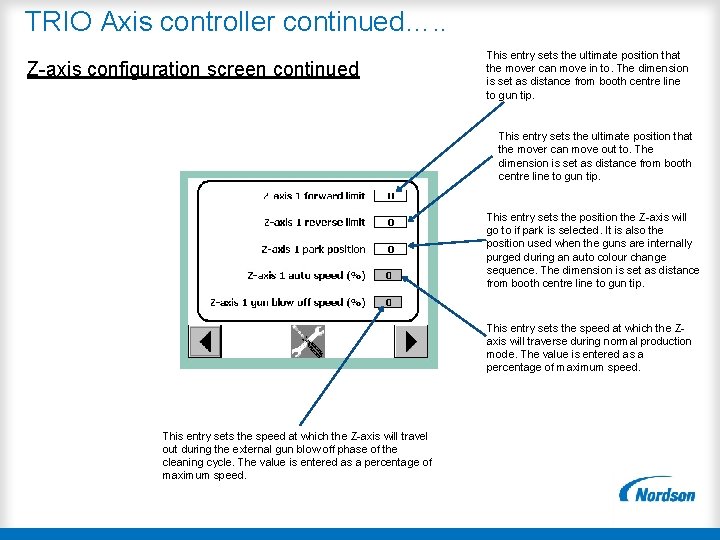
TRIO Axis controller continued…. . Z-axis configuration screen continued This entry sets the ultimate position that the mover can move in to. The dimension is set as distance from booth centre line to gun tip. This entry sets the ultimate position that the mover can move out to. The dimension is set as distance from booth centre line to gun tip. This entry sets the position the Z-axis will go to if park is selected. It is also the position used when the guns are internally purged during an auto colour change sequence. The dimension is set as distance from booth centre line to gun tip. This entry sets the speed at which the Zaxis will traverse during normal production mode. The value is entered as a percentage of maximum speed. This entry sets the speed at which the Z-axis will travel out during the external gun blow off phase of the cleaning cycle. The value is entered as a percentage of maximum speed.

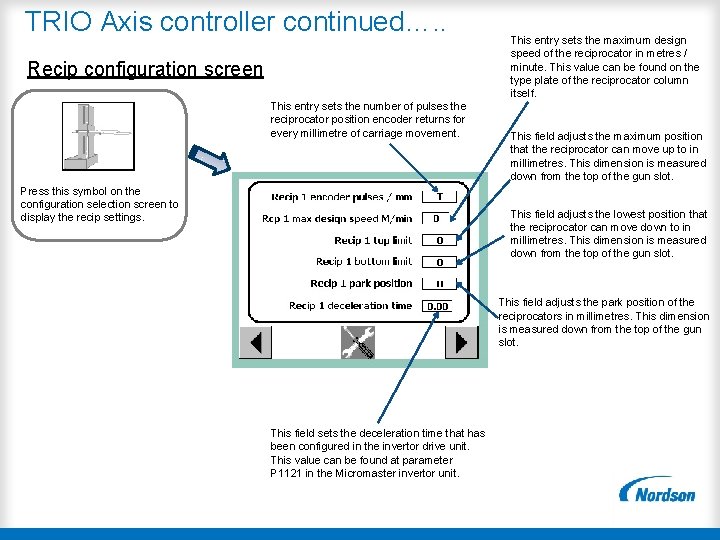
TRIO Axis controller continued…. . Recip configuration screen This entry sets the number of pulses the reciprocator position encoder returns for every millimetre of carriage movement. Press this symbol on the configuration selection screen to display the recip settings. This entry sets the maximum design speed of the reciprocator in metres / minute. This value can be found on the type plate of the reciprocator column itself. This field adjusts the maximum position that the reciprocator can move up to in millimetres. This dimension is measured down from the top of the gun slot. This field adjusts the lowest position that the reciprocator can move down to in millimetres. This dimension is measured down from the top of the gun slot. This field adjusts the park position of the reciprocators in millimetres. This dimension is measured down from the top of the gun slot. This field sets the deceleration time that has been configured in the invertor drive unit. This value can be found at parameter P 1121 in the Micromaster invertor unit.

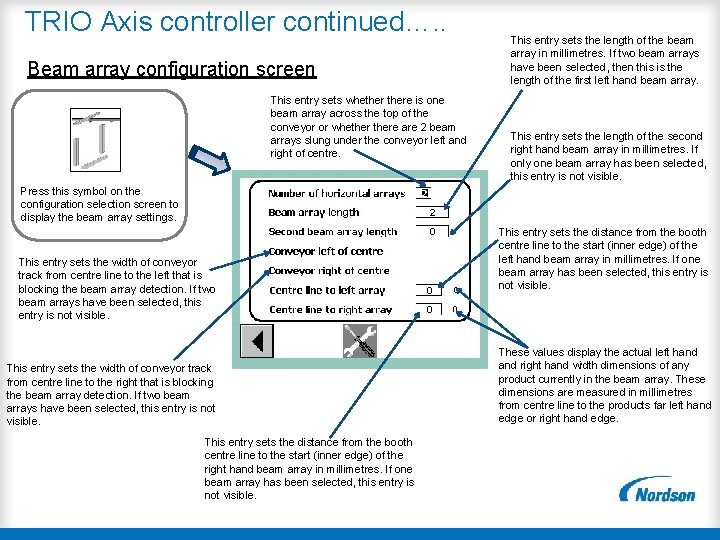
TRIO Axis controller continued…. . Beam array configuration screen This entry sets whethere is one beam array across the top of the conveyor or whethere are 2 beam arrays slung under the conveyor left and right of centre. This entry sets the length of the beam array in millimetres. If two beam arrays have been selected, then this is the length of the first left hand beam array. This entry sets the length of the second right hand beam array in millimetres. If only one beam array has been selected, this entry is not visible. Press this symbol on the configuration selection screen to display the beam array settings. This entry sets the width of conveyor track from centre line to the left that is blocking the beam array detection. If two beam arrays have been selected, this entry is not visible. This entry sets the width of conveyor track from centre line to the right that is blocking the beam array detection. If two beam arrays have been selected, this entry is not visible. This entry sets the distance from the booth centre line to the start (inner edge) of the right hand beam array in millimetres. If one beam array has been selected, this entry is not visible. This entry sets the distance from the booth centre line to the start (inner edge) of the left hand beam array in millimetres. If one beam array has been selected, this entry is not visible. These values display the actual left hand right hand width dimensions of any product currently in the beam array. These dimensions are measured in millimetres from centre line to the products far left hand edge or right hand edge.

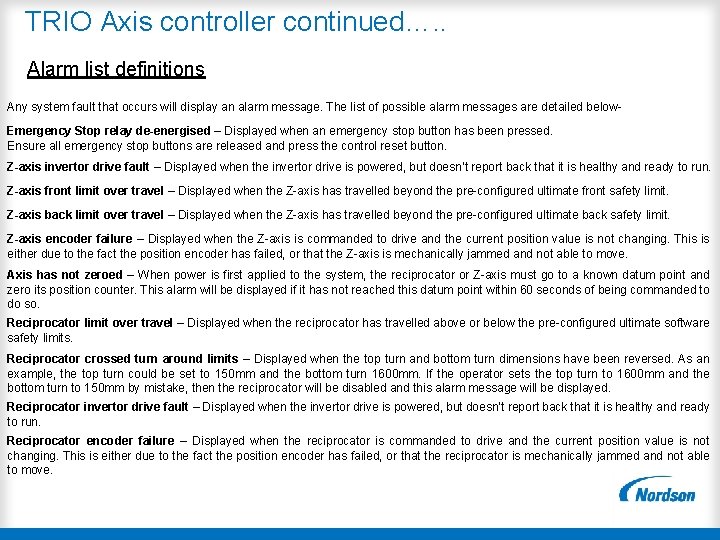
TRIO Axis controller continued…. . Alarm list definitions Any system fault that occurs will display an alarm message. The list of possible alarm messages are detailed below. Emergency Stop relay de-energised – Displayed when an emergency stop button has been pressed. Ensure all emergency stop buttons are released and press the control reset button. Z-axis invertor drive fault – Displayed when the invertor drive is powered, but doesn’t report back that it is healthy and ready to run. Z-axis front limit over travel – Displayed when the Z-axis has travelled beyond the pre-configured ultimate front safety limit. Z-axis back limit over travel – Displayed when the Z-axis has travelled beyond the pre-configured ultimate back safety limit. Z-axis encoder failure – Displayed when the Z-axis is commanded to drive and the current position value is not changing. This is either due to the fact the position encoder has failed, or that the Z-axis is mechanically jammed and not able to move. Axis has not zeroed – When power is first applied to the system, the reciprocator or Z-axis must go to a known datum point and zero its position counter. This alarm will be displayed if it has not reached this datum point within 60 seconds of being commanded to do so. Reciprocator limit over travel – Displayed when the reciprocator has travelled above or below the pre-configured ultimate software safety limits. Reciprocator crossed turn around limits – Displayed when the top turn and bottom turn dimensions have been reversed. As an example, the top turn could be set to 150 mm and the bottom turn 1600 mm. If the operator sets the top turn to 1600 mm and the bottom turn to 150 mm by mistake, then the reciprocator will be disabled and this alarm message will be displayed. Reciprocator invertor drive fault – Displayed when the invertor drive is powered, but doesn’t report back that it is healthy and ready to run. Reciprocator encoder failure – Displayed when the reciprocator is commanded to drive and the current position value is not changing. This is either due to the fact the position encoder has failed, or that the reciprocator is mechanically jammed and not able to move.