Travel and Expense Travel Authorizations Expense Reports Cash


- Slides: 40
Travel and Expense Travel Authorizations Expense Reports Cash Advances Amy Tucker – Bauldree atucker 7@ufl. edu http: //www. bridges. ufl. edu/travel/
Submitting a Travel Authorization: p Travel Authorizations are used to encumber monies before a travel has occurred. p Travel Authorizations should only be submitted if the travel has one of the following criteria: n It is considered to be a conference or a convention. Please be sure to keep a copy of the agenda to attach with your expense report. n It is a travel that has a registration fee included. n If it is a foreign travel.
Submitting a Travel Authorization p Log on to my. UFL, using your Gator. Link username and password (http: //my. ufl. edu) p Getting started: Navigation My Self Service > Travel and Expense > from the Travel and Expense Home page, select Travel Authorization
Travel and Expense Home
Creating the Travel Authorization p Click on the Add options to create or update a new Travel Authorization.
Creating the Travel Authorization p Select Add a New Value to begin a Travel Authorization. p Enter in the UFID number of the traveler. p As a traveler, you skip this step and do not need to select an Employee ID. When logged in as a Traveler, all Travel Authorizations will be for your Employee ID.
Creating the Travel Authorization p p Choose a Creation Method will be the next step. There are three options for creating a Travel Authorization: n 1. Open a Blank Travel Authorization – this is to start from “scratch”. n 2. Copy from existing Travel Authorization – this will allow you to copy a prior TA that may be similar to a future trip. n 3. Use a template.
Creating the Travel Authorization p General Information Page: 1. Enter in the description of the travel. Please give specific details in reference to the travel. Such as inservice trainings, please include the IST # in the description box. 2. Enter in the travel dates from when you start until the time that you return. 3. On the Business Purpose, please choose form the drop down box. 4. The Default Location is the ultimate location of travel. 5. Please include an explanation of why this travel is necessary.
Creating the Travel Authorization p Next, do not click on the Continue button, instead, click on the Default Accounting for this Travel Authorization Link.
Creating the Travel Authorization p p p This is the entry of chartfield information. Example, the chartfield for In-Service Trainings would be: Department ID: 60357000 Fund : 103 Program: 3301 Flex: 6035 GOAL 07 For each travel that occurs, you will have an accounting chartfield to enter into the Travel Authorization. n This is the most important step of the Travel Authorization. Without the correct accounting information, the travel request will not be approved.
Creating the Travel Authorization p After entering in the chartfield information, please click on the OK button. p This will take you back to the General Information page that you began with. p From here, click on the Continue Button.
Creating the Travel Authorization p p The next page to appear is the Travel Authorization Summary. From this page, you will enter in each expense type. For an example, you choose Lodging. Click on the ADD button.
Creating the Travel Authorization p p Chose the payment type, the billing type, and enter in the name of the hotel. Then choose the location of the hotel. Enter in the total amount of the lodging expense.
Creating the Travel Authorization p A tip for entering in information: n Whenever you have a magnifying glass next to an entry box, please click on the magnifying glass. People. Soft will not accept data that has not been chosen from the magnifying glass. n When you click on the magnifying glass, please change the box next to the Description to “contains”. n Then type in the data requested, such as Gainesville. Please do not enter in the state. n You will be given options to choose from. Click on the Gainesville FL choice under the Description heading.
Creating the Travel Authorization p When you have entered in all the required information, please select the update button. p You will notice that to the right is a shaded box. This gives you a summary of each expense that you are entering. p Then you will add another expense, with the same steps as above.
Creating the Travel Authorization p p p p When you click on Done, it will take you back to the Travel Authorization Summary Page. Please review all expenses, and amounts. If there is an error, please click on the expense, it will be in a “blue hyperlink text”. You can then correct or add information for the expense. After reviewing and correcting any errors, please click on the “SUBMIT FOR APPROVAL” button. If you are not completed with the Travel Authorization, you may click on the “SAVE FOR LATER” button. This allows you to go back in at a later date and finish the Travel Authorization. Very important to note however, if you do not click on the “SUBMIT FOR APPROVAL” button, it will not be sent to the approver, and will have the status of “Pending”.
Submitting a Expense Report: p Expense Reports are to be submitted for reimbursement of your expenses when you return from your trip. n Please keep all receipts – except for meals. Foreign Travels: p http: //www. state. gov/m/a/als/prdm/ p
Domestic Travel Reimbursement Rates p Beginning July 1, 2008 p Effective for all travel, the standard mileage rates to reimburse for the use of an automobile for business purposes will be 44. 5 cents a mile for all business miles driving. p Beginning July 1, 2008 p Effective for all travel, the following amounts for subsistence are allowed while traveling on official University business: n n Breakfast Lunch Dinner Total $6. 00 $11. 00 $19. 00 $36. 00
Submitting a Expense Report p Log on to my. UFL, using your Gator. Link username and password (http: //my. ufl. edu) p Getting started: Navigation My Self Service > Travel and Expense > from the Travel and Expense Home page, select Expense Report
Submitting a Expense Report
Creating the Expense Report p Click on the Create/Update option.
Creating the Expense Report p Select Add a New Value to begin a Expense Report. p Enter in the UFID number of the traveler. p As a traveler, you skip this step and do not need to select an Employee ID. When logged in as a Traveler, all Expense Reports will be for your Employee ID.
Creating the Expense Report p p Choose a Creation Method will be the next step. There are four options for creating a Expense Report: n 1. Open a Blank Expense Report – this is to start from “scratch”. n 2. When a Travel Authorization was not completed, submitted, or approved for a conference/convention, registration fee or a foreign travel. p If a TA was not done for the above travels, a justification letter must be attached to the expense report when submitted. n 3. Copy from an existing report n 4. Use a template.
Creating the Expense Report p General Information Page: 1. Enter in the description of the travel. Please give specific details in reference to the travel. Such as inservice trainings, please include the IST # in the description box. 2. Enter in the travel dates from when you start until the time that you return. 3. On the Business Purpose, please choose form the drop down box. 4. The Default Location is the ultimate location of travel. 5. Please include an explanation of why this travel is necessary.
Creating the Expense Report p Next, do not click on the Continue button, instead, click on the Default Accounting for this Travel Authorization Link.
Creating the Expense Report p p p This is the entry of chartfield information. Example, the chartfield for In-Service Trainings would be: Department ID: 60357000 Fund : 103 Program: 3301 Flex: 6035 GOAL 07 For each travel that occurs, you will have an accounting chartfield to enter into the Expense Report. n This is the most important step of the Expense Report. Without the correct accounting information, the travel request will not be approved.
Creating the Expense Report p After entering in the chartfield information, please click on the OK button. p This will take you back to the General Information page that you began with. p From here, click on the Continue Button.
Creating the Expense Report p p p The next page to appear is the Add Expense – Map Mileage. Enter in the expense date. Choose the Payment Type. Choose the Billing Type. Enter in the total amount of miles for your travel. Then click on the yellow button named “Calc Mileage” button. This will automatically calculate the amount of reimbursement for your miles. Enter in number of passengers.
Creating the Expense Report p When entering in the originating and destination locations, please remember the following tip: n Whenever you have a magnifying glass next to an entry box, please click on the magnifying glass. People. Soft will not accept data that has not been chosen from the magnifying glass. n When you click on the magnifying glass, please change the box next to the Description to “contains”. n Then type in the data requested, such as Gainesville. Please do not enter in the state. n You will be given options to choose from. Click on the Gainesville FL choice under the Description heading.
Creating the Expense Report There are two boxes listed under the Description comment box. There is the option to “check” in the boxes of “Personal Expense” and “No Receipt”. Please DO NOT check these boxes at anytime.
Creating the Expense Report p When you have entered in all the required information, please select the update button. p You will notice that to the right is a shaded box. This gives you a summary of each expense that you are entering. p Then you will add another expense, with the same steps as above.
Creating the Expense Report p p p p When you click on Done, it will take you back to the Expense Report Details. Please review all expenses, and amounts. If there is an error, please click on the expense, it will be in a “blue hyperlink text”. You can then correct or add information for the expense. After reviewing and correcting any errors, please click on the “SUBMIT FOR APPROVAL” button. If you are not completed with the Travel Authorization, you may click on the “SAVE FOR LATER” button. This allows you to go back in at a later date and finish the Expense Report. Very important to note however, if you do not click on the “SUBMIT FOR APPROVAL” button, it will not be sent to the approver, and will have the status of “Pending”.
Creating the Expense Report p Mail a copy of the Expense Report, along with your receipts and any other pertinent documents (i. e. agenda) to: UF Travel Department P. O. Box 115350 Gainesville, FL 32611
Submitting a Cash Advance: p Travelers can also submit a cash advance before traveling. This provides the employee with cash to pay for registration fees, lodging fees, etc. if they do not have personal funds to cover expenses during the travel. p Before submitting the cash advance, the traveler must have approval from the District Director. p A Travel Authorization must have been submitted and approved before the request for Cash Advance can be completed. p Cash Advances can only be requested for items that list Personal Funds as the Method of Payment on the approved Travel Authorization.
Submitting a Cash Advance p Log on to my. UFL, using your Gator. Link username and password (http: //my. ufl. edu) p Getting started: Navigation My Self Service > Travel and Expense > from the Travel and Expense Home page, select Cash Advance
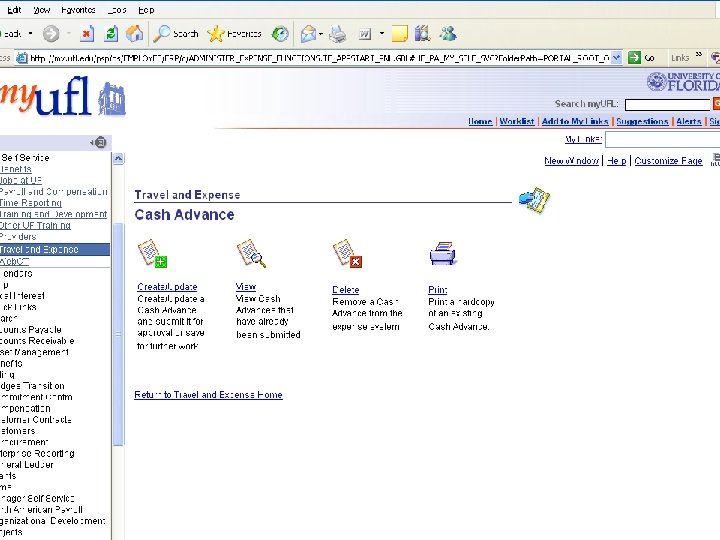
Travel and Expense Home
Submitting a Cash Advance p p Add a New Value. The employee ID populates on the Travel. ONLY the Traveler can request a cash advance. Type in the Travel Authorization ID Number and click add. Click on the correct Travel Authorization number and add a Cash Advance for that Travel Authorization. n The General Information from the Travel Authorization is populated. n Source – System Check or EFT n Enter in expected date of return. p Settlement of Cash Advance must be made within 10 workdays of date of return. Email notification will be sent to the Traveler after 10 days.
Submitting a Cash Advance p p p p The total amount of the Travel Authorization is imported. Modify the amount to reflect the amount requested for this Cash Advance. A traveler may request up to 100% of the Personal Funds expenditures. Ignore Import ATM Advances. This functionality is not used by UF. ’= Submit for approval. Once submitted, Cash Advance Total will update based on amount you have entered. There is a wage Garnishment Authorization. If a Cash Advance is not settled within 30 workdays of the date of return, a traveler authorizes UF to recover funds through payroll deduction. Resorting to payroll deduction disqualifies a traveler from any future Cash Advances.
Training Classes and Web Tutorials p There are training classes and web tutorials on this website for further information: http: //www. bridges. ufl. edu/travel/ p Also, you may call the Travel Department at 352 -392 -1245 if you have any questions.