Tools For Detection of Microscopic Objects Dissecting Microscope

Tools For Detection of Microscopic Objects Dissecting Microscope ¡ Compound Microscope ¡ Electron Microscope ¡

Dissecting Microscope ¡ Enlarges the image - Low magnification ¡ Has 2 optical lenses and 2 objective lenses ¡ Useful in performing dissections

Compound Microscope ¡ ¡ Used to observe small objects on a slide Specimen must be thin enough to let light pass through Has 1 optical lens and 2 or 3 objective lenses When looking through microscope the image will appear: l l l Enlarged Reversed Flipped upside down

Care and Handling of the Compound Microscope There are only a few ABSOLUTE rules to observe in caring for the microscopes you will use. Taken care of these instruments will last many decades and continue to work well. Please report any malfunctions immediately. 1. ALWAYS use two hands to carry the scope - one on the arm and one under the base - NO EXCEPTIONS! NEVER carry the scope upside down, for the ocular can and will fall out.

2. Always use the proper focusing technique to avoid ramming the objective lens into a slide - this can break the objective lens and/or ruin an expensive slide. *Do not use course adjustment knob when using high power objective lens!**

3. When finished using the microscope… …Always turn off the light and move objective lens back to low power

Lets get a microscope!!

Viewing an object under the microscope 1. Plug in microscope and switch light on 2. Switch to the lowest power objective lens 3. Adjust the coarse focus to raise the nose piece 4. Place slide on stage. Secure with stage clips if desired. 5. Look at the slide and place it so the specimen is over the light aperture in the stage.
. 6. Look through eyepiece")
5. Lower objective lens to lower limit (close to slide). 6. Look through eyepiece and slowly raise the lens using the coarse focus knob until you see the image come into focus 7. Adjust fine focus similarly. 8. Center the image and adjust the light using the diaphragm.

9. Now switch objectives to a higher power. 10. Readjust fine focus and light (diaphragm) as needed. **Do NOT use coarse adjustment in high power. **

Other types of Microscopes TRANSMISSION ELECTRON MICROSCOPE SCANNING ELECTRON MICROSCOPE

Electron Microscope ¡ Used to observe very tiny objects ¡ Can produce magnifications up to 500, 000 X ¡ Use a narrow beam of electrons instead of light ¡ Specimens must be embedded in plastic and cut into thin slices ¡ ¡ ONE DISADVANTAGE IS THAT SAMPLES MUST BE VIEWED IN A VACUUM – SO NO LIVING SAMPLES CAN BE STUDIED! Can see inside cells

TEM Examples
 – take pictures of surface of specimen")
• Scanning electron microscope (SEM) – take pictures of surface of specimen

E. COLI BACTERIA HEAD OF A SMALL BLACK ANT POLLEN

SEM Examples

Techniques Used in Biology

Preparing a Wet-mount slide ¡ ¡ Place a clean slide on the lab table. Handle slides at the ends, not the center, to avoid getting fingerprints in the viewing area of the slide. Add specimen to the slide. l For liquid samples, place one small drop in the center of the slide. l For solid samples, place the sample in the center of the slide and add one drop of water.

¡ Hold the coverslip by the edges to avoid fingerprints. ¡ Lower coverslip on specimen from a 45˚ angle. ¡ This helps to avoids air bubbles. ¡ Never view a slide without a coverslip. The coverslip protects the objective lens from the liquid on the slide.

Field of View the area that is visible when you look through the microscope ¡ When you increase the magnification, the FOV decreases ¡ ¡ http: //virtualurchin. stanford. edu/microscope. htm

Estimating the size of an object under the microscope Diameter of the FOV Estimated size = Number of objects that fit across

¡ Diameter = 1. 5 mm = 1500 µm = 750 µm 2 To convert from mm to µm multiply by 1000 (or move the decimal 3 times to the right)

Stains are chemicals that dye parts of cells (nuclei, cytoplasm, cell membranes and cell walls) for viewing under the microscope Natural cheek cells Stained cheek cells

¡ ¡ Microbial cytoplasm is usually transparent so it is difficult to view cells using the microscope Observations may be improved by using a biological stain. Natural cheek cells Stained cheek cells

1. Lugol's Iodine Solution ¡ Commonly used to stain plant cells – turns dark in the presence of starch and cell walls contain a lot of starch

2. Methylene blue • Commonly used to stain dead animal cells

Staining technique 1. 2. 3. 4. Prepare a wet mount slide. Add one drop of stain on one side of cover slip. Gently touch a paper towel to the other side of the coverslip. The paper towel will draw the water and the stain out from under the coverslip. Technique for Adding a Stain when making a Wet Mount

Start here

Other Tools in Biology

Centrifuge ¡ Instrument used to separate solutions according to density

¡ ¡ Least dense material collects on top Most dense parts settle to the bottom
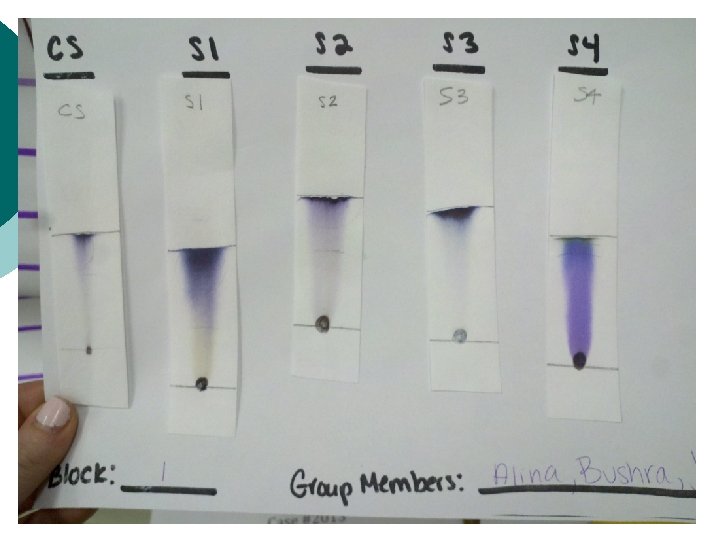
 or paper chromatography ¡ Procedure used to separate pigments")
Chromatography Thin Layer Chromatography (TLC) or paper chromatography ¡ Procedure used to separate pigments based on density

Least dense pigments are drawn farther up the paper More dense pigments remain towards the bottom of the paper

Uses of TLC ¡ ¡ Used to identify unknown solutions The Rf value of a particular compound will always be the same

")
Tools For Detection of Substances ¡ Indicators show a reaction (usually a color change) to signify the presence of a substance l Many indicators are used to test p. H level ¡

p. H ¡ ¡ Scale used to determine if a substance is an acid or a base Ranges from 0 to 14 l l l 7 is neutral Less than 7 is an acid Greater than 7 is a base

Testing p. H ¡ Litmus paper - contains a substance that detects the presence of acids or bases

Two types: 1. Red litmus if it turns blue l It’s Base! 2. Blue litmus – if it turns red l It’s Acid!

Other indicators Indicator Original Color of Positive Reaction

Other indicators Indicator Lugol’s Iodine Original Color of Positive Reaction

Other indicators Indicator Lugol’s Iodine Original Color Brown Color of Positive Reaction

Other indicators Indicator Lugol’s Iodine Original Color Brown Color of Positive Reaction Dark blue / Black in presence of starch

Other indicators Indicator Lugol’s Iodine Bromthymol Blue Original Color Brown Color of Positive Reaction Dark blue / Black in presence of starch

Other indicators Indicator Original Color Lugol’s Iodine Brown Bromthymol Blue Color of Positive Reaction Dark blue / Black in presence of starch

Other indicators Indicator Original Color of Positive Reaction Lugol’s Iodine Brown Dark blue / Black in presence of starch Bromthymol Blue Yellow in presence of acid (also tests for CO 2)

Other indicators Indicator Original Color of Positive Reaction Lugol’s Iodine Brown Dark blue / Black in presence of starch Bromthymol Blue Yellow in presence of acid (also tests for CO 2) Benedict’s Solution

Other indicators Indicator Original Color of Positive Reaction Lugol’s Iodine Brown Dark blue / Black in presence of starch Bromthymol Blue Yellow in presence of acid (also tests for CO 2) Benedict’s Solution **Must heat**

Other indicators Indicator Original Color of Positive Reaction Lugol’s Iodine Brown Dark blue / Black in presence of starch Bromthymol Blue Yellow in presence of acid (also tests for CO 2) Benedict’s Solution Blue **Must heat**

Other indicators Indicator Original Color of Positive Reaction Lugol’s Iodine Brown Dark blue / Black in presence of starch Bromthymol Blue Yellow in presence of acid (also tests for CO 2) Benedict’s Solution Blue **Must heat** Orange in presence of sugar

Other indicators Indicator Original Color of Positive Reaction Lugol’s Iodine Brown Dark blue / Black in presence of starch Bromthymol Blue Yellow in presence of acid (also tests for CO 2) Benedict’s Solution Blue **Must heat** Phenol Red Orange in presence of sugar

Other indicators Indicator Original Color of Positive Reaction Lugol’s Iodine Brown Dark blue / Black in presence of starch Bromthymol Blue Yellow in presence of acid (also tests for CO 2) Benedict’s Solution Blue **Must heat** Phenol Red Orange in presence of sugar

Other indicators Indicator Original Color of Positive Reaction Lugol’s Iodine Brown Dark blue / Black in presence of starch Bromthymol Blue Yellow in presence of acid (also tests for CO 2) Benedict’s Solution **Must heat** Blue Orange in presence of sugar Phenol Red Yellow in presence of acid Magenta in the presence of base

Other indicators Indicator Original Color of Positive Reaction Lugol’s Iodine Brown Dark blue / Black in presence of starch Bromthymol Blue Yellow in presence of acid (also tests for CO 2) Benedict’s Solution Blue **Must heat** Phenol Red Phenolpthalein Red Orange in presence of sugar Yellow in presence of acid

Other indicators Indicator Original Color of Positive Reaction Lugol’s Iodine Brown Dark blue / Black in presence of starch Bromthymol Blue Yellow in presence of acid (also tests for CO 2) Benedict’s Solution Blue **Must heat** Phenol Red Phenolpthalein Colorless Orange in presence of sugar Yellow in presence of acid

Other indicators Indicator Original Color of Positive Reaction Lugol’s Iodine Brown Dark blue / Black in presence of starch Bromthymol Blue Yellow in presence of acid (also tests for CO 2) Benedict’s Solution Blue **Must heat** Orange in presence of sugar Phenol Red Yellow in presence of acid Phenolpthalein Colorless Pink in presence of base

Benedict’s Solution Bromthymol Lugol’s Iodine Blue
- Slides: 59