The Northwest Microscope The Ocular Lens The Ocular


 objective lens")
 objective lens")
 objective lens")

- Slides: 49
The Northwest Microscope
The Ocular Lens
The Ocular Lens Ocular Magnification = ___ X
The Ocular Lens Ocular Magnification = 10 X
The Low Power Objective Lens Magnification =4 x
Ocular magnification x Objective magnification = Total Magnification Eg. For the low power objective: 4 Ocular magnification x Objective magnification Total Magnification = 10 x 4 =
Ocular magnification x Objective magnification = Total Magnification Eg. For the low power objective: 4 Ocular magnification x Objective magnification Total Magnification = 10 x 4 = 40 x
The Medium Power Objective Lens
The Medium Power Objective Lens Objective Magnification = 10 x
Total Magnification = Ocular magnification x Objective magnification 10 x 10 = 100 x
The High Power Objective Lens Magnification = 40 x
The High Power Objective Lens Magnification = 40 x Total Magnification = 10 x 40 = 400 x
The Light Switch
Course Focus Adjustment Knob
Course Focus Adjustment Knob Fine Focus Adjustment Knob
The Stage
The Stage Clips
The Stage The Center of the Stage The Stage Clips
The Light Control Disk
The S tage The Light Control Disk -the larger the hole below the object, the more light gets through to the object.
The Boreal Microscope
The AC Adaptor Plug into outlet
This end plugs in HERE
The ON/OFF Switch for the Light
The Ocular Lens Magnification = 10 x
Low Power Objective Lens Magnification = 4 x
Medium Power Objective Lens Magnification = 10 x
High Power Objective Lens Magnification = 40 x
Light
e g a t S Light Control Diaphragm Light
Course Focus Adjustment Knob
Course Focus Adjustment Knob Fine Focus Adjustment Knob
Stage
Stage Clips Stage
4 When you put the microscope away, the LOW power objective lens should be right on top of the center of the stage !!!!!!
4 When you put the microscope away, the LOW power objective lens should be right on top of the center of the stage !!!!!!
This is the Cover !
Put the cover the microscope before you leave!!
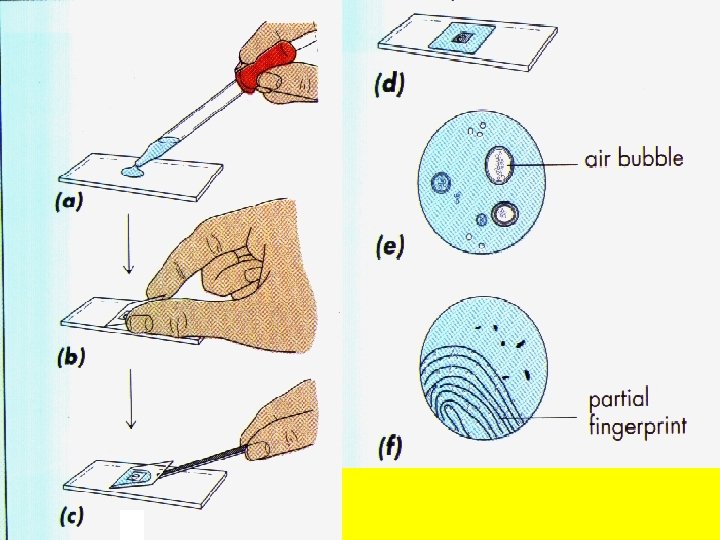
Steps in Viewing a Prepared Slide
Steps in Viewing a Prepared Slide 1. Click LOW power objective on top of the center of the stage.
Steps in Viewing a Prepared Slide 1. Click LOW power objective on top of the center of the stage. 2. Clip Slide under clips
Steps in Viewing a Prepared Slide 1. Click LOW power objective on top of the center of the stage. 2. Clip Slide under clips 3. 3. Align so object being viewed is right in the very center.
Steps in Viewing a Prepared Slide 1. Click LOW power objective on top of the center of the stage. 2. Clip Slide under clips 3. 3. Align so object being viewed is right in the very center. 4. 4. Adjust focus with course and then fine adjustment. Make sure the object is in the very center before you switch to a higher magnification.
Steps in Viewing a Prepared Slide 6. Click Medium (10 x ) objective lens Into place above the slide.
Steps in Viewing a Prepared Slide 6. Click Medium (10 x ) objective lens Into place above the slide. 7. Focus with fine adjustment knob. (You may have to move the slide a bit to keep the object in the center)
Steps in Viewing a Prepared Slide 6. Click Medium (10 x ) objective lens Into place above the slide. 7. Focus with fine adjustment knob. (You may have to move the slide a bit to keep the object in the center) 8. If you require, switch to HIGH power objective. Do NOT use the course adjustment knob!!! MAKE SURE THE LENS DOES NOT TOUCH THE SLIDE !!!!