The Microscope The Unseen World The Penny The


 Three shapes of bacteria")
 • Examines cork. • First to use the term")

 Neck – Supports the eyepiece. Objectives –")


 1931 Image is seen on a computer screen • •")

 – 1935 1. Gives a 3 D image Hookworm mouth!!!!!!")


- Slides: 26
The Microscope The Unseen World
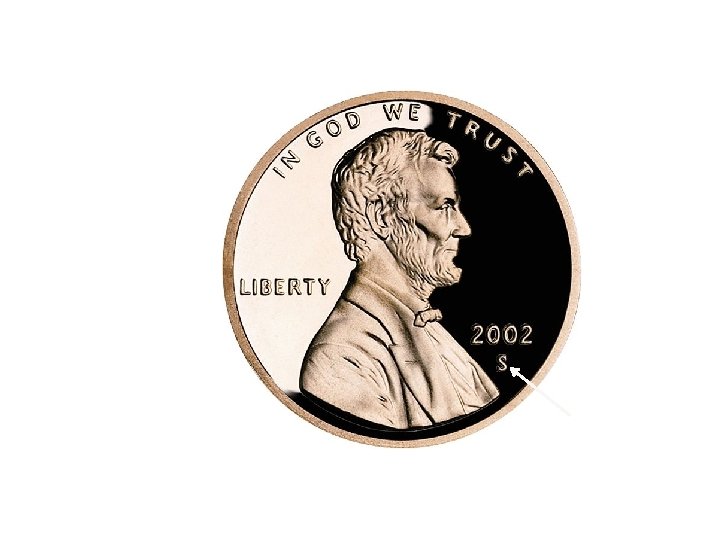
The Penny
The Penny VDB Victor D. Brenner
Frank Gasparro
The Microscope!! Is an instrument which provides an enlarged image of an object.
History • Anton Von Leeuwenhoek 1632 • First to observe living bacteria & drew them. • Also looked at sperm & blood
Ash Tree cross- section The Universality of Sex (sperm) Three shapes of bacteria
• Robert Hooke (1665) • Examines cork. • First to use the term “cell” cell referring to the many little boxes in cork.
Light Microscopes The type we use in our labs • Most commonly used microscope – – Uses light and lenses to magnify & view the specimen Has two sets of lenses – Ocular (eye piece) & Objective (near the object being viewed) Total magnification on our scopes = 40 – 1000 times Total magnification = Ocular (10 X) x Objective (40 X • Low: 4 x 10 = 40 • Med: 10 x 10 = 100 • High: 40 x 10 = 400
Ocular – Eye piece (magnifies 10 X) Neck – Supports the eyepiece. Objectives – 4 – 100 x magnification Arm – Supports neck and objectives. Carry by this Stage and clips – Holds slides in place Adjustments – Coarse & Fine. Focuses image Diaphragm – Controls the amount of light coming through the stage Light – Electric light source Base – Bottom of scope. One hand goes underneath
The Diaphragm • Use the Diaphragm to adjust the amount of light
Focusing Use the Adjustment knobs to focus the image • Coarse adjustment brings the image into near focus • Fine adjustment (smaller knob) brings it into fine focus. – Only use this one when on you are on high power
Rules for using the Microscope 1. 2. 3. 4. 5. 6. 7. 8. Use only the assigned microscope Carry & place the scope properly (6 cm from edge of table) Do not let the cords dangle or get into the sinks Clean lens only with lens paper. NO FINGERS! Start on low (4 x) power when you start your observations Always focus (move the stage) away from the slide Use the coarse adjustment first then the fine adjustment Be careful when switching to high (40 x) power to se that there is enough clearance between the objective and the slide 9. Do not use the coarse adjustment knob on high (40 x) power 10. When you are done with the scope, turn off the light switch 11. Return the low power objective (4 X) into place and raise the stage all the way up. 12. Always put scope away with cord wrapped around it, cover on & the low power objective in place 13. Put scopes away with the numbers facing out into the proper slot 14. Clean and dry all slides and cover slips before putting them away
Compound Microscope images Diatom Amoeba Paramecium Hydra budding Euglena Daphnia
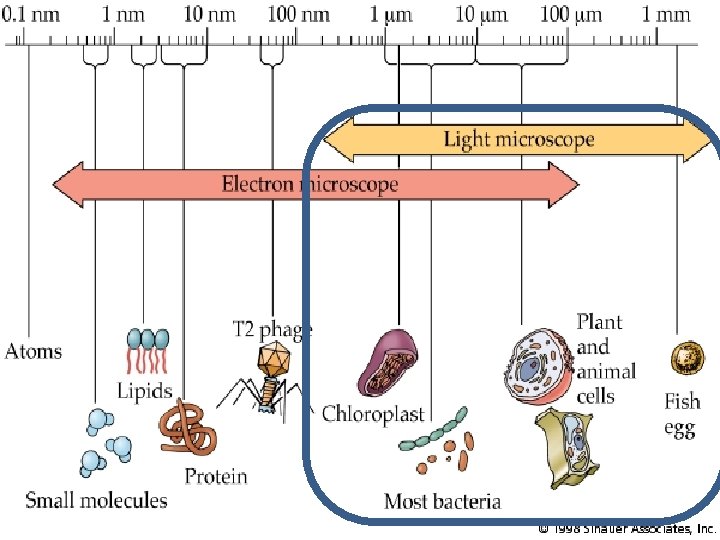
Electron Microscopes Uses electromagnets and streams of electrons to view a specimen 200, 000 – 1, 000 x magnification Animal cell Plant cell
Transmission Electron Microscope (TEM) 1931 Image is seen on a computer screen • • • Specimen must be thinly sliced and coated with metal. Gives a 2 D image of specimen Specimen must be dead
Herpes simplex viruses Staphylococcus aureus These have all had color added to them!!! E. coli bacteria
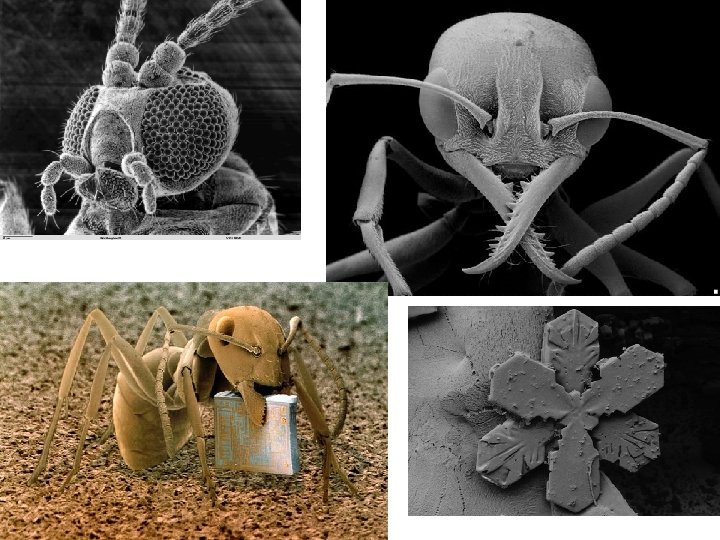
Scanning Electron Microscope (SEM) – 1935 1. Gives a 3 D image Hookworm mouth!!!!!!
Images Weevil Tick Diatom Radiolarian
Threads 100 x
The Letter “e” 40 x 400 x
Making a Wet Mount Slide • 1. Get a thin slice/piece of whatever your specimen is. • 2. Place ONE drop of water directly over the specimen. • 3. Place the coverslip at a 45 degree angle (approximately), with one edge touching the water drop, and let go.
Beware of Air Bubbles!!