The Internet Radio Linking Project IRLP System World

 146. 480 with 100 tone. Located at")


, running")

- Slides: 24
The Internet Radio Linking Project
IRLP System: Ø Ø (World Wide Communications) 146. 480 with 100 tone. Located at the home of KE 7 LVH, Bennington, Idaho 147. 500 with 100 tone. Located at the home of K 7 OGM, Fish Haven, Idaho.
What the is I. R. L. P. ? IRLP stands for Internet Radio Linking Project, and was the brainchild of Dave Cameron VE 7 LTD of Vancouver BC. Dave wanted to connect together two distant amateur radio stations, using the internet as a conduit. Now you can sit on couch with a handheld and have a conversation with someone in South Africa!!
IRLP allows the linking of two or more radios together using Voice over IP technology (Vo. IP) where the analog radio audio is converted to digital IP packets and sent over the internet. At the receiving end it is converted back to analog audio.
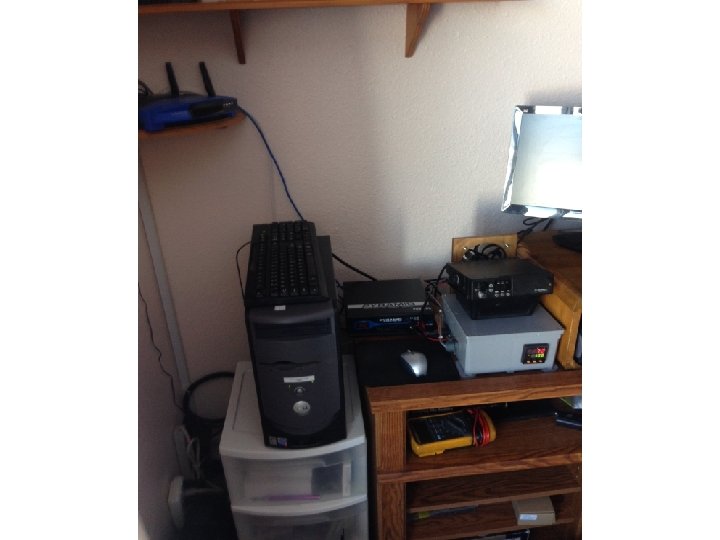
What is a IRLP station composed of? ? The IRLP mode requires… 1. A full time high speed Internet connection 2. A dedicated computer running Linux 3. Some custom hardware/software inside the computer 4. A dedicated radio Each station on the IRLP network is called a NODE and assigned a number. Mine is 7345. Eldon’s is 3188 It’s kind of like a telephone number. The central main server in British Columbia, Canada keeps track of the nodes, and the functionality of the entire system. You just punch in the node number of where you want to go and just like magic…. Your voice comes out there!
Modes of Operation There are two modes of IRLP operation: 1. Point to point (somewhat private) From your point (Bear Lake) to a specific place of your choosing, such as Sydney, Australia. 2. Reflector Mode (completely open to the world to listen) Multiple Audio Streams. Much like a party line – everyone hears everyone else!
Point to Point Mode Simplex Crescent City 8260 IRLP Server Sydney 6366 Simplex
http: //status. irlp. net/
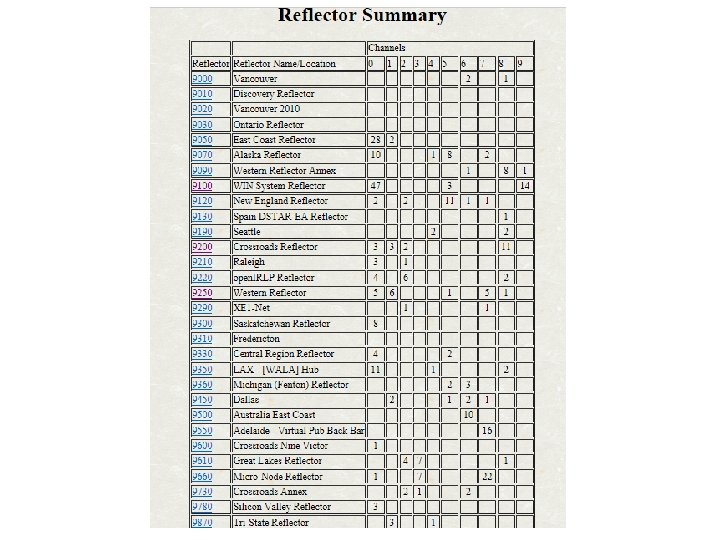
Reflector Mode United RPTR Kingdom Australia North RPTR Carolina Texas RPTR Hawaii Canada RPTR IRLP Reflector RPTR Win System Reflector 9100 California RPTR
How do I operate this mode? • Tune your radio to 146. 480 (147. 500 Eldon) simplex with a 100 Hz tone. • Look up on the internet at status. irlp. net and find what city, place or Reflector you want to make contact. • Key your microphone and hit the 4 digit code, then let go of the key • If you are close enough to my node, you will hear the distant station identify to you! NOW WAIT until the squelch tail drops. • Now, key your microphone, waiting two seconds, then announce that you are listening and what is your location. “Hello, this is KE 7 LVH in Bennington, Idaho monitoring. ” • Have a delightful conversation. When complete, wait until the squelch tail drops, key your microphone then hit the numbers 73. That is the code to terminate the link. • Then go try another city!! There are many nodes all over the planet. GO PLAY!! • If you have an questions, call me!
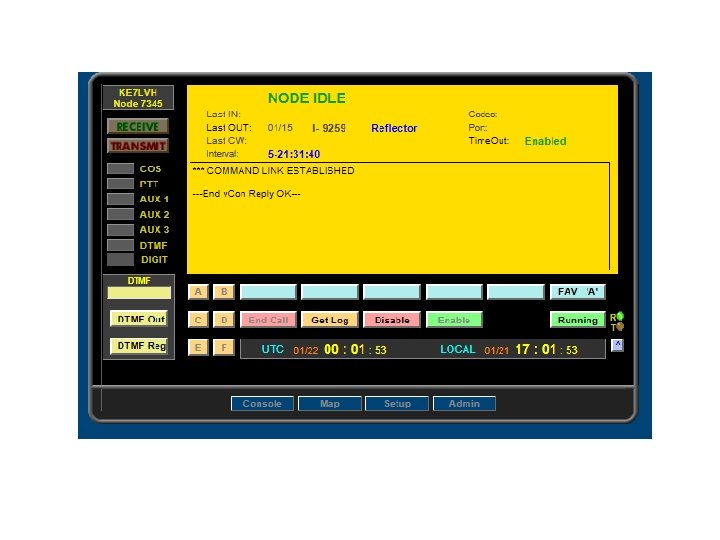
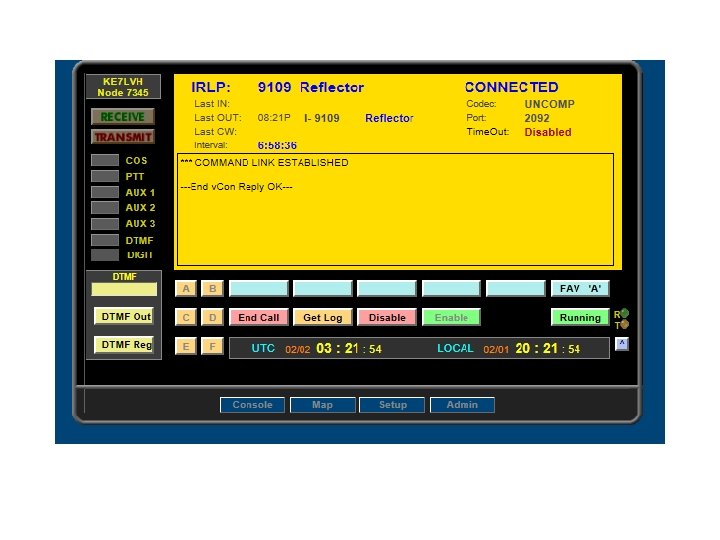
Another option to connect to my node? • Tune your radio to 146. 480 simplex with a 100 Hz tone. • On a computer or smart device (cell phone, Ipad, etc. ) go to this web address. http: //stn 7345. ip. irlp. net/irlpvcon/ • This will connect to my node (if the node does not show then the node is not connected). • If the Node is connected already it is in use or just connected monitoring or is not connected to any node or reflector but idle. • If connected and you do not want to use the Node or Reflector use DTMF 73 to disconnect as explain in next steps. • In the DTMF input block type the number of the Node or Reflector your wish to connect to and click on DTMF Out (Wait for the Node or Reflector ID to complete). • Try to make a contact or just listen to who is using the system already. • After completed type 73 in the DTMF input block and click on DTMF Out.
Using IRLP - Making a Call Before activating the IRLP, monitor the repeater for activity. 1. Identify yourself appropriately on the local node (for example: KE 7 LVH accessing IRLP) and then enter the node number you wish to connect to with your DTMF keypad on your transmitter (for example: to connect with node number 9250 in Las Vega, NV, you would key your radio then press 9250, then unkey). 2. You will receive a few seconds of dead-air – do not be concerned, this is normal. When the connection is confirmed the voice ID of the destination node will be transmitted back to you. 3. Once connected wait at least 15 seconds before transmitting. It is very possible that you may connect in the middle of another conversation already in progress. 4. Identify your presence on the repeater and attempt to make your contact. Or you may say “This is (your callsign) calling CQ, is anyone available for a contact”.
Using IRLP - Completing the Call 5. When finished talking or if there is no response to your call, key up, identify yourself appropriately (for example: KE 7 LVH disconnecting from IRLP) and enter 73 on your DTMF keypad to drop the link. If your signal is too noisy or weak to turn off the node that you called; request that the called node terminate the session; or, ask someone on the local repeater to terminate the call. If all else fails, the call will timeout if there is no activity for approximately 20 minutes. Remember to always wait for about 2 -3 seconds after keying up your transmitter to begin talking when using IRLP. There is a delay and the first part of your transmission will be cutoff otherwise.
Always be a courteous and good operator! *Pause between transmissions, listen for others * When on a reflector, initially wait 15 seconds before you transmit * Hold your PTT for about 2 seconds before talking to allow all nodes time to rise * No local rag-chews when on a reflector * Do not kerchunk an IRLP node. They don’t respond like a repeater. Plus, if you are connected to another site, kerchunking causes all other nodes to key up and down * Also, make sure your signal is solid into the node
REFLECTORS… Anything you do on an IRLP reflector can be heard around the world. Listen first, observing how others operate, then give it a try!
Listen to Nets on Reflectors! • • • • Insomniac Net Worldwide Friendship Alaska Morning Australian Truck Drivers Swedish Red Cross Kids Guam International Slow Scan TV Say Good Morning Civil Air Search and Rescue University VK Young Amateurs 220 MHz Rag Chewers Space and Information • • • • Round the World QSO Thursday Swap Bob’s Bodacious BBQ WIN System Tech Radio Satellite Great Lakes Marine Mobile WK 1 RK Kids Society of Engineers QSO Party YL IRLP/Echolink Ham Shopping Club Weather Radio Listeners Newsletter VHF-DX Group IRLP Fun Tailgaters VHF/UHF Swap
Setting up your own Node. Cost $124. 99
COMPUTER • A dedicated IBM compatible computer, Pentium II class (Intel, AMD etc), running a processor clocked at at least 300 MHz • At least 128 MB of RAM • A dedicated hard drive of at least 2 GB • Basic (legacy) parallel port running LPT 1 (or HEX 0 x 378/9 for the techies) • Soundcard - most PCI cards work as do many motherboard based Chipsets. ISA sound cards are no longer supported by the latest versions of the Cent. OS Linux Operating System. • Ethernet Adapter (Network Card) connected to the Internet • Dedicated Radio of your choice. • Connecting cable specific to radio choice.
Thank you! Any Questions? Now let’s try a demonstration!!