Technicians List Class Practical 1 Investigating Electromagnets Per


 Task 1: Investigate")


 • List the material/ equipment needed for the two investigations")


 • Task 2: Record the results in a table. •")
 Number of paperclips picked up")


 Copy the diagram of an electric bell and explain how")
 A battery or direct current supply is connected to the")


- Slides: 38
Technician’s List Class Practical 1. Investigating Electromagnets. Per group: - Large Iron Nail, Insulated copper wire, power pack, 6 x cells with 1. 5 v output (please check output before hand), rheostat, pencil, wires, crocodile clips, ammeters. Graph paper Demos 1. Wire, Crocodile Clips, Power pack, commercial compass.
ELECTROMAGNETS
Date Electromagnets Lesson Outcomes How I did Targets Connector: (Level 4) Task 1: Investigate the factors which effect the strength of an electromagnet Level 5 What is an electromagnet? Task 2: Interpret the data to draw conclusions. Level 6 Suggest how you can make it. Task 3: Explain some uses of electromagnets. Level 7
BIG picture • What skills will you be developing this lesson? • • Literacy Team work Self management Creative thinking Independent enquiry Participation Reflection • How is this lesson relevant to every day life? (WRL/CIT) • Uses of electromagnet, understand how the door bell works.
Demonstration • Pass current through a wire held next to a commercial compass. – What happens to the needle? – What does this mean? – Discuss with the person next to you for 2 minutes. • Now turn the wire into a few turns. Pass some current through it. What happens to the needle?
Demonstration • Make a crude electromagnet using copper wire wrapped around a pencil. Ask students to explain why this has become magnetic.
Making an electromagnet When electricity is passed through a coil of wire, the coil has a magnetic field around it. This is called an electromagnet. If the coil of wire is wrapped around a piece of iron, such as an iron nail, the magnetic field gets stronger.
Investigating electromagnets 8 J Electromagnets
Include an iron core 8 J Electromagnets
Change the number of turns 8 J Electromagnets
Change the current move the slider to change the current 8 J Electromagnets
New Information for Task 1 Electromagnets The strength of an electromagnet can be increased by doing three things: 1) Increasing the voltage or current 2) Increasing the number of coils 3) Inserting an iron core
Investigating an electromagnet An iron core at the centre of a coil of wire, increases the strength of an electromagnet. Investigate the other factors that can affect the strength of an electromagnet: 1. Investigate how the number of coils affects the number of paper clips attracted to an electromagnet. 2. Investigate how the size of the voltage affects the number of paper clips attracted to an electromagnet.
Task 1 (Level 5) • List the material/ equipment needed for the two investigations • Explain how you are going to carry out the investigations. • You must clearly write the aim of your investigation. Keywords for Task 1: • core • Electric current • Coil • Ammeter • Current • Also write • What are the IV, DV and controlled variables in both the investigations. • Number of turns • vary
Task 1: Answers Aim: to test the effects that increasing the number of coils and the voltage will have on the strength of an electromagnet Equipment needed: . Low voltage DC power supply • paper clips • insulated copper wire • crocodile clips attached to wires • connecting wires x 2 • iron rod (nail) • IV; number of coils or voltage • DV strength of magnet measured by how many paperclips you can pick up • CV. Power supply, type of wire, ammeter
Task 1: Review Go back to your lesson outcome grid and fill out the ‘How I did’ and the ‘Targets’ column. Lesson Outcomes Task 1: Level 5 How I did Met? Partly met? Not met? Targets How can I improve on task 1?
Wind the insulated copper wire around the nail until you have 20 turns , and then connect it between the crocodile clips. Set up the equpiment as demonstated • Increasing the Voltage 1 With the iron core still inside the coil, adjust the power supply to 2 V and note how many clips can be picked up. 2 Increase the current to 3 or 4 V and record the number of paper clips it picks up. 3 Continue to increase the voltage by 1 or 2 V each time until you reach 6. Record each of your results and then turn off the power supply. • Increasing the number of turns 1 Set the current to 2 V and see how many paper clips you can pick up. 2 Increase the number of turns to 30 and repeat number 1. 3 Continue to increase the number of turns from 30 to 40 then 50. Record your results each time.
Task 2 (Level 6) • Task 2: Record the results in a table. • Plot the graphs for both the experiments. • From the graphs , write down the conclusion • Extension : • Suggest ways to improve your investigation. Keywords for Task 2: • increases • Decreases • Stronger • Electromagnet • Number of turns
Results Voltage (volts) Number of paperclips picked up
Results Number of coils Number of paperclips picked up
Investigating an electromagnet – results 1 0 12 23 38 49 60 Remember – keep the number of coils the same throughout this experiment!
Investigating an electromagnet – results 2 0 8 18 31 46 Remember – keep the current the same throughout this experiment!
Task 2: Answers • Result 1 • As the current is increased the electromagnet becomes stronger. • Result 2 • If the number of coils is increased the electromagnet becomes stronger.
Investigating an electromagnet – graph 1
Investigating an electromagnet – graph 2
Task 2: Review Go back to your lesson outcome grid and fill out the ‘How I did’ and the ‘Targets’ column. Lesson Outcomes Task 2: Level 6 How I did Met? Partly met? Not met? Targets How can I improve on task 2?
New Information for Task 3 Using electromagnets – scrap yards A large electromagnet is used in a scrap yard to pick up and move heavy pieces of scrap metal. What metals would the electromagnet attract? What advantages does an electromagnet have over a permanent magnet?
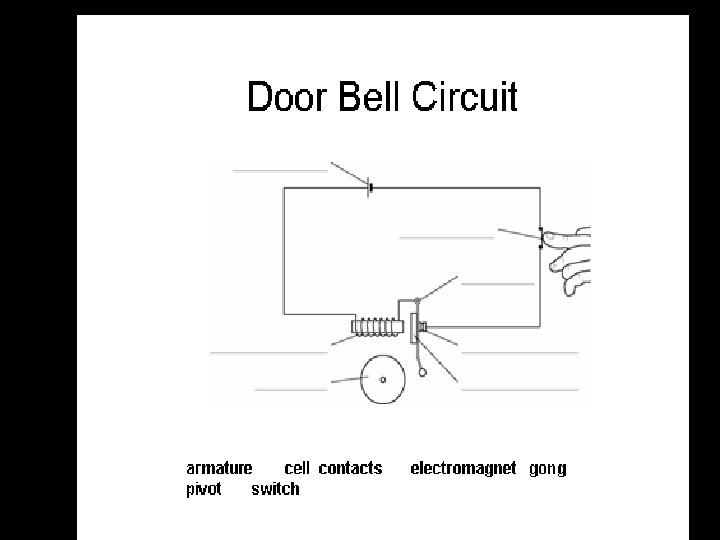
Task 3: (Level 7) Copy the diagram of an electric bell and explain how it works. Keywords for Task 3: • switch • Current • Passes • Magnet • Electromagnet • Attracts • Hammer • Task 3: Extension • gong
Task 3: (Level 7) A battery or direct current supply is connected to the terminals. When the switch is closed i. e. the door bell push switch is pushed, a ______ flows through the electromagnet which becomes ____ and attracts the metal bar, the armature, pulling it towards the electromagnet. The striker hits the bell. This causes a _____ in the circuit and the _____ stops flowing. The electromagnet is no longer ______ and the spring metal strip pulls the armature back. Contact is made, a current ____ and this process is repeated.
Task 3: Answers
Task 3: Review Go back to your lesson outcome grid and fill out the ‘How I did’ and the ‘Targets’ column. Lesson Outcomes Task 3: Level 7 How I did Met? Partly met? Not met? Targets How can I improve on task 3?
Using electromagnets – relay Lifts, cars and other large electrical machines use high currents. A relay, which includes an electromagnet, is used to allow a small current in one circuit to control a large current in another circuit.
Examples of electromagnets 1. Speaker 2. Relay switch
Uses of electromagnets 2 An electric bell
Homework • Homework task: Draw the diagram of a relay , explain its functioning. • Due date: • Criteria for level 5: • Criteria for level 6: • Criteria for level 7:
Multiple-choice Review of lesson quiz
What Have I Learnt? • There are three type of magnets: _____, ____ and _______ • _______, ______ and ____ are magnetic metals. • Like poles ____, unlike poles ______. • Magnetic forces act at a distance because of their _______ lines • Field lines act from ____ to ____. • The most magnetic part of magnets are the _______. • A magnet can be made by ___ a piece of______ or rubbing it with a _____ magnet. • A ___of wire with an _____ flowing through it becomes a magnet. • Putting _____ inside a current-carrying coil increases the ______ of the electromagnet. • Increasing the number of ______ of wire or increasing the ______ also increases the strength of an electromagnet. • Door _______ and _______ use electromagnets. • Electromagnets are useful because…. .