TECH 104 Technical Graphics Communication Week 2 Sketching
- Slides: 33

TECH 104 – Technical Graphics Communication Week 2: Sketching, Text, and Visualization

TECH 104 – Technical Graphics Communication Here’s what we talked about last time: Lines may be defined as……. 1. A series of points in space organized in a rational order 2. 2. The shortest distance between two points 3. 3. The geometry created by the intersection of two planes or surfaces 4. 4. A set of points organized that have length and direction, but no thickness Week 2: Sketching, Text, and Visualization

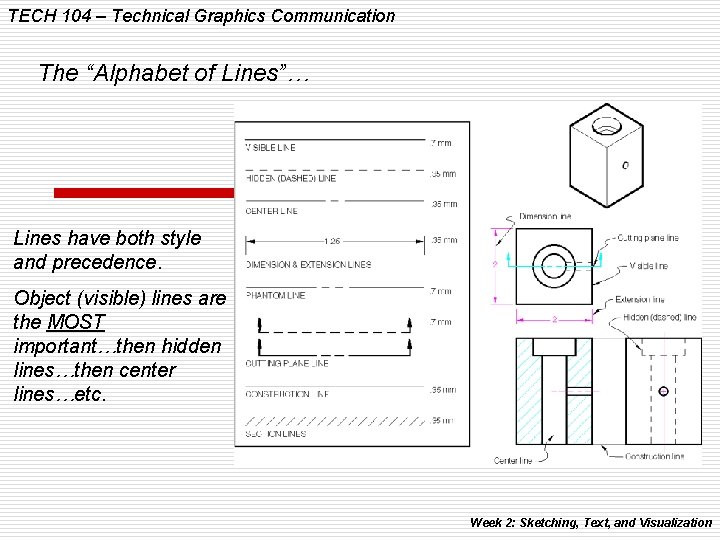
TECH 104 – Technical Graphics Communication The “Alphabet of Lines”… Lines have both style and precedence. Object (visible) lines are the MOST important…then hidden lines…then center lines…etc. Week 2: Sketching, Text, and Visualization

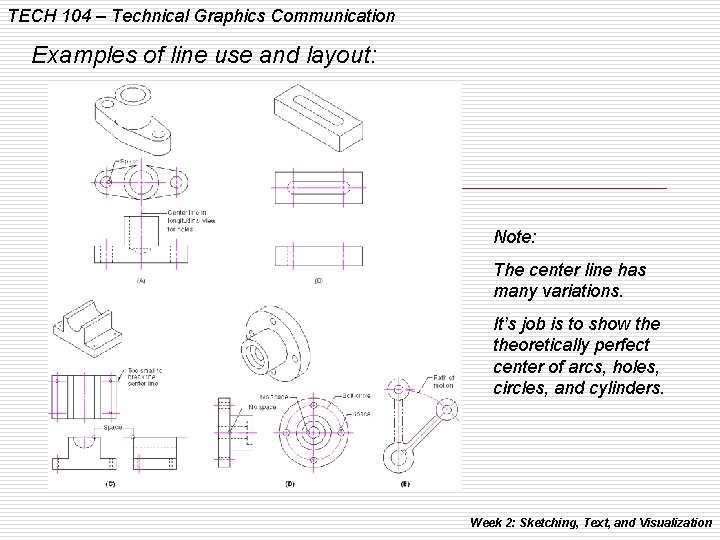
TECH 104 – Technical Graphics Communication Examples of line use and layout: Note: The center line has many variations. It’s job is to show theoretically perfect center of arcs, holes, circles, and cylinders. Week 2: Sketching, Text, and Visualization

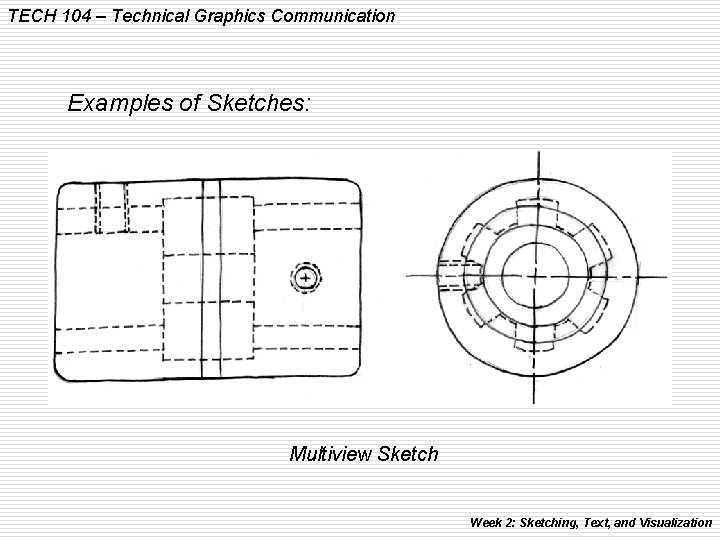
TECH 104 – Technical Graphics Communication Examples of Sketches: Multiview Sketch Week 2: Sketching, Text, and Visualization

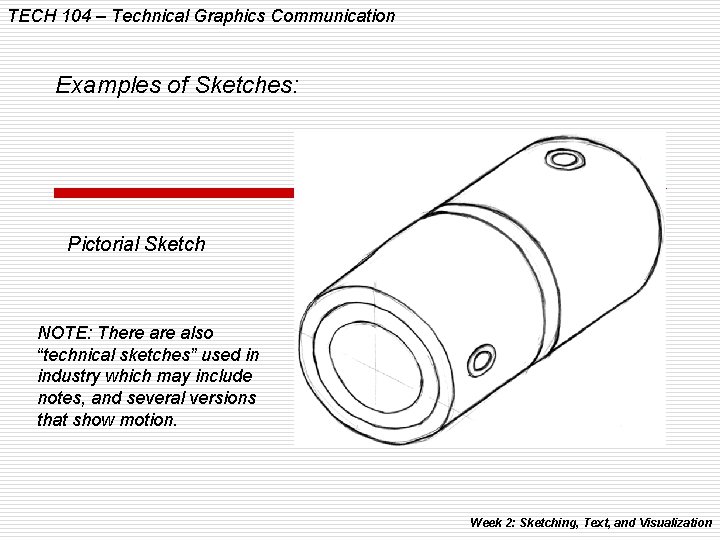
TECH 104 – Technical Graphics Communication Examples of Sketches: Pictorial Sketch NOTE: There also “technical sketches” used in industry which may include notes, and several versions that show motion. Week 2: Sketching, Text, and Visualization

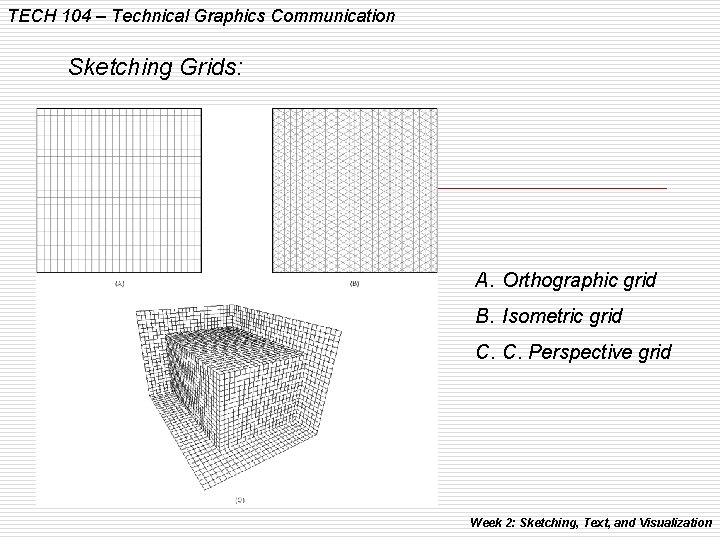
TECH 104 – Technical Graphics Communication Sketching Grids: A. Orthographic grid B. Isometric grid C. C. Perspective grid Week 2: Sketching, Text, and Visualization

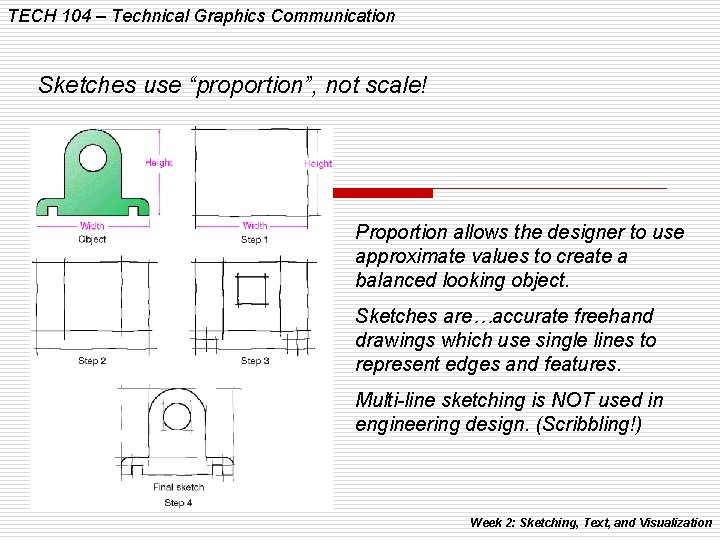
TECH 104 – Technical Graphics Communication Sketches use “proportion”, not scale! Proportion allows the designer to use approximate values to create a balanced looking object. Sketches are…accurate freehand drawings which use single lines to represent edges and features. Multi-line sketching is NOT used in engineering design. (Scribbling!) Week 2: Sketching, Text, and Visualization

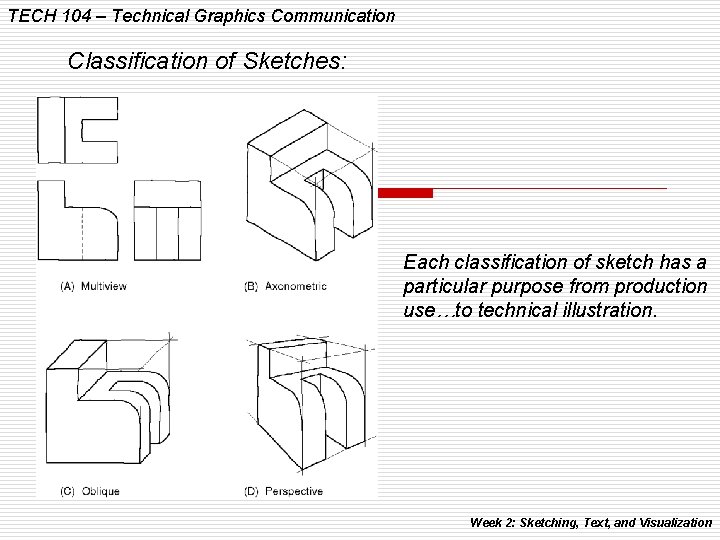
TECH 104 – Technical Graphics Communication Classification of Sketches: Each classification of sketch has a particular purpose from production use…to technical illustration. Week 2: Sketching, Text, and Visualization

TECH 104 – Technical Graphics Communication Question! How do you know when a sketch or CAD drawing is complete? ANSWER: When the production people can make the part without having to ask you any questions! Most drawings not only have views of the object, but also I include written notes and dimensions to aid in its production. Week 2: Sketching, Text, and Visualization

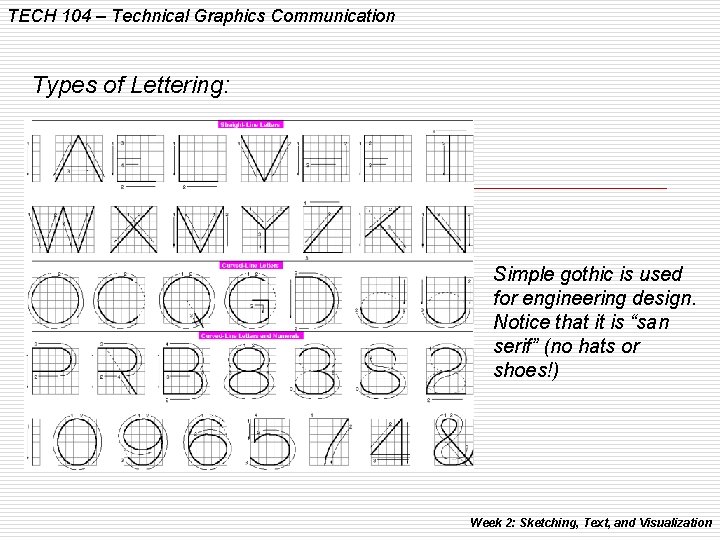
TECH 104 – Technical Graphics Communication Types of Lettering: Simple gothic is used for engineering design. Notice that it is “san serif” (no hats or shoes!) Week 2: Sketching, Text, and Visualization

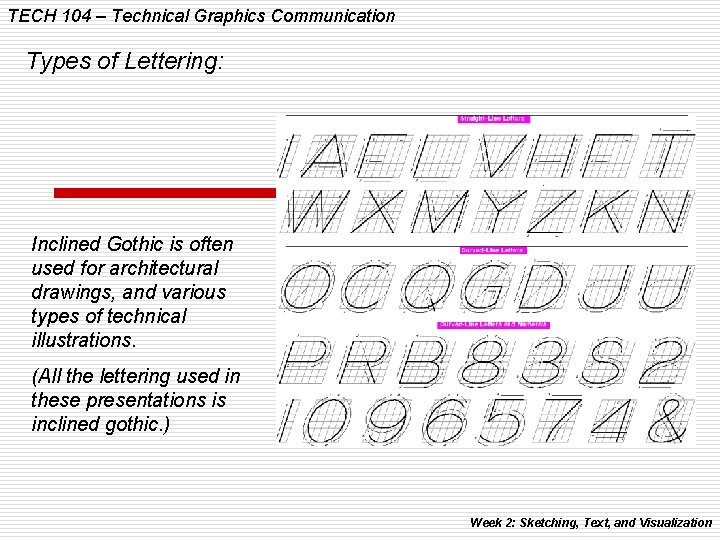
TECH 104 – Technical Graphics Communication Types of Lettering: Inclined Gothic is often used for architectural drawings, and various types of technical illustrations. (All the lettering used in these presentations is inclined gothic. ) Week 2: Sketching, Text, and Visualization

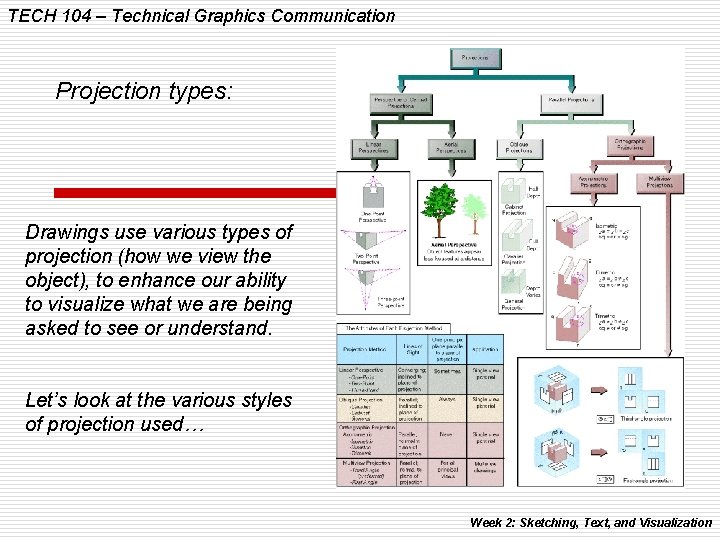
TECH 104 – Technical Graphics Communication Projection types: Drawings use various types of projection (how we view the object), to enhance our ability to visualize what we are being asked to see or understand. Let’s look at the various styles of projection used… Week 2: Sketching, Text, and Visualization

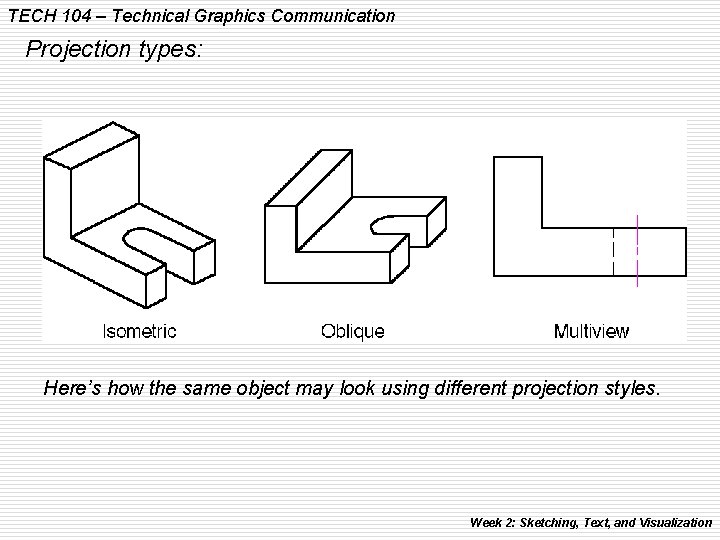
TECH 104 – Technical Graphics Communication Projection types: Here’s how the same object may look using different projection styles. Week 2: Sketching, Text, and Visualization

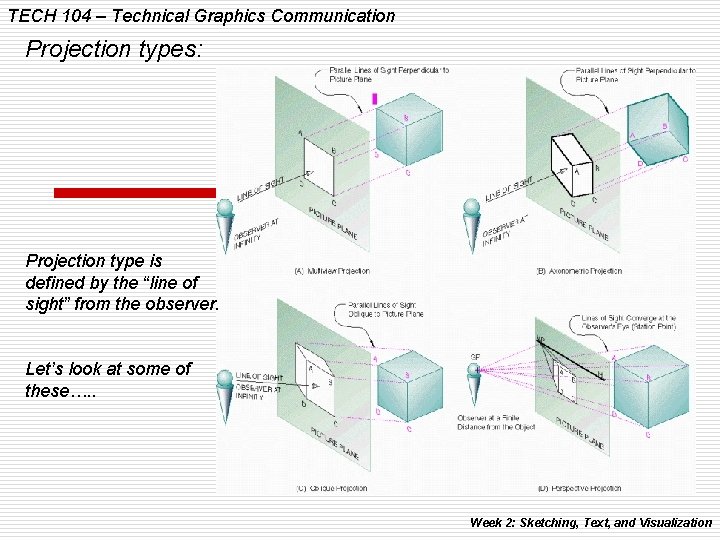
TECH 104 – Technical Graphics Communication Projection types: Projection type is defined by the “line of sight” from the observer. Let’s look at some of these…. . Week 2: Sketching, Text, and Visualization

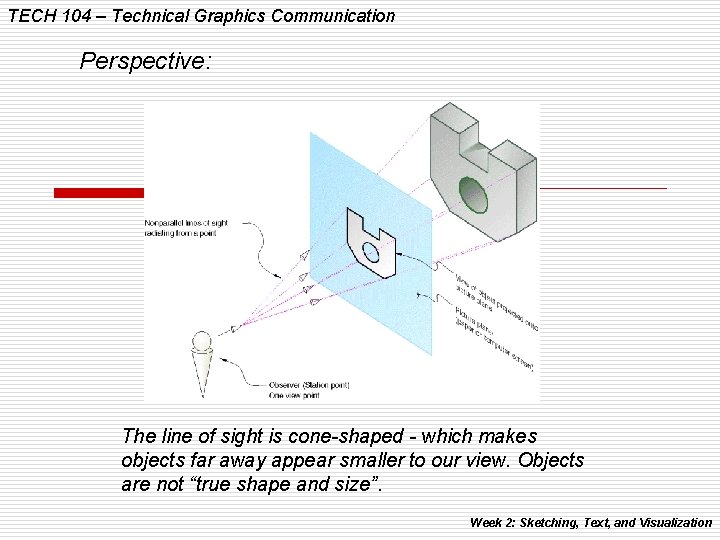
TECH 104 – Technical Graphics Communication Perspective: The line of sight is cone-shaped - which makes objects far away appear smaller to our view. Objects are not “true shape and size”. Week 2: Sketching, Text, and Visualization

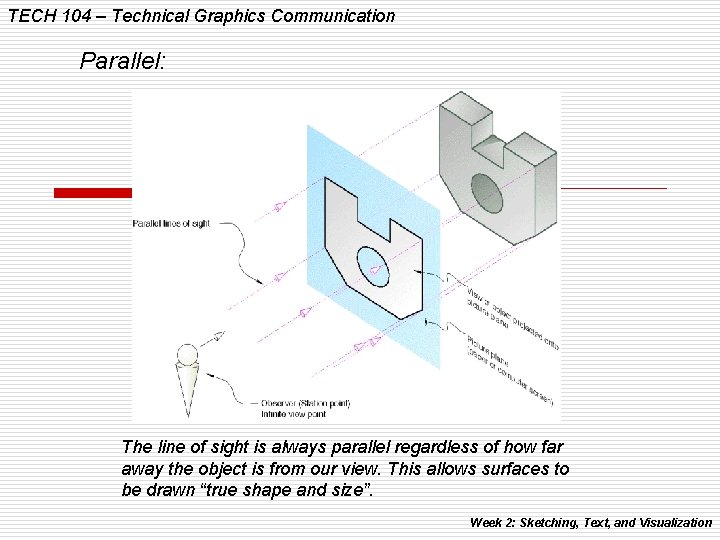
TECH 104 – Technical Graphics Communication Parallel: The line of sight is always parallel regardless of how far away the object is from our view. This allows surfaces to be drawn “true shape and size”. Week 2: Sketching, Text, and Visualization

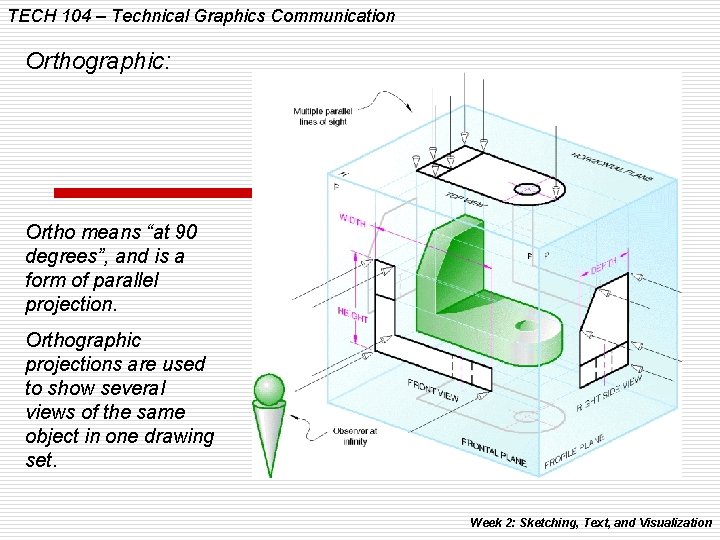
TECH 104 – Technical Graphics Communication Orthographic: Ortho means “at 90 degrees”, and is a form of parallel projection. Orthographic projections are used to show several views of the same object in one drawing set. Week 2: Sketching, Text, and Visualization

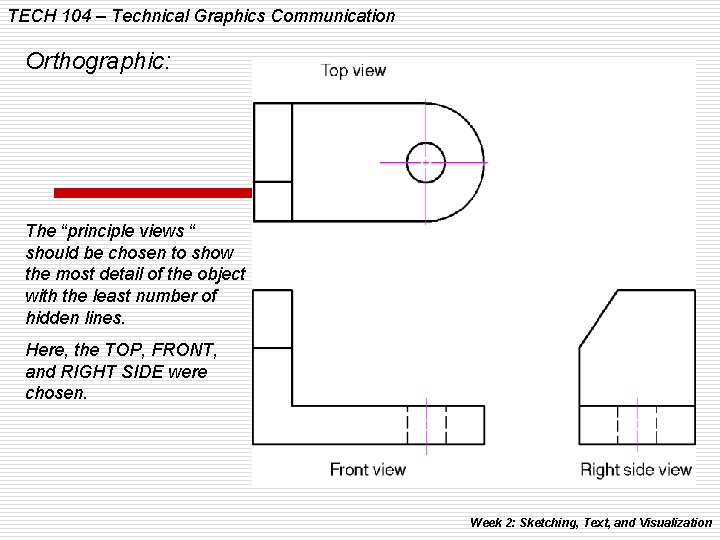
TECH 104 – Technical Graphics Communication Orthographic: The “principle views “ should be chosen to show the most detail of the object with the least number of hidden lines. Here, the TOP, FRONT, and RIGHT SIDE were chosen. Week 2: Sketching, Text, and Visualization

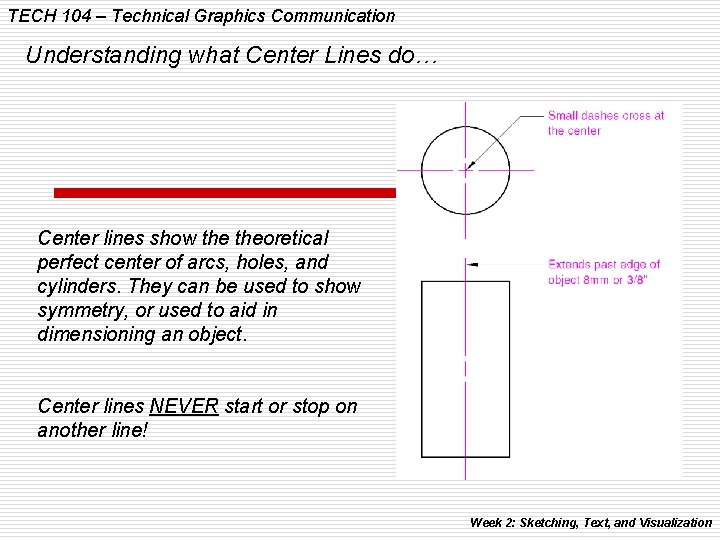
TECH 104 – Technical Graphics Communication Understanding what Center Lines do… Center lines show theoretical perfect center of arcs, holes, and cylinders. They can be used to show symmetry, or used to aid in dimensioning an object. Center lines NEVER start or stop on another line! Week 2: Sketching, Text, and Visualization

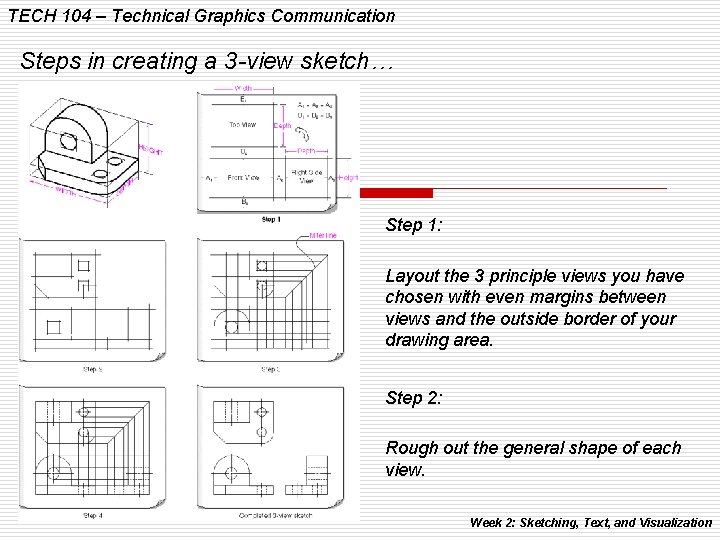
TECH 104 – Technical Graphics Communication Steps in creating a 3 -view sketch… Step 1: Layout the 3 principle views you have chosen with even margins between views and the outside border of your drawing area. Step 2: Rough out the general shape of each view. Week 2: Sketching, Text, and Visualization

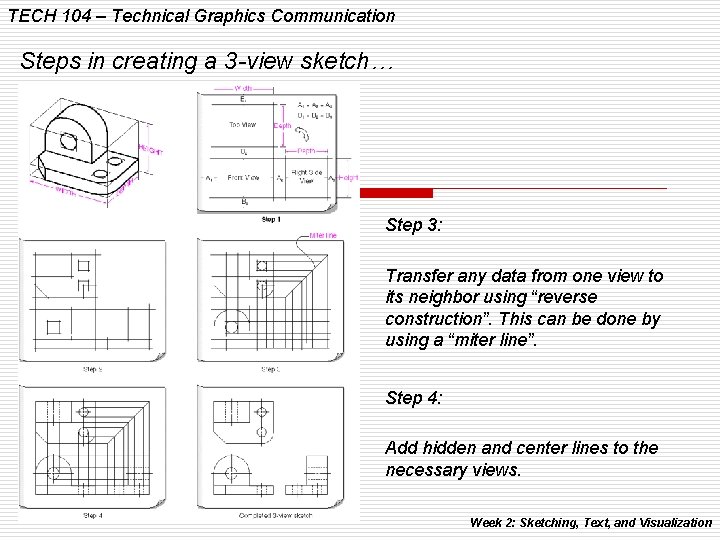
TECH 104 – Technical Graphics Communication Steps in creating a 3 -view sketch… Step 3: Transfer any data from one view to its neighbor using “reverse construction”. This can be done by using a “miter line”. Step 4: Add hidden and center lines to the necessary views. Week 2: Sketching, Text, and Visualization

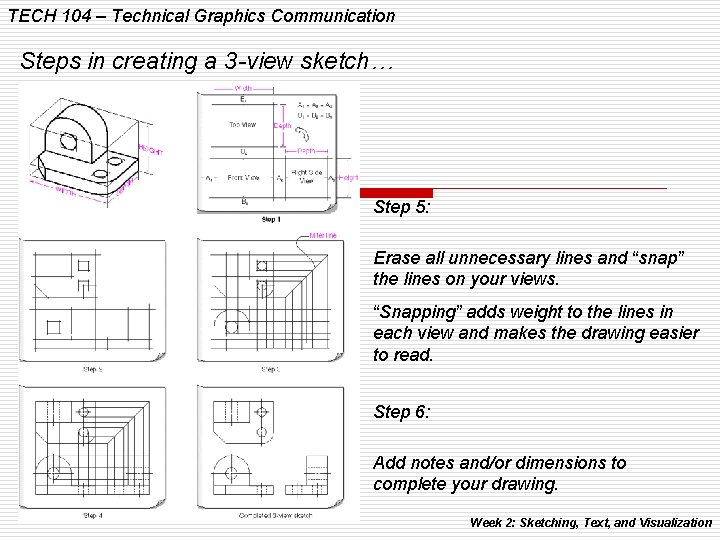
TECH 104 – Technical Graphics Communication Steps in creating a 3 -view sketch… Step 5: Erase all unnecessary lines and “snap” the lines on your views. “Snapping” adds weight to the lines in each view and makes the drawing easier to read. Step 6: Add notes and/or dimensions to complete your drawing. Week 2: Sketching, Text, and Visualization

TECH 104 – Technical Graphics Communication Here’s some tips on creating a multi-view drawing: 1. Lightly sketch all the information that you know first. 2. Use reverse construction to locate lines that may be unknown such as compound angles. 3. Add all circles and other arcs to your drawing. 4. Snap all arcs and circles first, and then straight lines. Week 2: Sketching, Text, and Visualization

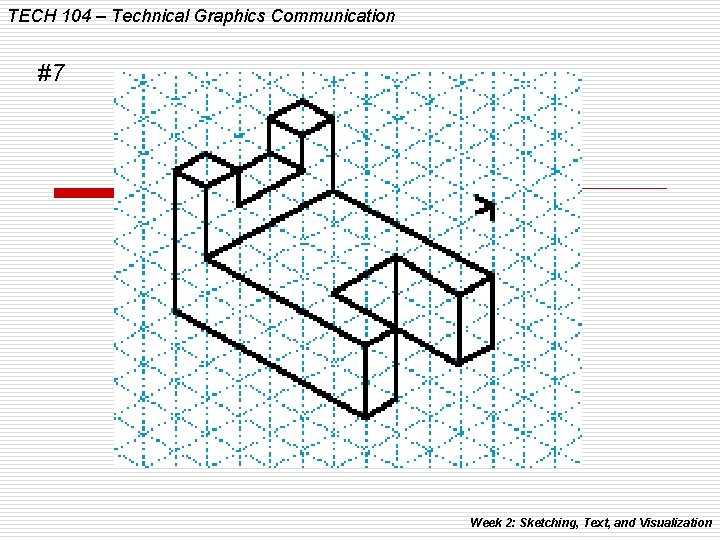
TECH 104 – Technical Graphics Communication #7 Week 2: Sketching, Text, and Visualization

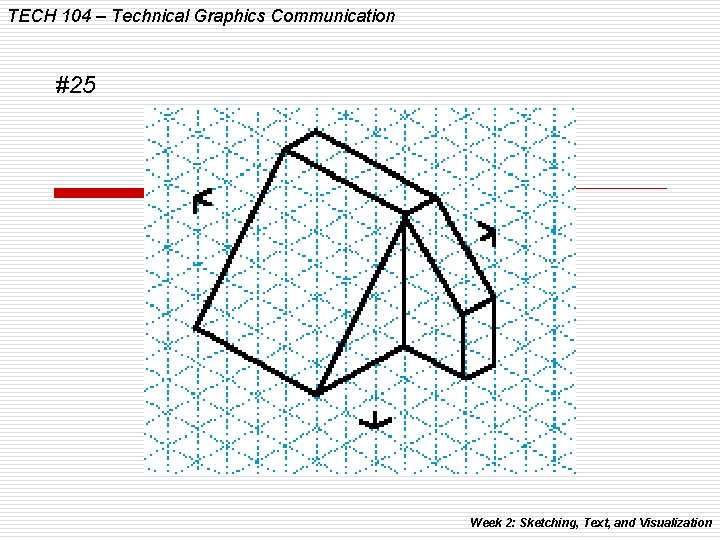
TECH 104 – Technical Graphics Communication #25 Week 2: Sketching, Text, and Visualization

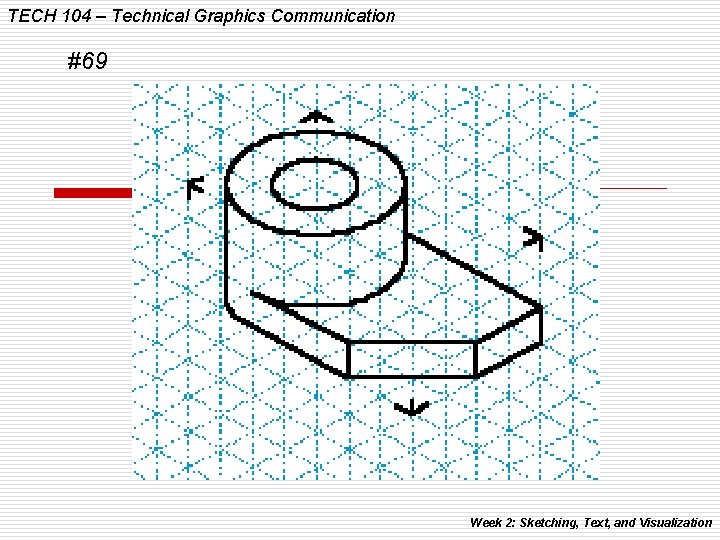
TECH 104 – Technical Graphics Communication #69 Week 2: Sketching, Text, and Visualization

TECH 104 – Technical Graphics Communication Week 2: Sketching Assignments

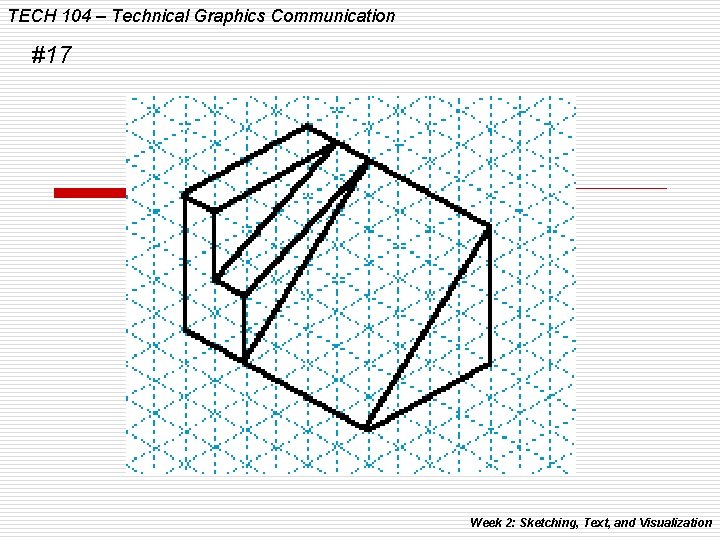
TECH 104 – Technical Graphics Communication #17 Week 2: Sketching, Text, and Visualization

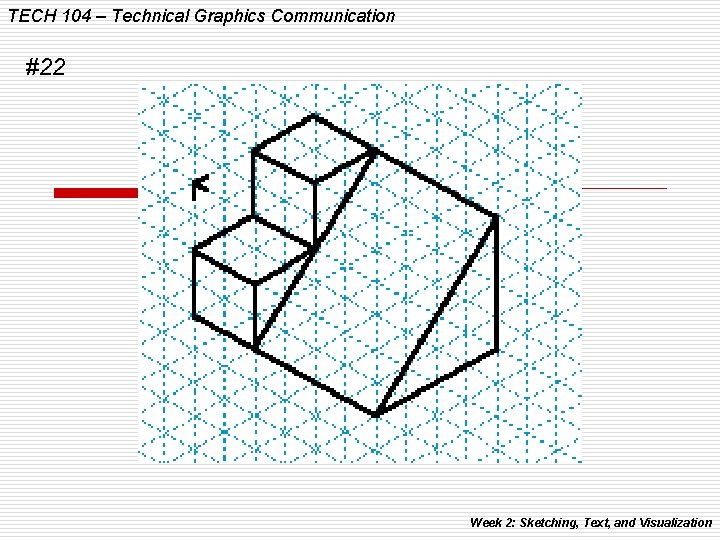
TECH 104 – Technical Graphics Communication #22 Week 2: Sketching, Text, and Visualization

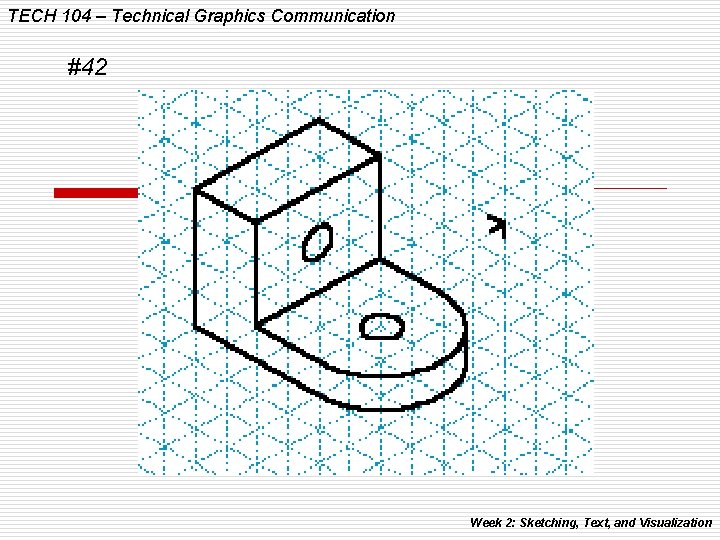
TECH 104 – Technical Graphics Communication #42 Week 2: Sketching, Text, and Visualization

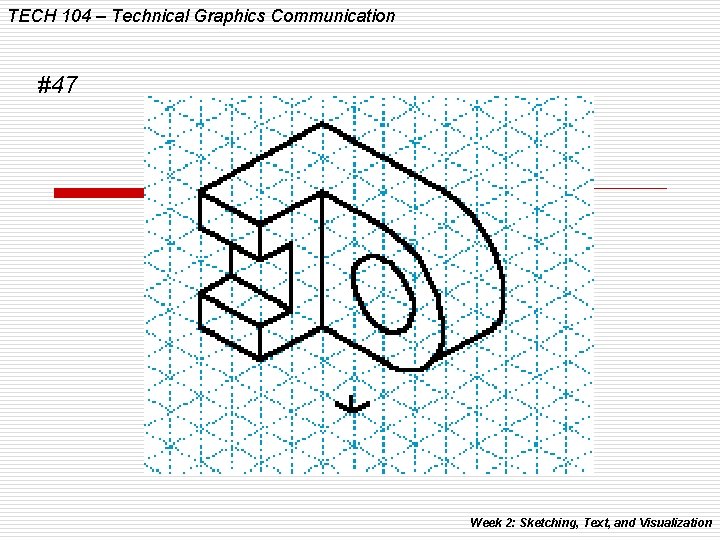
TECH 104 – Technical Graphics Communication #47 Week 2: Sketching, Text, and Visualization

TECH 104 – Technical Graphics Communication Week 3: Multiview Drawings (In-depth!) Week 2: Sketching, Text, and Visualization