Taping in sport Materials Elastic Adhesive Bandage EAB

Taping in sport
 This adheres to body contours and its elastic properties")
Materials Elastic Adhesive Bandage (EAB) This adheres to body contours and its elastic properties mean that it can 'give' a little with tissue changes

• Zinc Oxide Tape This material doesn't 'give' and is therefore ideal to provide restraint and reinforcement

• Cohesive strapping As the name suggests, this strapping sticks to itself. This is practical as no underwrap is required

Underwrap A thin foam material applied before the tape on sensitive areas

Chiropody Felt This can be used to protect sensitive areas, or as a 'horseshoe' in a compression support for the ankle

Adhesive Spray Used to firmly secure a tape job

• Adhesive Remover Solvent to help remove tape from the skin

Tape Cutters A safety blade to quickly remove strappings

Bandage scissors Scissors with a rounded edge
Taping should never be used as a substitute for treatment by a qualified healthcare")
1)Taping should never be used as a substitute for treatment by a qualified healthcare professional. • 2)The area to be taped should be clean and dry 3)Tape should be applied smoothly, 4)Once applied, the tape should be checked to make sure the athlete is comfortable with it. 5)Following activity, a tape cutter or bandage scissors should be used to remove the tape.

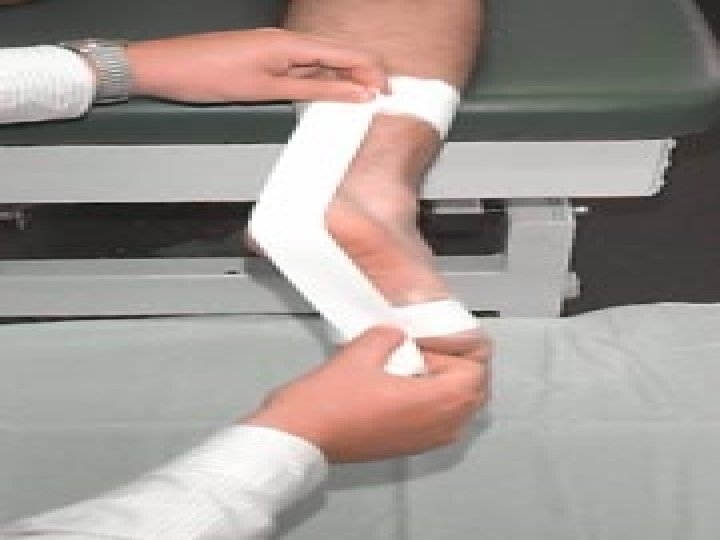
Taping for Acute Achilles Tendonitis

Ankle
Ankle is kept at 90 degrees (anatomical position) throughout the process 2)Underwrap is applied.")
1)Ankle is kept at 90 degrees (anatomical position) throughout the process 2)Underwrap is applied. The entire area should be covered with 1 -2 layers. 4)Anchors are placed at the musculotendinous junction of the gastrocnemius. 5)Stirrups (3 -5) are placed from anchor to anchor. Moleskin reinforces the stirrups.
Secure the stirrups over anchors. 7)Apply heel-locks (two strips on each side). 8)Apply closure")
6)Secure the stirrups over anchors. 7)Apply heel-locks (two strips on each side). 8)Apply closure (if elastic tape, incorporate heel-lock/figure-8). 9)The application is wrinkle-free, the tension is equal and appropriate

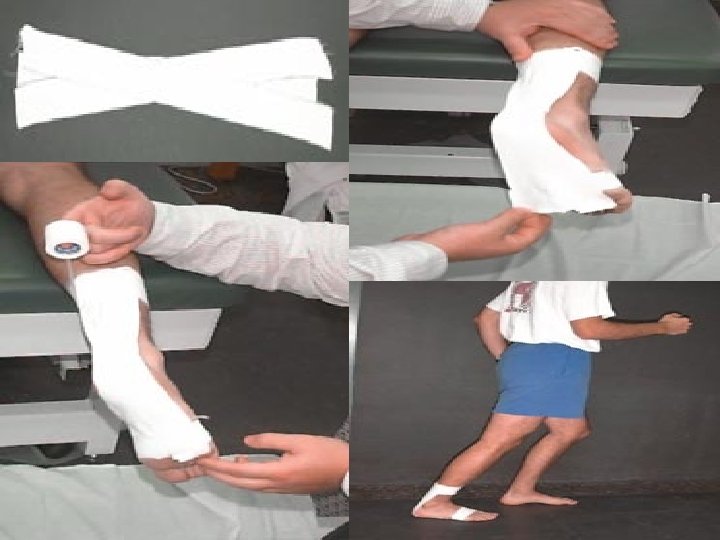
Step 1 Start in the forefoot

Step 2 Guide the tape diagonally up the foot

Step 3 and around the back of the heel bone.

Step 3 and around the back of the heel bone.

Step 5 Then under the foot and back over diagonally, a little higher this time.

Step 6 Then go back around the heel a little higher, . . .

Step 7 then diagonally forwards and around the foot again

Step 8 Smooth the bandage under the bottom aspect of the heel and pull upwards, really giving support to the lateral ankle ligaments.

Step 9 Then come round the heel again

Step 10 and finish off just above the ankle.

for an acutely sprained ankle A horseshoe is cut from chiropody felt and placed around the lateral and medial malleoli.

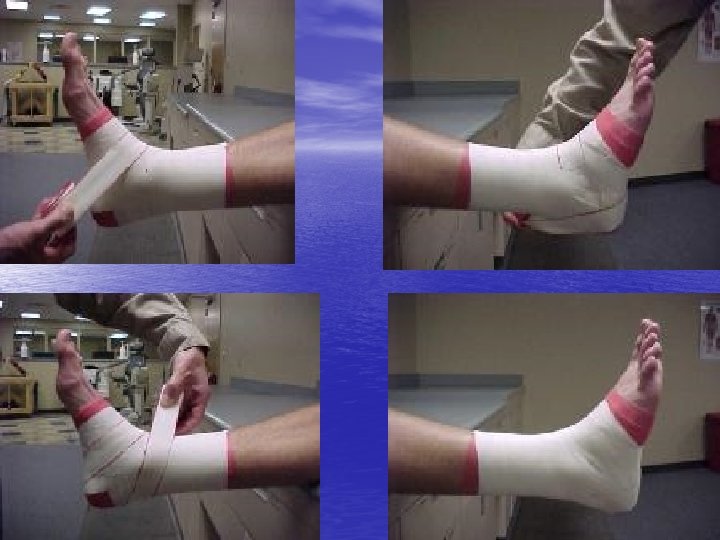
Taping for sprained ankle

Place two anchor strips on the distal leg and around the foot.

Apply one stirrup, pulling from the leg's medial aspect, under the heel to the leg's lateral aspect. A horizontal 'horseshoe' strip from the foot's medial to lateral aspect is then applied.

The procedure is then repeated until there are three stirrups and three horseshoes.

Close in ankle with horizontal closure strips.

Two heel locks are then applied to the ankle's medial and lateral aspects, making sure to pull on the medial aspect last, to finish the tape job pulling the foot into eversion.

Completed Ankle Wrap

Taping for Plantar Fasciitis

Ankle Taping

Preventative Taping For The Thumb

Preventative Taping For The Finger Apply 2 simple spirals • Use next finger as a splint

Plantar fascia taping • Step 1 • First, an anchor is placed around the heel from the lateral to medial border

Step 2 Then another anchor in the opposite direction

Step 3 The anchors are then linked by tape strips under the sole of the foot.

Step 4 Note how the Plantar fascia is bunched up in order to tape it in a shortened position

position Step 5 These straps are continued towards the toes, while maintaining the tissue in a shortened

Step 6 An end strap goes right round the circumference of the foot, at the point of the end of the two anchors

Step 7 Then another anchor goes over the torn edges of the strips. . .

Step 8 to give a neat finish

Patella tendon tape • Step 1 • The tape is applied with the knee bent. The tape starts by going circumferentially around the upper shin.

Step 2 The tape is passed round once. . .

Step 4 Step 3 several then twisted. . . times. . .

Step 5 in order to make a thicker band over the Patella tendon.

Step 6 Then the tape is passed around again. . .

Step 7 and the twisting repeated

Step 9 Step 8 The flat tape is to form a second thicker band. passed around again. . .

Step 10 and this time kept flat Step 11 to finish off.

patello-femoral pain syndrome • The aim of taping the kneecap is to correct the abnormal position of the patella
 non")
What is required? Fixomul / Hypafix type tape. 2. 5 cm (1 inch) non stretch white zinc oxide tape. It is often possible to buy a specific patella taping kit.

Step 1 Assess the knee cap to determine which way the tape should be applied. By moving and pressing the knee cap it may be possible to establish where the sore spot is and which way the patella should be pulled.
")
Step 2 Apply strips of the Fixomul / Hypafix tape covering the patella (kneecap) area. Do not apply any tension to the stips at this point. Re-assess the position of the kneecap again.

Step 3 - If the patella needs tilting

Step 4 - If the patella needs gliding medially

Step 5 - If the patella needs rotating

If successful there should be at least a 50% reduction in pain if not a complete reduction of pain.

Knee supports
- Slides: 65