Symmetric Layouts 2007 Maximum Hook Arc Good for
- Slides: 9

Symmetric Layouts 2007 • Maximum Hook & Arc – Good for most House Shots • Mid-Lane Hook & Back-End – A favorite for fresh PBA and Sport Conditions • Length & Back-End – A favorite for broken down PBA and Sport Conditions • Length – Good for most broken down House Shots • Full Roller Options

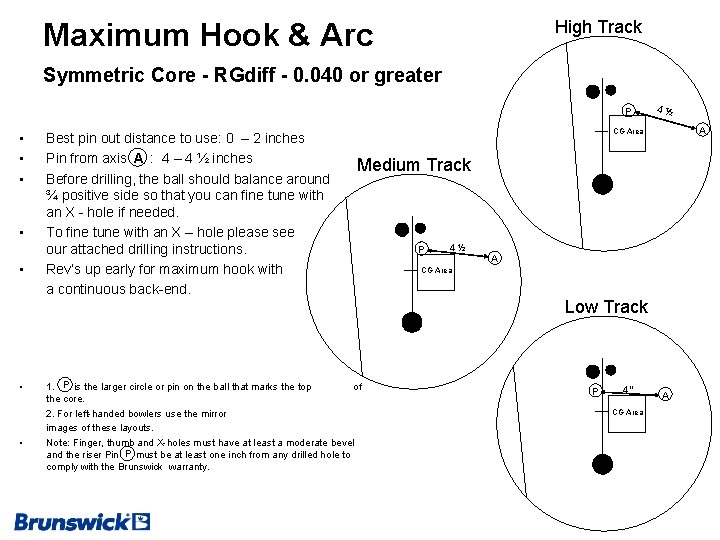
High Track Maximum Hook & Arc Symmetric Core - RGdiff - 0. 040 or greater P • • Best pin out distance to use: 0 – 2 inches Pin from axis A : 4 – 4 ½ inches Before drilling, the ball should balance around ¾ positive side so that you can fine tune with an X - hole if needed. To fine tune with an X – hole please see our attached drilling instructions. Rev’s up early for maximum hook with a continuous back-end. 4½ A CG Area Medium Track 1. P is the larger circle or pin on the ball that marks the top of the core. 2. For left-handed bowlers use the mirror images of these layouts. Note: Finger, thumb and X-holes must have at least a moderate bevel and the riser Pin P must be at least one inch from any drilled hole to comply with the Brunswick warranty. P 4½ A CG Area Low Track P 4” CG Area A

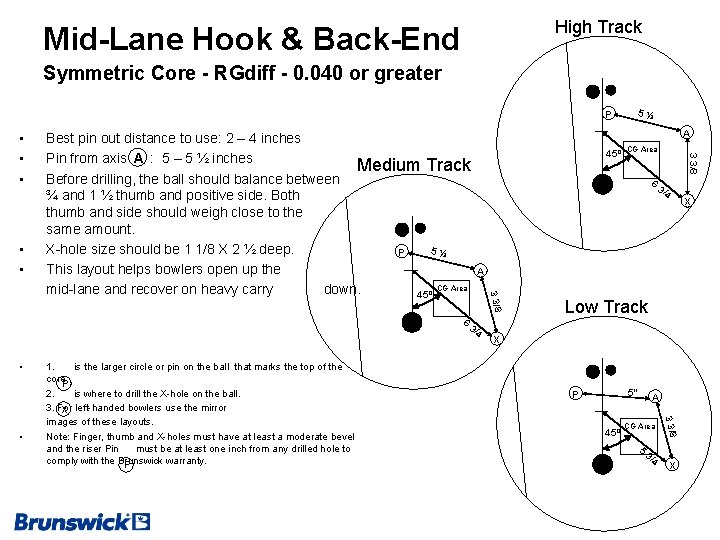
High Track Mid-Lane Hook & Back-End Symmetric Core - RGdiff - 0. 040 or greater P • • 6 • 45º CG Area 6 3/ 4 X A 3/ 4 Low Track X 5” P 45º A CG Area 5 3/ 4 3 3/8 • 1. is the larger circle or pin on the ball that marks the top of the core. P 2. is where to drill the X-hole on the ball. 3. For X left-handed bowlers use the mirror images of these layouts. Note: Finger, thumb and X-holes must have at least a moderate bevel and the riser Pin must be at least one inch from any drilled hole to comply with the Brunswick warranty. P A 3 3/8 Best pin out distance to use: 2 – 4 inches Pin from axis A : 5 – 5 ½ inches Medium Track Before drilling, the ball should balance between ¾ and 1 ½ thumb and positive side. Both thumb and side should weigh close to the same amount. X-hole size should be 1 1/8 X 2 ½ deep. 5½ P This layout helps bowlers open up the CG Area mid-lane and recover on heavy carry down. 45º 3 3/8 • • • 5½ X

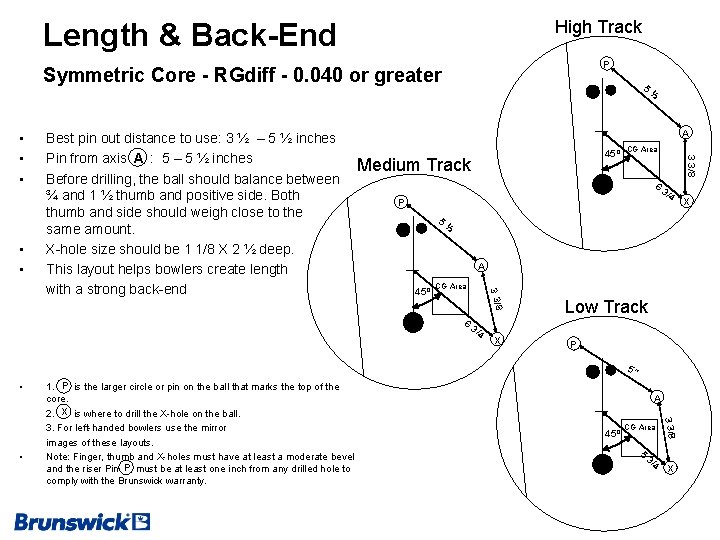
High Track Length & Back-End P Symmetric Core - RGdiff - 0. 040 or greater • • A 45º Medium Track CG Area 6 P 5 3/ 4 ½ A 45º CG Area 6 3 3/8 Best pin out distance to use: 3 ½ – 5 ½ inches Pin from axis A : 5 – 5 ½ inches Before drilling, the ball should balance between ¾ and 1 ½ thumb and positive side. Both thumb and side should weigh close to the same amount. X-hole size should be 1 1/8 X 2 ½ deep. This layout helps bowlers create length with a strong back-end ½ 3 3/8 • • • 5 3/ 4 X Low Track P 5” • A 45º CG Area 5 3/ 4 3 3/8 • 1. P is the larger circle or pin on the ball that marks the top of the core. 2. X is where to drill the X-hole on the ball. 3. For left-handed bowlers use the mirror images of these layouts. Note: Finger, thumb and X-holes must have at least a moderate bevel and the riser Pin P must be at least one inch from any drilled hole to comply with the Brunswick warranty. X X

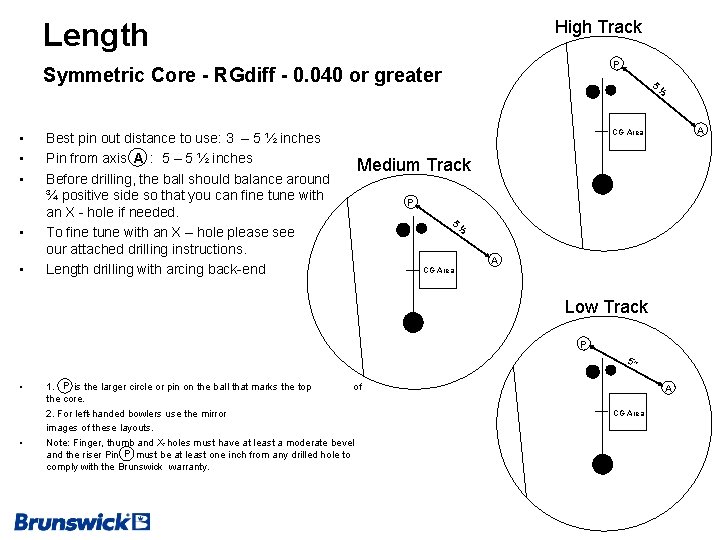
High Track Length P Symmetric Core - RGdiff - 0. 040 or greater • • • Best pin out distance to use: 3 – 5 ½ inches Pin from axis A : 5 – 5 ½ inches Before drilling, the ball should balance around ¾ positive side so that you can fine tune with an X - hole if needed. To fine tune with an X – hole please see our attached drilling instructions. Length drilling with arcing back-end 5 ½ A CG Area Medium Track P 5 CG Area ½ A Low Track P 5” • • 1. P is the larger circle or pin on the ball that marks the top of the core. 2. For left-handed bowlers use the mirror images of these layouts. Note: Finger, thumb and X-holes must have at least a moderate bevel and the riser Pin P must be at least one inch from any drilled hole to comply with the Brunswick warranty. A CG Area

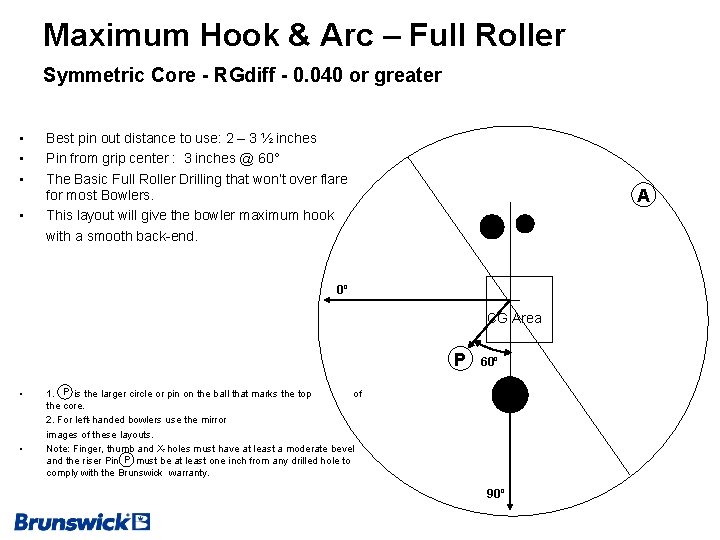
Maximum Hook & Arc – Full Roller Symmetric Core - RGdiff - 0. 040 or greater • • Best pin out distance to use: 2 – 3 ½ inches Pin from grip center : 3 inches @ 60° The Basic Full Roller Drilling that won’t over flare for most Bowlers. This layout will give the bowler maximum hook with a smooth back-end. A 0º CG Area P • • 60º 1. P is the larger circle or pin on the ball that marks the top of the core. 2. For left-handed bowlers use the mirror images of these layouts. Note: Finger, thumb and X-holes must have at least a moderate bevel and the riser Pin P must be at least one inch from any drilled hole to comply with the Brunswick warranty. 90º

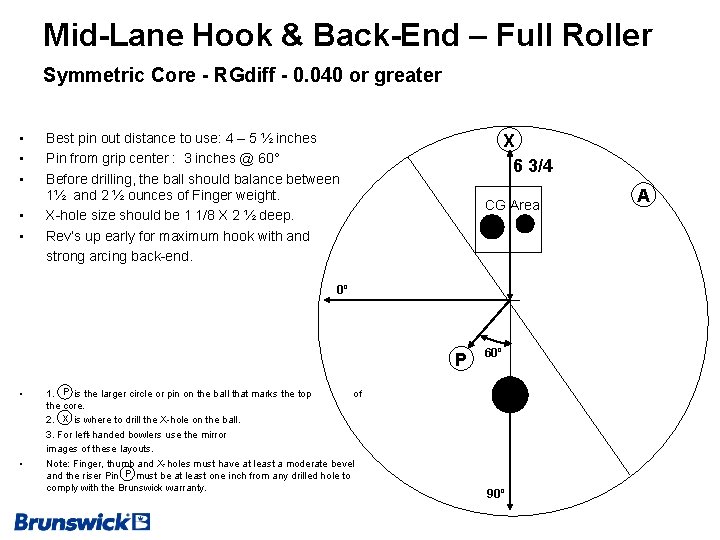
Mid-Lane Hook & Back-End – Full Roller Symmetric Core - RGdiff - 0. 040 or greater • • • Best pin out distance to use: 4 – 5 ½ inches Pin from grip center : 3 inches @ 60° Before drilling, the ball should balance between 1½ and 2 ½ ounces of Finger weight. X-hole size should be 1 1/8 X 2 ½ deep. Rev’s up early for maximum hook with and strong arcing back-end. X 6 3/4 CG Area 0º P • • 1. P is the larger circle or pin on the ball that marks the top of the core. 2. X is where to drill the X-hole on the ball. 3. For left-handed bowlers use the mirror images of these layouts. Note: Finger, thumb and X-holes must have at least a moderate bevel and the riser Pin P must be at least one inch from any drilled hole to comply with the Brunswick warranty. 60º 90º A

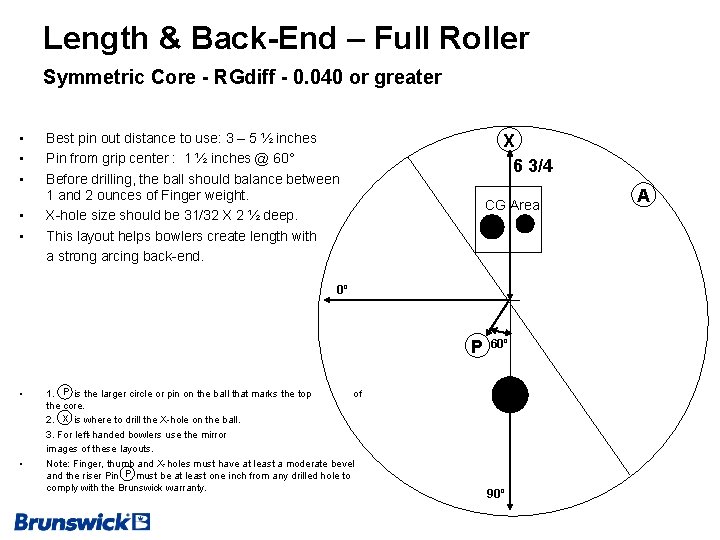
Length & Back-End – Full Roller Symmetric Core - RGdiff - 0. 040 or greater • • • Best pin out distance to use: 3 – 5 ½ inches Pin from grip center : 1 ½ inches @ 60° Before drilling, the ball should balance between 1 and 2 ounces of Finger weight. X-hole size should be 31/32 X 2 ½ deep. This layout helps bowlers create length with a strong arcing back-end. X 6 3/4 CG Area 0º P • • 1. P is the larger circle or pin on the ball that marks the top of the core. 2. X is where to drill the X-hole on the ball. 3. For left-handed bowlers use the mirror images of these layouts. Note: Finger, thumb and X-holes must have at least a moderate bevel and the riser Pin P must be at least one inch from any drilled hole to comply with the Brunswick warranty. 60º 90º A

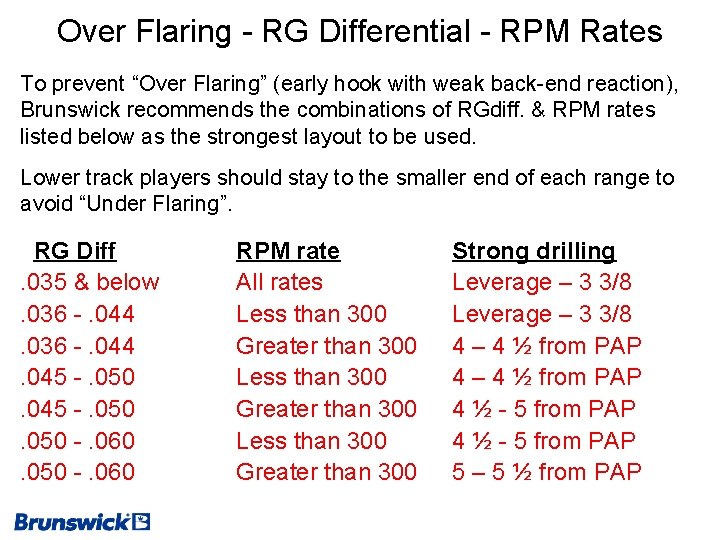
Over Flaring - RG Differential - RPM Rates To prevent “Over Flaring” (early hook with weak back-end reaction), Brunswick recommends the combinations of RGdiff. & RPM rates listed below as the strongest layout to be used. Lower track players should stay to the smaller end of each range to avoid “Under Flaring”. RG Diff. 035 & below. 036 -. 044. 045 -. 050 -. 060 RPM rate All rates Less than 300 Greater than 300 Strong drilling Leverage – 3 3/8 4 – 4 ½ from PAP 4 ½ - 5 from PAP 5 – 5 ½ from PAP