Surgical Procedures Devashish J Anjaria Surgical Fundamentals August


 – Place finger in track to confirm intrapleural positioning")


 – Ensure that back bleeding from")
 – Place the catheter to the")


 • Indications – Need to assess acid-base status, oxygenation and")
 • Palpate the pulse of the desired artery. • Have")


- Slides: 62
Surgical Procedures Devashish J. Anjaria Surgical Fundamentals August 11, 2006
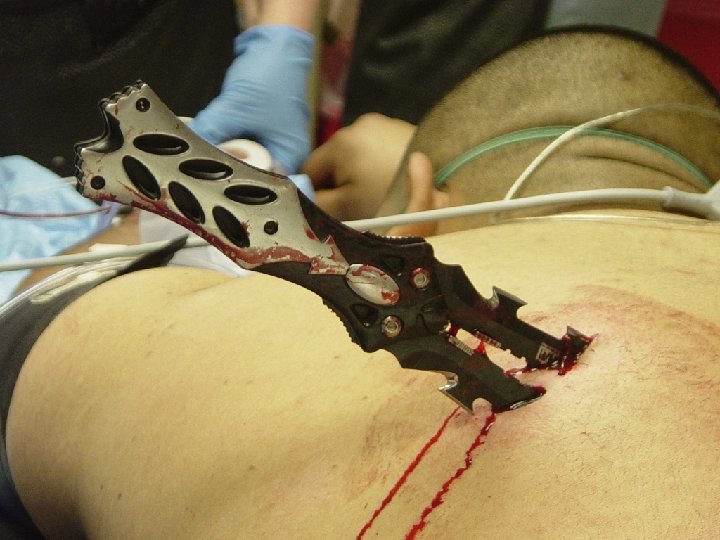
Case Presentation • 25 year old male presents s/p single stab wound to the left chest. He clearly smells of alcohol and is lethargic – responding only to painful stimuli. Field vitals are P 150, BP 80/palp, Resp 35. • What’s the plan? ?
ABC’s
Airway • Secure airway = cuffed tube in the trachea – Endotracheal • Orotracheal • Nasotracheal – Surgical airway • Cricothyroidotomy • Tracheostomy
Indications • Inability to oxygenate – Pa. O 2/Fi. O 2 < 200 • Inability to ventilate – Respiratory rate > 30 or < 5 – PCO 2 > 60 • Inability to protect airway – GCS ≤ 8
Initial Maneuvers • Chin lift – Contraindicated in cervical spine injuries or cervical fusion • Jaw thrust
Initial Maneuvers • Bag valve mask • Nasal and/or oral airways • The goal is to ventilate and pre-oxygenate
What you need. . . MAC or Miller Blades Laryngoscope Capnograph
What you need. . . • • • Working suction 10 cc syringe (to inflate the balloon) Medications – to premedicate, if applicable Tape or twill Stylet Pulse ox monitoring
And of course. . . The endotracheal tube
Nasotracheal Intubation • Prerequisites – Awake spontaneously breathing patient • Contraindications – Facial fractures – Basilar skull fracture – Apnea – Coagulopathy – Pregnancy
Nasotracheal Intubation - Technique • Pick an endotracheal tube 1 size smaller than the largest nasal airway which fits. • Thoroughly lubricate the endotracheal tube • Anesthetize the nares (if possible) with lidocaine jelly or cetacaine spray • Gently advance the tube until fogging is encountered and/or air moves through tube.
Nasotracheal Intubation - Technique • Ask the patient to take deep breaths and slowly advance the tube past the vocal cords with inspiration • When phonation is lost, inflate cuff, confirm position (listen, ETCO 2) and secure tube.
Orotracheal Intubation - Technique • • Stabilize cervical spine if necessary Have somebody apply cricoid pressure Open mouth and separate teeth with right hand Hold laryngoscope in left hand insert in right side of mouth, pushing the tongue to the left. • Vertical traction is applied to lift the epiglottis and visualize the vocal cords
Orotracheal Intubation - Technique
Orotracheal Intubation - Technique • The endotracheal tube is inserted through the cords and the cuff is inflated. • Tube position is confirmed – Auscultation/Chest excursion – Capnography – CXR • Tube is secured
Sedatives and Neuromuscular Blockers • Induction agents – Thiopental 4 – 6 mg/kg – Etomidate 0. 3 mg/kg – Ketamine 1 – 3 mg/kg • Neuromuscular blocking agents – Succinylcholine 1. 0 mg/kg – Vecuronium 0. 3 mg/kg for intubating • Sedatives – Midazolam 0. 05 – 0. 15 mg/kg – Propofol
Intubating Pearls • If the patient is an elective or semi-elective intubation – pre-oxygenate with 100% O 2 for at least 5 minutes. This can allow up to 10 minutes to intubate without desaturation. • If intubating without a pulse oximeter, hold your breath while attempting intubation, if you need to breath so does the patient – bag ventilate. • ETCO 2 requires cardiac output and therefore may not be reliable if intubating during a cardiac arrest – if none detected, confirm with physical exam.
Case Presentation • Neuromuscular blockade was administered however you are not able to intubate the patient. • Despite bagging, the patient is desaturating and now becoming bradycardic. • Now what? ? ?
Cricothyroidotomy • Indications – Extensive orofacial trauma preventing laryngoscopy – Upper airway obstruction • Hemorrhage • Edema • Foreign body – Unsuccessful endotracheal intubation • WHEN UNABLE TO VENTILATE!!!!!
Cricothyroidotomy • Contraindications – Children under age 12 • Needle cricothyroidotomy is preferred to prevent damage to the cricoid cartilage.
Cricothyroidotomy – Anatomy
Cricothyroidotomy – Anatomy
Cricothyroidotomy • Prep the neck • Palpate the cricothyroid membrane below the thyroid cartilage in the midline • Stabilize thyroid cartilage frimly with one hand make a transverse incision 2 cm in length down to and incising the cricothyroid membrane.
Cricothyroidotomy • Insert either a tracheal spreader or the back end of the scalpel handle and gently dialate • Insert a tube (tracheostomy, endotrachial, BIC pen? ) • Confirm ventilation • Suture tube to secure • Obtain hemostasis if necessary
Cricothyroidotomy
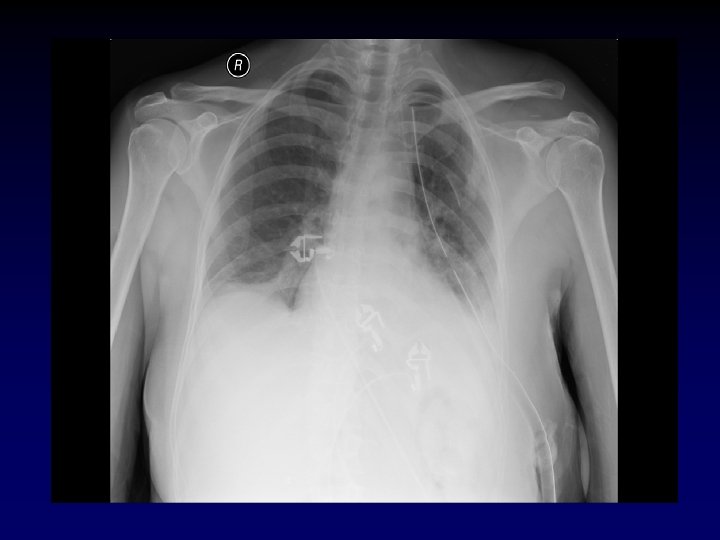
Case Presentation • As you are screaming “a knife, my kingdom for a knife, ” your colleague successfully intubates with return of end-tidal CO 2. • The chest is auscultated with good breath sounds heard on the right, and no breath sounds on the left. • Now what?
Tube Thoracostomy • Indications: − Hemothorax/Pleural effusion − Pneumothorax − Note for tension pneumothorax first tx should be 14 or 16 gauge angiocath in 2 nd intercostal space in midclavicular line. • Anatomy: • 5 th intercostal space in the anterior axillary line (at the level of the nipple). • Measure tube from insertion site to apex of lung.
Tube Thoracostomy • What you need. . . – Chest tube – Pleuravac – Sterile drapes, gloves and gown – Instruments – scalpel and Kelly clamp – Heavy silk suture – Gauze and silk tape for dressing
Tube Thoracostomy • Procedure: − Prep and drape hemothorax − Infiltrate skin, subcutaneous tissue and pleura with 1% lidocaine – – 1. 5 -2 cm incision directly over the 6 th rib down to the rib With a blunt clamp, dissect over the superior edge of the rib. Bluntly pierce the pleura with the clamp and spread the track. Be prepared for a rush of blood, fluid and/or air.
Tube Thoracostomy • Procedure (cont) – Place finger in track to confirm intrapleural positioning and lyse any adhesions. – Insert tube via track (with or without clamp) towards apex of lung. – Attach tube to pleuravac. – Secure tube to patient with heavy silk suture and tape all connections.
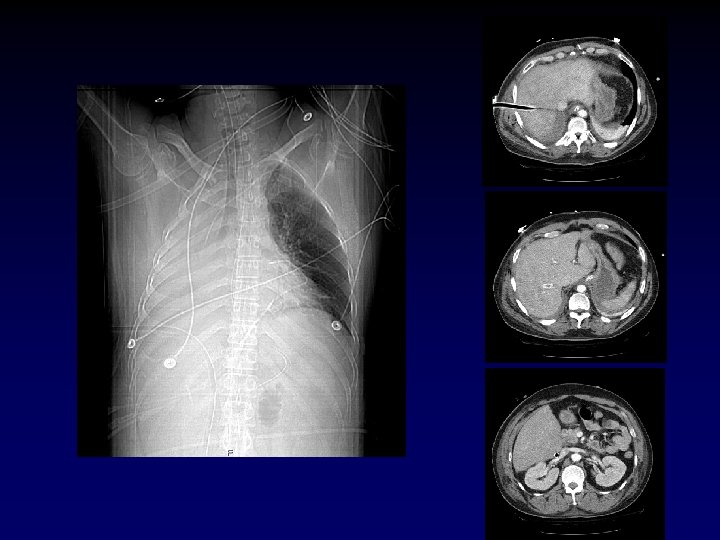
Warning! • History of chest tubes, thoracotomies or inflammatory pulmonary pathology. – Assume adhesions between the lung and the chest wall. – The chest tube insertion cause a lung laceration. • Be very careful how low you are, you can easily place an abdominal tube if you are not careful.
Case Presentation • Now that the chest tube is draining the hemopneumothorax, the patient’s pressure drops to 60/palp • Help? • The patient has bilateral track marks from history of IVDA.
Central Venous Access • Indications – CVP monitoring – TPN – Long-term infusion of drugs – Inotropic agents – Hemodialysis – Poor peripheral access
Central Venous Access • Vein sites – Femoral – Subclavian – Internal jugular • Contraindications – Vein thrombosis – Coagulopathy or thrombocytopenia
Central Venous Access • What you need – – – Central line kit/tray Sterile gloves and gown Mask and hat Sterile drapes Sterile flush – 10 cc syringe per port – Lidocaine – Betadine – Silk suture
Central Venous Access • General procedure – Prep the skin, sterile drape, sterile gown and glove – Ensure proper position – Infiltrate 1% lidocaine for adequate anesthesia – Cannulate the vein with a finder needle (if applicable) and then the 18 gauge primary needle while aspirating back on a syringe. – Once successful, hold the needle still and disconnect the syringe.
Central Venous Access • General procedure (cont. ) – Ensure that back bleeding from needle is venous – Feed J wire into vein while holding needle still – Remove needle, leaving wire in place – Make a skin incision over the needle – Use the dilator over the wire to dilate the skin and subcutaneous tissues – Remove the dilator and feed the venous catheter over the wire.
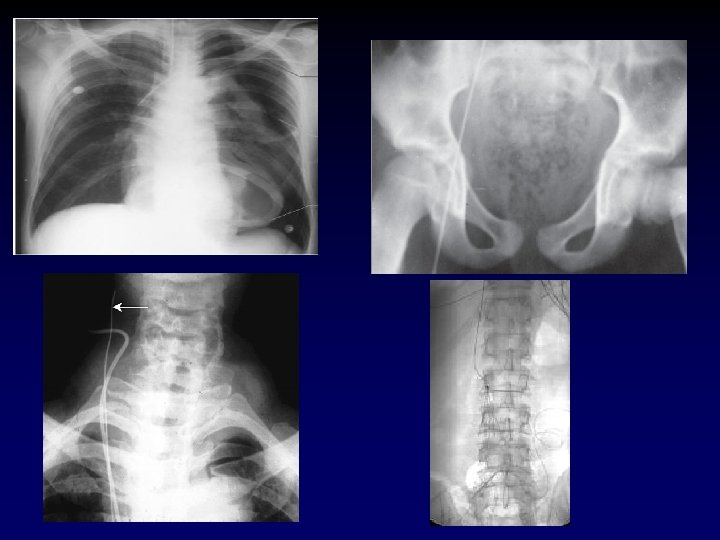
Central Venous Access • General procedure (cont. ) – Place the catheter to the appropriate length and remove the wire. – Aspirate and flush all ports to confirm placement – Suture the line into place – Apply sterile dressing – CXR for jugular or subclavian attempts. – During the entire procedure – NEVER LOSE CONTROL OF THE WIRE
Central Venous Access - Jugular • Position in Trendelenburg • Turn the patient’s head contralaterally • Anterior approach – Identify the apex of the triangle formed by the heads of the sternocleidomastoid muscle. – Palpate the carotid and retract medially – Insert syringe w/ needle at apex at an angle of 45° to the skin pointing towards the ipsilateral nipple – Vein should be within 3 cm in most people
Central Venous Access - Jugular
Central Venous Access - Jugular • Posterior approach – Identify the lateral border of the SCM where the ext. jugular crosses (about 4 -5 cm above the clavicle) – Insert a needle anteriorly and inferiorly pointing to the sternal notch – The vein should be encountered within 3 cm in most individuals.
Central Venous Access - Subclavian • Place an index finger at the sternal notch and the thumb at the intersection of the clavicle and the first rib • Insert the needle w/ syringe at the junction of the distal 1/3 and proximal 2/3 of the clavicle, 1 cm inferior to the clavicle. • Keeping the needle horizontal, advance towards the sternal notch, using the thumb to help the needle under the clavicle. • Aspirate while advancing straight towards notch. • If unsuccessful, consider reattempt 1 cm more lateral than initial trial.
Central Venous Access - Femoral • Palpate the femoral artery – Midpoint between ant. sup. iliac spine and pubic symphysis • Femoral vein is immediately medial to the artery. • Insert needle medial and parallel to the pulse at 45° to the skin. • The vein should be encountered within < 6 cm.
Central Venous Access Complications • Arterial puncture – remove needle/catheter and apply at least 5 minutes of direct pressure • Dysrhythmias – most often with wire, but if persists may require repositioning distal to RA • Pneumothorax – rates of 1 to 2% for subclavian and IJ, rates increase with > 2 attempts • Line sepsis – lowest with subclavian, highest with femoral, strict sterile technique lowers rates.
Case Presentation • Now with a femoral cordis in place, the patient receives 2 liters of LR with an improvement in vitals. He has 800 cc of blood drained from his left chest. • Is he adequately resuscitated? Over? Under?
Arterial Blood Gas (ABG) • Indications – Need to assess acid-base status, oxygenation and ventilation – Need to assess carboxyhemoglobin • Sites – Radial artery – Femoral artery
Arterial Blood Gas (ABG) • Palpate the pulse of the desired artery. • Have a bag of ice available • Prep the skin • Using a heparinized syringe and a 20 guage needle, aim at the pulse localized between 2 fingers at a 45° angle to the skin • Once blood return is seen, dedicated syringes will self fill • Once complete, hold 5 minutes of direct pressure and confirm hemostasis.
Case Presentation • As the respiratory therapist is suctioning the patient’s mouth, he starts vomiting rice and beans mixed with beer. • He does not appear to have aspirated, but his stomach is not empty yet. . .
Nasogastric Tube • Indications – – – Acute gastric dilatation Gastric outlet obstruction Ileus Small bowel obstruction Upper GI hemorrhage Enteral feeding • Contraindications – Basilar skull fracture – Absence of gag reflex – Recent esophageal or gastric surgery (relative)
Nasogastric Tube • Measure tube from nose to earlobe to anterior abdomen so that proximal hole is distal to xiphoid. • Lubricate the tube • Have the patient flex their neck
Nasogastric Tube • Slowly insert the tube straight posteriorly from the nares. • Advance the tube into the pharynx aiming posteriorly, asking the patient to swallow if possible. • Once the tube has been inserted to desired length, inject air into the tube and auscultate over the stomach for placement.
Nasogastric Tube • Secure the tube with tape to the nose. Be sure not to secure it to the forehead/upward as this can cause alar necrosis. • If the tube is to be used for feeding, placement should be confirmed by xray.
Conclusions • Knowledge about simple surgical procedures can be lifesaving – however pure knowledge is not a substitute for repeated practice. • Take every opportunity to practice these procedures with senior and/or attending supervision under controlled circumstances.