Studio Portraits Contents Types of Lighting Basic Posing

Studio Portraits

Contents • Types of Lighting • Basic Posing • Where to put those hands

Lighting for Portraiture • • General Three-Point Lighting Rembrandt Lighting Broad Portrait Lighting Short Portrait Lighting Split Portrait Lighting Butterfly Lighting

Lighting For Portraiture When Portrait photographs are composed and captured in a studio, the photographer has control over the lighting of the composition of the subject and can adjust direction and intensity. There are many ways to light a subject’s face and there are several common lighting plans.

3 -point Lighting • One of the most basic plans using 3 lights – 1. Key Light (or Main Light) • Usually placed to one side of the subject’s face, between 30 and 60 degrees off center and a bit higher than eye level. • It is the brightest light in the set up. – 2. Fill Light • Placed opposite the key light to fill in or soften the shadows on the opposite side of the face. • The brightness is usually between 1/3 and 1/4 that of the key light. – 3. Back Light (or Rim Light or Hair Light) • Usually placed behind the subject to provide seperation from the backround by highlighting the subject’s shoulders and hair. • The placement and brightness is a matter of taste and technique. • Can be fitted with a Snoot or Barn door.

3 -point Lighting

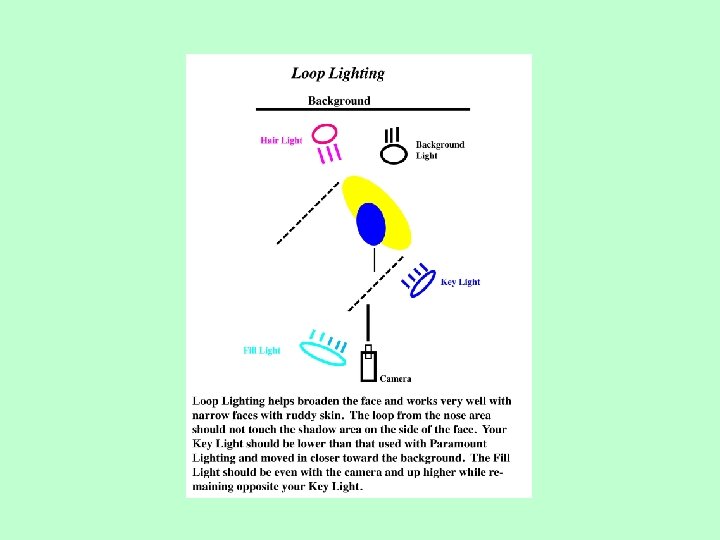
Rembrandt Lighting • Emphasizes texture and works well for full faces but not narrow faces. Not good for ruddy faces. • Very drammatic effect. • A diamond should be formed below the farthest eye and it should be as long as the nose and not wider than the eye. • The Key Light should be slightly lower and moved closer toward the background. • The Fill Light should be even with the camera and up higher while remaining opposite your Key Light.

Rembrandt Lighting

Broad Portrait Lighting • Broad portrait lighting is when the main light is illuminating the broad side of the face and the shadow from the nose is being cast onto the short side of the face. • In other words, broad lighting is when the more exposed side of the face is facing toward the main light.

Broad Portrait Lighting

Short Portrait Lighting • Short portrait lighting is when the main light is coming from the short side of the subject and the broad side of the face is more in shadow. • In other words…If the subject’s nose is facing left and the light is coming from that same side.

Short Portrait Lighting

Split Portrait Lighting • In broad, Short and Rembrant lighting, there will be a patch of light cast onto the shadow side of the face. • If the main light is placed so far off to the side of the subject that the patch disapears and only half is lit, then it is considered to be “Split” portrait lighting.

Split Portrait Lighting

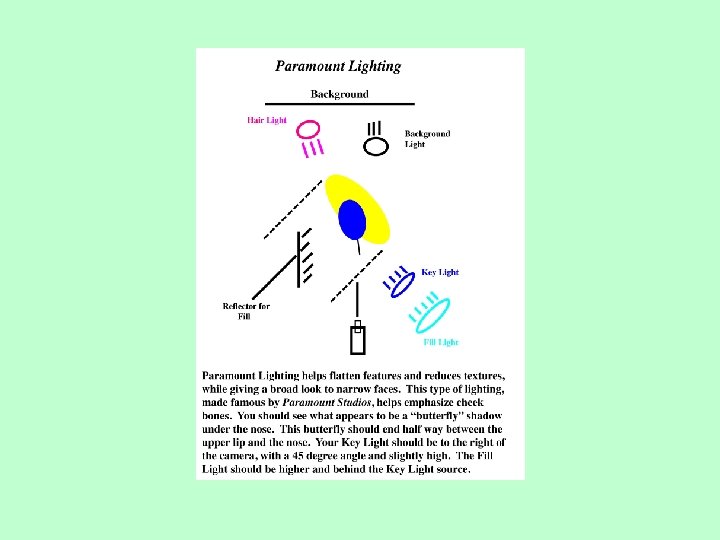
Butterfly Lighting • Very popular over the past decade or so; only two lights are used. • Key light placed directly in front of subject, often above the camera or slightly to one side, and a bit higher than is common for a three-point lighting plan. • Hair/Rim light is used as the second light with a reflector placed below the subject's face to provide fill light and soften shadows. • This lighting can be recognized by the strong light falling on the forehead, the bridge of the nose and the upper cheeks, and by the distinct shadow below the nose which often looks rather like a butterfly and thus provides the name for this lighting plan.

Butterfly Lighting Reflector

Basic Posing • Turn the body away from the camera – If you shoot square on it will look very boxy; the sitter will look fatter than they really are. – Their bust line will not be enhanced at all. • Shift the weight to the back leg, turning the leading foot towards the camera – This should give you the automatic S-curve that looks best. • Bring the tummy in and the chest out; shoulders back. – This enhances the whole shape of the torso. – If the hands are on the hips, then bend the elbows back-the space between the arms and the waist gives a slimming effect.

Basic Posing contd • If the bust still needs some help, you can bring the hands up. • Hands have a knack of looking long , so they need to be seen side on, generally together and with a relaxed poise. • Break everything! – The joints should be bent: arms, wrists and legs will all look better if they are slightly bent.

Where To Put Those Hands • There really aren’t that many places for the hands to go: thighs, hips, shoulders or hair. • Generally you will get a better image if the two hands are not directly opposite. – Go for one on the thigh, one on the shoulder in preferance to both on the thigh. – This is a rule made to be broken. • If the hands are holding something, make sure the something helps the pose. – By hiding tummies and things for a slimming effect. – Keep the object at an angle for a more dynamic image.

The End
- Slides: 22