Start SETUPS ON THE VERTICAL MILLING MACHINE tab
Start
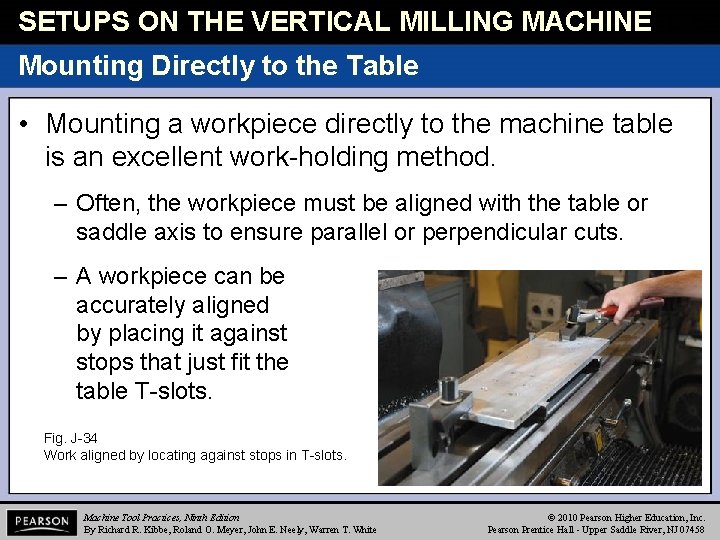
SETUPS ON THE VERTICAL MILLING MACHINE tab Mounting Directly to the Table • Mounting a workpiece directly to the machine table is an excellent work-holding method. – Often, the workpiece must be aligned with the table or saddle axis to ensure parallel or perpendicular cuts. – A workpiece can be accurately aligned by placing it against stops that just fit the table T-slots. Fig. J-34 Work aligned by locating against stops in T-slots. Machine Tool Practices, Ninth Edition By Richard R. Kibbe, Roland O. Meyer, John E. Neely, Warren T. White © 2010 Pearson Higher Education, Inc. Pearson Prentice Hall - Upper Saddle River, NJ 07458

SETUPS ON THE VERTICAL MILLING MACHINE tab Mounting Directly to the Table • Other methods are measuring from the edge of the table to the workpiece, or using a dial indicator fastened in the machine spindle or to the toolhead. Fig. J-35 Measuring the distance from the edge of the table to the workpiece. Machine Tool Practices, Ninth Edition By Richard R. Kibbe, Roland O. Meyer, John E. Neely, Warren T. White Fig. J-36 Aligning a workpiece with the aid of a dial indicator. © 2010 Pearson Higher Education, Inc. Pearson Prentice Hall - Upper Saddle River, NJ 07458
SETUPS ON THE VERTICAL MILLING MACHINE tab Using a Mill Vise • A precision mill vise may also be used to hold the part being machined. – The vise must be aligned with the table or saddle axis. – Once again, use a dial indicator for this purpose and always indicate a vise on its solid jaw. • Mill vises are precision tools. – Always treat them gently when setting them down on the machine table. – Be sure that the table is clean and that there are no burrs on the bottom of the vise. Machine Tool Practices, Ninth Edition By Richard R. Kibbe, Roland O. Meyer, John E. Neely, Warren T. White © 2010 Pearson Higher Education, Inc. Pearson Prentice Hall - Upper Saddle River, NJ 07458
SETUPS ON THE VERTICAL MILLING MACHINE tab Soft-Jaw Vises • A mill vise may be equipped with soft steel or aluminum jaws instead the hardened steel type. • After the vise has been bolted to the table & roughly aligned, a light cut can be taken on the soft jaws. – The result of this procedure is a vise jaw that has been machined true to the axis of the saddle or table. • Soft jaws are often used in production machining operations or where it might be desirable to shape the vise jaw in a certain way to hold a particular part. Machine Tool Practices, Ninth Edition By Richard R. Kibbe, Roland O. Meyer, John E. Neely, Warren T. White © 2010 Pearson Higher Education, Inc. Pearson Prentice Hall - Upper Saddle River, NJ 07458

SETUPS ON THE VERTICAL MILLING MACHINE tab Soft-Jaw Vises • Another excellent method of work holding is a magnetic chuck, once used primarily in surface grinding applications. – The chuck design prevents chip buildup on the workpiece. – A drawback of a magnetic chuck is that only ferrous materials can be securely held. Fig. J-37 Work holding with a magnetic chuck. Machine Tool Practices, Ninth Edition By Richard R. Kibbe, Roland O. Meyer, John E. Neely, Warren T. White © 2010 Pearson Higher Education, Inc. Pearson Prentice Hall - Upper Saddle River, NJ 07458

SETUPS ON THE VERTICAL MILLING MACHINE tab Work Edge and Hole Centerline Locating • After a workpiece has been set up on the mill, it may be necessary to position the machine spindle relative to the edge of the part or to center the spindle over an existing hole. – Edge finding and centerline finding are common operations that you will encounter almost daily in general milling machine operations. Machine Tool Practices, Ninth Edition By Richard R. Kibbe, Roland O. Meyer, John E. Neely, Warren T. White © 2010 Pearson Higher Education, Inc. Pearson Prentice Hall - Upper Saddle River, NJ 07458
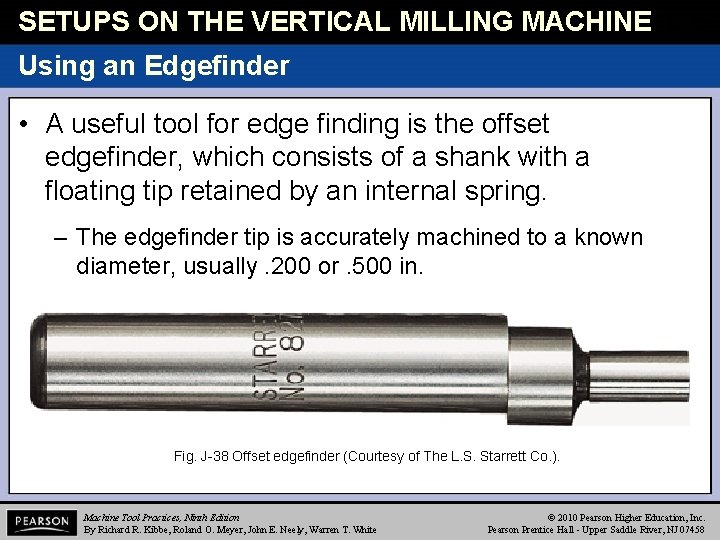
SETUPS ON THE VERTICAL MILLING MACHINE tab Using an Edgefinder • A useful tool for edge finding is the offset edgefinder, which consists of a shank with a floating tip retained by an internal spring. – The edgefinder tip is accurately machined to a known diameter, usually. 200 or. 500 in. Fig. J-38 Offset edgefinder (Courtesy of The L. S. Starrett Co. ). Machine Tool Practices, Ninth Edition By Richard R. Kibbe, Roland O. Meyer, John E. Neely, Warren T. White © 2010 Pearson Higher Education, Inc. Pearson Prentice Hall - Upper Saddle River, NJ 07458
HOW TO DO IT… l 1 Using an Edgefinder • Step 1 Secure the edgefinder in a collet or chuck in the machine spindle. • Step 2 Set the spindle speed to about 600 to 800 rpm, and slide the edgefinder tip over so that it is off center. • Step 3 Start the spindle and lower the quill or raise the knee so that the edgefinder tip can contact the edge of the part to be located. Machine Tool Practices, Ninth Edition By Richard R. Kibbe, Roland O. Meyer, John E. Neely, Warren T. White © 2010 Pearson Higher Education, Inc. Pearson Prentice Hall - Upper Saddle River, NJ 07458
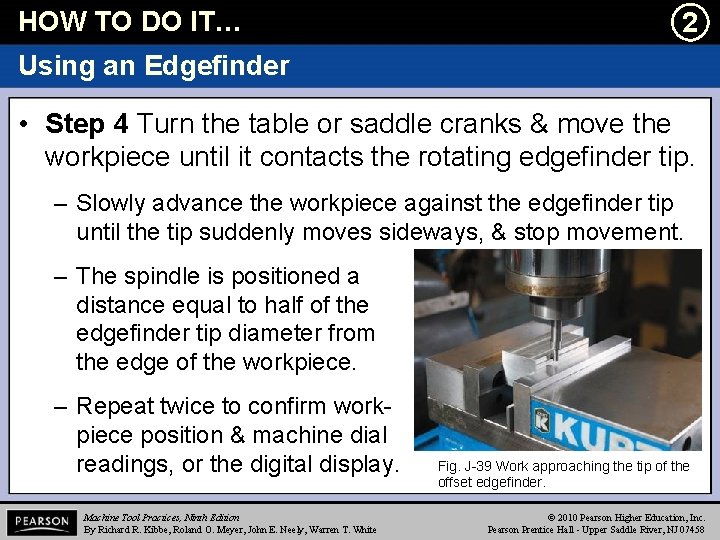
HOW TO DO IT… l 2 Using an Edgefinder • Step 4 Turn the table or saddle cranks & move the workpiece until it contacts the rotating edgefinder tip. – Slowly advance the workpiece against the edgefinder tip until the tip suddenly moves sideways, & stop movement. – The spindle is positioned a distance equal to half of the edgefinder tip diameter from the edge of the workpiece. – Repeat twice to confirm workpiece position & machine dial readings, or the digital display. Machine Tool Practices, Ninth Edition By Richard R. Kibbe, Roland O. Meyer, John E. Neely, Warren T. White Fig. J-39 Work approaching the tip of the offset edgefinder. © 2010 Pearson Higher Education, Inc. Pearson Prentice Hall - Upper Saddle River, NJ 07458
HOW TO DO IT… l 3 Using an Edgefinder • Step 5 When you are sure that the positioning is correct, lower the workpiece or raise the spindle and set the DRO display or the table and saddle micrometer collars to zero. – Move the table or saddle the additional. 100 in. in the same direction that it was moving as it approached the workpiece. – This will prevent introduction of a backlash error owing to slack in the table or saddle nuts. Machine Tool Practices, Ninth Edition By Richard R. Kibbe, Roland O. Meyer, John E. Neely, Warren T. White © 2010 Pearson Higher Education, Inc. Pearson Prentice Hall - Upper Saddle River, NJ 07458
tab SHOP TIP: Craftsmanship • When work requires accurate table movements, backlash must be considered. • When a digital readout is not available on your milling machine, use a dial indicator with a measuring capacity of 1 in. or more. • When this dial indicator is fitted with a magnetic base and clamped on the machine, it will measure exact table movement regardless of the play (backlash) between the nut and leadscrew of the machine. • Watch the dial while tightening the locking levers & make corrections before making a wrong cut. Machine Tool Practices, Ninth Edition By Richard R. Kibbe, Roland O. Meyer, John E. Neely, Warren T. White © 2010 Pearson Higher Education, Inc. Pearson Prentice Hall - Upper Saddle River, NJ 07458
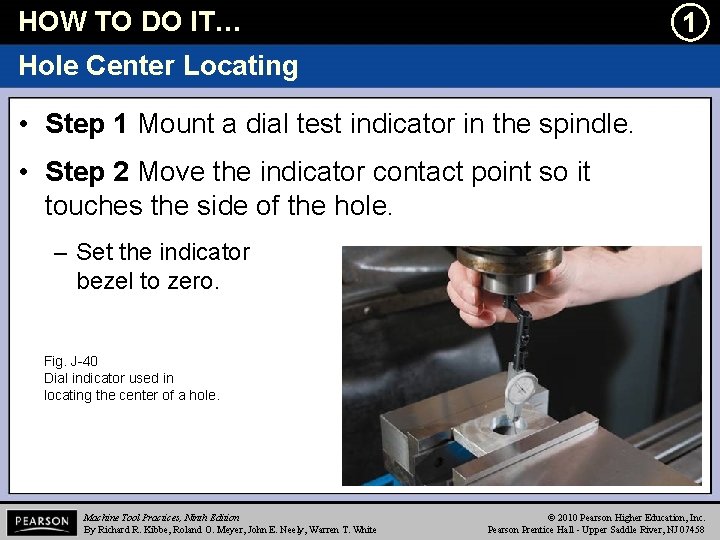
HOW TO DO IT… l 1 Hole Center Locating • Step 1 Mount a dial test indicator in the spindle. • Step 2 Move the indicator contact point so it touches the side of the hole. – Set the indicator bezel to zero. Fig. J-40 Dial indicator used in locating the center of a hole. Machine Tool Practices, Ninth Edition By Richard R. Kibbe, Roland O. Meyer, John E. Neely, Warren T. White © 2010 Pearson Higher Education, Inc. Pearson Prentice Hall - Upper Saddle River, NJ 07458
HOW TO DO IT… l 2 Hole Center Locating • Step 3 Rotate the spindle 180 degrees. – Compare the two indicator readings & split the difference between them by moving the machine table. – Locate the spindle center first in one axis, then in the second axis. • Step 4 If the hole is not round or cylindrical, the spindle still has to be centered in both table & saddle axis. – In this case, the indicator readings will be identical, 180 degrees apart, but will vary from axis to axis. Machine Tool Practices, Ninth Edition By Richard R. Kibbe, Roland O. Meyer, John E. Neely, Warren T. White © 2010 Pearson Higher Education, Inc. Pearson Prentice Hall - Upper Saddle River, NJ 07458
HOW TO DO IT… l 3 Hole Center Locating • Step 5 Always double-check the readings on the indicator and the machine dial settings before performing any additional machining. Machine Tool Practices, Ninth Edition By Richard R. Kibbe, Roland O. Meyer, John E. Neely, Warren T. White © 2010 Pearson Higher Education, Inc. Pearson Prentice Hall - Upper Saddle River, NJ 07458
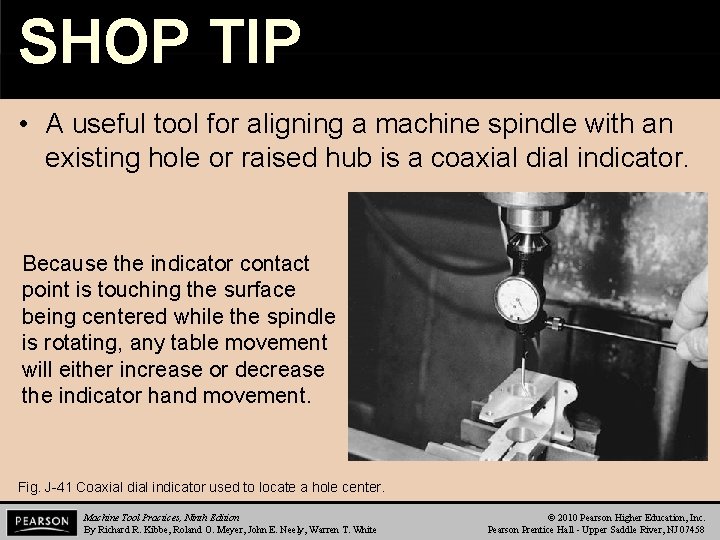
SHOP TIP tab • A useful tool for aligning a machine spindle with an existing hole or raised hub is a coaxial dial indicator. Because the indicator contact point is touching the surface being centered while the spindle is rotating, any table movement will either increase or decrease the indicator hand movement. Fig. J-41 Coaxial dial indicator used to locate a hole center. Machine Tool Practices, Ninth Edition By Richard R. Kibbe, Roland O. Meyer, John E. Neely, Warren T. White © 2010 Pearson Higher Education, Inc. Pearson Prentice Hall - Upper Saddle River, NJ 07458
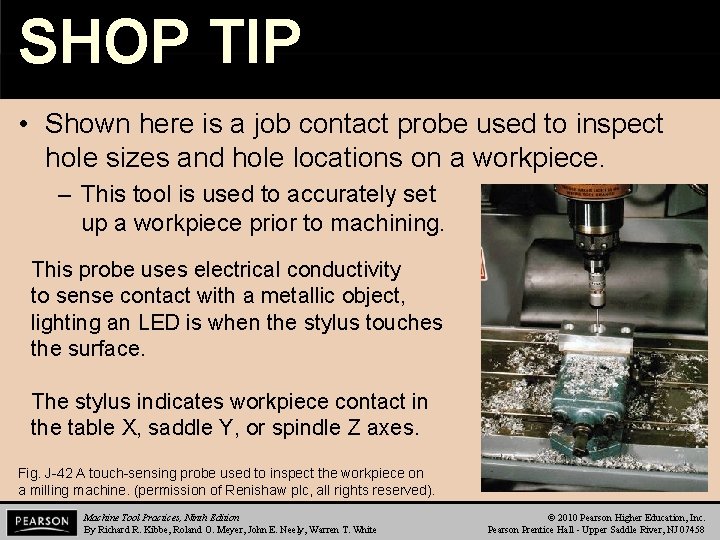
tab SHOP TIP • Shown here is a job contact probe used to inspect hole sizes and hole locations on a workpiece. – This tool is used to accurately set up a workpiece prior to machining. This probe uses electrical conductivity to sense contact with a metallic object, lighting an LED is when the stylus touches the surface. The stylus indicates workpiece contact in the table X, saddle Y, or spindle Z axes. Fig. J-42 A touch-sensing probe used to inspect the workpiece on a milling machine. (permission of Renishaw plc, all rights reserved). Machine Tool Practices, Ninth Edition By Richard R. Kibbe, Roland O. Meyer, John E. Neely, Warren T. White © 2010 Pearson Higher Education, Inc. Pearson Prentice Hall - Upper Saddle River, NJ 07458
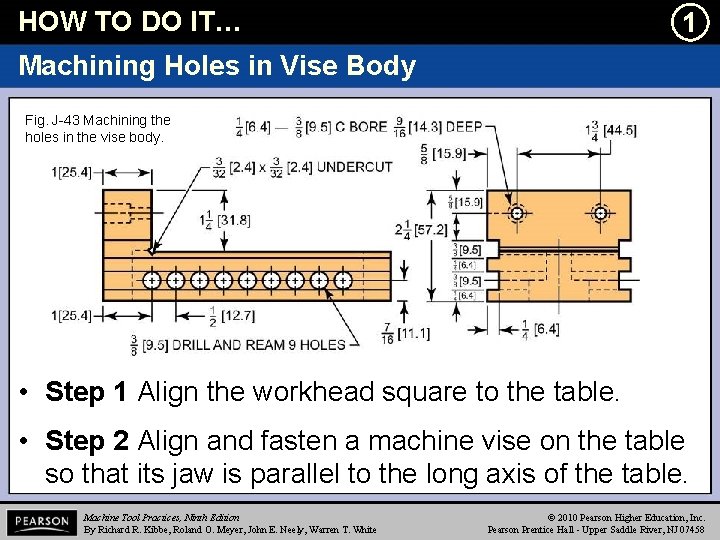
HOW TO DO IT… l 1 Machining Holes in Vise Body Fig. J-43 Machining the holes in the vise body. • Step 1 Align the workhead square to the table. • Step 2 Align and fasten a machine vise on the table so that its jaw is parallel to the long axis of the table. Machine Tool Practices, Ninth Edition By Richard R. Kibbe, Roland O. Meyer, John E. Neely, Warren T. White © 2010 Pearson Higher Education, Inc. Pearson Prentice Hall - Upper Saddle River, NJ 07458
HOW TO DO IT… l 2 Machining Holes in Vise Body • Step 3 Mount the vise body in the machine vise with the bottom surface against the solid jaw of the machine vise. • Step 4 Mount an edgefinder in a spindle collet and align the spindle axis with the base surface of the vise body. • Step 5 Move the table the required. 452 -in. distance and lock the table cross slide. • Step 6 Pick up the outside of the solid jaw of the vise body. Machine Tool Practices, Ninth Edition By Richard R. Kibbe, Roland O. Meyer, John E. Neely, Warren T. White © 2010 Pearson Higher Education, Inc. Pearson Prentice Hall - Upper Saddle River, NJ 07458
HOW TO DO IT… l 3 Machining Holes in Vise Body • Step 7 Move to the first hole location 1. 015 in. from the outside edge. • Step 8 Center drill this hole. • Step 9 Use a 1/4” twist drill to drill this hole 1 -1/2” deep. • Step 10 Repeat steps 8 & 9 for the remaining eight holes. – Accurate positioning is done with the micrometer dials or DRO system. Machine Tool Practices, Ninth Edition By Richard R. Kibbe, Roland O. Meyer, John E. Neely, Warren T. White © 2010 Pearson Higher Education, Inc. Pearson Prentice Hall - Upper Saddle River, NJ 07458
HOW TO DO IT… l 4 Machining Holes in Vise Body • Step 11 Remove the work from the machine vise. – Turn it over so the just-drilled holes are down & the bottom surface of the vise body is against the solid jaw. • Step 12 Use the edgefinder to pick up the two sides, as for the first drilling operation. • Step 13 Position the spindle over the first hole location, again with the hole on the solid jaw side. • Step 14 Center drill this hole. Machine Tool Practices, Ninth Edition By Richard R. Kibbe, Roland O. Meyer, John E. Neely, Warren T. White © 2010 Pearson Higher Education, Inc. Pearson Prentice Hall - Upper Saddle River, NJ 07458
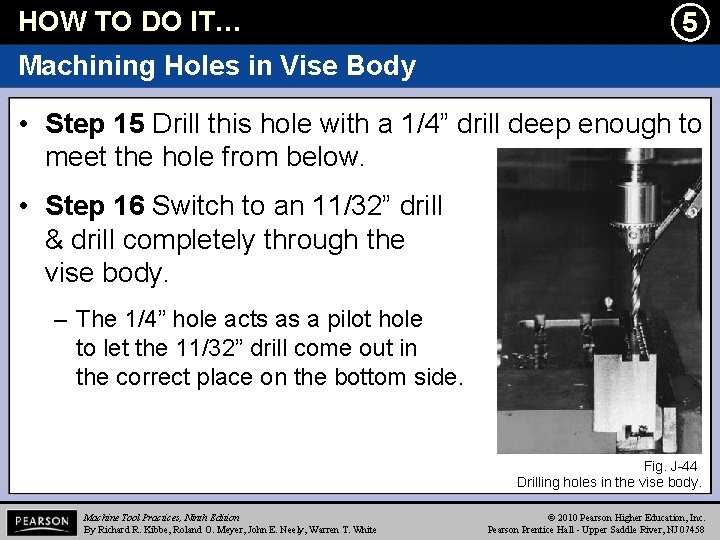
HOW TO DO IT… l 5 Machining Holes in Vise Body • Step 15 Drill this hole with a 1/4” drill deep enough to meet the hole from below. • Step 16 Switch to an 11/32” drill & drill completely through the vise body. – The 1/4” hole acts as a pilot hole to let the 11/32” drill come out in the correct place on the bottom side. Fig. J-44 Drilling holes in the vise body. Machine Tool Practices, Ninth Edition By Richard R. Kibbe, Roland O. Meyer, John E. Neely, Warren T. White © 2010 Pearson Higher Education, Inc. Pearson Prentice Hall - Upper Saddle River, NJ 07458
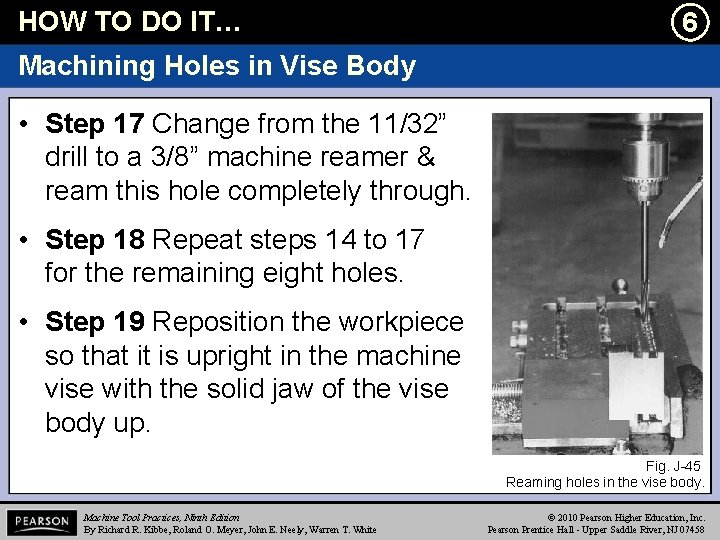
HOW TO DO IT… l 6 Machining Holes in Vise Body • Step 17 Change from the 11/32” drill to a 3/8” machine reamer & ream this hole completely through. • Step 18 Repeat steps 14 to 17 for the remaining eight holes. • Step 19 Reposition the workpiece so that it is upright in the machine vise with the solid jaw of the vise body up. Fig. J-45 Reaming holes in the vise body. Machine Tool Practices, Ninth Edition By Richard R. Kibbe, Roland O. Meyer, John E. Neely, Warren T. White © 2010 Pearson Higher Education, Inc. Pearson Prentice Hall - Upper Saddle River, NJ 07458
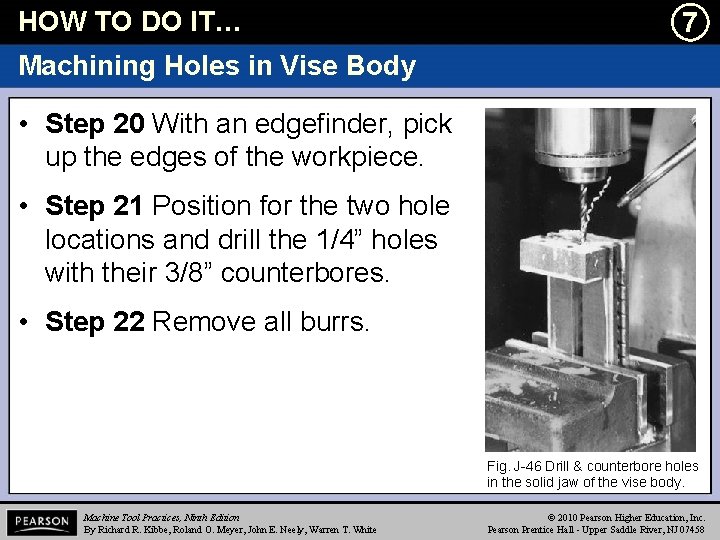
HOW TO DO IT… l 7 Machining Holes in Vise Body • Step 20 With an edgefinder, pick up the edges of the workpiece. • Step 21 Position for the two hole locations and drill the 1/4” holes with their 3/8” counterbores. • Step 22 Remove all burrs. Fig. J-46 Drill & counterbore holes in the solid jaw of the vise body. Machine Tool Practices, Ninth Edition By Richard R. Kibbe, Roland O. Meyer, John E. Neely, Warren T. White © 2010 Pearson Higher Education, Inc. Pearson Prentice Hall - Upper Saddle River, NJ 07458
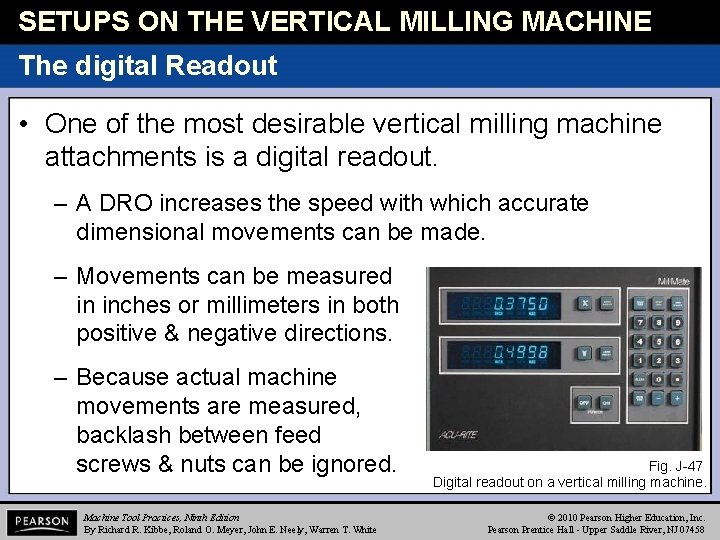
SETUPS ON THE VERTICAL MILLING MACHINE tab The digital Readout • One of the most desirable vertical milling machine attachments is a digital readout. – A DRO increases the speed with which accurate dimensional movements can be made. – Movements can be measured in inches or millimeters in both positive & negative directions. – Because actual machine movements are measured, backlash between feed screws & nuts can be ignored. Machine Tool Practices, Ninth Edition By Richard R. Kibbe, Roland O. Meyer, John E. Neely, Warren T. White Fig. J-47 Digital readout on a vertical milling machine. © 2010 Pearson Higher Education, Inc. Pearson Prentice Hall - Upper Saddle River, NJ 07458
End
- Slides: 26