Spring Net v 1 1 Quick Guide 1


 around Advice 구현 public class Debug. Interceptor : IMethod. Interceptor {")


 메소드 이름을 기준으로 Aspect : 메소드 이름을 기준으로 Auto Proxy를 구현하기")


![4. Data Access 4. 트랜잭션 전략 : 스프링닷넷에서 트랜잭션을 제어하기 위해서는 해당 메소드에 [Transaction]](https://slidetodoc.com/presentation_image_h/becca259dd1cccb27b7aa2a15c7bb1ea/image-22.jpg "4. Data Access 4. 트랜잭션 전략 : 스프링닷넷에서 트랜잭션을 제어하기 위해서는 해당 메소드에 [Transaction]")
")

- Slides: 27
Spring. Net v 1. 1 Quick Guide ㈜중외정보기술 권효중
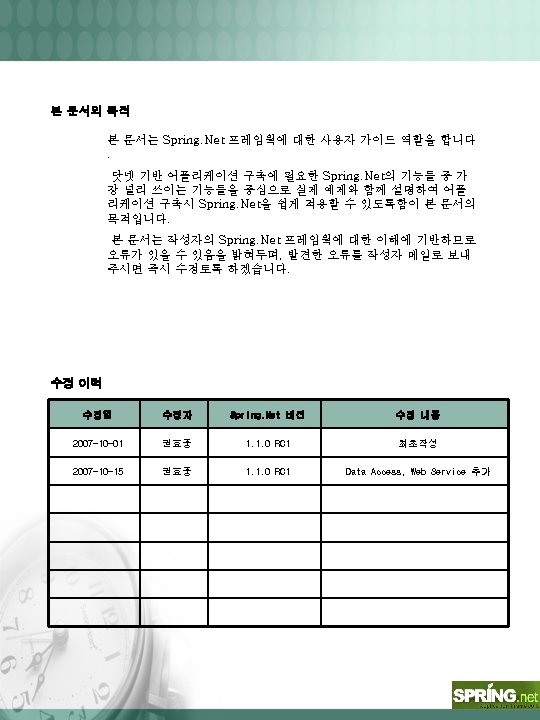
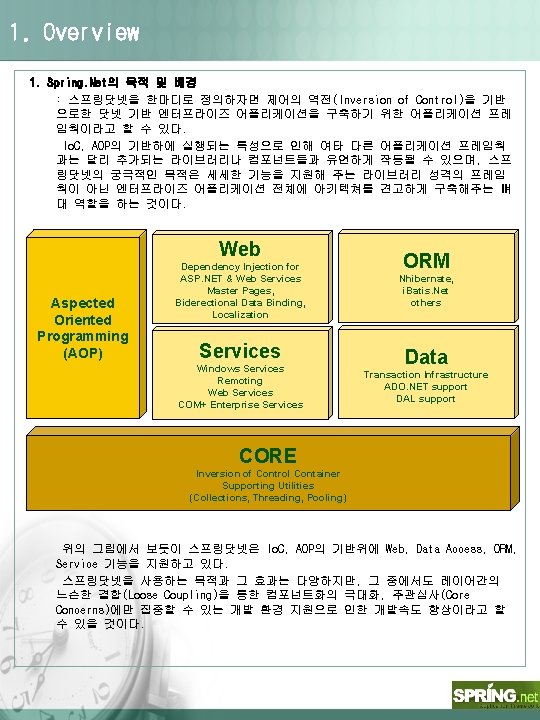
목 차 1 Overview 2 Inversion of Control 3 AOP 4 Data Access 5 Web Service 6 Sample
2. Inversion of Control 1. IApplication. Context 인터페이스의 역할 및 Dependency Lookup : Application Context는 Spring. Net에서 관리하는 객체의 생성과 소멸 등 일련의 작업을 하기 위한 컨테이너라고 볼 수 있다. 예를 들어, Spring. Net 프레임웍에서 Example. Object 라는 객체를 관리한다면 이 객체의 인스턴스는 Application Context라는 컨테이너에 키와 값의 쌍으로 저장되 어 있으며 프로그램에서 Example. Object 객체를 사용하려고 하면 Spring. Net 프레 임웍은 해당하는 Application Context에서 키를 조회하여 값에 해당하는 인스턴스 를 리턴하는 방식이다. <configuration> <config. Sections> <section. Group name="spring"> <section name="context" type="Spring. Context. Support. Context. Handler, Spring. Core"/> <section name="objects" type="Spring. Context. Support. Default. Section. Handler, Spring. Core"/> </section. Group> </config. Sections> <spring> <context> <resource uri="config: //spring/objects"/> </context> <objects xmlns="http: //www. springframework. net">. . . 사용할 객체 선언. . . </objects> </spring> </configuration> 윈폼이나 웹폼의 응용 프로그램 구성 파일에서 위와 같이 Application Context를 지정한 후, 프로그램에서는 아래와 같이 호출하여 사용한다. IApplication. Context ctx = Context. Registry. Get. Context(); IDAO dao = ctx. Get. Object("dao") as IDAO; 물론 Web. config나 App. config 파일외의 별도 XML 파일에서 관리하는 것도 역시 가 능하다. 단, 이 경우 주의할 점은 Visual Studio에서 별도의 XML 파일 속성 중 빌 드 작업 속성을 ‘포함 리소스’로 빌드해야만 파일을 인식할 수 있다. 쉽게 생각하면, 결국 Application Context는 마치 어플리케이션 전체를 관할하는 전역 변수나 인스턴스와 같은 역할을 한다고도 볼 수 있다.
2. Inversion of Control 3. Dependency Injection : 스프링닷넷 프레임웍은 설정 파일 내에서 객체간의 의존 관계를 설정할 수 있다. 이는 디자인패턴의 Factory Method Pattern에서의 팩토리 클래스와 같은 효과를 가진다. <object id=“service” type=“Service. Layer. Service, Service. Layer”> <property id=“Dao” ref=“dao”/> </object> <object id=“dao” type=“Dao. Layer. DAO, Dao. Layer”> 위의 설정은 Service 클래스에서 Property 메소드를 사용해서 DAO 클래스의 인스 턴스를 획득하고 있다. //Service. cs public class Service : IService { private IDAO dao; public IDAO Dao { set { dao = value; } } public string Say. Hello(string name) { return dao. Hello. DAO(name + " " + Test. Value); } } //DAO. cs public class DAO : IDAO { public string Hello. DAO(string name) { return "HELLO " + name + " FROM DAO"; } } 단, Property를 이용하여 DI를 구현할 경우에는 사용하는 클래스의 디폴트 생성자( 아규먼트없는 public 생성자)를 가지고 있어야 하며, 부득이하게 private 으로 선 언하여야 할 경우에는 다음으로 소개할 <constructor-arg> 엘리먼트를 사용하여야 한다. <object id=“service” type=“Service. Layer. Service, Service. Layer”> < constructor-arg name=“Dao” ref=“dao”/> </object>
2. Inversion of Control //Service. cs public class Service : IService { private DAO dao; private Service(){} private Service(DAO dao) { this. dao = dao; } public string Say. Hello(string name) { return dao. Hello. DAO(name + " " + Test. Value); } } 그러나, 위와 같이 구현할 경우는 그리 많지 않을것이며, 스프링닷넷 프레임웍의 개발 리드를 맡고 있는 Mark Polarck 또한 Property 를 이용한 DI 사용을 권장하 고 있다. 이처럼, DI 기능을 사용하여 객체를 생성하는 방법에는 Property를 이용하는 방법 과 생성자를 이용하는 방법 두가지가 있다. ASP. NET에서는 웹어플리케이션이 로드될 때 자동적으로 IApplication. Context 를 로딩해준다. 따라서 웹페이지에서는 바로 DI 기능을 사용할 수 있다. 하지만 윈폼에서는 아직 IApplication. Context의 로딩을 자동화해주지 않으므로 최초에 한 번은 프로그래머가 직접 로딩해 주어야 한다. // Program. cs static class Program { [STAThread] static void Main() { try { Application. Enable. Visual. Styles(); Application. Set. Compatible. Text. Rendering. Default(false); // Application. Context를 로딩 IApplication. Context ctx = Context. Registry. Get. Context(); Form main. Form = (Form)ctx["main. Form"]; Application. Run(main. Form); } catch(Exception x) {} } } // App. Config <object id="main. Form" type=“Test. NS. frm. Main, Test. NS"></object>
2. Inversion of Control 4. 설정파일에서의 Application. Context 설정방법 : 아래는 일반적인 설정파일의 형태이다. config. Sections 엘리먼트내에서 spring 섹션 그룹을 설정하고 그 내부에 context, objects 섹션을 설정한다. <? xml version="1. 0" encoding="utf-8" ? > <configuration> <config. Sections> <section. Group name="spring"> <section name="context" type="Spring. Context. Support. Context. Handler, Spring. Core" /> <section name="objects" type="Spring. Context. Support. Default. Section. Handler, Spring. Core" /> </section. Group> </config. Sections> <spring> <context> <resource uri="config: //spring/objects"/> </context> <objects xmlns="http: //www. springframework. net"> <object id="dao" type="My. Spring. Sample_05. DAO, My. Spring. Sample_05" > </object> <object id="service. Base" type="My. Spring. Sample_05. Service. Base, My. Spring. Sample_05"> <property name="Dao" ref="dao"/> </object> <object id="service" type="My. Spring. Sample_05. Service, My. Spring. Sample_05" parent="service. Base" singleton="true" lazy-init="true" > </objects> </spring> </configuration> 설정할 내용이 많을 경우 objects 엘리먼트의 내용은 부속 xml 파일로 빼낼 수 있 다. 그러기 위해서는 다음과 같이 지정한다. 단, 주의할 점은 부속 xml 파일의 빌 드 속성을 “포함 리소스”로 변경하는것을 절대 잊어선 안된다. <spring> <context type="Spring. Context. Support. Xml. Application. Context, Spring. Core"> <resource uri="file: //objects. xml"/> <resource uri="assembly: //My. Assembly/My. Project/objects-dal-layer. xml"/> </context> </spring>
3. AOP 3. before, around, after, throws advice : 스프링닷넷에서 제공하는 Advice에는 before, around, after, throws 네가지가 있다. 단어에서 유추할 수 있듯이 before는 특정 메소드가 호출되기전에 인터셉트 됨을 의미하며, around는 메소드가 실행되기 바로 전과 후에, after는 실행 직후 에, throws는 예외가 발생했을때 인터셉트된다. 1) before Advice 구현 public class Counting. Before. Advice : IMethod. Before. Advice { public void Before(Method. Info method, object[] args, object target) { Console. Write. Line(“메소드 호출전”); } } : before Advice는 IMethod. Bofore. Advice 인터페이스를 구현한 클래스의 Before 메 소드에서 실행된다.
3. AOP 2) around Advice 구현 public class Debug. Interceptor : IMethod. Interceptor { public object Invoke(IMethod. Invocation invocation) { Console. Write. Line(“메소드 실행전”); object rval = invocation. Proceed(); Console. Write. Line(“메소드 실행직후"); return rval; } } : around Advice는 IMethod. Interceptor 인터페이스를 구현한 클래스의 Invoke 메 소드에서 실행된다. 인자로 전달받은 invocation의 Proceed 메소드가 실행될때 타 겟 메소드가 실행된다. 3) after Advice 구현 public class Counting. After. Returning. Advice : IAfter. Returning. Advice { public void After. Returning(object return. Value, Method. Base m, object[] args, object target) { Console. Write. Line(“메소드 실행 직후”); } } : after Advice는 타겟 메소드가 실행된 직후에 IAfter. Returning. Advice 인터페이 스를 구현한 클래스의 After. Returning 메소드가 실행된다. 4) throws Advice 구현 public class Combined. Throws. Advice : IThrows. Advice { public void After. Throwing(Remoting. Exception ex) // Do something with remoting exception } { public void After. Throwing(Method. Info method, object[] args, object target, Sql. Exception ex) { // Do something will arguments } } : throws Advice는 예외가 발생될 때 IThrows. Advice 인터페이스를 구현한 클래스 의 After. Throwing 메소드가 실행된다. After. Throwing 메소드의 인자로 특정 Exception 객체를 선언하면 해당 예외가 발 생할 때만 호출된다.
3. AOP 4. Aspect 설정 방법 <objects xmlns='http: //www. springframework. net'> <object id="before. Advice" type="My. Spring. Sample_AOP. Aspect. Object. Before. Log, My. Spring. Sample_AOP" /> <object id="after. Advice" type="My. Spring. Sample_AOP. Aspect. Object. After. Log, My. Spring. Sample_AOP" /> <object id="around. Advice" type="My. Spring. Sample_AOP. Aspect. Object. Around. Log, My. Spring. Sample_AOP" /> <object id="throws. Advice" type="My. Spring. Sample_AOP. Aspect. Object. Exception. Log, My. Spring. Sample_AOP" /> <object id="DAOproxy" type="Spring. Aop. Framework. Proxy. Factory. Object"> <property name="Target"> <object type="My. Spring. Sample_AOP. DAO, My. Spring. Sample_AOP" /> </property> <property name="Interceptor. Names"> <list> <value>before. Advice</value> <value>after. Advice</value> <value>around. Advice</value> <value>throws. Advice</value> </list> </property> </objects> : Aspect를 설정하는 방법은 위에서 보듯이 Advice들을 구현한 object를 선언한 후에 타겟 객체를 지정하면 해당 객체의 메소드가 실행될 때 “interceptor. Names”Property의 “list”엘리먼트에서 지정한 Advice들이 해당 메소드의 실행을 가로채게 된다. 즉, 위에서는 DAO 객체의 메소드가 실행될 때 Advice가 작동하게 되는것이다.
3. AOP 5. Auto. Proxy : Auto Proxy 기능은 특정 클래스나 특정 메소드들만 Aspect 할 수 있는 기능을 말한다. 이 기능을 사용하면 객체들마다 Aspect를 설정해야하는 번거로움을 제거 할 수 있다. 1) 객체 이름(Object 엘리먼트의 id 값)을 기준으로 Aspect 특정 클래스명을 가진 객체를 Aspect 하기 위해서는 Object. Name. Auto. Proxy. Creator 를 구현한다. 아래의 설정 예제를 보자. <object id="around. Advice" type="My. Spring. Sample_AOP. Aspect. Object. Around. Log, My. Spring. Sample_AOP" /> <object id="Proxy. Creator" type="Spring. Aop. Framework. Auto. Proxy. Object. Name. Auto. Proxy. Creator, Spring. Aop"> <property name="Object. Names"> <list> <value>DAO*</value> </list> </property> <property name="Interceptor. Names"> <list> <value>around. Advice</value> </list> </property> </object> <object id="DAOproxy" type="My. Spring. Sample_AOP. DAO, My. Spring. Sample_AOP" /> 위의 예제에서는 “DAO”이름으로 시작하는 id를 가진 모든 객체의 메소드를 Aspect하게된다.
3. AOP 2) 메소드 이름을 기준으로 Aspect : 메소드 이름을 기준으로 Auto Proxy를 구현하기 위해서는 Name. Match. Method. Pointcut. Advisor를 사용해야한다. <object id="around. Advice" type="My. Spring. Sample_AOP. Aspect. Object. Around. Log, My. Spring. Sample_AOP" /> <object id="around. Advisor" type="Spring. Aop. Support. Name. Match. Method. Pointcut. Advisor, Spring. Aop"> <property name="Advice" ref="around. Advice"/> <property name="Mapped. Names"> <list> <value>Save*</value> </list> </property> </object> <!– DAO 객체에만 지정 --> <object id="DAOproxy" type="Spring. Aop. Framework. Proxy. Factory. Object"> <property name="Target"> <object type="My. Spring. Sample_AOP. DAO, My. Spring. Sample_AOP" /> </property> <property name="Interceptor. Names"> <list> <value>around. Advisor</value> </list> </property> </object> <!-- 모든 객체에 지정 --> <object id="DAOproxy" type="My. Spring. Sample_AOP. DAO, My. Spring. Sample_AOP" /> <object type="Spring. Aop. Framework. Auto. Proxy. Default. Advisor. Auto. Proxy. Creator, Spring. Aop" /> --> 위의 예제에서는 DAO 객체의 Save로 시작하는 메소드의 경우에만 Aspect를 실행한다. 물론, 객체명과, 메소드명을 혼합해서 사용하는 것도 가능하다. 또, 주석처리 되어있는 Default. Advisor. Auto. Proxy. Creator를 사용하면 context에 지정된 모든 객체의 Save로 시작하는 메소드를 대상으로 Aspect를 실행할 수도 있다.
4. Data Access 1. db. Provider : 스프링닷넷에서 제공하는 데이타베이스 provider는 아래와 같다. § Sql. Server-1. 1 - Microsoft SQL Server, provider V 1. 0. 5000. 0 in framework. NET V 1. 1 § Sql. Server-2. 0 (aliased to System. Data. Sql. Client) - Microsoft SQL Server, provider V 2. 0. 0. 0 in framework. NET V 2. 0 § Sql. Server. Ce-3. 1 (aliased to System. Data. Sql. Server. Ce) - Microsoft SQL Server Compact Edition, provider V 9. 0. 242. 0 § Ole. Db-1. 1 - Ole. Db, provider V 1. 0. 5000. 0 in framework. NET V 1. 1 § Ole. Db-2. 0 (aliased to System. Data. Ole. Db) - Ole. Db, provider V 2. 0. 0. 0 in framework. NET V 2. 0 § Oracle. Client-2. 0 (aliased to System. Data. Oracle. Client) - Oracle, Microsoft provider V 2. 0. 0. 0 § Oracle. ODP-2. 0 (aliased to System. Data. Access. Client) - Oracle, Oracle provider V 2. 102. 2. 20 § SQLite-1. 0. 43 - (aliased to System. Data. SQLite) - SQLite provider 1. 0. 43 for. NET Framework 2. 0 (My. Sql과 DB 2는 매뉴얼을 참조하길 바람) 설정파일에서는 아래와 같이 지정한다. <objects xmlns='http: //www. springframework. net' xmlns: db="http: //www. springframework. net/database"> <db: provider id=“db. Provider" provider=“Sql. Server-2. 0“ (또는, provider=“System. Data. Sql. Client”) connection. String="Data Source=(local); Database=Spring; User ID=springqa; Password=springqa; Trusted_Connection=False"/> <object id="ado. Template" type="Spring. Data. Ado. Template, Spring. Data"> <property name="Db. Provider" ref=“db. Provider"/> </objects>
4. Data Access 2. Ado. Template : 스프링닷넷은 데이타베이스 액세스를 위한 간편한 랩퍼클래스를 제공하며, 그것 이 Ado. Template이다. Ado. Template은 CRUD를 위한 다양한 메소드를 제공하고 있다. 입력성 쿼리를 위한 Execute. Non. Query, 단일값 반환을 위한 Execute. Scalar, 로우값 을 사용자 지정 객체로 반환해주는 Query. With. Result. Set. Extractor, Query. With. Row. Mapper, Query. For. Object 데이타셋이나 데이타테이블로 결과값을 반환 해 주는 Data. Table. Create, Data. Set. Create 등 다양한 메소드를 지원해 준다. <objects xmlns="http: //www. springframework. net" xmlns: db="http: //www. springframework. net/database"> <db: provider id="db. Provider" provider="Sql. Server-2. 0" connection. String="Data Source=khjnote; Initial Catalog=TEST_DB; Persist Security Info=True; User ID=sa; Password=showmethepower"/> <object id="ado. Template" type="Spring. Data. Core. Ado. Template, Spring. Data"> <property name="Db. Provider" ref="db. Provider"/> </object> <object id="dao" type="My. Spring. Sample_06. DAO, My. Spring. Sample_06"> <property name="Ado. Template" ref="ado. Template"/> </objects> public class DAO : Ado. Dao. Support, IDAO { public void Insert(string logonid, string name) { string query = "insert into users(logonid, name) values(@logonid, @name)"; IDb. Parameters. Builder builder = Create. Db. Parameters. Builder(); builder. Create(). Name("logonid"). Value(logonid); builder. Create(). Name("name"). Value(name); Ado. Template. Execute. Non. Query(Command. Type. Text, query, builder. Get. Parameters()); } } 위 예제는 Ado. Template을 통해서 데이터를 입력하고 있으며, 설정파일에서 Db. Provider를 DAO 클래스의 Ado. Template에 지정하였다.
4. Data Access : 아래의 예제는 여러줄의 데이터를 IList 타입의 사용자 지정 객체로 반환받고 있다. // DAO. cs public class DAO : Ado. Dao. Support, IDAO { public IList Select. All() { string query = "select logonid, name from users"; return Ado. Template. Query. With. Row. Mapper(Command. Type. Text, query, new User. Mapper()); } } // User. Mapper. cs public class User. Mapper : IRow. Mapper { public object Map. Row(System. Data. IData. Reader reader, int row. Num) { User. Entity user. Entity = new User. Entity(); user. Entity. Logonid = reader. Get. String(0); user. Entity. Name = reader. Get. String(1); return user. Entity; } } // User. Entity. cs [Serializable] public class User. Entity { private string logonid; private string name; public string Logonid { get { return logonid; } set { logonid = value; } } public string Name { get { return name; } set { name = value; } } } User. Mapper 객체를 통해 데이타리더로 받은 결과로우를 User. Entity 객체 콜렉션으 로 반환하고 있다.
4. Data Access 3. 네임스페이스 파서 : 설정파일에서 주의할점으로 네임스페이스 파서를 반드시 등록하는 것이다. 그렇지 않으면 설정파일의 스키마를 해석하지 못하는 오류가 발생한다. <? xml version="1. 0" encoding="utf-8" ? > <configuration> <config. Sections> <section. Group name="spring"> <section name="context" type="Spring. Context. Support. Context. Handler, Spring. Core" /> <section name="objects" type="Spring. Context. Support. Default. Section. Handler, Spring. Core" /> <section name="parsers" type="Spring. Context. Support. Namespace. Parsers. Section. Handler, Spring. Core" /> </section. Group> </config. Sections> <spring> <parsers> <parser type="Spring. Data. Config. Database. Namespace. Parser, Spring. Data" /> <parser type="Spring. Transaction. Config. Tx. Namespace. Parser, Spring. Data" /> </parsers> <context> <resource uri="assembly: //My. Spring. Sample_06/Service. xml"/> <resource uri="assembly: //My. Spring. Sample_06/DAO. xml"/> </context> </spring> </configuration> Database. Namespace. Parser는 xmlns: db="http: //www. springframework. net/database“ 스키마를 파싱하도록 도와주며, Tx. Namespace. Parser는 xmlns: tx="http: //www. springframework. net/tx“ 스키마를 파싱하도록 도와주는 역할을 실행한다.
4. Data Access 4. 트랜잭션 전략 : 스프링닷넷에서 트랜잭션을 제어하기 위해서는 해당 메소드에 [Transaction] 어 트리뷰트를 선언하고 설정파일에서는 아래의 코드를 삽입한다. <object id="transaction. Manager" type="Spring. Data. Core. Tx. Scope. Transaction. Manager, Spring. Data"> </object> <tx: attribute-driven transaction-manager="transaction. Manager"/> 또한 트랜잭션 네임스페이스 파서를 등록하는 것을 잊지 않도록 한다. <parser type="Spring. Transaction. Config. Tx. Namespace. Parser, Spring. Data" /> [Transaction] public void Create. User(string logonid, string name) { Dao. Insert(logonid, name); throw new Exception("강제 예외 실행"); Dao. Insert(logonid, name); } 아래는 특정 메소드에만 트랜잭션을 설정하는 방법이다. Create로 시작하는 메소 드는 모두 트랜잭션 기능이 적용된다. <tx: advice id="tx. Advice" transaction-manager="transaction. Manager"> <tx: attributes > <tx: method name="Create*"/> </tx: attributes> </tx: advice> 트랜잭션에 관해서는 다양한 옵션이 존재하므로 매뉴얼을 참조하길 바람. 주의 : 스프링닷넷의 트랜잭션을 사용하기 위해서는 반드시 인터페이스를 구현 해야함.
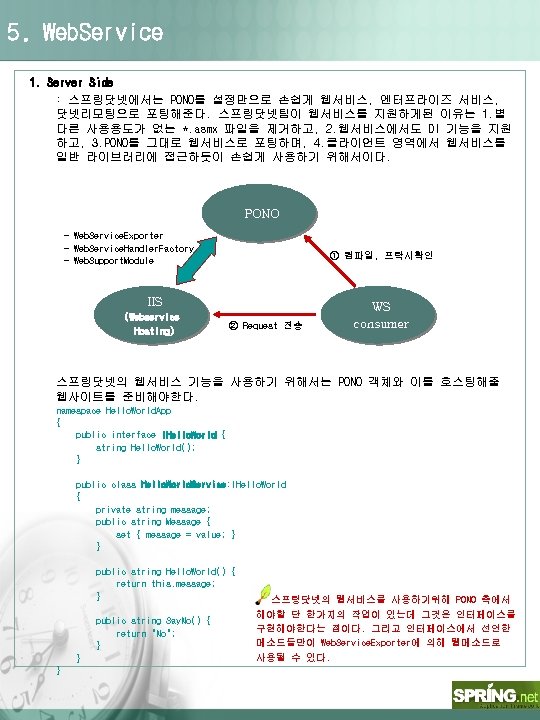
5. Web. Service : 다음은 PONO를 웹서비스로 포팅할 웹사이트의 Web. Config 이다. (일부발췌. ) <objects xmlns="http: //www. springframework. net"> <object id="hello. World" type="Hello. World. App. Hello. World. Service, Hello. World. App"> <property name="Message" value=“안녕하세요!"/> </object> <object id="Hello. World. Service" type="Spring. Web. Services. Web. Service. Exporter, Spring. Web"> <property name="Target. Name" value="hello. World"/> <property name="Namespace" value="http: //My. Spring. Sample_WS/Hello. World. Service"/> </object> http: //웹사이트이름 </objects> /Hello. World. Service. asmx 로 서비스됨. <system. web> <http. Handlers> <add verb="*" path="*. asmx" type="Spring. Web. Services. Web. Service. Handler. Factory, Spring. Web"/> </http. Handlers> <http. Modules> <add name="Spring" type="Spring. Context. Support. Web. Support. Module, Spring. Web"/> </http. Modules> </system. web> 설정이 완료되었으면 디폴트페이지에 링크를 걸어 Hello. World. Service. asmx를 확 인한다. <body> <table width="100%" height="100%" align="center" valign="middle"> <tr> <td align="center"> <h 2><a href="Hello. World. Service. asmx">hello. World. Service</a></h 2> </td> </tr> </table> </body>
5. Web. Service 2. Client Side : 클라이언트에서는 PONO 모듈을 참조한 후에 설정 파일에서 해당 웹서비스를 사 용하겠다는 선언을 하면된다. <object id="hello. World. Service" type="Spring. Web. Services. Web. Service. Proxy. Factory, Spring. Services"> <property name="Service. Uri" value="http: //localhost/Hello. World. Web/helloworldservice. asmx"/> <property name="Service. Interface" value="Hello. World. App. IHello. World, Hello. World. App"/> <property name="Product. Template"> <object> <property name="Timeout" value="10000" /> 웹메소드를 호출후 기다리는 시간 10초 설정 </object> </property> </object> 설정 파일에서는 위의 설정만으로 충분하며 클라이언트 코드에서는 일반적인 DI 기능을 사용하듯이 사용하면 된다. private IHello. World service. Hello; public IHello. World Service. Hello { get { return service. Hello; } set { service. Hello = value; } } private void button 1_Click(object sender, Event. Args e) { string s = Service. Hello. World(); Message. Box. Show(s); }