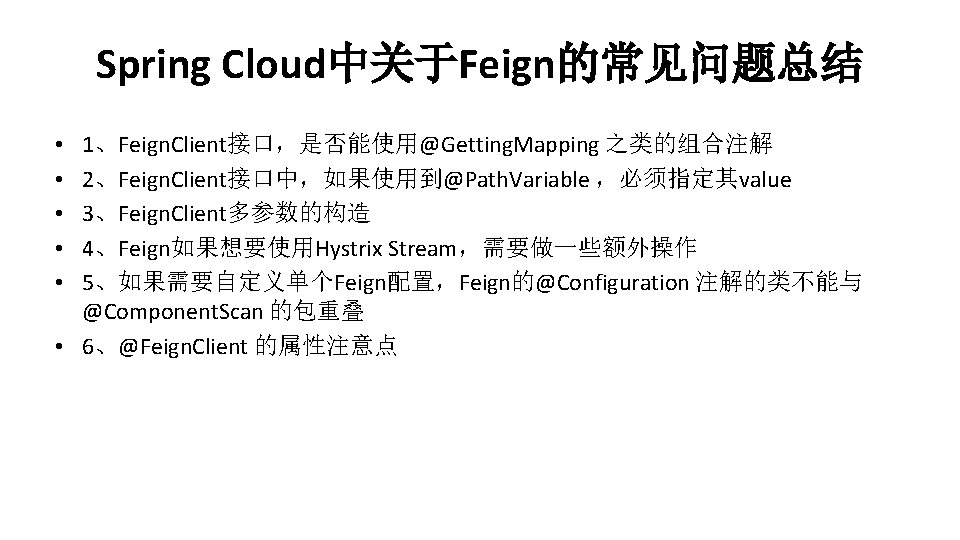
Spring Cloud Andy Spring Cloud Spring Cloud Spring

什么是Spring Cloud")
什么是Spring Cloud[")
什么是Spring Cloud")

服务提供者编码 新建 程 新建一个提供用户信息的 程,取名为:provider-user 在pom. xml添加依赖包 • <parent> • <group. Id>org. springframework. boot</group.")
服务提供者编码 • • • • • <!-- web支持: 1、web mvc; 2、restful; 3、jackjson支持; 4、aop. .")
服务提供者编码 • 在src/main/resources下新建schema. sql添加建表语句 drop table user if exists; create table user( id bigint")
服务提供者编码 • 在src/main/resources/新建data. sql插入数据 在User表插入几条数据进行测试: insert into user(id, username, age, balance) values(1, 'user 1',")
服务提供者编码 创建实体类User 创建Dao类User. Repository 创建Service类User. Service 创建Controller类User. Controller")
服务提供者编码 • 在src/main/resources新建application. properties server. port=7900 spring. jpa. generate-ddl=false spring. jpa. show-sql=true spring. jpa.")
服务提供者编码 • 编写启动类: • @Spring. Boot. Application • public class App { • public")
服务消费者编码 • 新建 程 • 新建一个服务消费者项目,取名为:consumer-movice • <!-- web支持: 1、web mvc; 2、restful; 3、jackjson支持; 4、aop.")
服务消费者编码 新建实体类User @Json. Ignore. Properties({\"hibernate. Lazy. Initializer\", \"handler\"}) 具体可以参考文章:https: //my. oschina. net/lieefu/blog/680098 新建Controller类Movice. Controller")


 • 创建项目 • 复制一个microservice-consumer-movice 程, 取名为microservice-consumer-movice-feign, 配置pom. xml,将上述的配置中的ribbon依赖替换成feign的依赖即可,具体如下: • • <dependency>")
 • • 开启Feign功能 在应用主类中通过@Enable. Feign. Clients注解开启Feign功能 • @Spring. Boot. Application •")
 • • 定义User. Client服务接口 定义ms-provider-user服务的接口,具体如下: • @Feign. Client(\"microservice-provider-user\") • public interface")
 • 在web层中调用上面定义的User. Client • @Autowired • private User. Client user. Client;")
 • • • 配置信息 application. properties中指定eureka服务注册中心即可,如: spring. application. name=microservice-consumer-movice-feign server. port=4444")

 • pom. xml中引入依赖hystrix依赖(ms-consumer-movice-ribbon) • <dependency> • <group. Id>org. springframework. cloud</group. Id>")
 • 在eureka-ribbon的主类Consumer. Movie. Ribbon中使用@Enable. Circuit. Breaker注解开启断 路器功能: • 改造原来的服务消费方式,新增User. Service类,在使用ribbon消费服务的函数上增加 @Hystrix.")


 : • (1)pom. xml中引入spring-cloud-config-server-git依赖,完整依赖配置如下: • •")
创建Spring Boot的程序主类,并添加@Enable. Config. Server注解,开启Config Server: • • @Spring. Boot.")
application. properties中配置服务信息以及git信息 • • • #应用程序名称. spring. applicatiton. name=microservice-config-server")

 • • <dependency> <group. Id>org. tmatesoft. svnkit</group. Id> <artifact. Id>svnkit</artifact. Id>")
 • • • • #应用程序名称 spring. application. name=ms-config-server-svn #端口号 server. port=7001")


创建一个Spring Boot应用并且添加依赖 • • • 创建一个Spring Boot应用(microservice-config-client),在pom. xml中引入spring-cloud-starter-config依赖 <!-- web支持: 1、web mvc; 2、restful; 3、jackjson支持;")
创建最基本的Spring Boot启动主类 • 创建一个Spring Boot应用(microservice-config-client),在pom. xml中引入spring -cloud-starter-config依赖 • @Spring. Boot. Application • public class")
创建bootstrap. properties配置,来指定 config server • • • #对应前配置文件中的{application}部分 spring. application. name=andy #对应前配置文件中的{profile}部分 spring. cloud.")
创建一个Rest Api来返回配置中心的from属 性 • • • @Refresh. Scope @Rest. Controller public class Test. Controller")


application. properties中配置Zuul应用的基础信息 • application. properties中配置Zuul应用的基础信息,如:应用名、服 务端口等。 • spring. application. name= microservice-zuul •")


 Eureka Server端 • 配置关闭自我保护,并按需配置Eureka Server清理无效节点的时间间隔。 • • # 设为false,关闭自我保护 eureka. server.")
 Eureka Client端 • 配置开启健康检查,并按需配置续约更新时间和到期时间。 • # 开启健康检查(需要spring-boot-starter-actuator依赖) eureka. client. healthcheck. enabled=true")


添加配置信息 • 创建application-peer 1. properties • • • spring. application. name= microservice-discovery-eureka. client. register-with-eureka=true")
添加配置信息 • 创建application-peer 2. properties • • • spring. application. name= microservice-discovery-eureka. client. register-with-eureka=true")
添加配置信息 • 创建application-peer 3. properties • • • spring. application. name= microservice-discovery-eureka. client. register-with-eureka=true")
在/etc/hosts文件中添加配置 • 在/etc/hosts文件中添加对peer 1、peer 2、peer 3的转换: • • 127. 0. 0. 1 peer 2")
启动应用程序 • 通过 --spring. profiles. active属性来分别启动peer 1、peer 2和peer 3")
服务注册 • 当Eureka为多节点的时候,服务提供方的Eureka地址怎么配置? • eureka. client. service. Url. default. Zone=http: //peer 1: 1111/eureka/, http:")


Random. Rule: 随机选择策略 • Random. Rule: 随机选择策略,也就是说Ribbon会随机从服务器列表 中选择一个进行访问;配置方式: • <client.")
Best. Available. Rule: 最大可用策略 • Best. Available. Rule: 最大可用策略,即先过滤出故障服务器后,选择 一个当前并发请求数最小的;")
Weighted. Response. Time. Rule: 加权轮询策略 • Weighted. Response. Time. Rule:")
Availability. Filtering. Rule: 可用过滤策略 • Availability. Filtering. Rule: 可用过滤策略,先过滤出故障的或并发请求 大于阈值一部分服务实例,然后再以线性轮询的方式从过滤后的实")
进行测试。 • (1)修改application配置文件 • 在application. properties配置文件中添加如下配置: • ms-provideruser. ribbon.")


")
错误的写法:直接使用复杂对象 • @Request. Mapping(method")
正确的写法 1:使用@Request. Param设置value属性 • @Request. Mapping(method = Request. Method. GET, value")
正确的写法 2:使用@Request. Param设置为map参数 • @Request. Mapping(method = Request. Method. GET, value")
 service. Id属性已经失效,尽量使用name属性。例如: • @Feign. Client(service. Id = \"ms-provider-user\") •")


添加fallback. Factory实现类 • • • • @Component public class User. Client. Hystrix. Fallback. Factory")
配置@Feign. Client的fallback. Factory属 性 • • @Feign. Client(value=“microservice-provider-user\", fallback. Factory=User. Client. Hystrix. Fallback. Factory.")

Ribbon中引入Hystrix • 在Ribbon中如果要使用Hystrix的话,那么需要先引用Hystrix的依 赖包:spring-cloud-starter-hystrix; • 其次就是在启动类中使用注解@Enable. Circuit. Breaker启用断路器; 在发起远程调用的方法上添加回调注解: @Hystrix. Command(fallback. Method=\"add. Service. Fallback\")。")
Feign中使用Hystrix")

 和metrics stream(指标流)")
 • 需要先添加依赖actuator: • <dependency> • <group. Id>org. springframework. boot</group. Id> • <artifact.")
")
")


- Slides: 193
从零开始学Spring Cloud 讲师:Andy
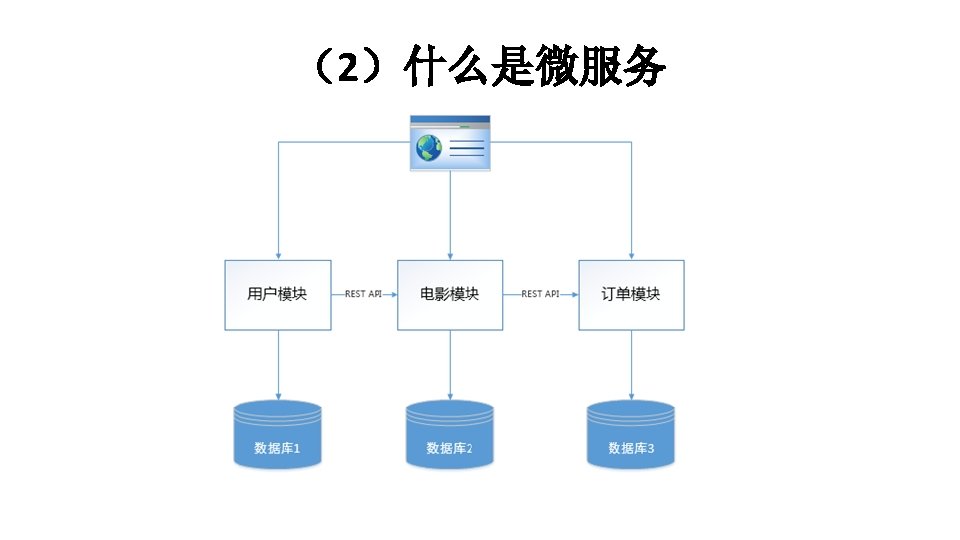
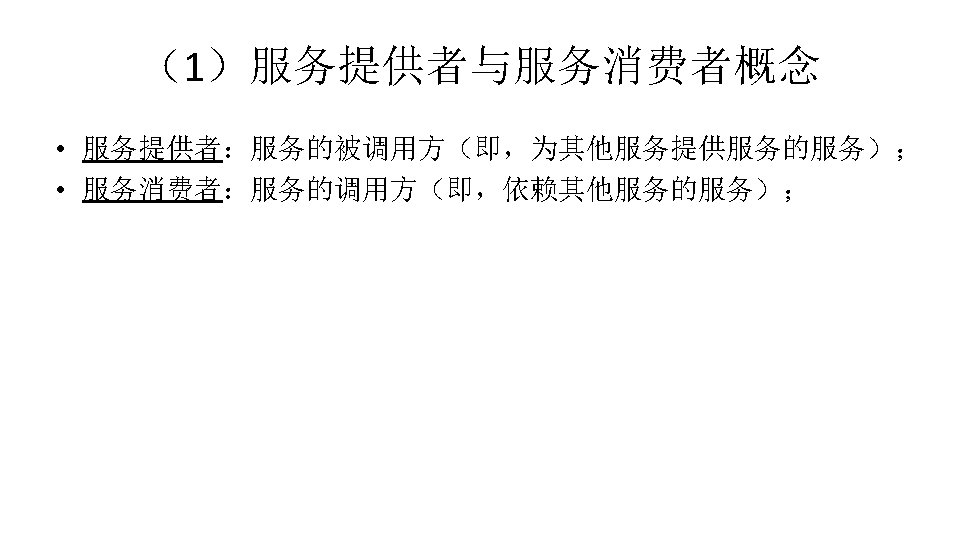
(五)什么是Spring Cloud
(五)什么是Spring Cloud[
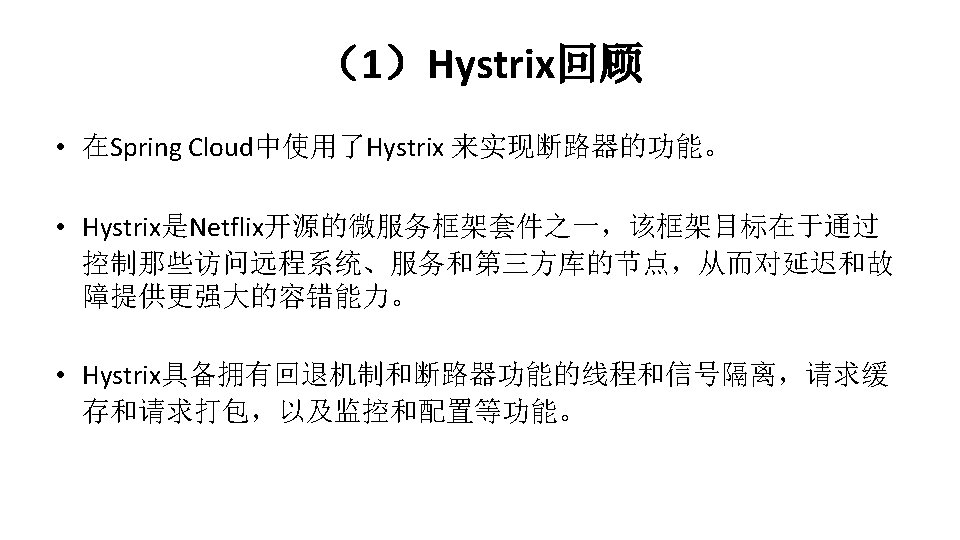
(五)什么是Spring Cloud
从零开始学Spring Cloud 讲师:Andy
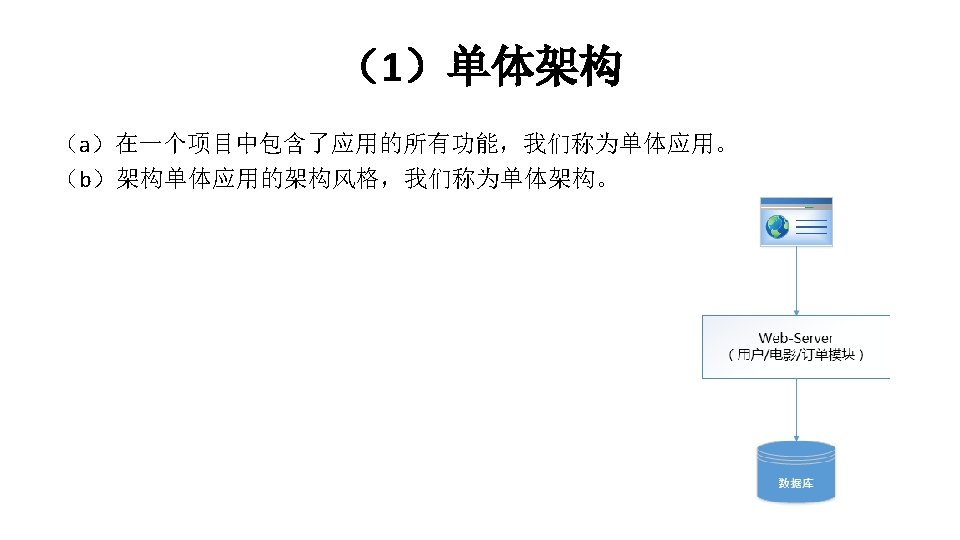
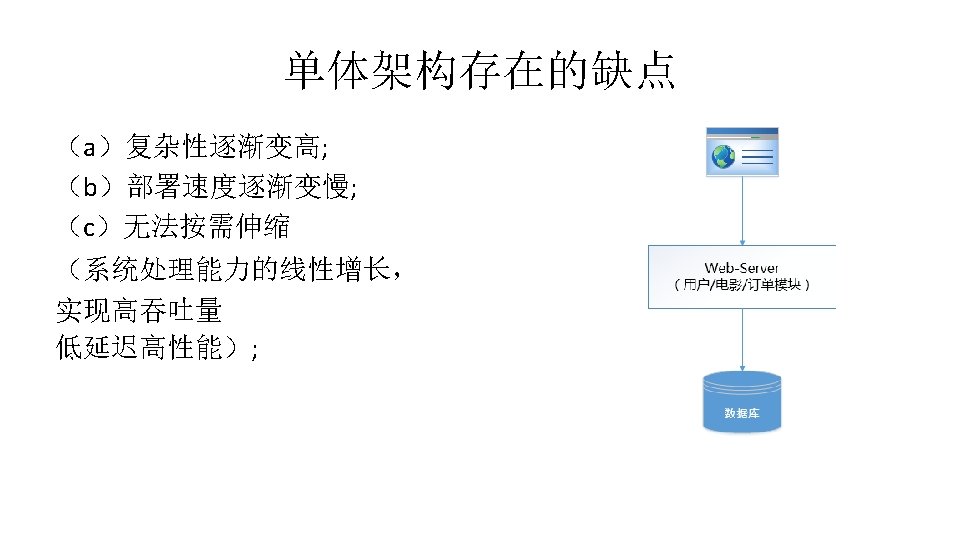
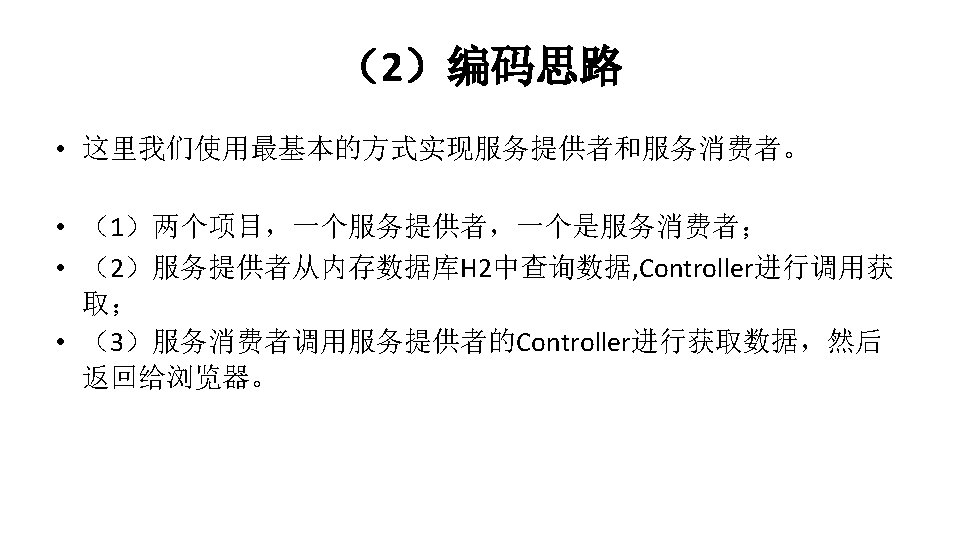
(3)服务提供者编码 新建 程 新建一个提供用户信息的 程,取名为:provider-user 在pom. xml添加依赖包 • <parent> • <group. Id>org. springframework. boot</group. Id> • <artifact. Id>spring-boot-starter-parent</artifact. Id> • <version>1. 4. 1. RELEASE</version> • </parent>
(3)服务提供者编码 • • • • • <!-- web支持: 1、web mvc; 2、restful; 3、jackjson支持; 4、aop. . . . --> <dependency> <group. Id>org. springframework. boot</group. Id> <artifact. Id>spring-boot-starter-web</artifact. Id> </dependency> <!-- 内存数据库h 2 --> <dependency> <group. Id>com. h 2 database</group. Id> <artifact. Id>h 2</artifact. Id> <scope>runtime</scope> </dependency> <!-- spring data jpa --> <dependency> <group. Id>org. springframework. boot</group. Id> <artifact. Id>spring-boot-starter-data-jpa</artifact. Id> </dependency>
(3)服务提供者编码 • 在src/main/resources下新建schema. sql添加建表语句 drop table user if exists; create table user( id bigint generated by default as identity, username varchar(40), name varchar(20), age int(3), balance decimal(10, 2), primary key(id) );
(3)服务提供者编码 • 在src/main/resources/新建data. sql插入数据 在User表插入几条数据进行测试: insert into user(id, username, age, balance) values(1, 'user 1', '张三 ', 20, 100. 00); insert into user(id, username, age, balance) values(2, 'user 2', '李四 ', 20, 100. 00); insert into user(id, username, age, balance) values(3, 'user 3', '王五 ', 20, 100. 00); insert into user(id, username, age, balance) values(4, 'user 4', '赵六 ', 20, 100. 00);
(3)服务提供者编码 创建实体类User 创建Dao类User. Repository 创建Service类User. Service 创建Controller类User. Controller
(3)服务提供者编码 • 在src/main/resources新建application. properties server. port=7900 spring. jpa. generate-ddl=false spring. jpa. show-sql=true spring. jpa. hibernate. ddl-auto=none spring. datasource. platform=h 2 spring. datasource. schema=classpath: schema. sql spring. datasource. data=classpath: data. sql logging. level. root=INFO logging. level. org. hibernate=INFO
(3)服务提供者编码 • 编写启动类: • @Spring. Boot. Application • public class App { • public static void main(String[] args) { • Spring. Application. run(App. class, args); • }
(4)服务消费者编码 • 新建 程 • 新建一个服务消费者项目,取名为:consumer-movice • <!-- web支持: 1、web mvc; 2、restful; 3、jackjson支持; 4、aop. . . . --> • <dependency> • <group. Id>org. springframework. boot</group. Id> • <artifact. Id>spring-boot-starter-web</artifact. Id> • </dependency>
(4)服务消费者编码 新建实体类User @Json. Ignore. Properties({"hibernate. Lazy. Initializer", "handler"}) 具体可以参考文章:https: //my. oschina. net/lieefu/blog/680098 新建Controller类Movice. Controller 在src/main/resources新建application. properties server. port=7901 新建启动类App. java 启动测试
从零开始学Spring Cloud 讲师:Andy
Why Eureka?
2. 2 Eureka简介
2. 2 Eureka简介
从零开始学Spring Cloud 讲师:Andy
创建父 程 • • • • • • <dependency. Management> <dependencies> <!-- spring cloud --> <dependency> <group. Id>org. springframework. cloud</group. Id> <artifact. Id>spring-cloud-dependencies</artifact. Id> <version>Dalston. SR 4</version> <type>pom</type> <scope>import</scope> </dependency> <!-- spring boot --> <dependency> <group. Id>org. springframework. boot</group. Id> <artifact. Id>spring-boot-dependencies</artifact. Id> <version>1. 5. 8. RELEASE</version> <type>pom</type> <scope>import</scope> </dependency> </dependencies> </dependency. Management>
创建“服务注册中心” • • <dependency> <group. Id>org. springframework. cloud</group. Id> <artifact. Id>spring-cloud-starter-eureka-server</artifact. Id> </dependency>
创建”服务提供方” • • • <!-- eureka client 依赖 --> <dependency> <group. Id>org. springframework. cloud</group. Id> <artifact. Id>spring-cloud-starter-eureka</artifact. Id> </dependency>
从零开始学Spring Cloud 讲师:Andy
Ribbon介绍 • 新建项目添加依赖 • 取名为microservice-consumer-movice-ribbon,并在pom. xml中加入如下内容: • <dependency> • <group. Id>org. springframework. cloud</group. Id> • <artifact. Id>spring-cloud-starter-ribbon</artifact. Id> • </dependency> • • <dependency> • <group. Id>org. springframework. cloud</group. Id> • <artifact. Id>spring-cloud-starter-eureka</artifact. Id> • </dependency>
Ribbon介绍 • 添加发现服务能力 • 在应用主类中,通过@Enable. Discovery. Client注解来添加发现服务能力。 创建Rest. Template实例,并通过@Load. Balanced注解开启均衡负载能力。 • 修改Movice. Controller的地址 • @Get. Mapping("/user/{id}") • public User get. By. Id(@Path. Variable long id){ • return rest. Template. get. For. Object("http: //ms-provideruser/"+id, User. class); • }
Ribbon介绍 • • • 配置服务注册中心 application. properties中配置eureka服务注册中心: spring. application. name=microservice-consumer-movice-ribbon server. port=3333 eureka. client. service. Url. default. Zone=http: //localhost: 1111/eureka/ • ///service instance. • Service. Instance service. Instance = client. get. Local. Service. Instance(); • System. out. println("ms-provider-user->/user/"+id+", host: "+service. Instance. get. Host()+"service_id"+service. Instance. get. Service. Id()+", port: "+service. Instance. get. Port());
从零开始学Spring Cloud 讲师:Andy
Spring Cloud 服务消费者(Feign) • 创建项目 • 复制一个microservice-consumer-movice 程, 取名为microservice-consumer-movice-feign, 配置pom. xml,将上述的配置中的ribbon依赖替换成feign的依赖即可,具体如下: • • <dependency> <group. Id>org. springframework. cloud</group. Id> <artifact. Id>spring-cloud-starter-feign</artifact. Id> </dependency> <group. Id>org. springframework. cloud</group. Id> <artifact. Id>spring-cloud-starter-eureka</artifact. Id> </dependency>
Spring Cloud 服务消费者(Feign) • • 开启Feign功能 在应用主类中通过@Enable. Feign. Clients注解开启Feign功能 • @Spring. Boot. Application • @Enable. Discovery. Client //添加服务发现能力. • @Enable. Feign. Clients //添加feign支持. • /* • • • * ---不需要使用Rest. Template了. @Bean public Rest. Template rest. Template(){ return new Rest. Template(); } */
Spring Cloud 服务消费者(Feign) • • 定义User. Client服务接口 定义ms-provider-user服务的接口,具体如下: • @Feign. Client("microservice-provider-user") • public interface User. Client { • • //通过Spring MVC的注解来配置microservice-provider-user服务下的具 体实现。 • @Request. Mapping(method = Request. Method. GET, value = "/user/{id}") • public User get. By. Id(@Path. Variable("id") long id); • • }
Spring Cloud 服务消费者(Feign) • 在web层中调用上面定义的User. Client • @Autowired • private User. Client user. Client; • • @Get. Mapping("/user/{id}") • public User get. By. Id(@Path. Variable long id){ • return user. Client. get. By. Id(id); • }
Spring Cloud 服务消费者(Feign) • • • 配置信息 application. properties中指定eureka服务注册中心即可,如: spring. application. name=microservice-consumer-movice-feign server. port=4444 eureka. client. service. Url. default. Zone=http: //localhost: 1111/eureka/ 启动该应用,访问几次:http: //localhost: 4444/user/1 • 对服务提供方实现了均衡负载。
从零开始学Spring Cloud 讲师:Andy
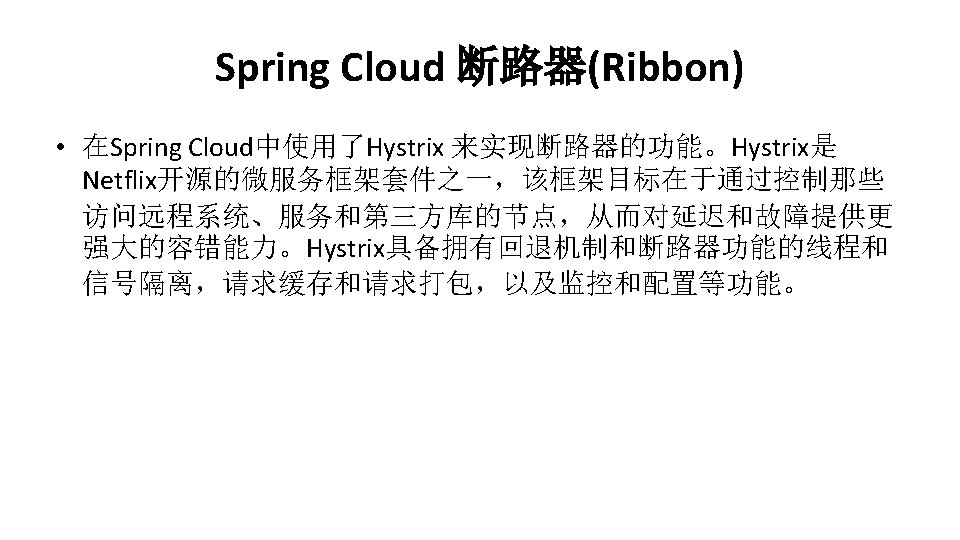
Spring Cloud 断路器(Ribbon) • pom. xml中引入依赖hystrix依赖(ms-consumer-movice-ribbon) • <dependency> • <group. Id>org. springframework. cloud</group. Id> • <artifact. Id>spring-cloud-starter-hystrix</artifact. Id> • </dependency>
Spring Cloud 断路器(Ribbon) • 在eureka-ribbon的主类Consumer. Movie. Ribbon中使用@Enable. Circuit. Breaker注解开启断 路器功能: • 改造原来的服务消费方式,新增User. Service类,在使用ribbon消费服务的函数上增加 @Hystrix. Command注解来指定回调方法。 • @Hystrix. Command(fallback. Method="add. Service. Fallback") • public User add. Service. Fallback(long id){ • User user = new User(); • user. set. Name("no find user. "); • return user; • }
从零开始学Spring Cloud 讲师:Andy
Spring Cloud Feign中使用Hystrix • 我们不需要在Feign 程中引入Hystix,Feign中已经依赖了Hystrix • 使用@Feign. Client注解中的fallback属性指定回调类 • • @Feign. Client(value="ms-provider-user", fallback=User. Client. Hystrix. class) public interface User. Client { • • • package com. kfit. client; import com. kfit. user. bean. User; //通过Spring MVC的注解来配置compute-service服务下的具体实现。 @Request. Mapping(method = Request. Method. GET, value = "/user/{id}") public User get. By. Id(@Path. Variable("id") long id); } @Component public class User. Client. Hystrix implements User. Client{ } public User get. By. Id(long id) { return new User(); }
Spring Cloud Feign中使用Hystrix • springcloud版本是Dalston 版本 • feign. hystrix. enabled=true
从零开始学Spring Cloud 讲师:Andy
1. 1 构建Config Server • 通过Spring Cloud构建一个Config Server,非常简单,只需要三步(新建一个项目microservice-config-server) : • (1)pom. xml中引入spring-cloud-config-server-git依赖,完整依赖配置如下: • • • <dependency> <group. Id>org. springframework. boot</group. Id> <artifact. Id>spring-boot-starter-web</artifact. Id> </dependency> <group. Id>org. springframework. cloud</group. Id> <artifact. Id>spring-cloud-config-server</artifact. Id> </dependency>
1. 1 构建Config Server • (2)创建Spring Boot的程序主类,并添加@Enable. Config. Server注解,开启Config Server: • • @Spring. Boot. Application @Enable. Config. Server public class Config. Server. App { public static void main(String[] args) { Spring. Application. run(Config. Server. App. class, args); } }
1. 1 构建Config Server • (3)application. properties中配置服务信息以及git信息 • • • #应用程序名称. spring. applicatiton. name=microservice-config-server #端口号 server. port=7001 • • # git管理配置,此地址构成:git地址(https: //git. oschina. net/happyangellxq 520/)+项目地址(spring-clouddemo) spring. cloud. config. server. git. uri=https: //git. oschina. net/happyangellxq 520/spring-cloud-demo #配置仓库路径下的相对搜索位置,可以配置多个 : 是一个目录,在此目录下就是存放着applicationxxx. properties spring. cloud. config. server. git. search. Paths=chapter 6/config-repo #访问git仓库的用户名 spring. cloud. config. server. git. username=123456@qq. com #访问git仓库的用户密码 spring. cloud. config. server. git. password=123456
从零开始学Spring Cloud 讲师:Andy
Spring Cloud 分布式配置中心(svn) • • <dependency> <group. Id>org. tmatesoft. svnkit</group. Id> <artifact. Id>svnkit</artifact. Id> </dependency>
Spring Cloud 分布式配置中心(svn) • • • • #应用程序名称 spring. application. name=ms-config-server-svn #端口号 server. port=7001 #激活svn管理配置 spring. profiles. active=subversion #svn地址 spring. cloud. config. server. svn. uri=svn: //xxx. com/java/lxq_2016/config-server-svn #svn账号 spring. cloud. config. server. svn. username= svn账号 #svn密码 spring. cloud. config. server. svn. password= svn密码 #默认分支--相当于git的master和config-label spring. cloud. config. server. default-label=master
从零开始学Spring Cloud 讲师:Andy
从零开始学Spring Cloud 讲师:Andy
(1)创建一个Spring Boot应用并且添加依赖 • • • 创建一个Spring Boot应用(microservice-config-client),在pom. xml中引入spring-cloud-starter-config依赖 <!-- web支持: 1、web mvc; 2、restful; 3、jackjson支持; 4、aop. . . . --> <dependency> <group. Id>org. springframework. boot</group. Id> <artifact. Id>spring-boot-starter-web</artifact. Id> </dependency> <group. Id>org. springframework. cloud</group. Id> <artifact. Id>spring-cloud-starter-config</artifact. Id> </dependency>
(2)创建最基本的Spring Boot启动主类 • 创建一个Spring Boot应用(microservice-config-client),在pom. xml中引入spring -cloud-starter-config依赖 • @Spring. Boot. Application • public class Config. Client. App { • public static void main(String[] args) { • Spring. Application. run(Config. Client. App. class, args); • }
(3)创建bootstrap. properties配置,来指定 config server • • • #对应前配置文件中的{application}部分 spring. application. name=andy #对应前配置文件中的{profile}部分 spring. cloud. config. profile=dev #对应前配置文件的git分支 spring. cloud. config. label=master #配置中心的地址 spring. cloud. config. uri=http: //localhost: 7001/ #应用端口号 server. port=7002
(4)创建一个Rest Api来返回配置中心的from属 性 • • • @Refresh. Scope @Rest. Controller public class Test. Controller { @Value("${from}") private String from; } @Request. Mapping("/from") public String from() { return this. from; }
@Refresh. Scope • refresh post方式执行http: //localhost/refresh 会刷新env中的配置 • restart 如果配置信息已经注入到bean中,由于bean是单例的,不会去加载修改后的配 置 需要通过post方式去执行http: //localhost/restart, 需要通过application. properties中配置endpoints. restart. enabled=true启动指定的 端口
从零开始学Spring Cloud 讲师:Andy
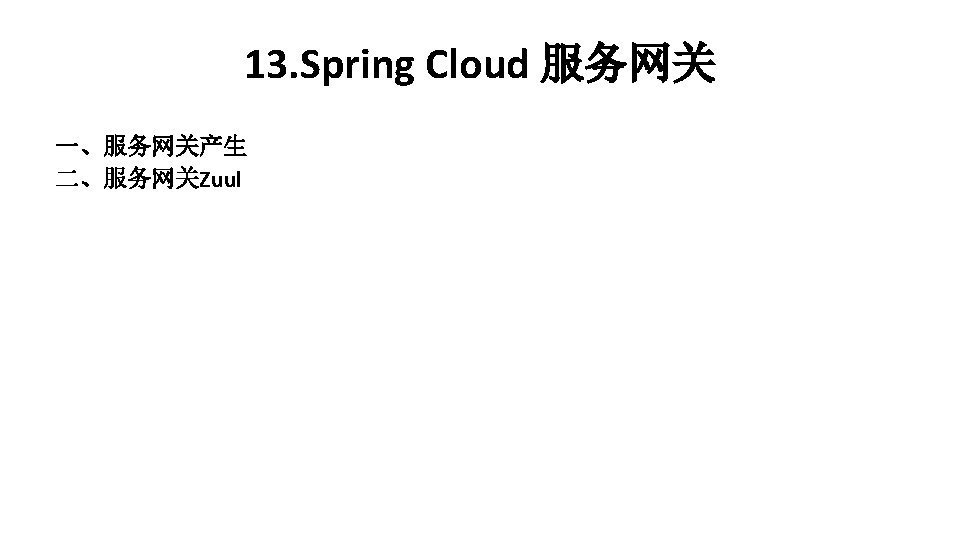
13. Spring Cloud 服务网关
服务网关Zuul • 引入依赖spring-cloud-starter-zuul、spring-cloud-starter-eureka: • • <dependency> <group. Id>org. springframework. cloud</group. Id> <artifact. Id>spring-cloud-starter-zuul</artifact. Id> </dependency> • • <dependency> <group. Id>org. springframework. cloud</group. Id> <artifact. Id>spring-cloud-starter-eureka</artifact. Id> </dependency>
服务网关Zuul • 应用主类使用@Enable. Zuul. Proxy注解开启Zuul • • @Spring. Cloud. Application @Enable. Zuul. Proxy //开启Zuul public class Api. Getway. App { public static void main(String[] args) { Spring. Application. run(Api. Getway. App. class, args); } }
服务网关Zuul • (3)application. properties中配置Zuul应用的基础信息 • application. properties中配置Zuul应用的基础信息,如:应用名、服 务端口等。 • spring. application. name= microservice-zuul • server. port=5555
服务路由 • • 通过url直接映射,我们可以如下配置: # routes to url zuul. routes. api-a-url. path=/api-a-url/** # strip. Prefix的配置意思:是否要去掉前缀 zuul. routes. api-a-url. strip. Prefix=true zuul. routes. api-a-url. url=http: //localhost: 2222/
服务路由 • • • 通过service. Id映射,我们可以如下配置: # routes to service. Id zuul. routes. api-a. path=/api-a/** zuul. routes. api-a-url. strip. Prefix=true zuul. routes. api-a. service. Id= ms-provider-user zuul. routes. api-b. path=/api-b/** zuul. routes. api-a-url. strip. Prefix=true zuul. routes. api-b. service. Id= ms-provider-movie eureka. client. service. Url. default. Zone=http: //localhost: 1111/eureka/
从零开始学Spring Cloud 讲师:Andy
Spring Cloud 服务网关-过滤器 • • • • • • • • • public class Access. Filter extends Zuul. Filter{ @Override public Object run() { Request. Context ctx = Request. Context. get. Current. Context(); Http. Servlet. Request request = ctx. get. Request(); Object access. Token = request. get. Parameter("access. Token"); if(access. Token == null){ System. out. println("-->access token is empty"); ctx. set. Send. Zuul. Response(false); ctx. set. Response. Status. Code(401); ctx. set. Response. Body("access denied"); } System. out. println("-->access token is ok"); return null; } @Override public boolean should. Filter() { return true; } @Override public int filter. Order() { return 0; } @Override public String filter. Type() { return "pre"; } }
Spring Cloud 服务网关-过滤器 • • • • @Spring. Cloud. Application @Enable. Zuul. Proxy //开启Zuul public class Api. Getway. App { @Bean public Access. Filter access. Filter() { return new Access. Filter(); } } public static void main(String[] args) { Spring. Application. run(Api. Getway. App. class, args); }
从零开始学Spring Cloud 讲师:Andy
Rabbit. MQ实现 • <dependency> • <group. Id>org. springframework. cloud</group. Id> • <artifact. Id>spring-cloud-starter-bus-amqp</artifact. Id> • </dependency>
Rabbit. MQ实现 • • spring. rabbitmq. host=localhost spring. rabbitmq. port=5672 spring. rabbitmq. username=guest spring. rabbitmq. password= guest • POST: http: //localhost: 7003/bus/refresh
从零开始学Spring Cloud 讲师:Andy
Spring Cloud消息总线-改进版 • <dependency> • <group. Id>org. springframework. cloud</group. Id> • <artifact. Id>spring-cloud-starter-bus-amqp</artifact. Id> • </dependency>
Spring Cloud消息总线-改进版 • • • 配置: spring. rabbitmq. host=localhost spring. rabbitmq. port=5672 spring. rabbitmq. username=guest spring. rabbitmq. password= guest
从零开始学Spring Cloud 讲师:Andy
解决方法 • (1) Eureka Server端 • 配置关闭自我保护,并按需配置Eureka Server清理无效节点的时间间隔。 • • # 设为false,关闭自我保护 eureka. server. enable-self-preservation=false # 清理间隔(单位毫秒,默认是 60*1000) eureka. server. eviction-interval-timer-in-ms=2000
解决方法 • (2) Eureka Client端 • 配置开启健康检查,并按需配置续约更新时间和到期时间。 • # 开启健康检查(需要spring-boot-starter-actuator依赖) eureka. client. healthcheck. enabled=true • # 续约更新时间间隔(默认 30秒) • eureka. instance. lease-renewal-interval-in-seconds=5 • # 续约到期时间(默认 90秒) • eureka. instance. lease-expiration-duration-in-seconds=5
解决方法 • 添加依赖: • <!-- 监控依赖. --> • <dependency> • <group. Id>org. springframework. boot</group. Id> • <artifact. Id>spring-boot-starter-actuator</artifact. Id> • </dependency>
从零开始学Spring Cloud 讲师:Andy
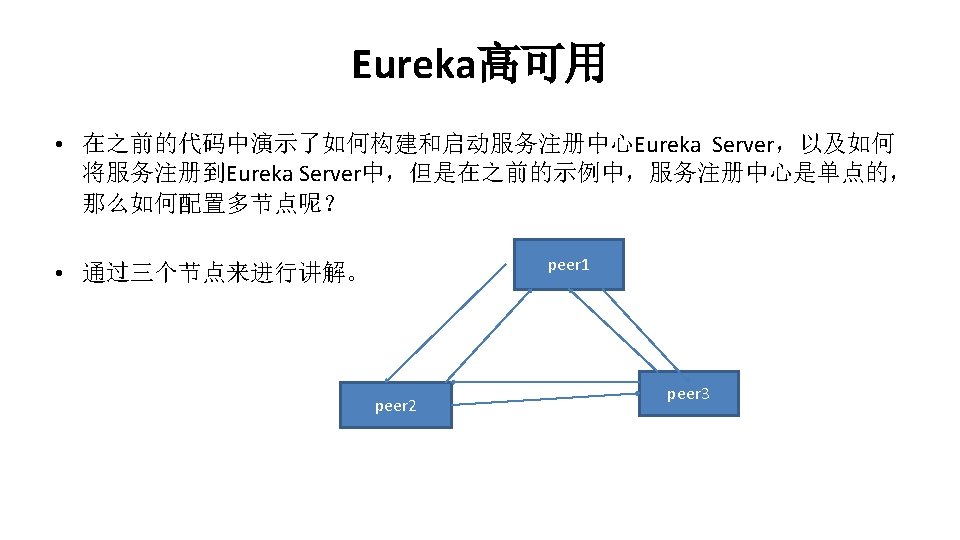
(1)添加配置信息 • 创建application-peer 1. properties • • • spring. application. name= microservice-discovery-eureka. client. register-with-eureka=true eureka. client. fetch-registry=true server. port=1111 eureka. instance. hostname=peer 1 eureka. client. service. Url. default. Zone=http: //peer 2: 1112/eureka/, http: // peer 3: 1113/eureka/
(1)添加配置信息 • 创建application-peer 2. properties • • • spring. application. name= microservice-discovery-eureka. client. register-with-eureka=true eureka. client. fetch-registry=true server. port=1112 eureka. instance. hostname=peer 2 eureka. client. service. Url. default. Zone=http: //peer 1: 1111/eureka/, http: // peer 3: 1113/eureka/
(1)添加配置信息 • 创建application-peer 3. properties • • • spring. application. name= microservice-discovery-eureka. client. register-with-eureka=true eureka. client. fetch-registry=true server. port=1113 eureka. instance. hostname=peer 3 eureka. client. service. Url. default. Zone=http: //peer 1: 1111/eureka/, http: // peer 2: 1112/eureka/
(2)在/etc/hosts文件中添加配置 • 在/etc/hosts文件中添加对peer 1、peer 2、peer 3的转换: • • 127. 0. 0. 1 peer 2 peer 3
(3)启动应用程序 • 通过 --spring. profiles. active属性来分别启动peer 1、peer 2和peer 3
(4)服务注册 • 当Eureka为多节点的时候,服务提供方的Eureka地址怎么配置? • eureka. client. service. Url. default. Zone=http: //peer 1: 1111/eureka/, http: //peer 2: 1112/eureka/
从零开始学Spring Cloud 讲师:Andy
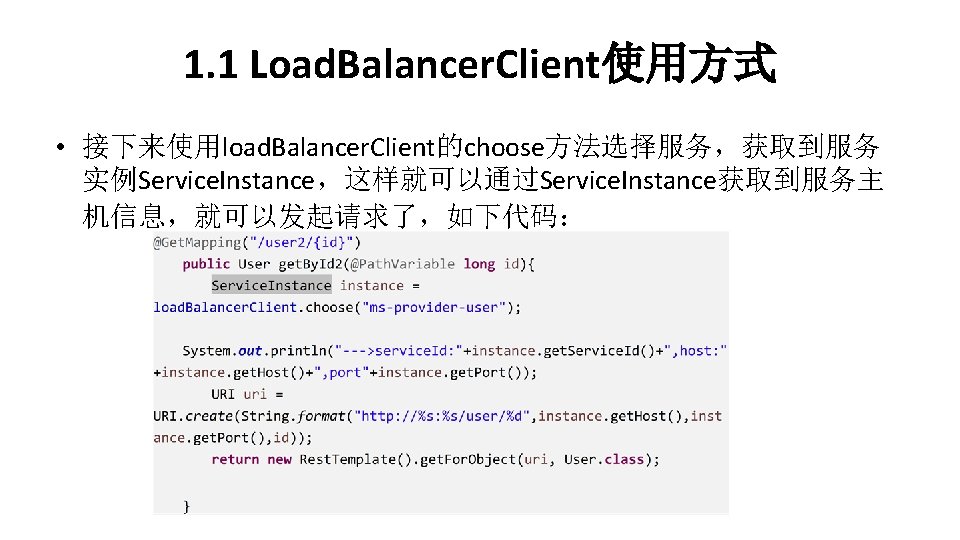
1. 1 Load. Balancer. Client使用方式 • 这里我们先看下Load. Balancer. Client要怎么使用,首先在需要的地方 注入Load. Balancer. Client对象,如下代码: • @Autowired • private Load. Balancer. Client load. Balancer. Client;
1. 2 Ribbon负载均衡策略 • (2)Random. Rule: 随机选择策略 • Random. Rule: 随机选择策略,也就是说Ribbon会随机从服务器列表 中选择一个进行访问;配置方式: • <client. Name>. ribbon. NFLoad. Balancer. Rule. Class. Name=com. netflix. loadb alancer. Random. Rule
1. 2 Ribbon负载均衡策略 • (3)Best. Available. Rule: 最大可用策略 • Best. Available. Rule: 最大可用策略,即先过滤出故障服务器后,选择 一个当前并发请求数最小的; 配置方式: • <client. Name>. ribbon. NFLoad. Balancer. Rule. Class. Name=com. netflix. loadb alancer. Best. Available. Rule
1. 2 Ribbon负载均衡策略 • (4)Weighted. Response. Time. Rule: 加权轮询策略 • Weighted. Response. Time. Rule: 带有加权的轮询策略,对各个服务器响 应时间进行加权处理,然后在采用轮询的方式来获取相应的服务器; 配置方式: • <client. Name>. ribbon. NFLoad. Balancer. Rule. Class. Name=com. netflix. loadb alancer. Weighted. Response. Time. Rule
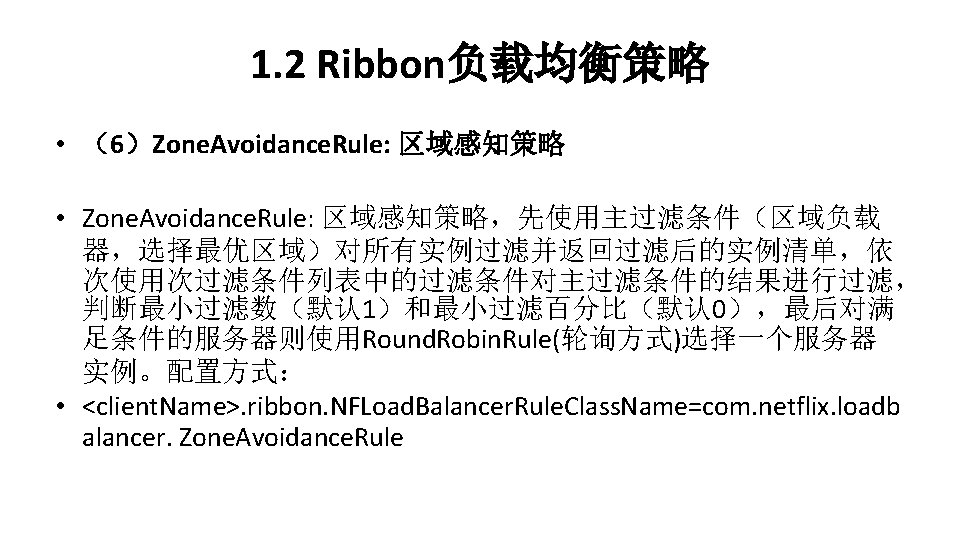
1. 2 Ribbon负载均衡策略 • (5)Availability. Filtering. Rule: 可用过滤策略 • Availability. Filtering. Rule: 可用过滤策略,先过滤出故障的或并发请求 大于阈值一部分服务实例,然后再以线性轮询的方式从过滤后的实 例清单中选出一个; 配置方式: • <client. Name>. ribbon. NFLoad. Balancer. Rule. Class. Name=com. netflix. loadb alancer. Availability. Filtering. Rule
1. 3 Ribbon负载均衡策略:举个栗子 • 在这里我们使用Random. Rule(随机选择策略)进行测试。 • (1)修改application配置文件 • 在application. properties配置文件中添加如下配置: • ms-provideruser. ribbon. NFLoad. Balancer. Rule. Class. Name=com. netflix. loadbalancer. R andom. Rule • 这样配置完之后,我们访问ms-provider-user服务的话就会使用 随机分配策略。
1. 4 Ribbon连接超时Read. Timeout问题 • 在有些比较耗时的处理的时候,可能会碰到连接超时的问题。这里 我们可以设置ribbon的超时时间。 • microservice-provider-user. ribbon. Read. Timeout = 10000 • microservice-provider-user. ribbon. Connect. Timeout = 10000 • 默认的Read. Timeout时间为 5 s,Connect. Timeout时间为 2 s,
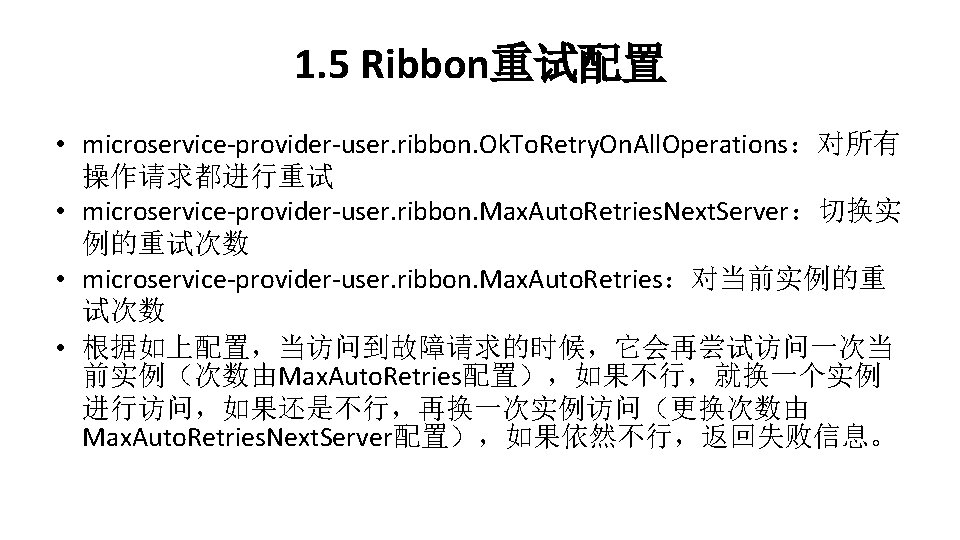
1. 5 Ribbon重试配置 • • • #对所有操作请求都进行重试 microservice-provider-user. ribbon. Ok. To. Retry. On. All. Operations=true #对当前实例的重试次数 microservice-provider-user. ribbon. Max. Auto. Retries=1 #切换实例的重试次数 microservice-provider-user. ribbon. Max. Auto. Retries. Next. Server=2
1. 5 Ribbon重试配置 • 需要注意参数: • #该参数用来开启重试机制,在Dalston. SR 4已经默认为true, 在 Camden SR 2默认为false • #spring. cloud. loadbalancer. retry. enabled=true • 。
从零开始学Spring Cloud 讲师:Andy
Ribbon如何脱离Eureka使用 • 1. 如何在没有Eureka的情况下使用Ribbon • 2. 在Ribbon中禁用Eureka • 3. 直接使用Ribbon API
1. 如何在没有Eureka的情况下使用Ribbon • Ribbon client默认要配置server list, 你可以提供配置像这样: • microservice-provider-user. ribbon. list. Of. Servers= localhost: 2222
2. 在Ribbon中禁用Eureka • 设置ribbon. eureka. enable=false将会明确的让Eureka的ribbon失效。 • ribbon. eureka. enable=false
3. 直接使用Ribbon API
从零开始学Spring Cloud 讲师:Andy
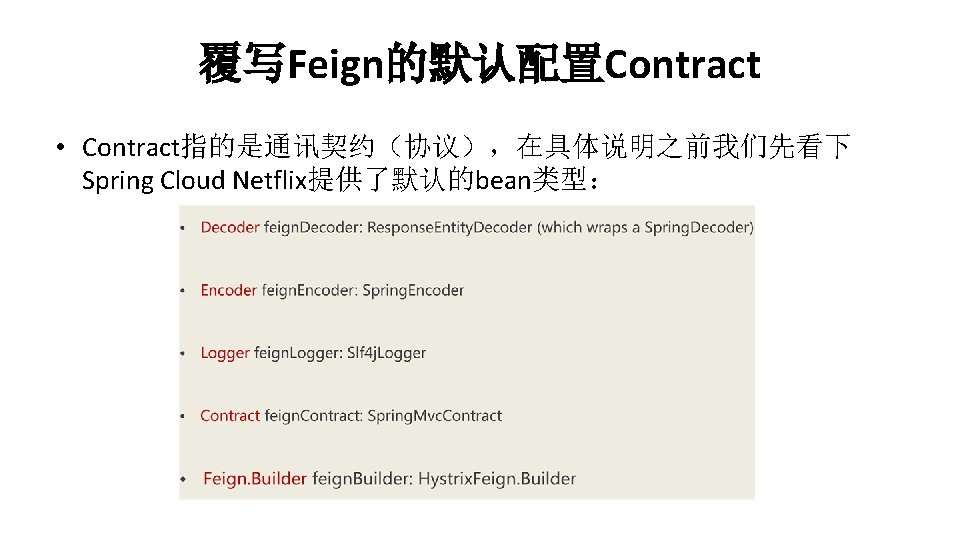
1. 3 示例 • 创建一个配置类Configuration 1: • @Configuration • public class Configuration 1 { • • @Bean • public Contract feign. Contract(){ • return new Contract. Default(); • } • • }
1. 3 示例 • 在User. Client中指定配置类: • @Feign. Client(value="microservice-provideruser", fallback=User. Client. Hystrix. class, configuration=Configuration 1. clas s) • public interface User. Client {}
1. 3 示例 • 使用Feign契约进行通讯配置 • @Feign. Client(value="microservice-provideruser", fallback=User. Client. Hystrix. class, configuration=Configuration 1. class) • public interface User. Client { • • //使用feign提供的协议 • @Request. Line("GET /user/{id}") • public User get. By. Id(@Param("id") long id); • }
从零开始学Spring Cloud 讲师:Andy
1、Feign. Client接口,是否能使用@Get. Mapping 之 类的组合注解 • 这个和当前使用的Spring Cloud版本有关系,对于Dalston. SR 4是可以的,如下形 式代码: • @Get. Mapping(value = "/user/{id}") • public User get. By. Id 1(@Path. Variable("id") long id); •
2、Feign. Client接口中,如果使用到@Path. Variable ,必须指定其value • @Request. Mapping(method = Request. Method. GET, value = "/user/{id}") • public User get. By. Id 2(long id); • 这边的@Path. Variable("id") 中的”id”,不能省略,必须指定。
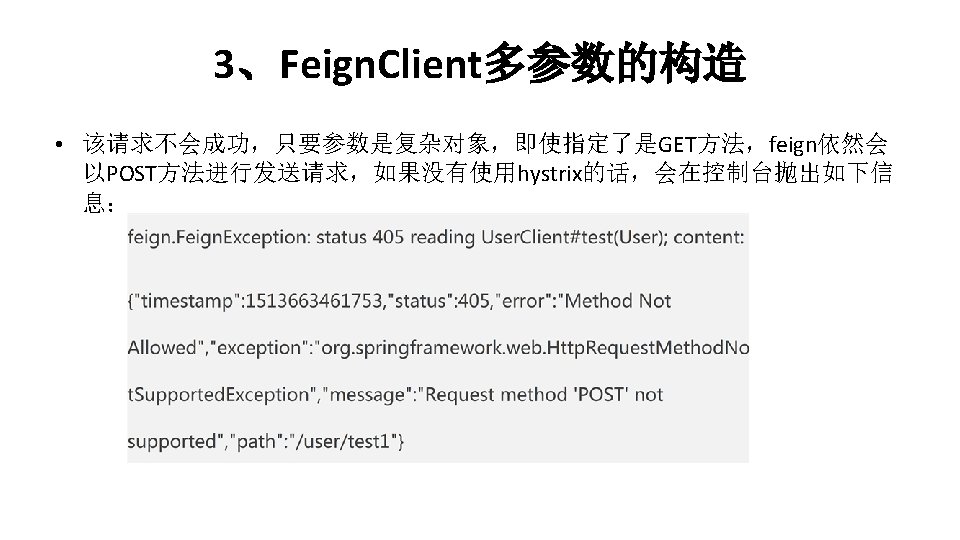
3、Feign. Client多参数的构造 • 如果想要请求microservice-provider-user 服务,并且参数有多个例如:http: //ms -provider-user/test? id=1&username=�三 要怎么办呢? • (1)错误的写法:直接使用复杂对象 • @Request. Mapping(method = Request. Method. GET, value = "/user/test 1") • public User test(User user);
3、Feign. Client多参数的构造 • (2)正确的写法 1:使用@Request. Param设置value属性 • @Request. Mapping(method = Request. Method. GET, value = "/user/test 1") • public User test 11(@Request. Param("id")Long id, @Request. Param("username")String username);
3、Feign. Client多参数的构造 • (2)正确的写法 2:使用@Request. Param设置为map参数 • @Request. Mapping(method = Request. Method. GET, value = "/user/test 1") • public User test 11(@Request. Param Map<String, Object> map); • 在controller类中的也是需要使用@Request. Param: • @Get. Mapping("/user/test 12") • public User test 12(@Request. Param Map<String, Object> map){ • System. out. println("Movice. Controller. id="+map); • return user. Client. test 11(map); • }
6、@Feign. Client 的属性注意点 • (1) service. Id属性已经失效,尽量使用name属性。例如: • @Feign. Client(service. Id = "ms-provider-user") • 这么写是不推荐的,应写为: • @Feign. Client(name = "microservice-provider-user")
从零开始学Spring Cloud 讲师:Andy
方法一:设置Hystrix的超时时间 • hystrix. command. default. execution. isolation. thread. timeout. In. Milliseco nds=5000
方法二:禁用Hystrix的超时时间 • hystrix. command. default. execution. timeout. enabled=false
方法三:禁用feign的hystrix • feign. hystrix. enabled=false
从零开始学Spring Cloud 讲师:Andy
(1)添加fallback. Factory实现类 • • • • @Component public class User. Client. Hystrix. Fallback. Factory implements Fallback. Factory<User. Client 2>{ public User. Client 2 create(Throwable e) { System. out. println("fallback: reason was-->"+e. get. Message()); return new User. Client 2() { } } }; public User get. By. Id(long id) { User user = new User(); user. set. Id(-1); return user; }
(2)配置@Feign. Client的fallback. Factory属 性 • • @Feign. Client(value=“microservice-provider-user", fallback. Factory=User. Client. Hystrix. Fallback. Factory. class) public interface User. Client 2 {}
从零开始学Spring Cloud 讲师:Andy
(2)Ribbon中引入Hystrix • 在Ribbon中如果要使用Hystrix的话,那么需要先引用Hystrix的依 赖包:spring-cloud-starter-hystrix; • 其次就是在启动类中使用注解@Enable. Circuit. Breaker启用断路器; 在发起远程调用的方法上添加回调注解: @Hystrix. Command(fallback. Method="add. Service. Fallback")。
(3)Feign中使用Hystrix
从零开始学Spring Cloud 讲师:Andy
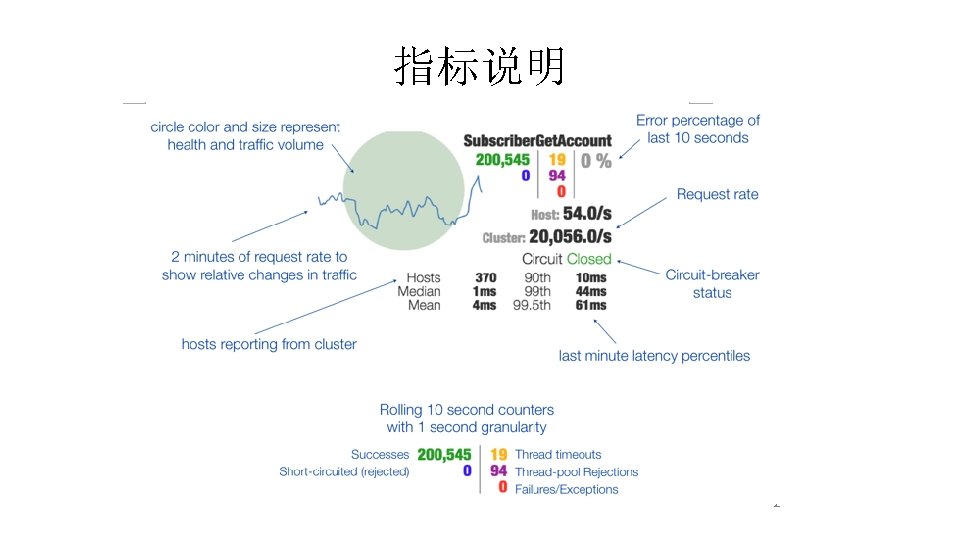
Health Indicator(健康指标) 和metrics stream(指标流)
Health Indicator(健康指标) • 需要先添加依赖actuator: • <dependency> • <group. Id>org. springframework. boot</group. Id> • <artifact. Id>spring-boot-starter-actuator</artifact. Id> • </dependency> 健康指标(健康检查)是通过访问 http: // ip: port /health 来确定服务的可用 状态。
metrics stream(指标流)
metrics stream(指标流)
从零开始学Spring Cloud 讲师:Andy
第一步:依赖 • <dependency> • <group. Id>org. springframework. cloud</group. Id> • <artifact. Id>spring-cloud-starter-hystrix-dashboard</artifact. Id> • </dependency>
第二步:启动类添加注解 • • @Spring. Boot. Application @Enable. Hystrix. Dashboard public class Hystrix. Dashborard. App { public static void main(String[] args) { Spring. Application. run(Hystrix. Dashborard. App. class, args); } }
第二步:启动类添加注解 • • @Spring. Boot. Application @Enable. Hystrix. Dashboard public class Hystrix. Dashborard. App { public static void main(String[] args) { Spring. Application. run(Hystrix. Dashborard. App. class, args); } } 访问地址:http: //127. 0. 0. 1: port/hystrix
从零开始学Spring Cloud 讲师:Andy
第一步:添加依赖 • • • • <dependency> <group. Id>org. springframework. boot</group. Id> <artifact. Id>spring-boot-starter-web</artifact. Id> </dependency> <group. Id>org. springframework. boot</group. Id> <artifact. Id>spring-boot-starter-actuator</artifact. Id> </dependency> <group. Id>org. springframework. cloud</group. Id> <artifact. Id>spring-cloud-starter-turbine</artifact. Id> </dependency>
第三步:修改配置文件 • • spring. application. name=microservice-hystrix-turbine server. port=7787 eureka. client. service. Url. default. Zone=http: //localhost: 1111/eureka/ turbine. aggregator. cluster. Config=default turbine. app-config=microservice-consumer-movice-ribbon turbine. cluster. Name. Expression=new String("default")
第三步:修改配置文件 • turbine. app. Config 配置需要聚合的�用 • turbine. cluster. Name. Expression 获取集群名表达式 • turbine. aggregator. cluster. Config turbine需要聚合的集群名称 通� http: //localhost: 9090/turbine. stream? cluster=MAIN ��,默�是 default的�, �求的�候,就不需要 cluster了。
第四步:启动测试 • http: //127. 0. 0. 1: 3333/user/1 • http: //127. 0. 0. 1: 3334/user/1 • http: //127. 0. 0. 1: 7787/turbine. stream • http: //127. 0. 0. 1: 3334/hystrix