SMEAR LAYER CONTENTS Introduction Definition History Morphology of


 observed the smear layer using")


 showed that smear layer was made up of")


 and Mader et al (1984) described the")

 proposed that the penetration of smear material")


 – • Removing most of the smear layer over the")


 o Greatly increases the dentin permeability")


")


, Profile system and manual instrumentation in oval")


")


 – To reduce the surface tension – Increased wetting effect")


")

 – less effective than 50% citric acid – attributed to")
 • Removes the smear layer Kaufman et al (1981) • Has")
 • Calt , Serper 2000 • 17% EDTA")
 • Low p. H in concentrated solution & can act as")
 – • Doxycycline HCl (100 mg/ml) is effective in removing")
 Torabinejad et al")
 17% EDTA + 2 additional proprietary surfactants • Jantarat")


 – lasers can be used to vaporize")
 – using the Er: YAG laser demonstrated optimal")


- Slides: 130
SMEAR LAYER
CONTENTS • • Introduction Definition History Morphology of the smear layer – – Formation of smear layer Structure Thickness Composition • Physiological considerations – Influence on sensitivity of dentin – Influence on permeability of dentin
• • • Functional implications in Restorative dentistry Smear layer & Bonding Smear layer in Endodontics Influence of smear layer on sealing Removal of smear layer – Chemical – Ultrasonics – Lasers • Conclusion
INTRODUCTION • Whenever the tooth surface is altered by rotary or manual instrumentation, cutting debris is smeared over the enamel & dentin surfaces, forming what is termed the smear layer. • When tooth structure is cut, instead of being uniformly sheared, the mineralized matrix shatters. • Considerable quantities of cutting debris, made up of very small particles of mineralized collagen matrix, are produced.
• The term 'smear layer' is used most often to describe the grinding, debris left on dentin by cavity preparation. • However, the term applies to any debris produced iatrogenically by the cutting, not only of coronal dentin, but also of enamel, cementum, and even the dentin of the root canal
DEFINITION • According to Schwartz and Summit : The smear layer has been defined as “ any debris , calcific in nature , produced by reduction or instrumentation of dentin , enamel or cementum , or as a ‘contaminant’ that precludes interaction with the underlying pure tooth tissue” • According to Cohen: Smear layer is an amorphous , relatively smooth layer of microcrystalline debris whose surface cannot be seen with naked eye.
Morphology of the Smear Layer A John Gwinett
• Whenever dentin is cut with a hand instrument or a rotary instrument, the mineralized matrix shatters rather than being uniformly sheared or cleaved, producing considerable quantities of cutting debris. • Much of the debris, made up of small particles of mineralized collagen matrix, is spread over the surface of the dentin to form what has been called a 'smear layer' (Eick & others, 1970) • It is analogous to wood being covered by wet sawdust
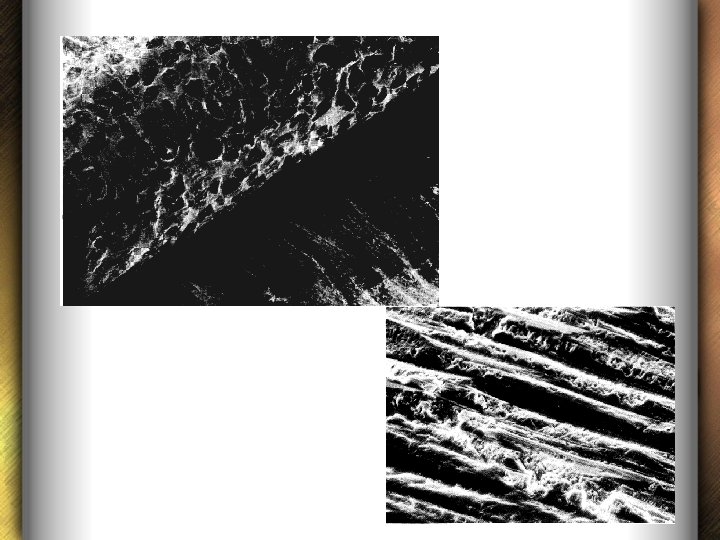
Smear layer after use of steel and tungsten burs • Steel and tungsten carbide burs produce an undulating pattern, the troughs of which run perpendicular with the direction of movement of the hand piece. • Fine grooves can be seen running perpendicular to the undulations i. e. , parallel with the direction of rotation of the bur.
Such a phenomenon is referred to as galling and the frictional humps represent a "rebound effect" of the bur against the tooth surface. .
• The galling phenomenon appears more marked with tungsten carbide burs which run at high speed. • The fine grooves can be related to small facets found on the cutting flutes of the bur. • These facets arise because of wear of the flutes and act as abrading points scratching the tooth surface as the bur rotates
Debris & smearing by a steel bur
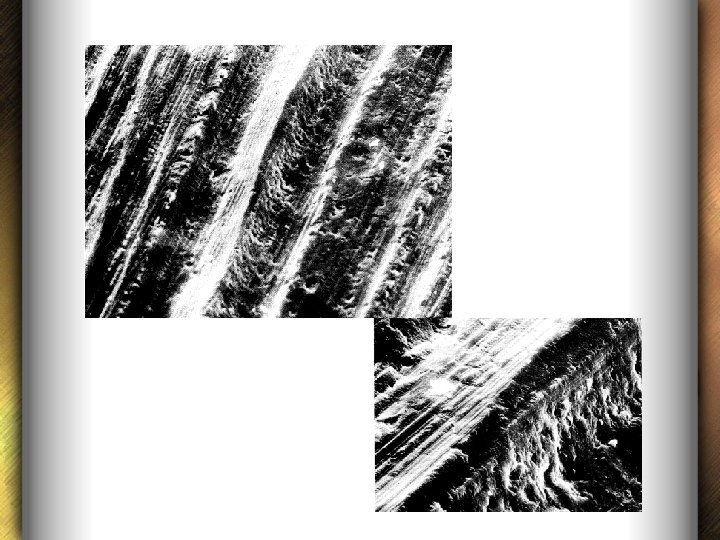
Smear layer after use of Diamond points • Diamond points unlike carbide burs remove the dentinal structure by abrading action. • As burs rotate, the flute undermines the tooth surface and the amount removed depends upon the angle of the flute. • On the other hand, abrasive particles, passing across the tissue, plough troughs in which substrate is ejected ahead of the abrading particle and elevated into ridges parallel with the direction of travel of the particle
• Several factors govern the size of the grooves, including particle size, pressure, and hardness of the abrasive relative to the substrate. • At low magnification the surface is traversed by relatively parallel deep grooves, the size of the grooves depending upon the coarseness of the abrasive. • The grooves run parallel with the direction of motion of the handpiece. • At higher magnification fine grooves run within the deep grooves.
SEM of dentin abraded. – occluded dentinal tubules & prominent peritubular mounds
• A significant difference exists between diamond points used with and without a coolant of water spray. • In the absence of coolant, smeared debris can be found commonly on the surface. • The smeared debris does not form a continuous layer but exists rather as localized islands with discontinuities exposing the underlying dentin.
• If the diamond is allowed to log with cutting debris, the smear layer appears to cover a wider area. • Coolant of water spray does not prevent smearing but appears to significantly reduce the amount and distribution of it.
Formation of smear layer • Boyde et al (1963) observed the smear layer using SEM and considered that the frictional heat during cavity preparation was the most important factor in the formation of the smear layer. • The frictional heat may be 600°C, much below the melting point of apatite (which is 1500°C to 1800°C) • Therefore smearing was probably a physicochemical phenomenon involving mechanical shearing and thermal degradation of hydroxyapatite proteins
• Eirich and Westwood in 1976 observed that the plastic flow of hydroxyapatite is believed to occur at lower temperatures than its melting point and may also be a contributing factor to smearing.
Structure of the smear layer • The smear layer is absent from specimens of demineralized teeth examined by light microscope because the smear layer is dissolved during demineralization. • When examined in undemineralized specimens by scanning electron microscope : v At low magnification smear layer shows a typically amorphous, relatively smooth, featureless surface and the dentinal tubules are obscured.
v At higher magnification, the smear layer exhibits a granular substructure. • This appearance may be formed by translocating and burnishing the superficial components of the dentine
• Eick et al (1970) showed that smear layer was made up of tooth particles ranging from less than 0. 5 m to 15 m • Pashley et al (1988) found out that these particles were also composed of globular subunits, 0. 05 -0. 1 m in diameter which originated from mineralized fibers.
Thickness of the Smear Layer • The thickness of the smear layer was reported to be 1 -5 m (Goldman et al in 1981 and Mader et al in 1984) • This thickness may depend upon the type and sharpness of the cutting instruments and whether the dentine is cut dry or wet (Barnes 1974, Gilboe et al 1980) • Thickness increases with increasing roughness of the bur.
• Use of coarse diamond burs produces a thicker smear layer than carbide burs DCNA Jan 1990 • The thickest smear layer was produced of about 10 -15 m in an invitro study using a coarse diamond blade mounted on a metallurgical saw (Pashley, Michelich and Kehl 1981)
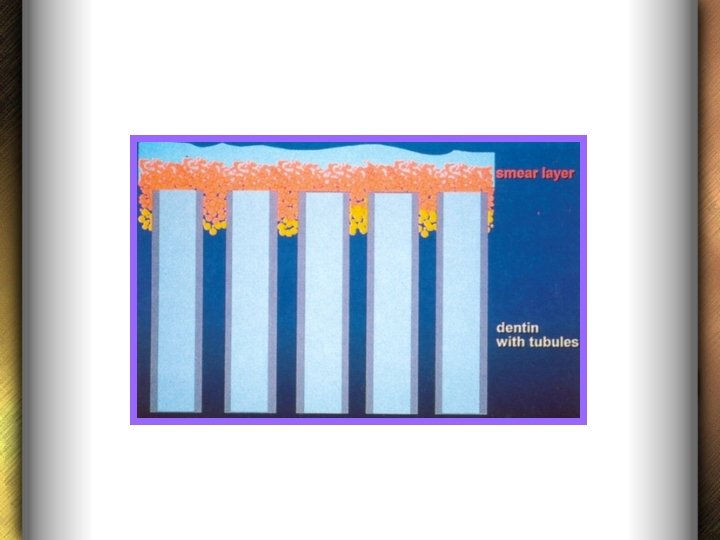
Layers of the Smear layer Cameron (1983) and Mader et al (1984) described the smear layer material in two parts: • First, superficial smear layer which is adhering loosely to the underlying dentin and • Second, the smear material packed into dentinal tubules called smear plugs
• The extension of this packed material into dentinal tubules was calculated as extending up to 40µm. • It was also concluded that this tubular packing phenomena of smear layer was due to the action of burs and endodontic instruments (Brannstrom and Johnson 1974, Mader et al 1984)
• However, Cengiz et al (1990) proposed that the penetration of smear material into dentinal tubules could be caused by capillary action as a result of adhesive forces between the dentinal tubules and the smear material.
Composition of the Smear layer • The composition of the smear layer reflects the composition of hard tissues from which they are formed (Eick et al, 1970; Thompson et al, 1989; Eliades et al, 1990) Ø It contains both organic and inorganic substance.
Organic Inorganic • • Collagen Heated coagulated proteins Necrotic or viable pulp tissue Odontoblastic processes Saliva Blood cells Microorganisms • Minerals from the dentinal structures • Some non specific inorganic contaminants
Physiologic Considerations David H Pashley
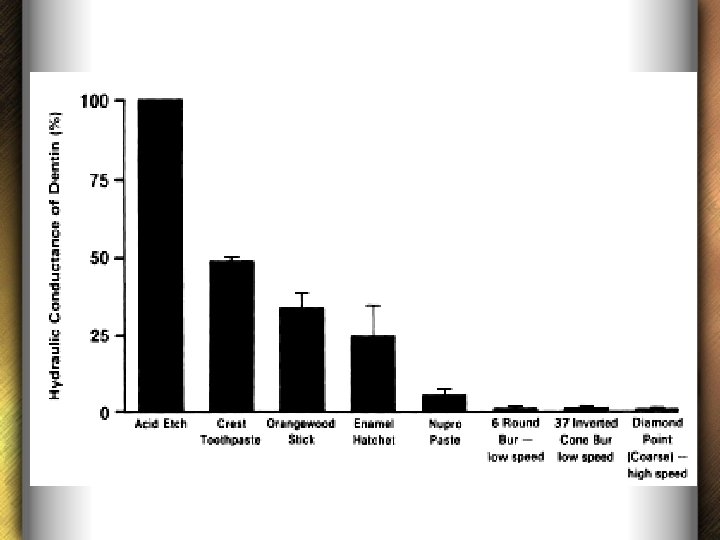
• The smear layer increases the resistance to movement of fluid across dentin discs both in vivo and vitro. • As the rates of filtration of fluid provide a convenient, quantitative method of assessing the presence of a smear layer, they were used to compare a variety of different methods of producing a smear layer on dentin etched with acid in vitro. • The ease with which fluid could flow through etched dentin (dentin free of a smear layer), termed 'hydraulic conductance'
INFLUENCE ON SENSITIVITY OF DENTIN • Dentin sensitivity is caused by open tubules in exposed dentin (Brannstrom 1982, 1986, 1992). • . Most of the resistance to the flow of fluid across dentin is due to the presence of the smear layer. Etching dentin greatly increases the ease with which fluid can move across dentin. This is accompanied clinically by increased sensitivity of dentin to osmotic, thermal and tactile stimuli (Johnson & Brannstrom, 1974).
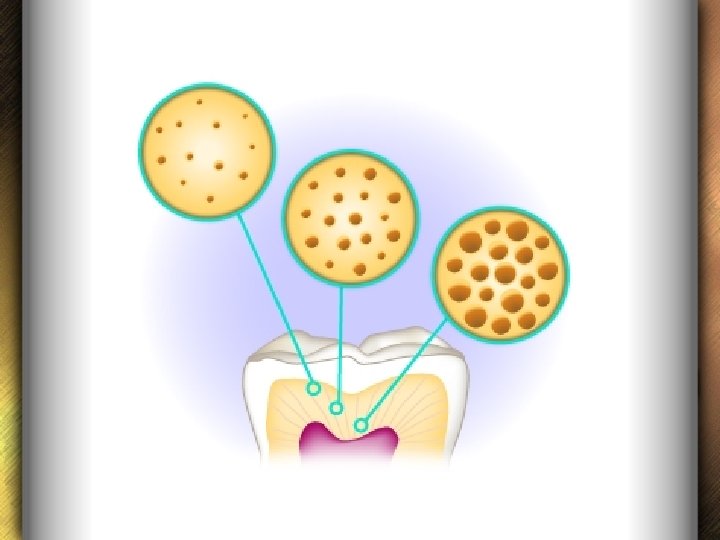
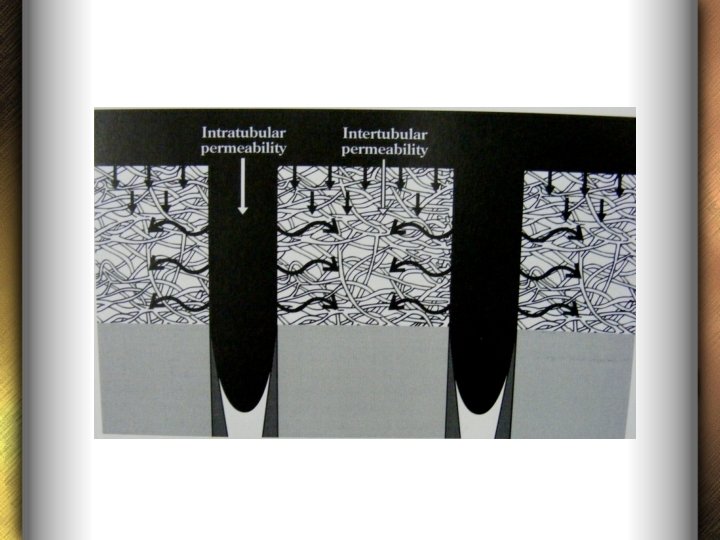
INFLUENCE ON PERMEABILITY OF DENTIN • The presence of a smear layer has a large influence on permeability of dentin. • Substances diffuse across dentin at a late that is proportional to their concentration gradient and the surface area available for diffusion.
• The area available for diffusion in dentin is determined by the density of dentinal tubules, that is, the number of tubules per square millimeter, and by the diameter of these tubules. • Both of these values vary as a function of distance from the pulp chamber (Forssell-Ahlberg, Brannstrom & Edwall, 1975, Garberoglio & Brannstrom, 1976)
Area of surface of dentin at various distances from the pulp
• The actual area of diffusional surface is the product of tubule density and the area of each tubule • Thus, area of diffusional surface varies from about 1% at the DEJ to about 22% near pulp.
• It is important to distinguish between transport of materials by diffusion and by convection. • Diffusion occurs from areas of higher concentration to areas of lower concentration. • Diffusion varies with the square of radius(πr 2)
• During diffusion, the concentration of substances is dissipated over distance. • For instance, the Concentration of microbial products entering the pulp chamber through very thick dentin (i. e. long tubules) is only a fraction of the concentration of these agents on the dentin surface.
• The transport of materials across dentin by convection is due to the presence of a pressure gradient. • In convection, there is no change in the concentration of substances dissolved in the fluid because the fluid and all that is dissolved in it is made to flow from one point to another. • The driving force is the pressure, which is dissipated over distance
• Transport across dentin by convection or fluid filtration varies with the fourth power of radius. (πr 4) • Thus, movement of fluid across dentin by convection is much more sensitive to the degree of occlusion of tubules, that is, the presence or absence of a smear layer, than is movement of substances by diffusion
• The presence of the smear layer has a profound effect on the resistance to movement of fluid across dentin by modifying the tubular radius. • The smear layer accounted for 86% of the total resistance to flow of fluid • Removing the smear layer increases dentin permeation by diffusion about 5 -6 times and by convection (or filtration) about 25 -36 times.
Functional implications in Restorative Dentistry • Smear layer is of concern as it masks the underlying dentin matrix and may interfere with the bonding of adhesive dental cements such as the polycarboxylates and glass ionomers, which may react chemically with the dentin matrix. • Dahl (1978) demonstrated that simply pumicing the dentin surface produced a threefold increase in the tensile strength of the bond between dentin and polycarboxylate cement over that seen with zinc phosphate cement which relies strictly upon mechanical roughness for retention.
q Remove the smear layer by etching with acid (Lee & others, 1971, 1973; Bowen, 1978; Brannstrom & others, 1979 b, 1980; Pashley & others, 1981) • This seemingly extreme procedure does not injure the pulp (Brannstrom, 1982), especially if dilute acids (Bowen, 1978) are used for short periods of time. • Etching dentin with 6% citric acid for 60 seconds removes all of the smear layer (and smear plugs) as does 15 seconds of etching with 37% phosphoric acid (Pashley & others, 1981).
• Advantages are that the o smear layer is entirely removed, o the tubules are open and available for increased retention, and o the surface collagen is exposed for possible covalent linkages with new experimental primers for cavities (Fusayama et al, 1979; Bowen & Cobb, 1983)
• Further with the smear layer gone, one doesn't have to worry about it slowly dissolving under a leaking restoration or being removed by acid produced by bacteria, leaving a void between one cavity wall and the restoration which might permit bacterial colonization.
• Disadvantage of removing the smear layer is that, in its absence, o there is no physical barrier to bacterial penetration of dentinal tubules. o Further, with nothing occluding the orifices of the tubules, the permeability of dentin increases four to ninefold depending upon the size of the molecule (Pashley 1978; Boyer & Svare, 1981).
ü Brannstrom’s concept (1982) – • Removing most of the smear layer over the tubules without removing the smear plugs in the tubules is ideal. • Difficult to achieve clinically because of the complex geometry of many cavities & difficulty of obtaining adequate access.
q Another entirely different approach would be to use a resin that would infiltrate through the entire thickness of the smear layer and either bond to the underlying matrix or penetrate into the tubules.
q Another approach is to try to fix the smear layer with glutaradehyde (Hoppenbrouwers, Driessens & Stadhouders, 1974) or tanning agents such as tannic acid or ferric chloride (Powis & others, 1982) • The idea is to increase the cross linking of exposed collagen fibers within the smear layer and between it and the matrix of the underlying dentin to improve its cohesion
Laser & Smear layer • Lasers work by thermomechanical ablation process that involves microexplosions within the tooth structure • Does not produce a smear layer • Er. YAG laser reveals a typically scaly, coarse & irregular surface.
• Surface is rough but not demineralized • Patent dentinal tubules
Drawbacks : • Substructural cracks in dentin Kataumi et al 1998 • More fractures within the dentin Van meerbeek et al 2003, Martinez et al 2000, Giachetti et al 2004 • Structural weakening is not only confined to the uppermost layer. • Also weakens dentin to a depth of 3 -5µm – jeopardizes adhesion of resin materials.
Smear layer & Bonding Bowen Nakabayashi
• Smear layer can be a detriment to effective bonding. • Inherent weak attachment to the underlying dentin. • Brittle in nature • Early smear layer research – nonacidic adhesives – bonds were prone to cohesive failure
Two strategies are used to overcome the low attachment strengths of the smear layer: 1. Removal of the smear layer prior to bonding (etch & rinse approach) 2. Use of bonding agents that can penetrate the smear laer and incorporate it into the hybrid layer (self etch approach) ü Both techniques have been successful
Removal of smear layer (Etch & Rinse system) o Greatly increases the dentin permeability o Better micromechanical retention Ø Early systems: (hydrophobic resins) • Outward fluid flow in tubules resulting in water contamination of bonding lower bond strength • Dentinal fluid would dilute bonding primers Ø Recent adhesive systems increased hydrophilicity provides better bonding to wet dentin surface
Hybridization Nakabayashi 1982
Hybridization – formation of hybrid layer • Process of resin interlocking in the demineralized dentin surface, thereby providing micromechanical retention. • Term commonly used for bonding after acid etching but also to the layers produced by a self-etch adhesive
Incorporating the smear layer (Self-etch approach)
Smear Layer in Endodontics
• Endodontic smear layer is very similar to coronal smear layer in composition • May also contain remnants of odontoblastic process, pulp tissue & bacteria
Effect of instrumentation on endodontic smear layer • Thickness of the smear layer may depend on the type & sharpness of cutting instrument. • Amount of smear layer produced during rotary preparation, as with Gates-Glidden or post drills is greater than that produced by hand filing Czontskowsky et al 1990
“Smear layer production by 3 rotary reamers with different cutting blade designs : A SEM Study” Spangberg et al OOOOE 2003; 96; 601 Profile Hero 642 Stainless steel engine reamer (Mani) All instruments left a smear layer However least was in Hero 642
Surface texture of smear layer • Hero 642 grp – characterstic snowy & dusty appearance – many open dentinal tubules • Profile grp – shiny & burnished appearance – few openings – thick smear layer in a tree bark pattern • Steel reamers – thinner & less compressed than Profile
“Effects of irrigation on debris & smear layer on canal walls prepared by 2 rotary techniques : A SEM study” Peters et al JOE 2000 • Lightspeed & Profile • Tap water & alternating 5. 25% Na. Ocl + 17% EDTA • Using only water – similar for both LS & PF • With EDTA/Na. OCl – better for LS – larger canal preparations – more effective removal of smear layer
“Comparative investigation of 2 rotary Ni. Ti instruments: Protaper vs Ra. Ce : cleaning effectiveness” Schafer et al IEJ 2004 • Completely clean canals were never observed. • Debris removal – better with Ra. Ce • Smear layer removal – no significant difference Ø Final apical preparation diameter in Protaper grp = 30 & in Ra. Ce grp = 35
“Efficiency of rotary nickel titanium K 3 instruments compared with stainless steel hand K-Flexofile. Part 2. Cleaning effectiveness and shaping ability in severely curved root canals” Schafer et al IEJ 2003 • For debris removal, K-Flexofiles achieved significantly better results than K 3 instruments. • The results for remaining smear layer were similar. • K 3 instruments maintained the original canal curvature significantly better than K-Flexofiles.
• K 3 files possess radial lands and this design feature might explain their poorer cleaning efficiency
“Cleaning efficiency of Anatomic endodontic technology (AET), Profile system and manual instrumentation in oval shaped root canals” - An in vitro study Dr. E. Sujayeendranath Reddy, Dr. Madhu Pujar
Results : • At 1, 5 and 10 -mm levels the root canals prepared with AET had significantly less surface debris and smear layer on the canal walls compared with canals prepared with Pro. File or manual instrumentation. • For all three groups significantly lower mean smear layer scores (P < 0. 05) were recorded at 5 and 10 -mm levels compared with the 1 mm level
Several reasons that may explain why AET-shaped root canals have lower debris and smear layer scores • Instruments are made of stainless steel • Instruments are stiffer than nickel-titanium rotary instruments and can be easily forced towards the root canal walls and the polar recesses during the side-to-side lifting motion.
• Special handpiece - The Endo-Eze handpiece uses a reciprocal quarter turn motion (oscillating angle of 30°) • Resulted in a larger preparation with an increased volume of irrigants in direct contact with the root canal walls
• Reduced efficiency of the Pro. File rotary instruments may be the flat configuration of the outer edges, which may be responsible for packing debris further into dentinal tubules, thus making it more difficult to remove Conclusion – • Although better instrumentation scores were obtained in canals prepared with AET, complete cleanliness was not achieved by any of the techniques and instruments investigated
Bacterial presence • Bacterial penetration into the dentinal tubules upto 150µm in the apical 2/3 rd Sen et al 1995
Effect of smear layer on penetration of root canal medicaments Bystrom & Sundquist (1985) • Presence of smear layer can inhibit or significantly delay the penetration of antimicrobial agents (irrigants & intracanal medicaments) into the dentinal tubules Orstavik & Haapasalo (1990) • Removing the smear layer for decreasing the time necessary to achieve the disinfecting effect of medicaments.
Influence of smear layer on sealing and obturation • One of the objectives of a successful endodontic treatment is the total obturation of the root canal system. • Leakage through an obturated root canal is expected to take place at the interfaces between sealer and dentin or sealer and the filling material, or through voids with in the sealer. • Hence the sealing quality of a root canal depends much on the sealing ability of the sealer.
• Microleakage in the root canal is a complex subject because many variables may influence leakage such as, root filling techniques, the physical and chemical properties of the sealer and most importantly the smear layer.
SMEAR LAYER
Keeping the smear layer Removal of Smear layer may block the dentinal tubules It can harbor bacteria limit bacterial or toxin penetration by altering the dentin permeability Detrimental to effective disinfection of dentinal tubules by preventing proper penetration of irrigating solutions & intracanal medicaments Can act as a barrier between obturating materials & canal wall – interfere with seal Michelich et al 1980, Pashley et al 1981, Safavi et al 1990 Yang et al 2002, Holstein et al 1990, Foster et al 1993, Lester et al 1977, Holz et al 1987, White et al 1984
Effect of Smear layer on Sealing ability of canal obturation : A Systematic Review & Meta-analysis A Shahravan et al JOE Feb 2007
• To determine whether smear layer removal reduces leakage of obturated teeth in vitro • Studies between 1975 – 2005 • Categorized based on the method of leakage test • 26 studies included
• 65 comparisons • Type of leakage test v Dye leakage test (44 comparisons) v Fluid filtration test (7 comparisons) v Electrochemical test (7 comparisons) v Bacterial leakage test (6 comparisons) v Volumetric dye leakage test (1 comparison)
q Dye leakage test studies • Combined effect showed that removing smear layer decreases dye leakage • Taylor et al 1997, “Coronal leakage : effects of smear layer, obturation technique & sealer” JOE 1997: 23: 508 • Cold vs Warm compaction ; ZOE vs resin sealer • Most significant difference with Cold lateral compaction & resin sealer
• Saunders et al 1994 – warm technique with GIC based sealer • Evans et al 1986 • Kennedy et al 1986 – chemically softened GP with ZOE sealer • Park et al 2004 – warm technique with resin sealer
• 2 types of dyes used – Methylene blue & India ink • Methylene blue – more penetration acidic small molecular size
q Fluid Filtration test studies • 4 of 7 comparisons showed a significant difference in favour of removing the smear layer Cobankara et al 2004, v “Evaluation of influence of smear layer on the apical & coronal sealing ability of two sealers” JOE 2004 • AH 26 & Roeko. Seal • Removal of the smear layer had a positive effect in reducing apical & coronal leakage for both.
v Economides et al 2004 “Comparative study of apical sealing ability of a new resin based sealer” JOE 2004 : 30: 403 • Fibrefill (resin based) & Calcibiotic Root canal sealer (Ca. OH based) • Fiberfill showed less leakage than CRCS • Microleakage was less when the smear layer was removed. v Timpawat et al 2001 “ Effect of removal of smear layer on apical microleakage”
q Electrochemical test studies • 6 out of 7 comparisons showed results in favour of removing it • Von Fraunhofer et al 2000 – cold compaction with resin based sealer • Bayirli et al 1994 – warm compaction with Ca. OH based sealer
q Bacterial leakage test studies • 2 of 6 comparisons reported a significant difference in favour of smear layer removal • Clark-Holke et al 2003 – cold compaction with resin based sealer • Behrend et al 1996 – warm technique with ZOE based sealer • Others – no significant difference
q Volumetric dye leakage • Only 1 study – significant difference in favour of removing the smear layer • Vassiliadis et al “Effect of smear layer on coronal microleakage” OOOOE 1996 • Cold technique with ZOE sealer
Following explanations have been drawn by several authors to support the idea of removing the smear layer : • It has an unpredictable diameter & volume, because a great portion of it consists of water (Holz et al 1987) • Contains bacteria & necrotic tissue (Mc. Comb & Smith 1975, Goldberg et al 1977)
• May act as a substrate for the bacteria letting them penetrate deeper into dentinal tubules (George S, Anil Kishen 2005) • May limit the optimum penetration of disinfecting agents, medicaments & root canal filling materials into tubules (Wayman et al 1979, Yamada et al 1983)
Ø According to meta-regression analysis • • • Obturation type, sealer type, type of dye used, site of leakage test, duration of the test & year of publication No effect on the results Concluded that removal of smear layer improves the fluid tight seal whereas other factors did not produce significant effects.
Removal of Smear Layer
Chemical Smear layer Removal Lasers Ultrasonics
Chemical removal q Sodium hypochlorite • Organic tissue dissolving activity Rubin et al 1979, Goldman et al 1982 • Not effective in removing smear layer Baker et al 1975, Goldman et al 1981, Berg et al 1986, Baumgartner et al 1987 • Na. OCl + H 2 O 2 – Not effective Bitter et al 1989
Chelating agents Ø EDTA – chelates the calcium ions in dentin & dissolves the inorganic portion Grossman et al 1988 • Decalcifies dentin to a depth of 20 -30µm in 5 min • When used alone EDTA removed the inorganic portion but left an organic layer in the tubules.
Ø Sodium hypochlorite + EDTA • Alternating the use of EDTA & Na. OCl is an effective method for smear layer removal Goldman et al 1982, Yamada et al 1983 , Baumgartner et al 1987, Cengiz et al 1990 ü Most effective final flush of 10 ml of 17% EDTA followed by 10 ml of 5. 25% Na. OCl
• EDTA acts on inorganic component the dentin demineralizing • Na. OCl acts on organic component & antimicrobial properties tissue dissolving
Ø EDTAC (with cetavlon) – To reduce the surface tension – Increased wetting effect – Deeper penetration into irregularities
“The effect of EDTAC and the variation of its working time analyzed with scanning electron microscopy” Goldberg & Spielberg. 1982 • Different working times evaluated were 5, 15 & 30 minutes. • The results showed that the effect of EDTAC could be seen after 5 minutes but the strongest effect was detected at 15 minutes with no variations after 30 minutes
“Time-dependent effects of EDTA on dentin structures Calt , Ahmet Serper. JOE Jan 2002 • Final irrigation was done with 10 ml of 17% EDTA for 1 & 10 min respectively in each group followed by 10 ml of 5% Na. OCl in both the groups • The results showed that 1 minute EDTA irrigation was effective in removing the smear layer , whereas a 10 minute application caused excessive peritubular and intertubular dentinal erosion.
“Efficacy of several concentrations of sodium hypochlorite for root canal irrigation” Craig Baumgartner , Paul Cuenin JOE Dec 1992 • Sodium hypochlorite solutions in concentrations of 5. 25%, 2. 5% & 1% were equally effective in removing the dentinal debris & pulpal remnants.
“Effect of Application time of EDTA and sodium hypochlorite on intracanal smear layer removal – SEM analysis” Texeira CS, Felippe MC IEJ May 2005 • Final irrigation with 3 ml of 15% EDTA followed by 3 ml of 1% Na. OCl for different time durations of 1 min, 3 min & 5 minutes respectively. • Were equally effective in removing the smear layer
Organic acids q Citric acid • More effective than Na. OCl alone (Baumgartner 1984) • Better than many acids such as polyacrylic acid, lactic acid & phosphoric acid (Meryon et al 1987)
• Wayman et al 1979 – showed best results with sequential use of 10% citric acid & 2. 5% Na. OCl, then again followed by 10% citric acid. • However, not as effective as 17%EDTA-Na. OCl combination (Yamada et al 1983) Ø Disadvantage of citric acid – left precipitated crystals in the root canal which may interfere with root canal obturation.
q Lactic acid (50%) – less effective than 50% citric acid – attributed to viscosity of lactic acid. q Tannic acid (25%) – effective in removing the smear layer Bitter et al 1989 • But Sabbak et al 1998 – tannic acid increased the crosslinking of exposed collagen within the smear layer and within the matrix of the underlying dentin increasing the organic cohesion to the tubules
q Salvizol (Bis-Dequalinium-Acetate) • Removes the smear layer Kaufman et al (1981) • Has low surface tension • Less toxic than Na. OCl • But less effective than EDTA Berg et al (1986)
q EGTA (Ethylene glycol-bis-NNN tetraacetic acid) • Calt , Serper 2000 • 17% EDTA / 17% EGTA followed by 5% Na. OCl • Both effective in removing the smear layer and EGTA caused less dentinal erosion. • Can be used as an alternate chelator.
q Tetracyclines (Doxycycline) • Low p. H in concentrated solution & can act as a calcium chelator. • Can cause surface demineralization • Substantivity
Barkhordar et al (1997) – • Doxycycline HCl (100 mg/ml) is effective in removing the smear layer Ersev et al (2001) – • Tetracycline as effective as 50% citric acid but tetracycline demineralized less peritubular dentin than citric acid.
q MTAD (Mixture of tetracycline isomer, an acid & a detergent) Torabinejad et al 2003 • Irrigation with 5. 25% Na. OCl & final rinse with – 17% EDTA – MTAD • MTAD is an effective solution for the removal of smear layer & does not significantly change the structure of dentinal tubules
q Smear Clear (Sybron. Endo) 17% EDTA + 2 additional proprietary surfactants • Jantarat et al 2007 – compared 17% EDTA with Smear Clear as the final irrigating solution Conclusion • Smear. Clear seems to be the best solution for removal of the smear layer after root canal instrumentation.
Ultrasonic removal Ø Acoustic streaming v Cameron et al , 1983 “The use of ultrasonics in the removal of smear layer : A SEM study” o Debris free canal with the use of 3% Na. OCl solution + ultrasonics for 5 mins
• Cameron et al , 1988 “Use of ultrasonics for smear layer removal: effect of sodium hypochlorite concentration” o Complete smear removal with 4% Na. OCl + ultrasonics for 2 mins v Prati et al 1994 – achieved smear removal with ultrasonics
v In contrast , it has also been found that ultrasonics were not able to remove the smear layer. (Cymerman et al 1983, Baker et al 1988, Goldberg 1988) v Baumgartner et al , 1992 “Efficacy of several concentrations of Na. OCl for root canal irrigation” o Ultrasonically energised Na. OCl did not remove the smear layer
“Effects of EDTA with and without surfactants or ultrasonics on removal of smear layer” Jeen-Nee Lui et al JOE April 2007 • 17% EDTA /Smear Clear and with / without ultrasonics • The results showed that addition of surfactants to EDTA did not result in better smear layer removal. • But the use of ultrasonics with 17% EDTA improved smear layer removal
Laser Removal • Takeda et al (1998) – lasers can be used to vaporize tissues in the root canal, remove the smear layer & eliminate the residual tissue in the apical portion of the canal. • Dederich et al (1993) used Nd: YAG laser • Disruption of the smear layer but melting of the dentin Ø Other lasers- CO 2 laser, Argon laser
• Takeda et al (1998) – using the Er: YAG laser demonstrated optimal removal of smear layer without melting, charring & recrystallization associated with other lasers. • Kimura et al (2002) - removal of smear layer with Er: YAG laser Ø Main difficulty with laser removal of smear layer – access to small canal spaces with relatively large probes for delivery of laser beam
CONCLUSION • In Restorative dentistry, numerous studies have proved the pros & cons of smear layer as a natural cavity liner and adhesion inhibitor. • Hence depending on the kind of restoration, the operator should choose whether to incorporate, modify or remove the smear layer.
In endodontics – • On the basis of available evidence it can be concluded that root canal instrumentation produces smear layer which may contain bacteria and may prevent penetration of intracanal medicaments into the dentinal tubules. • It seems reasonable to suggest that removal of smear layer can result in a more thorough disinfection of the root canal system and ensure better adaptation between the obturation materials & root canal walls.
REFERENCES • • Sturdevant’s Art & Science of Operative Dentistry – 5 th ed Textbook of Operative Dentistry – Summit Pathways of the Pulp- Cohen – 9 th edition Endodontics – Ingle – 6 th ed Hybridization of dental hard tissues- Nakabayashi DCNA 1990 Vol 34 Operative dentistry 1984 Supplement 3 OOOOE Dec 2002
• • Int Endodontic Journal 1995 Vol 28 JOE Feb 2007 Operative Dent 2006 Vol 31 Dent Mat 2008 Vol 24 Dent Mat 2003 Vol 19 OOOOE 2003; 96; 601 IEJ 2004; 37; 239 JOE Jan 2000; 26