SLRS Revisited is the Straight Line Reference System

- Slides: 16

SLRS Revisited …is the Straight Line Reference System still working ? Dr. Johannes J. Prenting SLRS put to 2 nd test FNAL, October 2018

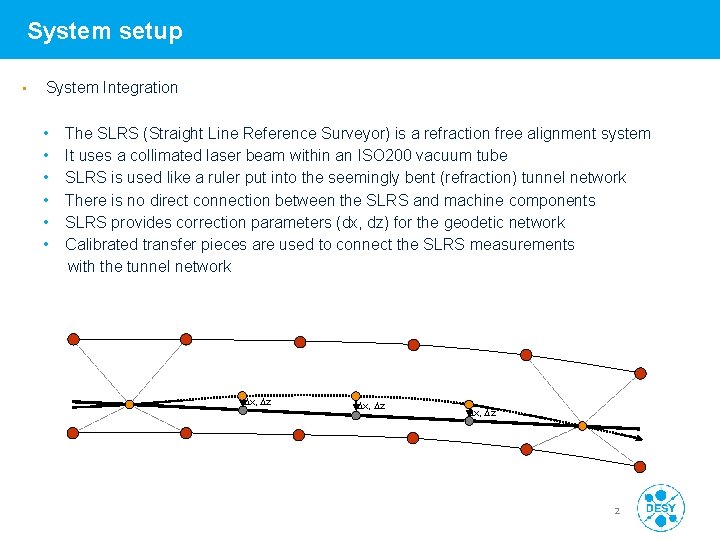
System setup • System Integration • • • The SLRS (Straight Line Reference Surveyor) is a refraction free alignment system It uses a collimated laser beam within an ISO 200 vacuum tube SLRS is used like a ruler put into the seemingly bent (refraction) tunnel network There is no direct connection between the SLRS and machine components SLRS provides correction parameters (dx, dz) for the geodetic network Calibrated transfer pieces are used to connect the SLRS measurements with the tunnel network Dx, Dz 2

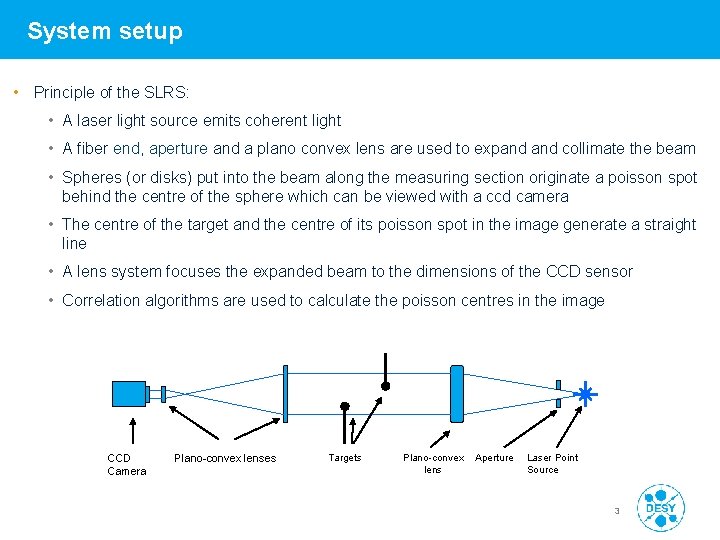
System setup • Principle of the SLRS: • A laser light source emits coherent light • A fiber end, aperture and a plano convex lens are used to expand collimate the beam • Spheres (or disks) put into the beam along the measuring section originate a poisson spot behind the centre of the sphere which can be viewed with a ccd camera • The centre of the target and the centre of its poisson spot in the image generate a straight line • A lens system focuses the expanded beam to the dimensions of the CCD sensor • Correlation algorithms are used to calculate the poisson centres in the image CCD Camera Plano-convex lenses Targets Plano-convex lens Aperture Laser Point Source 3

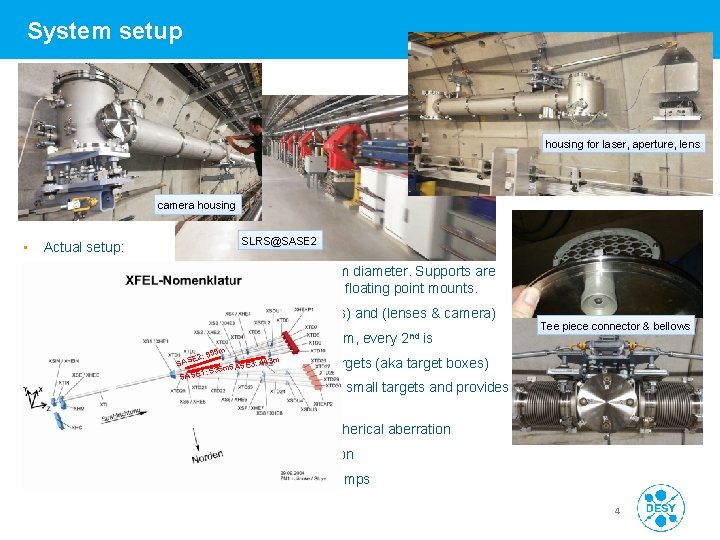
System setup housing for laser, aperture, lens camera housing • SLRS@SASE 2 Actual setup: • Aluminum pipes, 7. 73 m/3. 87 m long, 200 mm diameter. Supports are placed every 3 to 4. 5 m with fixed point and floating point mounts. • special housings for (laser, aperture, lenses) and (lenses & camera) • Tee piece connector with bellows, every 24 m, every 2 nd is Tee piece connector & bellows 55 m 2: 5 SE 43 m equipped with. SAadapted targets (aka target boxes) SE 3: 4 Ameasurement 535 m. S 1: SASE • blue laser (wavelength = 405 nm) allows for small targets and provides fine interference patterns • revised plano convex lenses for minimal spherical aberration • Gig. E-Camera with 2048 x 2048 pix. resolution • Oerlikon/Leybold Trivac D 65 B Vacuum pumps 4

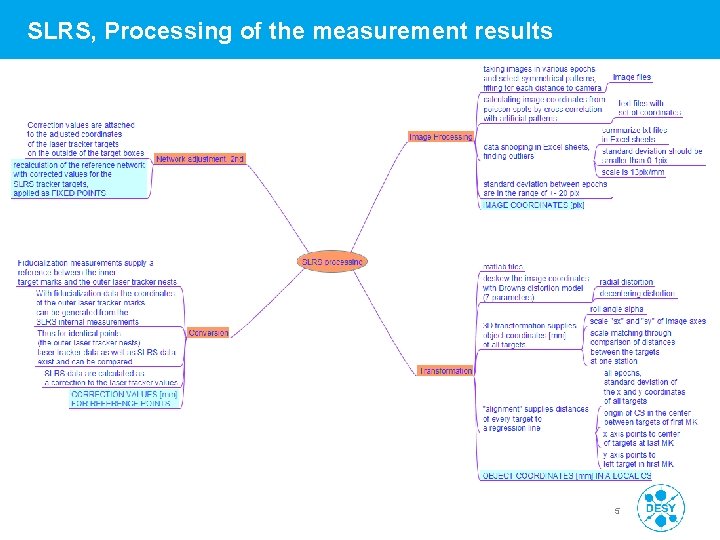
SLRS, Processing of the measurement results 5

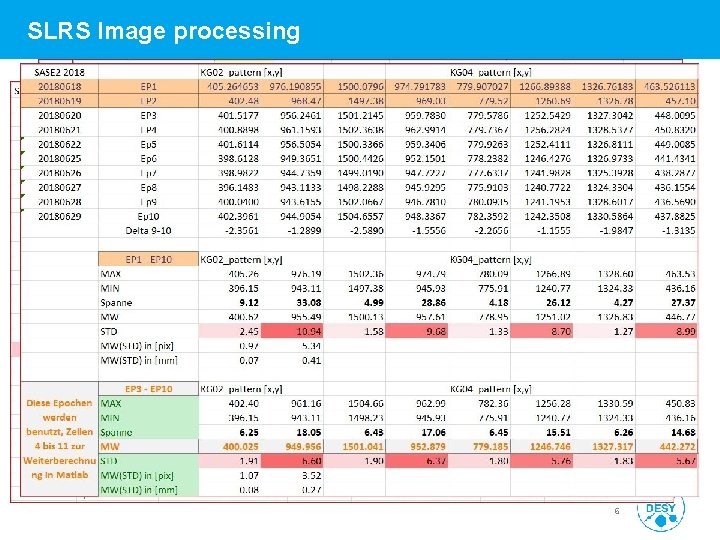
SLRS Image processing taking images in various epochs at the time of network measurements image files calculating image coordinates from poisson spots by cross correlatiopn with artificial, symmetrical patterns text files with set of coordinates Image Processing summarize text files in excel sheets IMAGE COORDINATES [pix] data snooping in excel sheets, finding outliers standard deviation should be smaller than 0. 1 pix scale is 13 pix/mm technical resolution is 8 µm but variance of 6 pix gives only 0. 5 mm 6

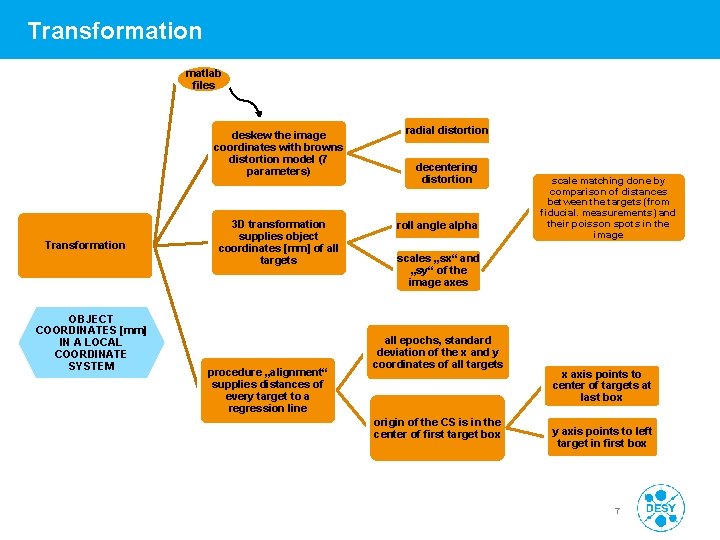
Transformation matlab files deskew the image coordinates with browns distortion model (7 parameters) Transformation OBJECT COORDINATES [mm] IN A LOCAL COORDINATE SYSTEM 3 D transformation supplies object coordinates [mm] of all targets procedure „alignment“ supplies distances of every target to a regression line radial distortion decentering distortion roll angle alpha scale matching done by comparison of distances between the targets (from fiducial. measurements) and their poisson spots in the image scales „sx“ and „sy“ of the image axes all epochs, standard deviation of the x and y coordinates of all targets origin of the CS is in the center of first target box x axis points to center of targets at last box y axis points to left target in first box 7

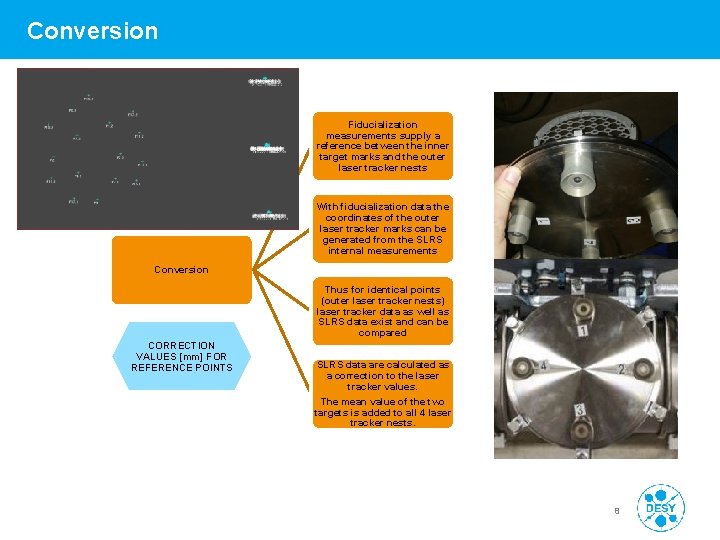
Conversion Fiducialization measurements supply a reference between the inner target marks and the outer laser tracker nests With fiducialization data the coordinates of the outer laser tracker marks can be generated from the SLRS internal measurements Conversion Thus for identical points (outer laser tracker nests) laser tracker data as well as SLRS data exist and can be compared CORRECTION VALUES [mm] FOR REFERENCE POINTS SLRS data are calculated as a correction to the laser tracker values. The mean value of the two targets is added to all 4 laser tracker nests. 8

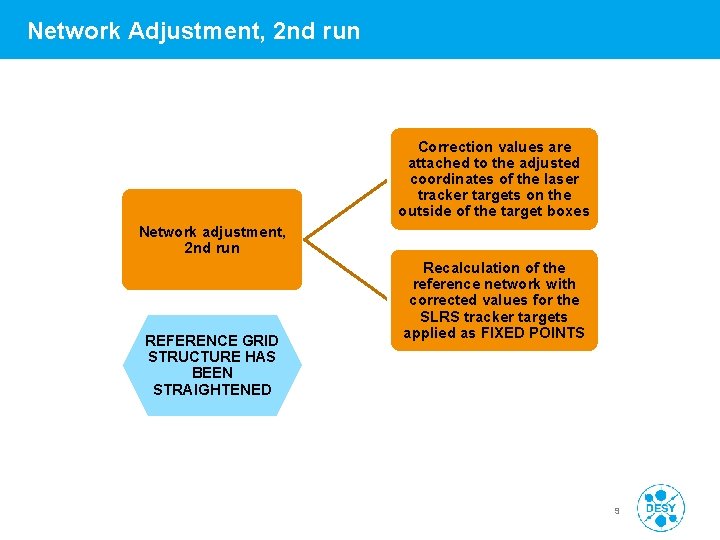
Network Adjustment, 2 nd run Correction values are attached to the adjusted coordinates of the laser tracker targets on the outside of the target boxes Network adjustment, 2 nd run REFERENCE GRID STRUCTURE HAS BEEN STRAIGHTENED Recalculation of the reference network with corrected values for the SLRS tracker targets applied as FIXED POINTS 9

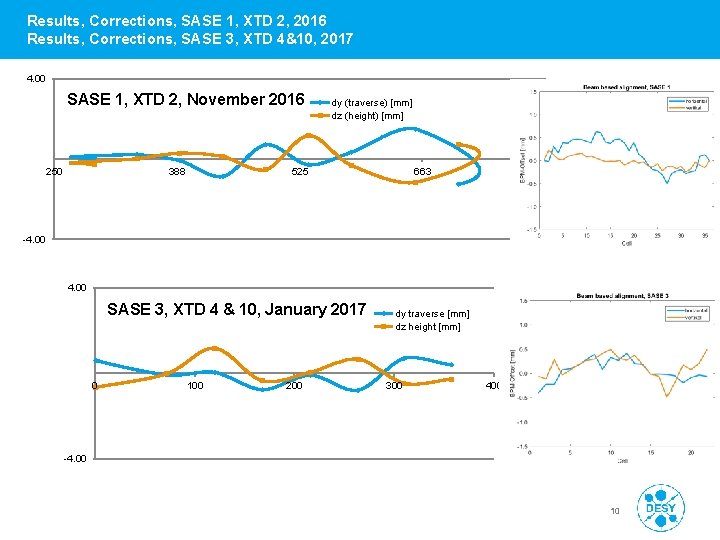
Results, Corrections, SASE 1, XTD 2, 2016 Results, Corrections, SASE 3, XTD 4&10, 2017 4. 00 SASE 1, XTD 2, November 2016 250 388 dy (traverse) [mm] dz (height) [mm] 525 663 800 -4. 00 SASE 3, XTD 4 & 10, January 2017 0 100 200 dy traverse [mm] dz height [mm] 300 400 -4. 00 10

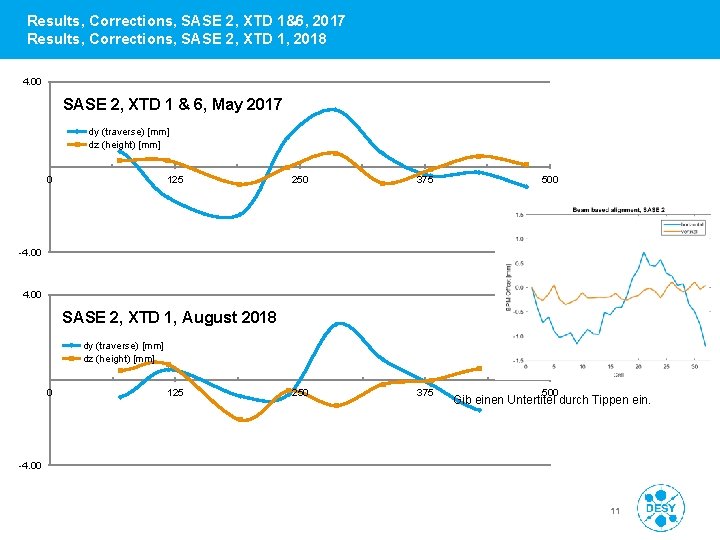
Results, Corrections, SASE 2, XTD 1&6, 2017 Results, Corrections, SASE 2, XTD 1, 2018 4. 00 SASE 2, XTD 1 & 6, May 2017 dy (traverse) [mm] dz (height) [mm] 0 125 250 375 500 -4. 00 SASE 2, XTD 1, August 2018 dy (traverse) [mm] dz (height) [mm] 0 125 500 Gib einen Untertitel durch Tippen ein. -4. 00 11

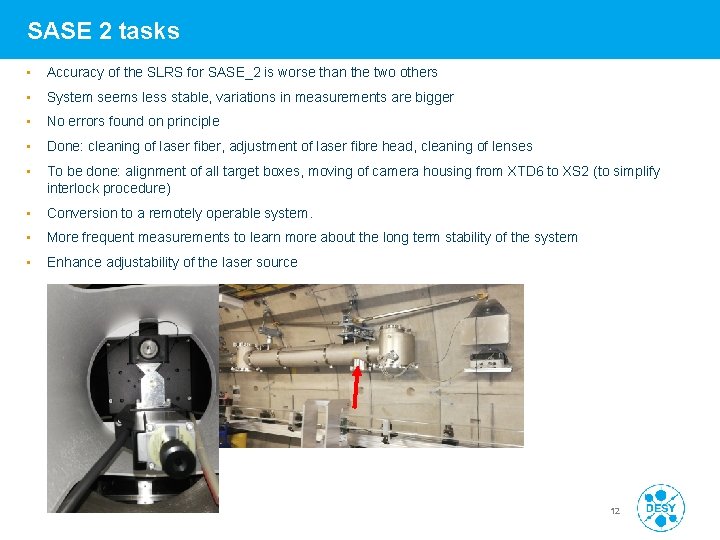
SASE 2 tasks • Accuracy of the SLRS for SASE_2 is worse than the two others • System seems less stable, variations in measurements are bigger • No errors found on principle • Done: cleaning of laser fiber, adjustment of laser fibre head, cleaning of lenses • To be done: alignment of all target boxes, moving of camera housing from XTD 6 to XS 2 (to simplify interlock procedure) • Conversion to a remotely operable system. • More frequent measurements to learn more about the long term stability of the system • Enhance adjustability of the laser source 12

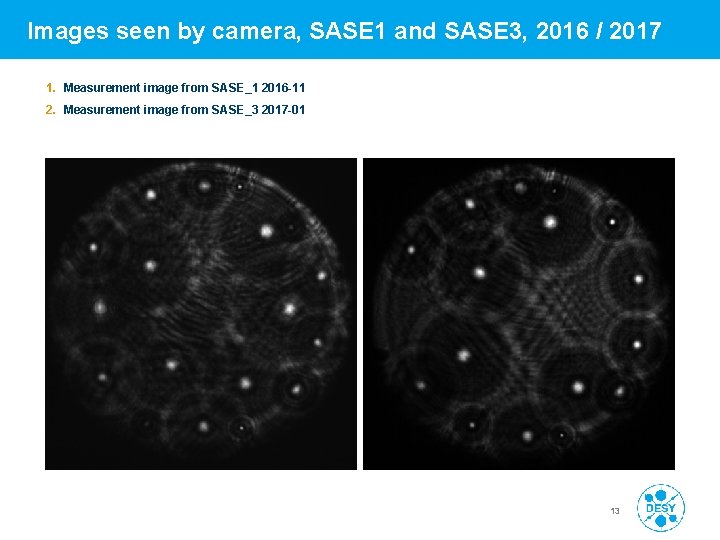
Images seen by camera, SASE 1 and SASE 3, 2016 / 2017 1. Measurement image from SASE_1 2016 -11 2. Measurement image from SASE_3 2017 -01 13

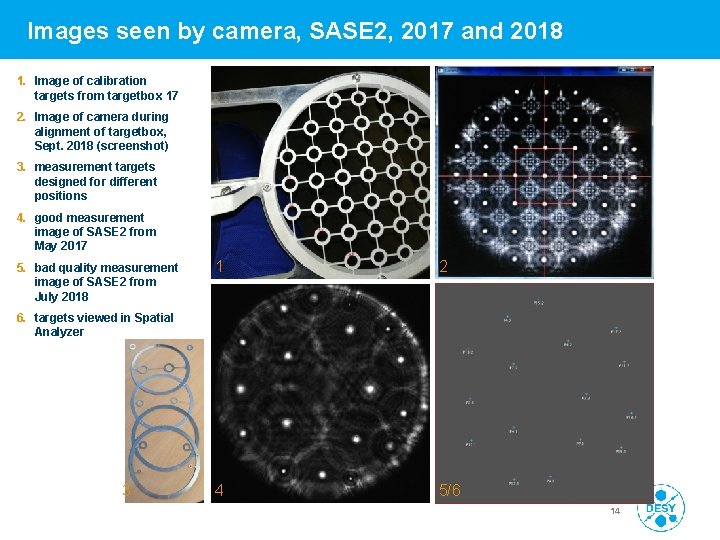
Images seen by camera, SASE 2, 2017 and 2018 1. Image of calibration targets from targetbox 17 2. Image of camera during alignment of targetbox, Sept. 2018 (screenshot) 3. measurement targets designed for different positions 4. good measurement image of SASE 2 from May 2017 5. bad quality measurement image of SASE 2 from July 2018 1 2 4 5/6 6. targets viewed in Spatial Analyzer 3 14

Conclusions • The SLRS system worked fine up to now (at least in 2 cases). • Machine sections have been aligned to the measurement outcomes of the SLRS. Fine alignment has been done after a bba (as planned). • The SLRS for SASE 2 is less stable than the other 2 systems. • The calculation process overall consists of too many single steps and is confusing. This is the work of several persons in successive contracts. • The calculation process has to be simplified and integrated by means of software witchcraft. First step has been the changeover from excel sheets to matlab files. More steps are to follow.

Conclusions • Due to time restrictions the collection of measurement data has been limited to a few days. We need a greater extend of measurement samples in order to learn more about the system behaviour. Therefore the system is changed to a remotely operable system in the next few maintenance periods. • The adjustability of the inner components of the laser box has to be improved. Some maintenance is required in given periods (cleaning of laser fibre & lenses). • Mechanical stability of the system has to be enhanced. • The variances of the measurement outcomes have to be minimized. • In order to pass the final acceptance all SLRSs have to be delivered within specs: • initial alignment to 0, 5 mm wrt 500 m length. • Again, like at last IWAA: …to be continued • THANK YOU FOR YOUR ATTENTION. 16