Skin assessment d marwa hamdy Equipment Record chart


- Slides: 38
Skin assessment d/ marwa hamdy
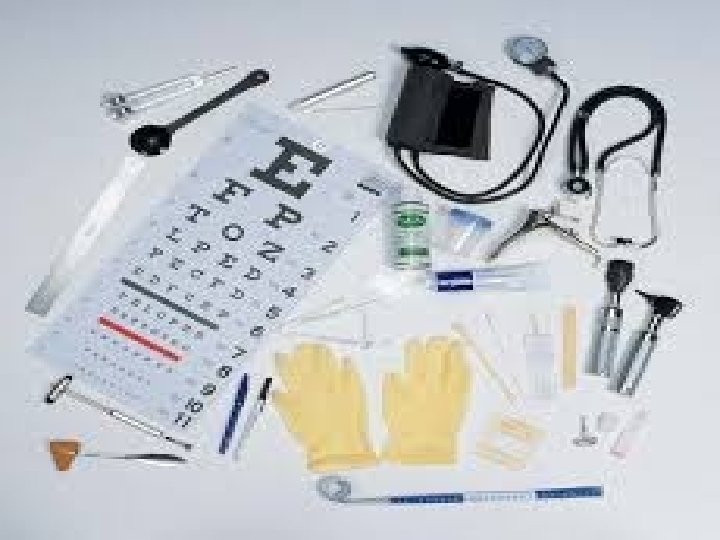
Equipment • • • Record chart. Well-light, warm private room or space. Gown for the patient privacy and comfort. Sheet or blanket for privacy and comfort. Gloves. Millimeter ruler.
Preparation Ensure that adequate lighting is available.
Procedure: Step 1: Introduce self and verify patient's identity. Rationale: Attain patient's cooperation and prevent mistakes. Step 2: Explain procedure to the patient. Rationale: Attain patient's cooperation. Step 3: Gather appropriate equipment. Rationale: Ease performance of the procedure.
• Step 4: Perform hand hygiene and observe other appropriate infection control procedures. • Rationale: Prevent spread of infection. • Step 5: Provide for patient privacy. • Rationale: Avoid patient's embarrassment. • Step 6: Maintain body mechanics. • Rationale: Prevent strain on nurse's back.
• Step 8: Inspect skin color and uniformity of skin color. • Rationale: To detect normal variation and abnormalities and comparing color of symmetrical of body parts.
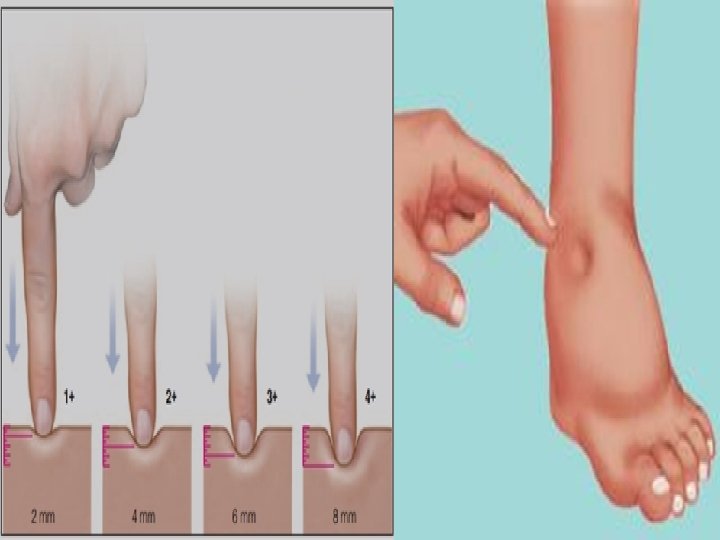
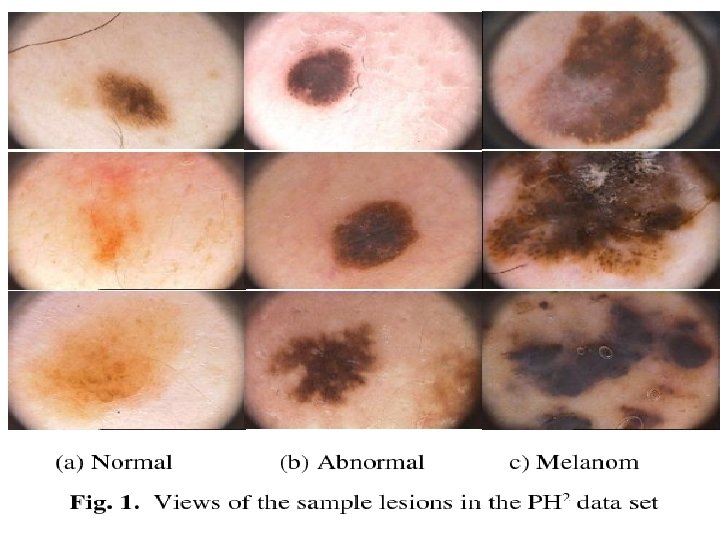
• Step 8: Assess edema if present (location, color, temperature, shape and the degree to which the skin remains intended or pitted when pressed by finger). • Rationale: Normally there is no edema. • Step 9: Inspect, palpate and describe skin lesions apply gloves if lesions are open or draining. Describe lesions according to location, distribution, color, size, shape, type or structure use the millimeter ruler to measure lesions. • Rationale: To assess characteristics of any lesions.
Abnormal skin
• Step 10: Observe and palpate skin moisture. • Rationale: Normally the skin moisture in skin folds and axillae. • Step 11: Palpate the skin temperature, using the back of your hand. • Rationale: To compare the symmetry of each body parts. • Step 12: Note skin turgor (fullness or elasticity) by lifting and pinching the skin on an extremity.
• Step 13: Hand washing. • Step 14: Rearrange the equipment. • Step 15: Place the patient in comfortable position.
Step 16: Documentation: a. All assessments and procedures must be completely documented according to institutional policy. b. Record under objective portion of assessment. c. Record data and time of assessment.
Expected outcomes 1. Compare finding to previous skin assessment data if available determine if lesions or abnormalities are changing. 2. Report deviations for normal or expected findings to the primary care provided.
Hair assessment
Assessing the hair Equipment: Clean gloves.
Preparation Obtain history of the following recent use of hair dyes, rinses, chemotherapy and the presence of acute or chronic condition.
Procedure: • Step 1: Introduce self and verify patient's identity. • Rationale: Attain patient's cooperation and prevent mistakes. • Step 2: Explain procedure to patient. • Rationale: Attain patient's cooperation. • Step 3: Gather appropriate equipment. • Rationale: Ease performance of the procedure.
• Step 4: Perform hand hygiene and observe other appropriate infection control procedures. • Rationale: Prevents spread of infection. • Step 5: Provide for patient privacy. • Rationale: Avoid patient's embarrassment. • Step 6: Maintain body mechanics. • Rationale: Prevent strain on nurse's back.
• Step 7: Wear gloves and inspect the evenness of growth of hair over the scalp. • Rationale: To ensure hair evenly distributed hair. • Step 8: Inspect hair thickness or thinness. • Rationale: Normally hair should be thick. • Step 9: Inspect hair texture and oiliness. • Rationale: To assess hair texture should be silky resilient hair.
• Step 10: Note presence of infections and checking behind the ears and along the hairline at the neck. • Rationale: To inspect hair free from any infection. • Step 11: Inspect amount of body hair. • Rationale: To ensure there is no abnormality.
Abnormal hair
• Step 12: Remove and discard gloves and perform hand hygiene. • Rationale: To prevent spread of microorganism. • Step 13: Rearrange the equipment if used. • Step 14: Place the patient comfortable position.
Step 15: Documentation: a. All assessment and procedures must be completely documented according to institutional policy. b. Record under objective portion of assessment. c. Record in order of the category group used in the assessment. d. Record data and time of assessment.
Expected outcomes: 1. Perform detailed follow up examination based on findings that deviated from expected or normal for the patient. 2. Relate finding to pervious assessment data if available.
Assessing nails
Preparation: 1. If patient with artificial nails or polish on finger nails or toenail are required to remove these for assessment. 2. Inquire if the patient has any history of the following [presence of diabetes mellitus, peripheral circulatory disease, previous injury or severe illness].
Procedure: • Step 1: Introduce self and verify patient's identity. • Rationale: Attain patient's cooperation and prevent mistakes. • Step 2: Explain procedure to patient. • Rationale: Attend procedure to patient. • Step 3: Gather appropriate equipment. • Rationale: Ease performance of the procedure.
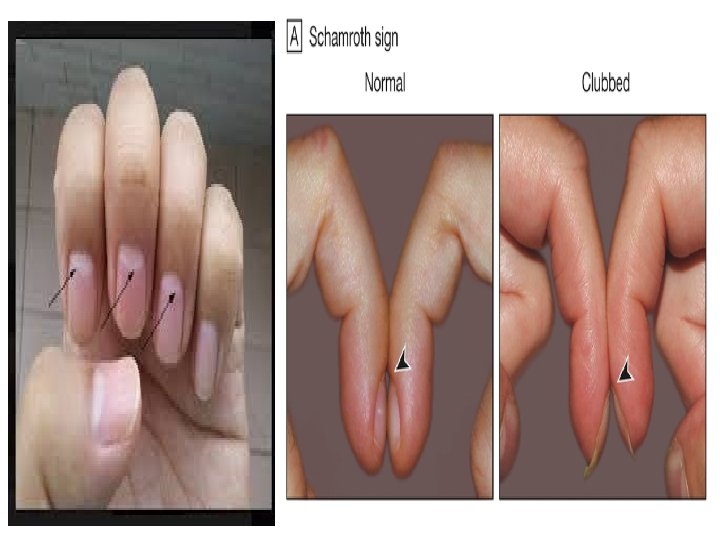
• Step 4: perform hand hygiene and observe other appropriate infection control procedures. • Rationale: Prevent spread of infection. • Step 5: Maintain body mechanics. • Rationale: Prevent strain on nurse's back. • Step 6: Inspect finger nail plate shape. • Rationale: To determine its curvature and angle. Normally find nail convex curvature angle of nail plate about 160.
• Step 7: Inspect finger nail and toe nail texture. • Rational: Normally nail smooth texture.
Abnormal nail
• Step 8: Inspect finger nail and toe nail bed color. • Rationale: To detect any abnormality as bluish (may reflect cyanosis) and pallor (may reflect poor arterial circulation). • Step 9: Inspect tissues surrounding nails. • Rationale: To ensure free from any abnormality. Normally should be intact epidermis.
• Step 10: Perform blanch test of capillary refill. • Rationale: To ensure prompt return of pink or usual color (generally less than 2 seconds). • Step 11: Rearrange the equipment if used. • Step 12: Place the patient comfortable position.
a. of the category group used in the assessment. b. Record data and time of assessment.
Expected outcome: • As the previous procedure.