SHADING shows changes from light to dark or


 Practice shading on the Basic Shapes worksheets. 2)")


- Slides: 14
SHADING shows changes from light to dark or dark to light in a picture by darkening areas that would be shadowed and leaving other areas light. Blending of one value into another is sometimes called feathering. Shading is often used to produce illusions of dimension and depth.
VALUE STEPS # 1 The darkest tone is as near to BLACK as you can get, this is your darkest shade. Don't try to achieve this tone in one application, build it up in layers. #2 DARK GRAY, this represents the shadowed side of an object as it recedes from the light. On the ball, the #1 light is coming from the upper Black front. The shadow is seen around the lower side. #4 #5 #3 #2 #1 #2 Dark gray # #3 Medium gray 3 MEDIUM GRAY, This is called a halftone, because it is seen halfway between the light area and the dark area. The mid gray, the tone that represents the actual color of the object without the effects of either direct light or shadow. #4 LIGHT GRAY, This is the hardest element to see, but it is probably the most important one to have in your art work. This is #4 reflected light. It is light that bounces up onto the ball from the Light gray table. It separates shadow from cast shadows. #5 White (highlight) #5 WHITE, This is the lightest part of an object where the full light falls directly on to it. It is where the light is the strongest and is called the highlight.
Shading is really hard for a lot of Students! So…. .
…remember nothing but nothing is more important than PRACTICE
TRY SHADING THIS GRAY SCALE l The pencil must be applied SMOOTHLY to begin with if you want it to look smooth in the end. l So we can't be scribbling. l Pencil strokes are applied very closely to each other, so that it becomes hard to tell one stroke from another. l For most people it's quite easy to apply a lot of pressure, but what comes much harder is a lighter touch. l Under shading is unspeakably better than over shading. l If you do draw too hard and try to mop it up with an eraser later on, you're prone to disaster. l Ease up already. l Don’t try to achieve this value in one application. Build it up with soft layers.
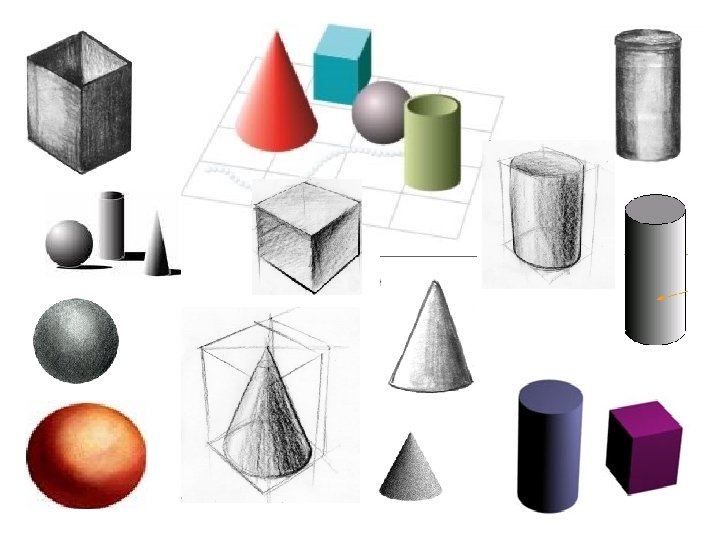
THE DRAWING PROJECTS Cone, Sphere, Cylinder, Cube
CONE STEP 1 Add a light source STEP 2 Trace shape VERY LIGHTLY STEP 3 Now lightly fill the shape using a sharp color pencil. STEP 4 This will be the first of a many layers which will build up to the required value. SPHERE CYLINDER CUBE STEP 5 Start with the lines closer together and gradually increase the distance between them, slowly reducing the amount of pressure on the pencil. STEP 6 Don’t try to achieve this value in one application. Build it up with soft layers. STEP 7 Creating three dimensional shadows is all about being subtle; gradually blending light and dark STEP 8 Pressure and layering is what determines what shade your pencil will draw. That slow change in shade is what you need to create our shape. STEP 9 Your pencil is extremely sensitive to your touch. STEP 10 When you learn to control that pressure and layering, Your shading quality will do new and interesting things.
PROJECT & OBJECTIVES Students will: 1) Practice shading on the Basic Shapes worksheets. 2) Utilize the five step value scale to shade each shape correctly. 3) Draw four basic shapes: cone, sphere, cylinder, and cube. 4) Gradually shade each shape in the direction of light source. 5) Use value to change each shape into the form. 6) Blend shapes evenly and smoothly. 7) Practice… practice.
CONE http: //www. expertvillage. com/videos/basic-artistic-drawing-cones. htm SPHERE http: //www. expertvillage. com/videos/basic-artistic-drawing-shading-circles-a. htm http: //www. expertvillage. com/videos/basic-artistic-drawing-shading-circles-b. htm CYLINDER http: //www. expertvillage. com/videos/basic-artistic-drawing-shading-cylinders. htm
SHADING SHAPES CREDITS Drawing Pencil Portraits by Lee Hammond http: //homepages. tesco. net/p. wilkinson/Blend. Shade. htm Arts. Work http: //artswork. asu. edu/arts/students/line 4. htm Drawing Tutorials by Rebekah Lynn http: //www. rebekahlynn. com/free/tutorial/shading_tutorial. html