Shading Diffuse Lighting and More Texturing Paul Taylor


- Slides: 50

Shading, Diffuse Lighting and More Texturing Paul Taylor 2010

Games Industry Speakers, etc • Fridays @ 3 pm?

Shading and Diffuse Surfaces Part I

What is Shading? • Shading is how we apply lighting to surfaces – Most of the following is falling into disuse, except on commodity hardware – It may still be useful depending on how much you are squeezing your platform

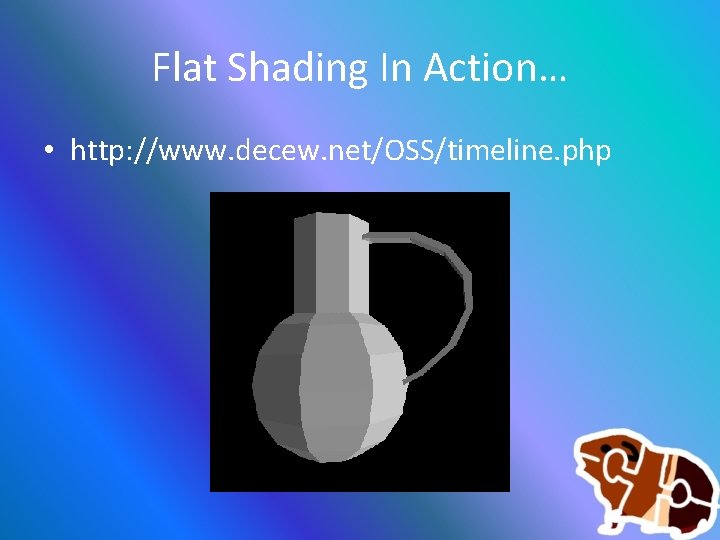
Flat Shading • Unexciting – This is the simplest form of shading – The first vertex from each polygon is selected for shading. – The Pixel shader is then given a flat shade colour for each polygon.

Flat Shading In Action… • http: //www. decew. net/OSS/timeline. php

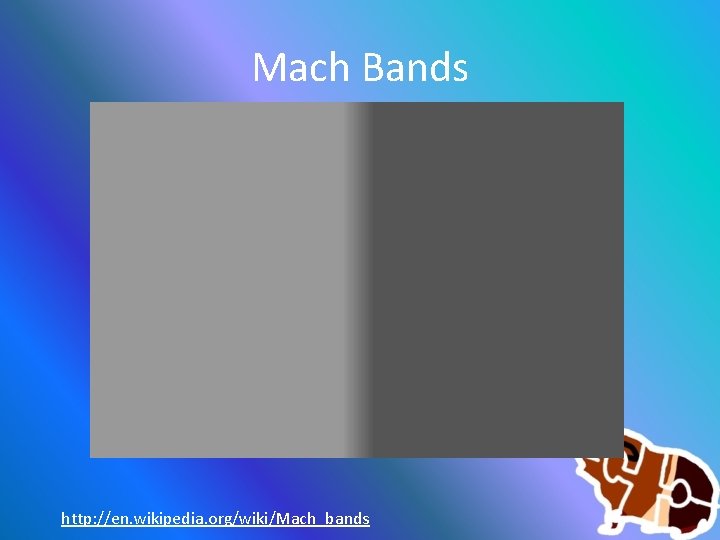
Mach Bands http: //en. wikipedia. org/wiki/Mach_bands

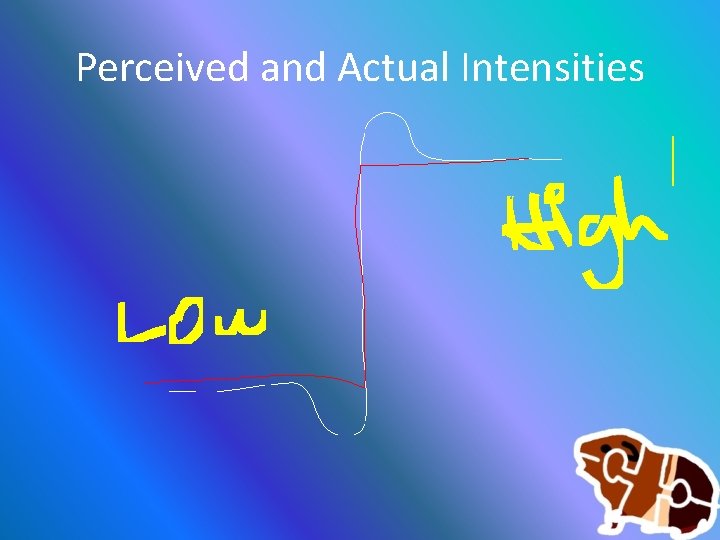
Perceived and Actual Intensities

When Flat Shading is ok… • Typically at best it’s average looking if – Both Light and Viewer are distant • This way variances between adjacent polygons will be low – If light or viewer are close variances in adjacent Polygons will be ugly-huge

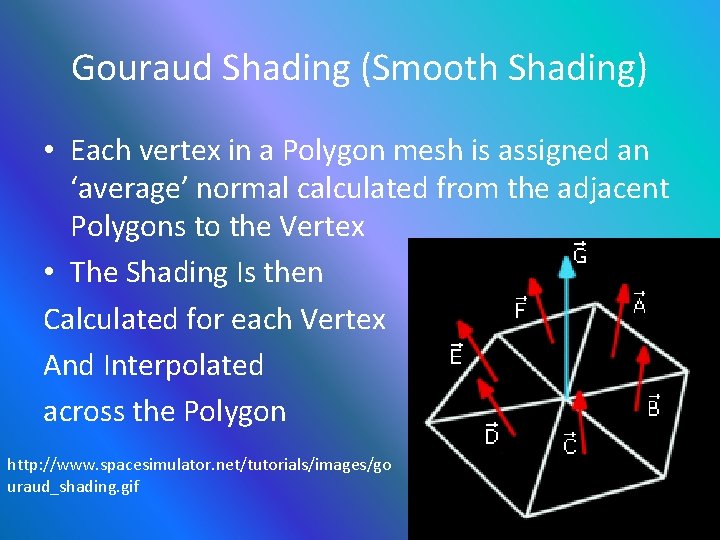
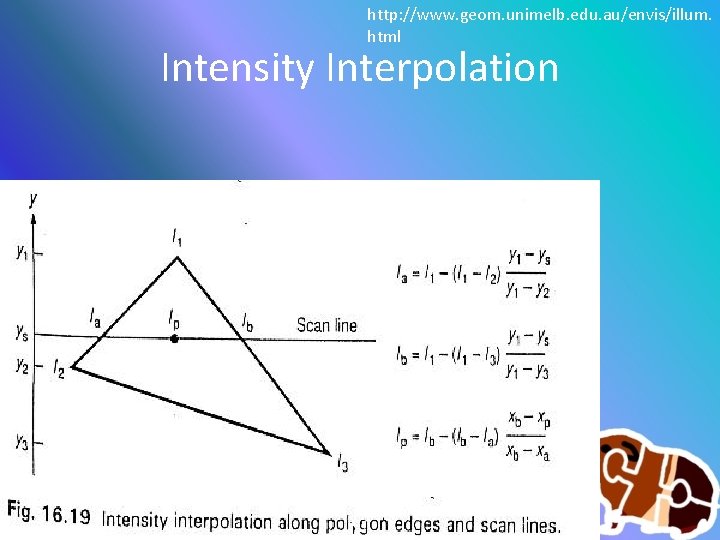
Gouraud Shading (Smooth Shading) • Each vertex in a Polygon mesh is assigned an ‘average’ normal calculated from the adjacent Polygons to the Vertex • The Shading Is then Calculated for each Vertex And Interpolated across the Polygon http: //www. spacesimulator. net/tutorials/images/go uraud_shading. gif

http: //www. geom. unimelb. edu. au/envis/illum. html Intensity Interpolation

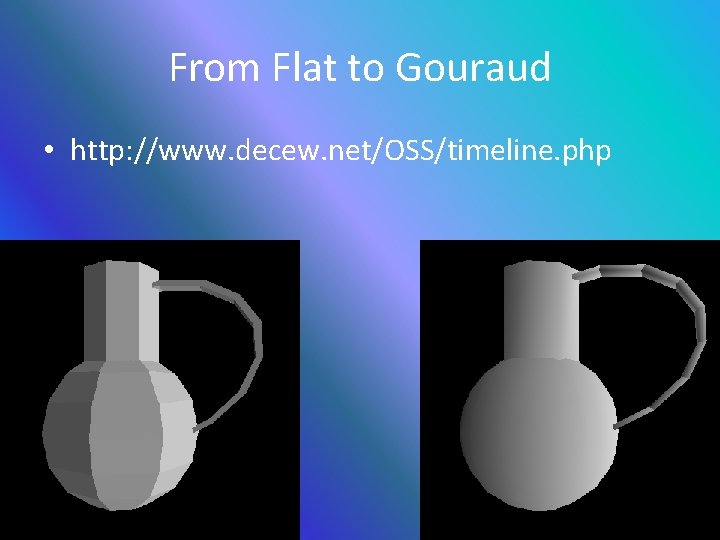
From Flat to Gouraud • http: //www. decew. net/OSS/timeline. php

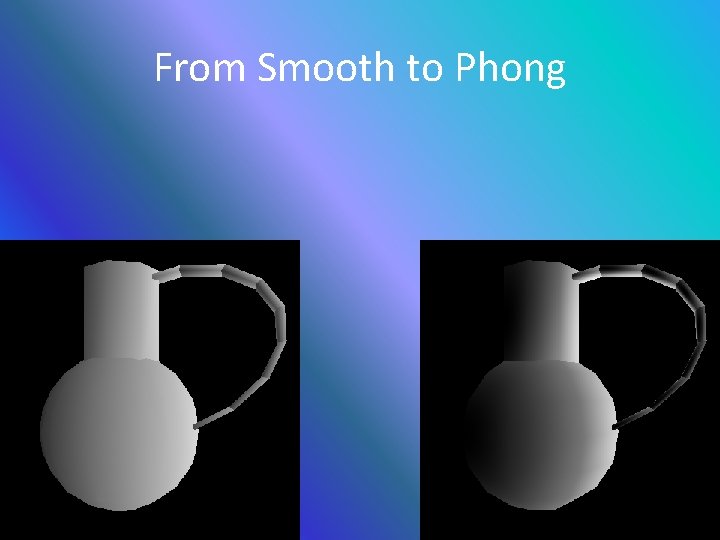
Phong Shading • The Normal Is calculated at each Vertex as per Gouraud Shading • Then Instead of Interpolating the Shade over the Polygon, we Interpolate the Normal across the Polygon Edges and use this to Render each pixel with its own Normal, and associated Shade • In effect Phong Shading represents each Polygon as a Curved Surface to the Light Source

From Smooth to Phong

Diffuse Surfaces • Each Pixel is simply coloured based on the Diffuse Absorption, The Diffuse light sources, and the pixels current colour • Diffuse Light Sources have can have distance and attenuation, and only light the sides of the object which have a direct LOS to the Light

What do we need to implement Diffuse? • We need a Surface Normal • We need a light source • Distance is of no concern at this basic level, but will be incorporated later on.

The hard part • We will implement Phong Shading for now • You’ll need to pass in ‘correct’ Normals for each vertex • Another option we have is to use a normal map • This adds some more complexity to handling your vertices • So be careful!!

Ideal Shading with Static Light Sources • We will want to use a Normal Map, or High detail Polygon Mesh • Use these to build a 2 D Texture containing the lighting of the object. • Grab the source texture and save it as a ‘Light Map’

Shading – The easy Part • Calculate the angle between the surface Normal and the Light Source Direction (If it is > 90 Degrees we don’t light) * Light direction is ignored for Point Lights • Multiply the intensity of the Diffuse light by that angle. • Colour the Pixel!

Branching in HLSL Shaders (. fx) Float diffuse. Angle = dot(light. Dir, pixel. Normal); [branch] If (diffuse. Angle > 0. 0 f) { Color += pixel. diffuse * diffuse. Angle * pixel. Diffuse; } Color + = light. Ambient * pixel. Ambient; Return colour;

Going Beyond the Phong There are many newer texture-based developments • Bump Mapping • Normal Mapping • Parallax Mapping • Displacement Mapping (True Bump Mapping)

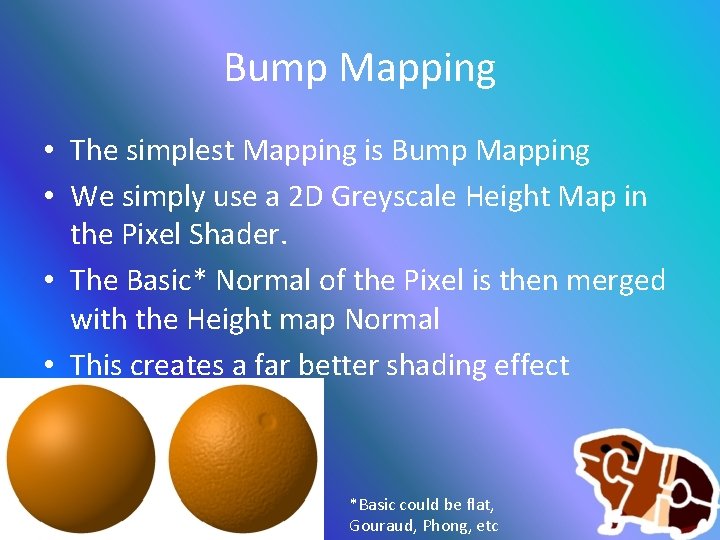
Bump Mapping • The simplest Mapping is Bump Mapping • We simply use a 2 D Greyscale Height Map in the Pixel Shader. • The Basic* Normal of the Pixel is then merged with the Height map Normal • This creates a far better shading effect *Basic could be flat, Gouraud, Phong, etc

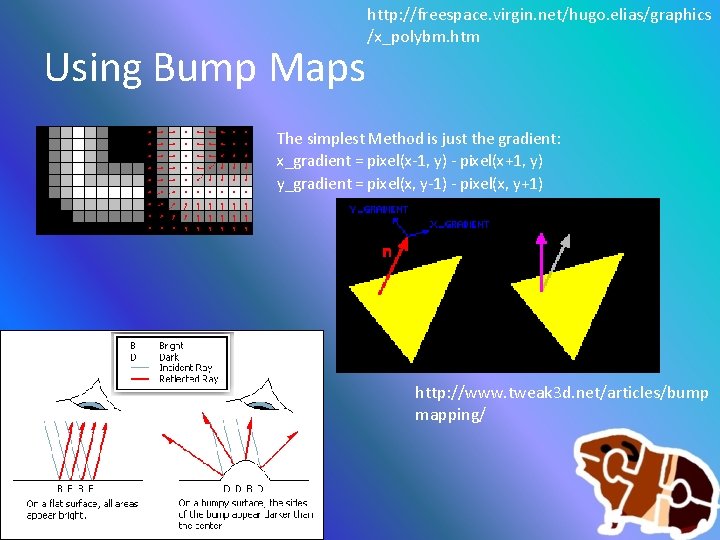
Using Bump Maps http: //freespace. virgin. net/hugo. elias/graphics /x_polybm. htm The simplest Method is just the gradient: x_gradient = pixel(x-1, y) - pixel(x+1, y) y_gradient = pixel(x, y-1) - pixel(x, y+1) http: //www. tweak 3 d. net/articles/bump mapping/

Normal Maps • A 3 Component Texture containing the XYZ of each Pixel on the object • XYZ corresponds to the Unit Normal of each pixel – This requires more texture space than basic Bump Mapping – Requires less computation, as we do not need interpolated Vertex normals

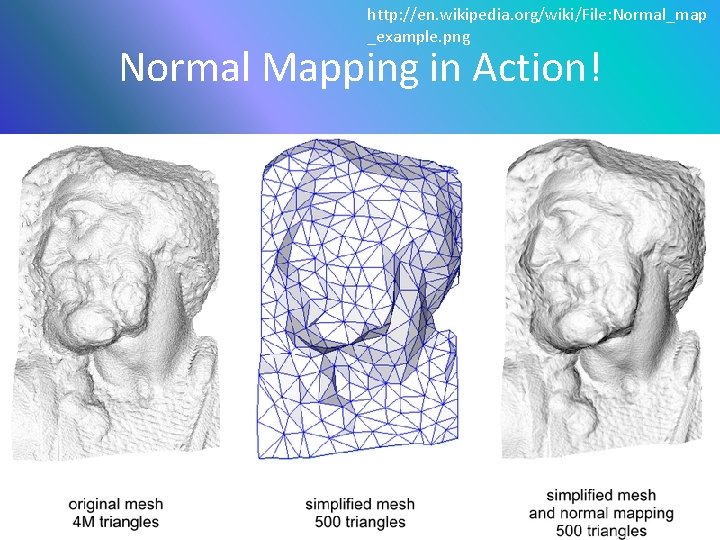
http: //en. wikipedia. org/wiki/File: Normal_map _example. png Normal Mapping in Action!

Parallax Mapping (Offset Mapping) (Virtual Displacement Mapping) Introduced in 2001 by Tomomichi Kaneko ++ • Taking the View Angle and Surface Normal into account, Parallax Mapping will ‘displace’ Pixels by varying amounts • As the angle increases, so does the displacement of the pixels, giving a much more realistic sense of depth

Basic Parallax Mapping Implementation Limitations • No Occlusion • No true silhouette mapping

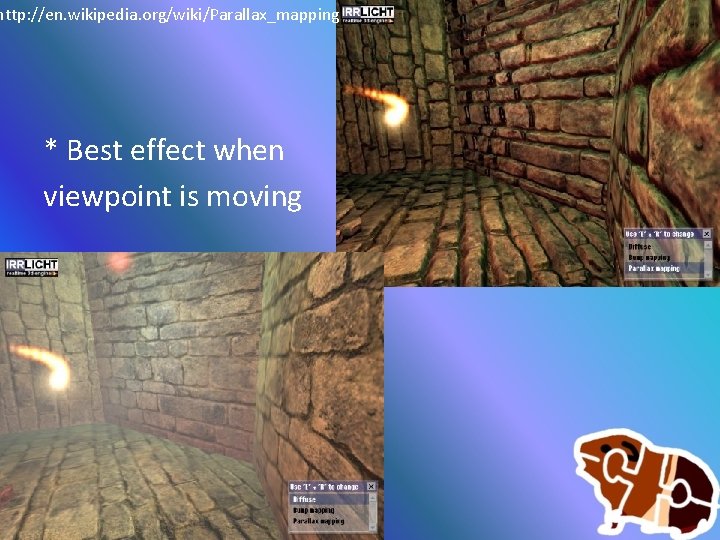
http: //en. wikipedia. org/wiki/Parallax_mapping * Best effect when viewpoint is moving

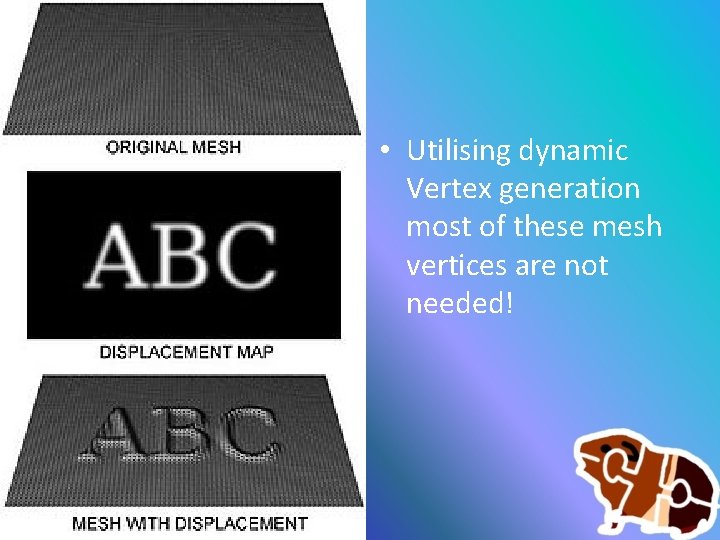
Displacement Mapping • The most realistic and most expensive • This actually creates displaced vertices, so can create self-shadows and self-occlusion using textures • Requires the generation of vertices on demand, something a Geometry Shader or Tessellation Shader would love to do! • Direct. X 11 will be very powerful at this

• Utilising dynamic Vertex generation most of these mesh vertices are not needed!

Texturing an Object Part II

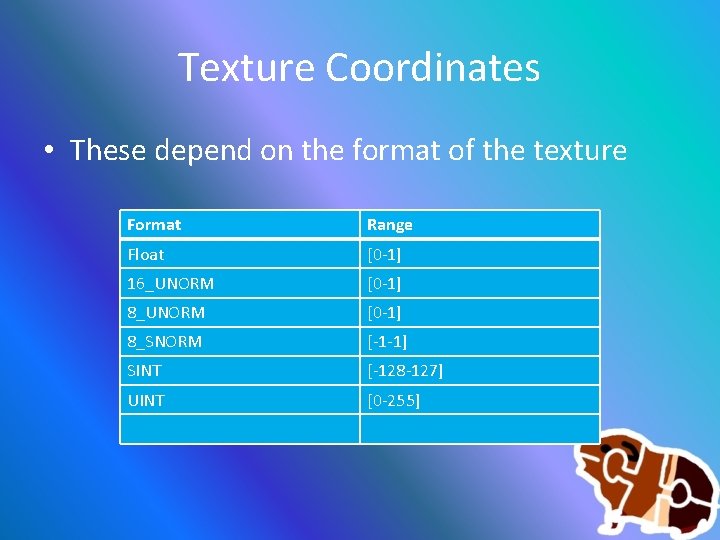
Texture Coordinates • These depend on the format of the texture Format Range Float [0 -1] 16_UNORM [0 -1] 8_SNORM [-1 -1] SINT [-128 -127] UINT [0 -255]

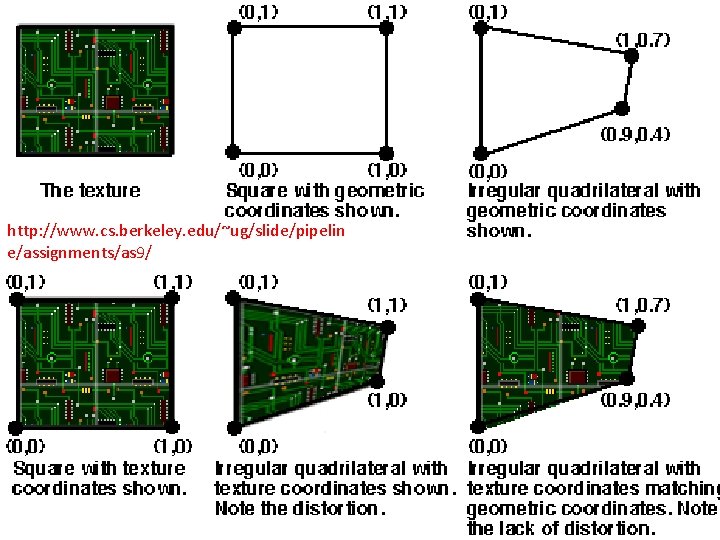
http: //www. cs. berkeley. edu/~ug/slide/pipelin e/assignments/as 9/

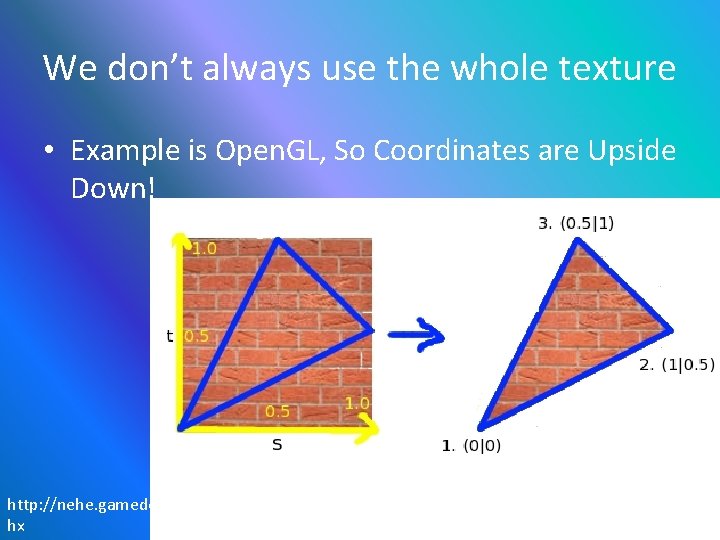
We don’t always use the whole texture • Example is Open. GL, So Coordinates are Upside Down! http: //nehe. gamedev. net/wiki/New. Lesson 5. as hx

Texturing Objects • What we will need: • A new Vertex Structure – Add a D 3 DXVECTOR 2 to hold coordinates • A texture to load – Should be 2 n x 2 n in dimensions • An object to Texture – To begin we will use a Cube

From the Coding Perspective: We need to load the image into memory: • Create. Shader. Resource. View. From. File(. . . ) We must create a Texture 2 D pointer in our. fx file • Texture 2 D g. Box. Texture; We then get the Shader variable • Get. Variable. By. Name()->As. Shader. Resource(); Now we can set the Shader pointer to the texture we initially created: * Set. Resource(. . . );

From the Human Perspective • We need to load our textures (Create a Dx. View) • After getting a pointer to the Shader resource, we then connect it to the correct texture as needed. – So We use Set. Resource, then Draw object 1, use Set. Resource, then draw object 2, etc. • We colour each pixel based on the colour of the texture pixel

Sampler State • The Sampler State controls how DX uses your textures, from the different kinds of filtering, to the different addressing modes available. • It has more abilities, hit up MSDN http: //msdn. microsoft. com/enus/library/microsoft. xna. framework. graphics. s amplerstate_members. aspx

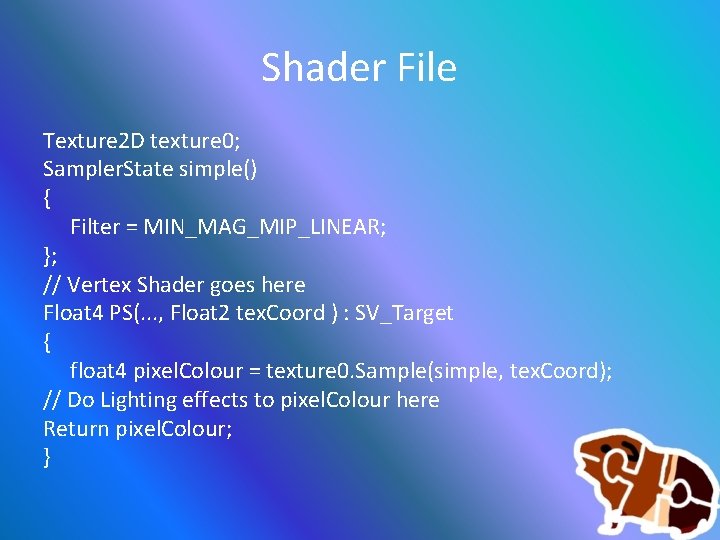
A Basic Sampler State (. fx file) Sampler. State simple() { Filter = MIN_MAG_MIP_LINEAR; };

U V Addressing Modes • To define how the texture is applied we must set the addressing mode for each direction of the texture (U and V) • WRAP – Repeating Texture • BORDER – No Texture Past [0, 1] • CLAMP – Stretch the last pixel • MIRROR – Similar to WRAP


Shader File Texture 2 D texture 0; Sampler. State simple() { Filter = MIN_MAG_MIP_LINEAR; }; // Vertex Shader goes here Float 4 PS(. . . , Float 2 tex. Coord ) : SV_Target { float 4 pixel. Colour = texture 0. Sample(simple, tex. Coord); // Do Lighting effects to pixel. Colour here Return pixel. Colour; }

Crazy Texturing Part III

The following is what ID have done • This isn’t THE FUTURE, it’s A FUTURE • Being able to program shaders, this is one possible challenge you could help solve!

Advanced Texturing The ID Tech 5 Engine • Was* going to be fully realised in Dx 9 / Open. GL 3. x • Job Based implementation • Currently licensed for two games: • Rage • Doom 4

• Completely Dynamically Changeable World • Dynamic LOD to scale to available system memory • Physically Blend the textures in memory – Immediate Un-sampling – followed by blending • Feedback analysis controls texture priority • Jpeg Compressed Light and Bump maps

Virtual Texturing (Mega. Texture) • Supports textures up to 128000 x 128000 pixels!!! • Utilising 4 x float colours that would be 262, 144, 000 bytes. • 250, 000 MB • ~244 GB textures

ID Tech 5

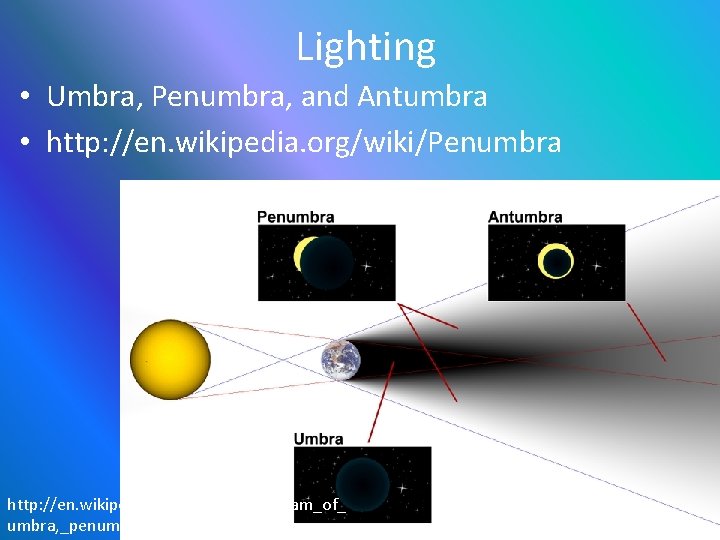
Lighting • Umbra, Penumbra, and Antumbra • http: //en. wikipedia. org/wiki/Penumbra http: //en. wikipedia. org/wiki/File: Diagram_of_ umbra, _penumbra_%26_antumbra. png

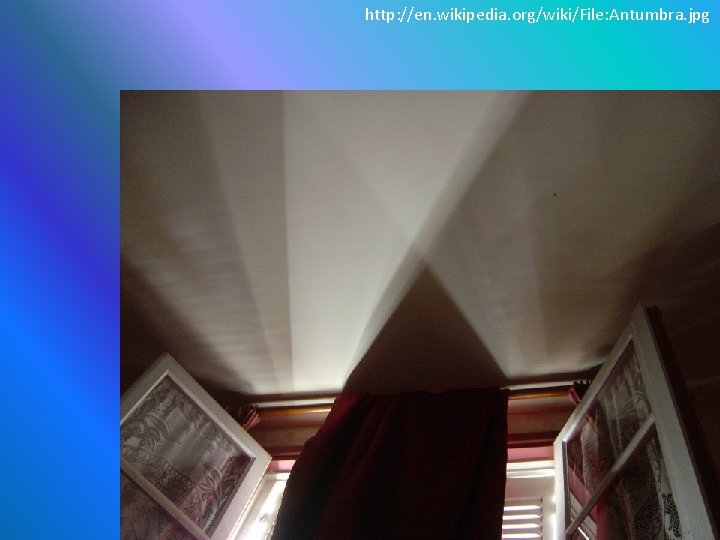
http: //en. wikipedia. org/wiki/File: Antumbra. jpg