Sewing Notes 17 1 8 th Grade Sewing


- Slides: 26
Sewing Notes 17 -1 8 th Grade
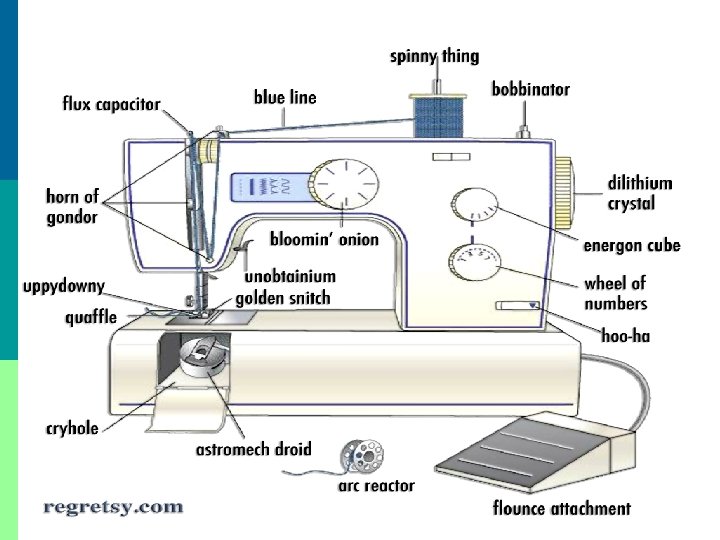
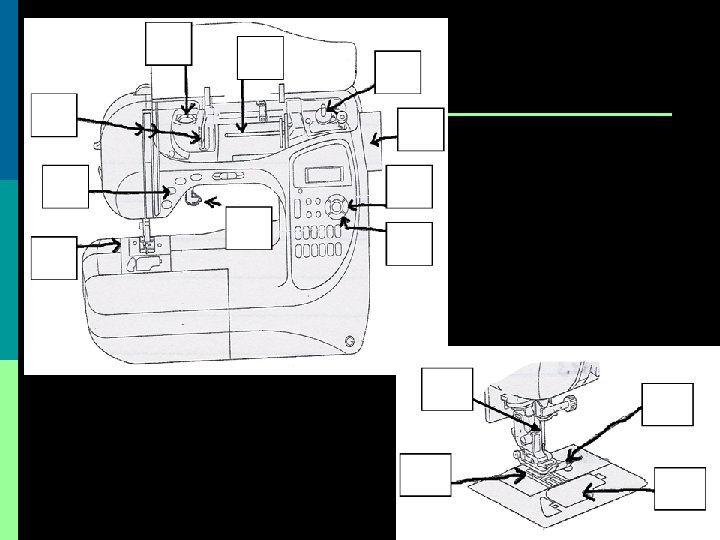
Sewing Machine Parts 1. Hand Wheel – manual control – moves take-up lever and needle up and down 2. Thread Guides – hold the upper thread in place as it moves through the machine 3. Needle – feeds the thread that forms the upper part of the stitch 4. Stitch Length Control (Regulator) – controls the length of the stitches 5. Stitch Width Control – determines width of zigzag or decorative stitches
Sewing Machine Parts 6. Presser Foot – holds fabric in place against the feed dogs 7. Feed Dogs – moves the fabric during stitching – found in the throat plate 8. Throat Plate –seam allowance markings that help keep stitching straight 9. Spool Pin – holds thread spools during sewing 10. Bobbin – small spool that form the bottom part of the stitch
Sewing Machine Parts 11. Bobbin Winding Spindle – hold bobbin while thread is being wound on 12. Reverse – button that allows the machine to stitch backwards 13. Thread Tension Control – regulates tightness and looseness of the thread 14. Foot Feed – pedal that controls starting, stopping and speed of the machine 15. Bobbin Case – hold bobbin in place during sewing – under the throat plate 16. Presser Foot Lifter– raises and lowers the presser foot
Young Living 18 -1 Preparing Your Pattern and Fabric Page 504
1. Using a Guide Sheet a. b. c. d. a set of step-by-step instructions for sewing a pattern how to use a pattern a diagram of the pieces Explanation of pattern markings
Basic Pattern Markings 1. 2. 3. 4. 5. 6. 7. Cutting Line Stitching Line Grain Line Dots Notches Place on Fold Dart For specific information regarding each marking, refer to figure 18 -1 on page 507
Guide Sheet p Layout - Diagram of how pattern pieces should be placed on the fabric n This allows for the most efficient use of fabric – creates the least amount of waste and ensures that all the pieces fit correctly
2. Preparing the Pieces a. b. Cut apart pattern pieces, but DO NOT trim to exact measurements Study each pieces to check for markings 1. 2. 3. Notches Grain line Lengthen/shorten
3. Check Pattern Measurements a. b. c. d. e. Check to see if the pattern fits your body type Make length and width alterations before you cut To lengthen – use parallel lines labeled “lengthen or shorten” Width – measure pattern pieces to determine ease Ease – the amount of fullness added to a pattern for movement and comfort
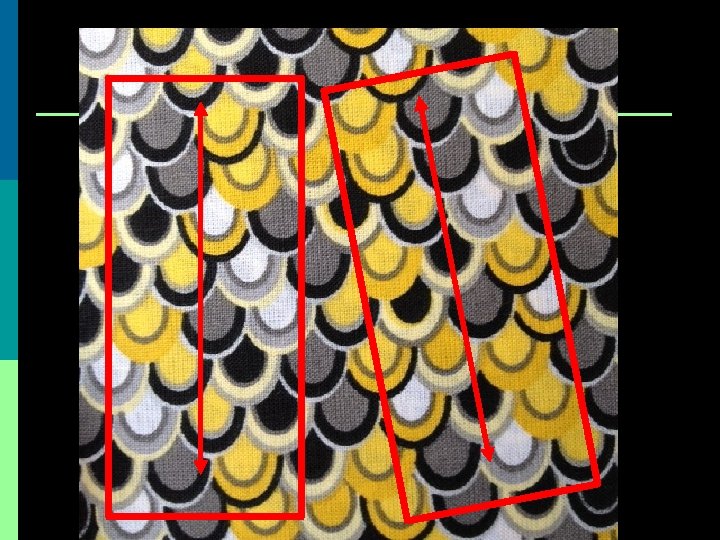
4. Preparing the Fabric a. b. Some fabric must be pre-washed to avoid shrinking Check the grain of the fabric – the direction in which the threads run a. b. c. Selvage – the tightly woven edge with no visible loose threads Raw edge – the unfinished edges that have loose threads Bias – the diagonal of the fabric
Preparing the Fabric c. To see if the fabric is on grain… a. b. Fold fabric so the raw edges match together If the crosswise edges meet, the fabric is on grain
Young Living 18 -2 Starting to Sew Page 510
1. Using Pattern Pieces a. Pinning 1. 2. 3. 4. 5. 6. Fold fabric so the right sides are together Arrange pattern pieces according to layout Lengthwise grain line should be parallel to selvage Do not cut any pieces until they are all pinned in place Place pins diagonally to cutting line – keeps fabric flat Place pins every 3 -6 inches
1. Using Pattern Pieces b. Cutting 1. 2. 3. 4. Place fabric flat on table, one hand holds fabric, the other cuts Cut with long even strokes Cut around outside of notches Leave pattern pieces pinned to the fabric until you are ready to sew
2. Basic Sewing Skills a. Seam 1. 2. 3. 4. Lay 2 pieces of fabric together with right sides facing each other Line up edges so they are even Match all markings and notches Pin pieces together perpendicular to the edge
2. Basic Sewing Skills b. Stitching Straight Seams 1. 2. 3. 4. Place fabric under presser foot and line up to seam allowance Backstitch – stitching over ½ inch of a line of stitching at the beginning and end to lock threads in place Guide fabric with both hands, but DO NOT push Seam Allowance – fabric between seam line and raw edge
Thread Tension p The tension of your thread makes a huge impact on your final product. Stitches should be smooth and even. Too Loose p Too Tight Just Right Think you tension is wrong? Rethread the machine first!!!
2. Basic Sewing Skills c. Stitching Curved Seams 1. 2. 3. Trickier than straight seams Guide fabric so the curve is smooth Keep stitching an even distance from the edge
2. Basic Sewing Skills d. Turning Corners/Pivoting 1. 2. 3. When coming to a corner, Stitch the last few stitches using the hand wheel Lift presser foot and leave the needle in the fabric Turn the fabric to the correct position and lower presser foot
2. Basic Sewing Skills e. Seam Finishing 1. 2. 3. Treatments used on the seam edges to prevent the fabric from raveling Slight raveling - stitch ¼ inch from the edge then use pinking shears Easy raveling - stitch a zigzag line near the edge of fabric
2. Basic Sewing Skills f. Casings 1. 2. Fabric tunnel made to enclose elastic or drawstrings Fold Down Casing a. b. c. d. e. f. Fold garment edge ¼ inch, to the wrong side Fold edge again to be ½ inch wider than the elastic Pin in place and stitch near the open edge Leave a 2 inch opening to insert elastic Insert elastic, stitch ends together, stitch opening D Stitch in the Ditch D A&B&C E
2. Basic Sewing Skills g. Hems 1. Fold edge to the wrong side of the fabric at desire length a. 2. Some fabric require a double fold to hide the exposed raw edge Pin in place and stitch close to the open edge 1 2