Setting up the Patriotwaves SDR Radio Follow the

 and create a")

 • ZADIG • Go to http: //zadig. akeo. ie/ and")
 Go to http: //vb-audio. pagespersoorange. fr/Cable/index. htm and download the")

 the VBCABLE_Setup File. IMPORTANT: Make sure you")


 • Go to your Download Folder and select")


 RX")


 357 -1254 ext 804 and speak to")
- Slides: 22
Setting up the Patriotwaves SDR Radio Follow the instructions to the letter. If you have issues or questions contact PATRIOTWAVES at (888) 357 -1254 ext 804
Setup Folder • Open your main hard drive (C drive? ) and create a new folder called ‘SDR Download’ • Open My Computer • Open Local Disk C: • XP users select FILE and NEW FOLDER • Vista and later select ORGANIZE and NEW FOLDER • This is where you will place the Program software files for setup.
Download the Software LINKS http: //www. hdsdr. de/index. html -Radio interface http: //zadig. akeo. ie/ - Driver Installation program RTL 2832. DLL Dynamic Link Library – For Radio Interface https: //www. dsdplus. com/ digital speech decoder program http: //vb-audio. pagesperso-orange. fr/Cable/index. htm - Cable C http: //vb-audio. pagespersoorange. fr/Cable/Virtual. Cables. htm - Cables A & B Put all this software into the SDR download folder
Software download (cont. ) • ZADIG • Go to http: //zadig. akeo. ie/ and download the program. IMPORTANT: Make sure you download the right one. There is one for Windows XP and one for Vista and later. Make sure you know what system you are running. If unsure contact PATRIOTWAVES. • DSDPlus • When you go to the DSDPlus site download version 1. 074. If you have a dual radio then download both 1. 074 and 1. 074 versions.
Software Download (cont. ) Go to http: //vb-audio. pagespersoorange. fr/Cable/index. htm and download the program zip file. If you have a dual radio go to http: //vbaudio. pagespersoorange. fr/Cable/Virtual. Cables. htm and download both cable A & B zip files. That completes the list of Software to operate the JH-15 SDR Radio Now we begin the installation
VB Virtual Cable Installation • Open your Download folder and unzip or extract the compressed files. You will need to have a program to unzip files Win. Zip, 7 Zip or Windows compressed files program. When prompted where to place files you will browse for your main drive (C: drive? ) and create a new folder called VB Cable. Extract the files and open the folder. • If you downloaded both cables A & B then create two folders Cable A and Cable B and extract the zip files to their appropriate folder.
Install the cable • Click (double click) the VBCABLE_Setup File. IMPORTANT: Make sure you are the administrator of your computer. If you are setup as a user only there will be an issue with the installation. If it does not install then try a right click and “run as administrator” • IMPORTANT: Select the correct setup. One is for 64 bit machines. Use the correct setup. VBCABLE_Setup(64) • Once installed you may receive message about restarting. Ignore or select “No” if prompted as we will reboot after the installation.
Install the HDSDR program • Go to the Download Folder and click open the HDSDR_install. exe file. When prompted go to main Drive (C: ? ) and let the program create your file there instead of in your program file. Hit OK and install HDSDR. When asked add the icon to your desktop you should select “Yes”. It will be more convenient but it is not mandatory. • IMPORTANT: If you have a 64 bit machine, the program must be installed in you Programs Files (x 86) folder. If you are unsure check to see whether you have two Program File folders
Adding the Ext. IO_RTL. dll • Go to the Download Folder and copy the Ext. IO_RTL. dll file. • Copy the file by right clicking your mouse and select copy. • Go to the HDSDR folder you just created and loaded and past the Ext. IO_RTL. dll file in that folder with the other files.
Install Digital Speech Decoder Program (DSDPlus) • Go to your Download Folder and select the DSDPlus 1 p 074 file. Again you will have to extract these files to a new folder. • When prompted, again you will create a new folder called “DSD Plus” in your main Drive (C: ? ) • If it does not auto open to the file location, then go to the file and right click the DSDPlus. exe file and create shortcut on your desktop. Again, it’s not mandatory but convenient. • If you have a dual radio then make two folders DSDPlus 1 and DSDPlus 2 and unzip both files to their appropriate folders.
Install ZADIG USB Driver Program • Go to the Download Folder and right click the ZADIG application and copy it. • Go to your HDSDR folder and paste the app there. • Right click the file again and send icon to your desktop (not mandatory but for convenience)
Jade Helm Radio • Plug the two radios USB connectors to your computers ports. You may get auto install procedures running in which case you refuse the install or allow it if you cannot stop it depending upon your system settings and configuration. • Restart your computer to activate the VB Cable program you installed earlier.
After Reboot • Open the Zadig Program and run it. 1 2 3
Install the Drivers • Go to options and select “list all devices” • You should see two bulk in devices 0 and 1. Or you may see RTL 2838. You should see one for each radio. 2. Select the Win. USB driver and replace (or reinstall driver) for one or both devices. • If restart is required then restart the computer otherwise, close the program.
Start DSD Plus • Open the DSD Plus icon • You will see fouyr windows load. Check the command prompt window and make sure your input is VB Cable and the output is your soundcard speakers or headphones • (see next slide)
DSD+ 1. 074 DSDPlus -h for help summary Appending synthesized audio to file 'DSDPlus. wav' 0 frequency records loaded 0 radio records loaded 0 group records loaded 0 site records loaded 0 network records loaded audio input device #1 = 'VB-Audio Point' audio input device #2 = 'Avance AC 97 Audio' audio output device #1 = 'Avance AC 97 Audio' audio output device #2 = 'VB-Audio Point' audio input device #1 (VB-Audio Point) initialized audio output device #1 (Avance AC 97 Audio) initialized D-STAR decoding enabled NXDN 4800 decoding enabled NXDN 9600 decoding enabled DMR/Moto. TRBO decoding enabled P 25 Phase 1 decoding enabled X 2 -TDMA decoding enabled Pro. Voice decoding enabled Mono audio decoding initiated; press Esc to exit. . .
Start HDSDR • Open HDSDR from you desktop
Settings • Soundcard Digital Mode: RX input = Cable (VB Audio Virtual Cable) RX Output = Cable (VB Audio Virtual Cable) • Bandwidth: Output 12000 • Ext. IO: 1. 2 Msps sample rate, Buffer size 16 kb, check tuner AGC only • Mode: FM • Frq. Mgr: Click User 1 and at the bottom boxes add the following: • NAME: P 25 • LO [Hz]: add 851, 000 • Tune [Hz]: add 851, 000 • Mode: FM (then select add and double click it)
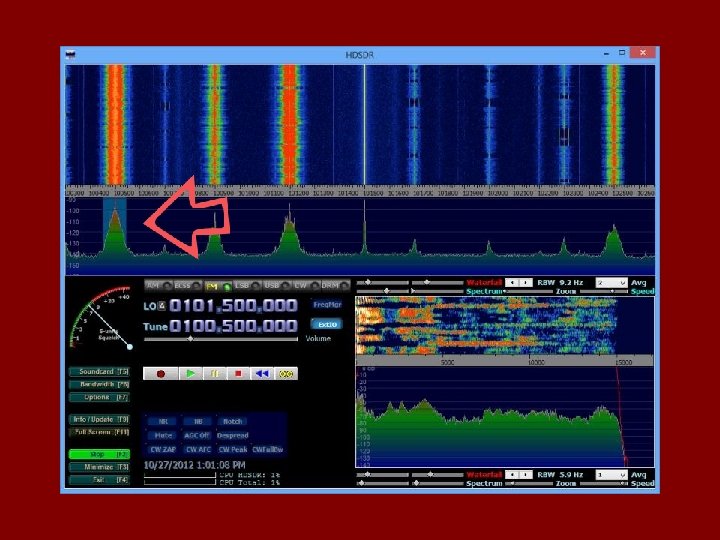
Begin the Scan • See that the frequency LO and Tune are now set to 851, 000 Hz • Click Start button • You will hear no sound until you find an apco P 25 phase 1 transmission (digital transmission) • Put your mouse cursor in the spectrum area and begin to roll your mouse wheel to scroll the scanner up and search for a signal • Signals will rise and fall on the spectrum so wait and look for these rises and dips. • See the graphic next page
Changing to Analog Mode • Changing from Digital to Analog mode is simply a matter of opening the soundcard and srtting the RX Output from VB Cable to your speakers, headphones or soundcard setting. The RX input always remains on VB Cable.
Contact Support • Call Patriotwaves at (888) 357 -1254 ext 804 and speak to out team for help and a quick tutorial over phone once you have gotten to this point. • Thank you for being a customer and patriot.