Semi Rigid Isolator Units Charles River Laboratories Consulting

Semi – Rigid Isolator Units Charles River Laboratories Consulting & Staffing Services

Terminology n n n Flexible Film SRI HEPA Port Gasket Magnahelic Gauge

Isolator History & Function n Used since 1950’s Flexible Film or Rigid contruction Biocontainment ¡ n Negative Air Pressure Bioexclusion ¡ ¡ Positive Air Pressure “Biosecurity” at Charles River

Features n n Typical forward facing port Gasket will change color when sealed properly Hinge Gasket Clamp

Features Flexible Front HEPA Filter External Filter Glove Arm

Isolator Supplies O-Rings Nitrile Gloves Electrical Tape

Leak Detection n Snoop® Apply liquid to area suspected of leak and watch for bubbles Alternative ¡ Mild Soap solution

Air flow Positive Negative

Keeping it Clean n n Wescodyne® Clidox ¡ n Bleach Solution Windex®/Cinch® n n Peracetic Acid Chemical Incompatibility ¡ Check MSDS

Ergonomics n n Your back should always be as straight as possible. Hydraulic tables allow the user to adjust the height!

Filter Change n n Filters should be checked daily Filters need to be changed when the magnahelic gauge increases by 0. 05 (i. e. from 1. 0 to 1. 5)

Filter Pop Quiz n Which filter assembly needs to be replaced?

Testing for deterioration n This rim should appear green even when stretched. If small holes or cracks are present glove must be replaced. Punctures from animal bites or instruments also warrant glove replacement.

Semi-Rigid Isolator Daily Checks and Inspections Glove and flexible surface checks • Check the magnahelic gauge • Pull the gloves inside out, pulling on the cuff only • Check for holes, punctures, tears, or stretched areas • Then recheck the magnahelic for proper pressure • Wipe down the outside of the flexible front surface

Magnahelic and Ball Valve Magnahelic Gauge Ball Valve Fan Motor

Semi-Rigid Isolator Daily Checks and Inspections Magnehelic gauge check • Check gauge and record twice daily • Gauge reads what the pressure is inside the isolator (+. 10 or -. 10) • Reads in Inches of Water • Not reading proper pressure report immediately • DO NOT adjust equipment unless properly trained

Filter Locations HEPA filter External Filter

But how do you use it?

Introduction of supplies

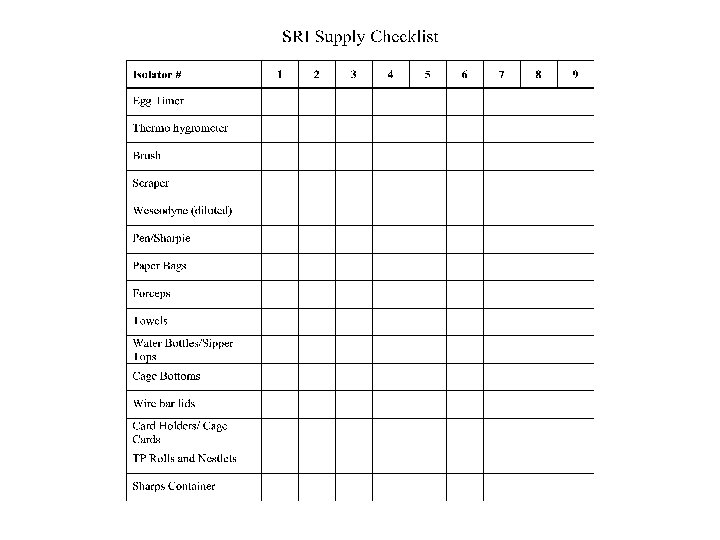
Supplies always in unit n n n n Disinfectants Sharps Forceps Scraper Marking Pens Absorbent Towels Paper Bags Hand Broom

Supplies introduced to unit n n n Feed Bedding Cages Water Sterilized vs Irradiated

Port Door

How to Use the Semi-Rigid Isolator Units Loading the Isolator: • Remove all jewelry, watches and especially rings • Don protective glove liners • Gather appropriate supplies • Open the outside port door • Place supplies into port –Spray down supplies with disinfectant/sterilent • Allow sufficient contact time • 20 – 40 minutes • Secure outer door

How to Use the Semi-Rigid Isolator Units Loading the Isolator: continued • Push the sleeves into the isolator by holding onto cuff • Over stretching the gloves will cause damage • Open the port door • Remove items from port into the isolator • After all items have been removed, shut and lock port door clamps

How to Use the Semi-Rigid Isolator Units Unloading the Isolator: • Once everything is ready to be removed from the isolator spray the inside of the port completely • Spray all items before placing them into port • Once all items are sprayed down with Clidox the port can be loaded • After everything is loaded the port is then closed • Set the timer according to SOP/Chemical Manufacturer

How to Use the Semi-Rigid Isolator Units Unloading the Isolator: • When the timer goes off you may unload the port • Contaminated items should be disposed/sanitized appropriately.

How to Use the Semi-Rigid Isolator Units n n n Label door with time initials Set exposure timer Document event in log

Introducing/Removing Animals to Isolator n Supplies ¡ ¡ Biosafety Cabinet Plastic bottle/containers n ¡ ¡ Nalgene® Disinfectant Forceps

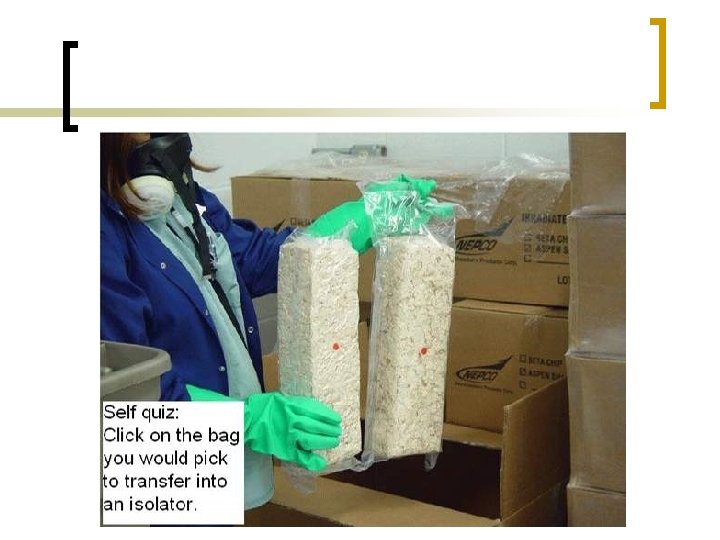
Introducing/Removing Animals to Isolator n Transfer into bottle/container inside BSC ¡ n n Leave lids unsealed until all containers are filled Use same introduction procedures as supplies Ensure animals are promptly removed from bottle/container ¡ Air supply in sealed container must be established

Removing Animals from Isolator n n Return to plastic bottles/containers Double wrap in bag ¡ n n Paper or plastic? Use regular “spray out” procedures Air supply for animals limited!

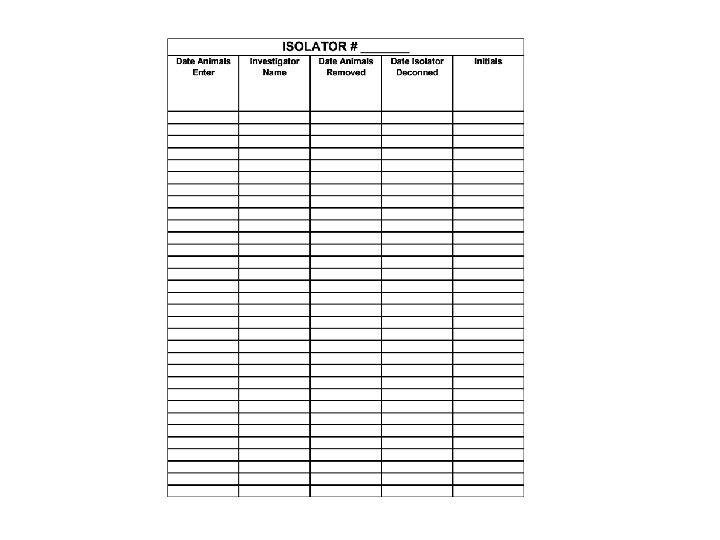
Semi-Rigid Isolator Daily Checks and Inspections Inside of the isolator check • Shelving and all surfaces for cracks or cuts in the plastic • Light bulb and casing • Port and clamps to ensure that it seals inside and out • If any one of these items are wrong or not working report immediately • DO NOT leave trash inside the isolator • DO NOT leave the isolator dirty Animal checks inside the isolators • Check feed and water levels in each cage • Observe the animals to ensure health status • Check for and change any wet cages

Semi-Rigid Isolator weekly Checks and Inspections Cage changing • Before cage changing begins ensure that all of the daily checks have been completed • Make sure all items for changing are inside the isolator before starting, this will help with being efficient • Change cages • After the cages have been changed remove all trash and dirty bedding from the isolator • Make sure all animals are present and safely in their home cages • Wash down the inside of the isolator, all surfaces including the inside of the glove sleeves • Once all trash is removed wipe down the port Filter checks • Check the outside filter for any dirt, debris, or damage • Report to a supervisor if something is found
- Slides: 35