SEALING a LETTER from the COLONIAL ERA Presented


 alcohol can also be used")


- Slides: 43
SEALING a LETTER from the COLONIAL ERA Presented by BOB VAN CLEEF of the North River Railway
ORIGIN OF SEALS • Since time immemorial, the seal has served as a stamp of indisputable authenticity, just as a signature is accepted in the world today. • Clay seals were used by kings in Mesopotamia 3000 years ago and mentioned in the bible when Jezebel used Ahab’s seal to counterfeit important documents. • Few of these seals remain today as they were usually destroyed on the death of the kings that used them. • This practice continues to this day as the ring seal of the pope continues to be destroyed on his demise.
CHOPS • Chops, which came into use with the invention of paper, replaced clay seals. • They are carved from stone (usually soapstone or jade) and used with red past to make an ‘impression. ’ • Originating in China and spreading to Japan and Asia they also conveyed the same weight as a signature does today but can also represent a business or simply an office. • An important divergence from signet rings is that chops are often passed down from generation to generation. • They are still very much in use today in certain parts of the world.
CHOPS TODAY • Chops usually come with a red paste. • An English name can be translated into the characters and carved in stone and packaged like this • Chops can be made from soapstone, jade or ivory.
SIGNING A DOCUMENT
SEALS ON PAPER • The invention of paper in China spread throughout Europe and created the need for an alternate approach to authenticating a document. • The romans first used Bitumen, a sticky hydrocarbon byproduct from Mesopotamia, and then beeswax to form the seal on documents. • The use of Beeswax quickly spread north through to Europe and was in use up until the English middle ages.
EARLY WAX FOR SEALS Many seals at this point contained the a coat of arms of the owner • Sealing ‘wax’ was further developed in Europe by the Middle Ages as the seal medium of choice. • At first Roman beeswax was mixed with ‘Venice turpentine’, a greenish-yellow resinous extract of the European Larch tree. • By the 16 th century the mixture had morphed to a mixture of shellac, turpentine, resin, chalk or plaster and coloring matter (often vermilion or red lead) without beeswax.
SEALS WERE ‘MINIATURIZED’ Signet rings became available to the merchant class • As seals began to spread to the middle class they became smaller and more portable. • Signet rings were popular with the heads of guilds and wealthy land owners. • Some rings were made of gold and silver but most were of less precious metals like brass and pewter.
A NEW CONCEPT • The middle ages saw the increase of cooperation between several agents and groups signing for a common cause. • It became more convenient to sometimes attach strings to an important document and attach the seals of the ‘signers’ of the document to the strings. • Remember, many could not read or write. • Guild symbols were added to the coat-of-arms used by the nobility.
GAINING OF SEAL POPULARITY • • • Using seals to keep a letter closed and to insure it had not been tampered with was practiced in the middle ages among the upper classes. It did not become widespread until the post-medieval period (16 th century) when travel, emigration and colonization increased. This was more as a practical necessity as the cost to send a letter was very high. Postage was by the sheet and an envelope was counted as an extra sheet, often doubling the cost of the letter.
“MODERN” seals An engaged couple would arrange their initials one way, then re-arrange them once married. • The postal services grew rapidly as the middle classes expanded. • Wealthy individuals and the need to correspond over longer distances lowered the expense of sending a letter but it was still quite expensive. • ‘Common’ individuals with no coats of arms began to use their initials instead of coats of arms to seal their letters. • Conventions for the initials used and placement were soon developed.
A FEW EXAMPLES Single Initials: You can select either your first or last name Married Couple (or soon to be): The monogram will contain the bride's first initial, the surname of the couple (large in the center) , and the groom's first initial, in that order. Single Person (Man or Woman): The surname initial goes in the center and is larger. The first name initial is placed to the left, and the middle name initial is placed to the right. Three Letters the Same Size: Another common way to arrange Monograms, especially for Men, is to arrange the Initials in the order as they appear in the name, all the same size. Monogramming a Gift for a Married Woman: A monogrammed gift for a married woman is traditionally presented in first Name, Last Name (larger) and middle initial order. Two Letters: You would use the initial letters in the first and last name for a two-letter monogram. Couples may use the two-letter monogram to unite the initial letters of both their first names. There are to many more examples than can be listed here.
LANGUAGE OF SEALING WAX Traditional sealing wax was red but other colors existed. These colors could also could convey a meaning. • • • White - Marriages but also surprisingly enough death, funerals and melancholy Black & Violet - Condolences and for black, notice of death Light Red - Denotes a happy lover and for Valentines Brown - Displeasure Chestnut brown - Dinner invitations Yellow - Spurned adorers Green - Hope Pale green - Reproaches Sky blue - Constancy Rose colored & Pink - Appropriate for girls writing one another Gray - Friendship Flaming Vermilion - The most common color of wax seals today was used on business letters needing a quick reply
THE COLONIAL SEAL • Most seals have a hardwood handle. • They also have a separate metallic die (stamp) containing the design to be pressed into the hot wax. • This die could range from baked clay to silver or even gold but most were more common brass. • A few early examples had the design carved directly into the handle.
STAMP CARE • Seals should be wiped with an oilimpregnated cloth before and after use. • Seals can collect dirt, wax or corrosive oils from handling. • Almost all modern stamps are either brass or are plated and can be subject to corrosion or damaged caused by bits of loose wax. • Coat a new seal with a bit of vegetable oil and let stand for a day or two to ‘season’ the seal This helps to keep the wax from sticking.
SEALING A LETTER • Carefully heat the end of the wax stick. Hot wax melts at about 150⁰F • This can be done with a match but In colonial days this would be done using a candle or a splinter of wood. • Overheating or holding the flame too close will cause the wax to turn black. • The next steps must be done quickly before the wax hardens.
STIR THE WAX • Allow several drops of wax to fall where the layers of paper overlap. • Quickly rub the end of the stick in small circular motions to insure the wax adheres to the paper. • Lift the wax stick straight up to prevent drips or streamers. • Only a bit of experience will show much wax must be used.
AFIX THE SEAL • Press the seal down lightly with a single quick motion. • Continue holding the seal down several seconds to allow the wax to cool and harden. • Pull the seal upwards with a slight twisting motion. • The stamp should release freely without any wax crumbs caught in the details. ‘Season’ the stamp with a light coat of vegetable oil to prevent sticking.
VOILA! • The result should be the full impression of the seal surrounded by a low, raised, symmetric rim of excess wax. • This may take a bit of practice but when done well the letter will remain sealed until the seal is broken.
HIGHLIGHTING • If you really wanted to be fancy there were a number of ways to highlight the seal • One method was to guild the raised portion (foreground) of the seal. • There were also ways to highlight the background. • More on this later.
ON THE ROAD • Lap desks and Travel kits like the modern one shown here were popular with those who traveled in colonial times. • This box contains all the supplies required to seal about fifty letters. • Note the small spirit lamp and spoon that could be used for “mass mailings”
BEGINNING OF THE END • Many stores after the war of 1812 used a template to cut sheets of paper in a way that they could be easily folded into an envelope. • By the civil war pre-paid envelops with pre-gummed flaps were made by machine thus beginning the slow phasing out for the need of sealing wax. • Wax use has continued for fancy or high society announcements, invitations and ceremonial documents and in the form of embossing. • Not that money stock certificates and diplomas still bear seals albeit in printed form.
MODERN SEALS • Modern envelopes have all but replaced the need for seals. • Decorative or cause-related seals like Easter Seals can sometimes still be found. • Kits like this are available for the few who still like to follow the practice on a few letters using old-fashioned wax with wicks. This simple kit contains the seal and wax required to seal a letter.
WAX STICKS WITH WICKS • Sealing wax candles were simply sealing wax with a candle wick. • These were developed well after the colonial era. • They are a bit easier to use as only a match and a seal are required to seal a letter. • Unfortunately the resulting seal will be contaminated by the smoke and may not bond as well with the envelope.
SEALING WAX IN USE • To use, simply light the sealing wax candle like any other candle. • Hold at about a 20 to 30 degree angle and allow it to drip where the seal is to be placed. • Press the seal as before to seal the letter.
MODERN TIMES Today’s postal system has raised new challenges for using sealing wax. All mail was carefully hand cancelled in colonial times which raised no problems with brittle seals. Today most letters are canceled by machine. Modern waxes are more flexible and will usually survive mail cancelling machines but not always. Hand canceling can be requested but A) there is usually an extra cost, B) It is usually sent through a machine anyway and C) Hand cancelling today often causes more damage than the machine.
MODERN WAX STICKS • Modern sealing waxes open up many other new options for sealing a letter. • Some options vary from those that could have been used in colonials times to modern ones that the colonialists could not even have imagined would exist. • Sticks come in many colors and many shapes. • Most remain quite flexible once cooled yet remain firmly bonded to paper. • Many more tools are available for quite reasonable prices.
GOING MODERN • Almost any common butane fire starter makes an excellent replacement for a match or candle to melt wax. • This is probably the fastest and easiest way to seal a letter • The key word here is ‘almost’ • Try using the starter with the wax in use just to make sure.
USING A HOT GLUE GUN • Special wax sticks are made to be used in low-temperature glue guns. • WARNING - DO NOT USE HIGH TERMPERATURE GUNS! • Simply squeeze the trigger to apply a blob of wax then press the stamp into the wax. • You’re done! • A letter can be sealed in seconds instead of the minutes it takes when heating by flame.
MASS PRODUCTION • A glue gun can also be used to make seals on baking parchment. • Later, instead of dragging the glue gun out and setting up a seal can be peeled from the parchment • Simply Add a double-sided adhesive disk to opposite side of seal, apply the seal to letter and press into place.
STICK-ON SEALS • Custom stick-on seals with your own design can be ordered. • These come with a sticky backing. Simply peel and press into place. • Another option is to add a dab of wax from a glue gun instead of a sticky pad and press seal in place. • Both of these methods are especially useful for mass mailings.
WAX BEADS • Sealing wax also came in bead form during colonial times. • It is still used today but more for sealing bottles of wine than sealing letters. • Some beads melt at a higher temperature than others and is brittle rather than flexible. • Beads for sealing letters are bigger; one, two or three beads are just right depending on the size of the seal.
USING WAX BEADS • The easiest way to use wax beads is to simply melt them in a spoon over a tea-candle.
SPIRIT LAMPS • Small lamps that burn isopropyl (denatured) alcohol can also be used to melt sealing wax. • One major advantage is that alcohol burns clean without smoke. • Small ladles with pouring spouts can apply small amounts of wax exactly where wanted. • These are every bit as handy today as they were in colonial times.
WICKLESS SPIRIT LAMP • This modern wickless burner is the deluxe heat source for melting wax. • There is no wick to burn down or trim. • Make no mistake. Once lit the flame is barely visible A but much greater amount of heat is generated within the perforated coil then with the previous lamp while the base remains cool.
HIGHLIGHTING • Special ink powders are available to add highlight colors to a stamp. • These are available in both metallic and non-metallic colors. • Highlighting can be done either on the foreground or on the background as shown here.
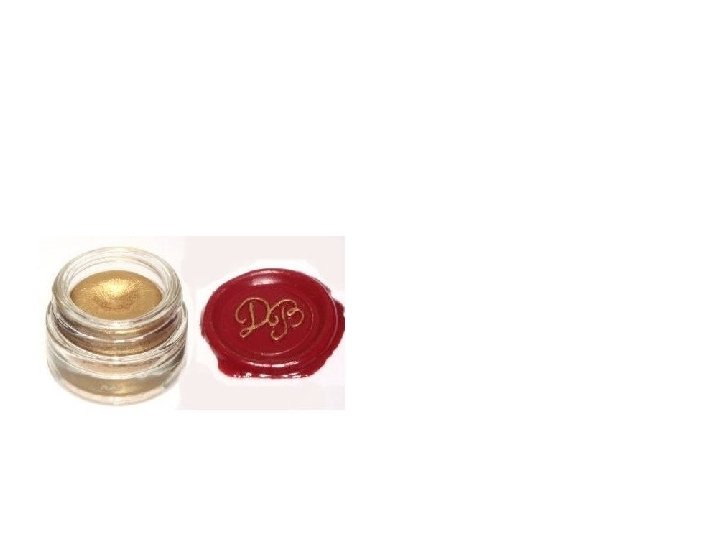
BACKGROUND HIGHLIGHTS • Metallic gold and silver are the most common highlighting color but many others are available. • Just press the stamp into a thin layer of powdered ink before pressing into the wax. • Carefully wipe the stamp clean before and after each use with a different wipe to prevent color contamination. Shown here are examples of background highlighting. Note that the depressed area around the design is highlighted while the raised portion remains the color of the wax.
FOREGROUND HIGHLIGHTS • Here, the foregrounds highlights are the coloration of the raised portion of a seal. • These require a slightly different approach. • This uses much less ink.
APPLY FOREGROUND HIGHLIGHTS • There are several ways to do this. • One way is to use the same sponge brushes used to apply makeup. • Rub a SMALL about of ink to the brush. • Use small, light strokes to the raised portion of the image. • Blow any excess ink away.
DONE – THE END
RESOURCES J Herbin - http: //www. jherbin. com/index. shtml Historical Writing Sets and Calligraphy Supplies Letterseals. Com - http: //www. letterseals. com Unique Letter Seals and Sealing Wax Nostalgic Impressions - https: //www. nostalgicimpressions. com/ Purveyors of Sealing Wax, Wax Seals and Fine Writing Accessories SEALS_4_You - http: //www. waxseal. com. au/ Custom made wax seals and supplies. Also Embossing supplies and metal plaques The Victorian Web - http: //www. victorianweb. org/ Archives of material of everything from the Victorian era Medieval Manuscript Manual - http: //web. ceu. hu/medstud/manual/MMM/home. html All about medieval period writing. Good background for Colonial writing.
This presentation has been brought to you by the North River Railway Bob Van Cleef 46 Broadway Coventry, CT 06238 http: //www. northriverrailway. net THE END