Scrimmage Downs Keys Run Plays Pass Plays Forward


 • Strength declared to L’s side • H")


 H B L • Strength declared to L’s")
 H B L • H has #1 receiver")
 H B • H has #1 receiver to")


 • Observe action on and by your key, especially if")
, especially if pressed. •")


. • Rule of forward/backward")

- Slides: 20
Scrimmage Downs Keys; Run Plays; Pass Plays Forward Progress
Determining Keys • Receivers are numbered from each sideline. Widest is #1; next is #2; etc. If receivers are stacked, closest to LOS is lower number. • In general, H & L will have #1; B will have #2. If only 1 receiver to each side, B will have #1 to L’s side and L will observe backs coming out of backfield. • TWINS: H & L will have #1 to their side; B will have #2 to L’s side (primary) and then the receiver from H’s side that enters middle zone (secondary). • TRIPS: H & L will have #1 to their side; B will have #3. The #2 receiver is assigned based on to whom he is closer. Closer to #1 → H or L; Closer to #3 → B • QUADS: Wing & Back Judge take 2 receivers closest to them; Watch for Press Coverage; Switch to “Areas of Responsibility” quickly. • MOTION: May or may not affect keys; “Snapshot” of positions at the snap will determine keys.
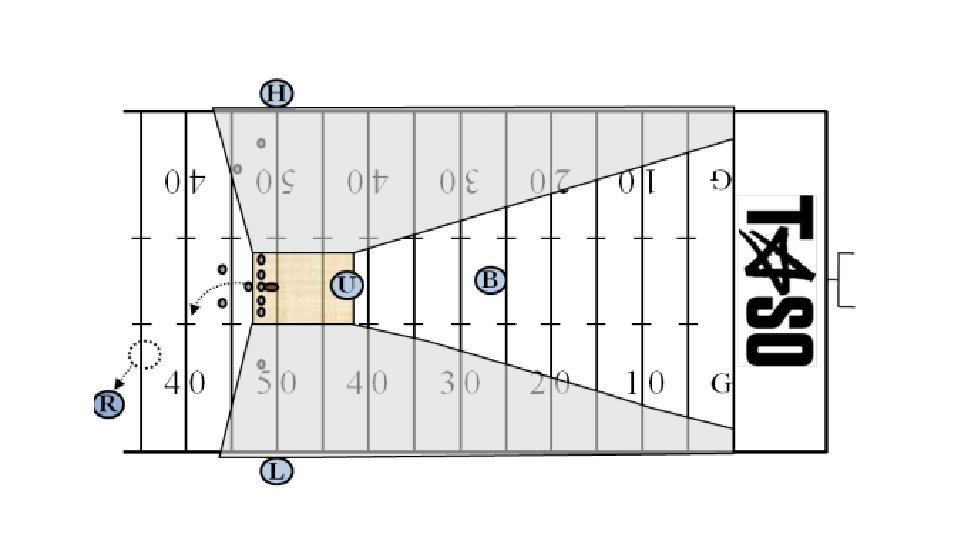
Balanced Formation (1 Receiver Each Side) • Strength declared to L’s side • H has #1 receiver on H’s side H • B has receiver on L’s side • L has backs leaving backfield B L
` ` ` ` ` Strength to H’s Side H • H has #1 receiver on H’s side • B has #2 receiver on H’s side • L has #1 receiver on L’s side B L
Strength to L’s Side H • L has #1 receiver to L’s side. • B has #2 receiver to L’s side • H has #1 receiver on H’s side B L
Twins (2 Receivers to Each Side) H B L • Strength declared to L’s side • H has #1 receiver to H’s side • L has #1 receiver to L’s side • B’s primary key is #2 receiver to L’s side. • B’s secondary key is receiver (#1 or #2) entering middle zone from H’s side.
Trips (3 Receivers to One Side) H B L • H has #1 receiver to H’s side • L has #1 receiver to L’s side • B has #3 receiver • #2 receiver assigned by to whom he is closer - #1 or #3 • Be prepared to go to Zone coverage quickly
Quads (4 Receivers to One Side) H B • H has #1 receiver to H’s side • L has two receivers closest to L (#1 & #2) Watch Press Coverage • B has two receivers closest to B (#3 & #4) • Switch to “Areas of Responsibility” quickly. (Man – Zone – Ball) L
Running Plays Initial Responsibilities
Referee • Observe action behind LOS and the runner to the NZ. Trail (don’t chase) runner into side zone, covering behind play. • Observe action on the ball and QB on handoffs & backward passes. • Once you read run, focus on front side of point of attack (POA). • Stay with QB when: he goes OB; after handoffs & backward passes; and after change of possession (COP). • Assist with ball mechanics/spotting the ball.
Umpire • On plays between tackles, focus on POA in front of & around runner. • On plays outside tackles, turn slowly toward flow, clearing blockers as you turn. Observe action on the back side of flow (behind & away from runner). • For dead ball between hash marks, retrieve & spot ball according to forward progress marked by wing AND closest lateral placement (1 -5). • For dead ball outside hash marks, initiate ball mechanics to spot ball as stated above. • For wide plays and OB, be prepared to assist with separating players. “Follow the Hogs”
Wings (H and L) • Observe action on and by your key, especially if pressed. • Observe blocking in front of runner who is behind LOS on your side or in the NZ. • Determine forward progress when necessary. (Cross-field Mechanics) • Cover runner in your side zone to the GL, observing action on and by the runner. If OB, may face out in order to observe players. • Flow away, clean up action behind play.
Back Judge • Observe action on and by your key(s), especially if pressed. • Move laterally and backward to observe actions of players ahead of the runner as ball moves toward sideline. Assist umpire with second level blocking. • For wide plays and OB, be prepared to assist with separating players and with ball mechanics. • Be ready to take over on cutback and breakaway plays. On long plays, be ready to rule on the goal line.
Goal Line Plays • R: Same position & coverage as other scrimmage plays. • U: Same position & coverage as other scrimmage plays. Don’t stand on GL. Watch for ball being moved forward after declared dead. Never signal score, but assist wing with ball location, if necessary. • H/L: Initial position wide, off sideline. Cover GL at snap to rule on score. Work back forward progress if short of GL. Watch for pass. • B: Not as deep as normal. Sole coverage of end line. Coordinate coverage with wing on passes (catch/feet). Maintain wide view for fouls.
Forward Passes Basic Coverage
Referee • Observe legality of blocks in backfield and by your line key until QB is threatened. • Observe legality of pass and action by and against the passer. • Verbally alert defenders when pass has been released. (Ball’s away) • Continue to observe passer until no longer threat of foul. • Determine forward/backward pass with help of wing • R is solely responsible for RPS & ING (may get help from wings)
Umpire • Check legality of numbers of interior linemen. • Observe actions of players on and directly behind NZ (HIPI fouls). • Observe OL for potential IDP. • Pivot on low trajectory and short passes over middle to assist with catch/no catch. • Signal legal touching (tip) when appropriate.
Wings • Observe action by and on eligible receivers (keys). • Rule of forward/backward of quick passes. Covering official signals if backward (arm extended horizontally toward passer’s GL) • Move downfield 5 -7 yards. • When pass in flight, move to best position to judge the play. • Be prepared for cross-field mechanics when receiver on opposite side is driven backward after catch. • Be prepared to come back to NZ if necessary. • Entire sideline is your responsibility (Catch; Runner OB)
Back Judge • Observe action on and by keys as they leave LOS. • Cover plays from behind deepest receivers. • Transition to Zone Coverage after receivers are free from threat at LOS • Bracket receivers between yourself and the appropriate wing. • Observe contact between receiver and defensive player: Earn your $$ • DH • DPI • OPI