S 2 Chemical Changes Substances 1 2 3

S 2 Chemical Changes & Substances 1. 2. 3. 4. 5. 6. 7. 8. Solids, Liquid and Gases Particles Heating & Cooling Substances The Water Cycle Solutions Solubility Separation Techniques Climate Change - Topical Science: Global Warming 9. Rocks

Lesson 1: Solids, Liquids & Gases LI To describe the key differences between solids, liquids and gases.

What is a Solid? Substances which are classified as solids have many things in common. Solids have a FIXED SHAPE. This is due to the particles which make them up being packed very closely together. Solids CANNOT move on their own. It is important to remember that there are some SOFT solids like cloths while others which you can SEE THROUGH such as glass or perspex.

What is a Liquid? Substances which are classified as liquids have many things in common. Liquids have NO FIXED SHAPE. The particles which make them up are still relatively close together but there are more spaces between them which allows them to move. Liquids are able to FLOW and will always take up the same volume or space.

What is a Gas? Substances which are classified as gases have many things in common. Gases have NO FIXED SHAPE or VOLUME. This is due to the spaces between gas particles being much larger than in either solids or liquids. A common misconception is that all gases are colourless and odourless but this is not true. Some gases are coloured, such as Bromine while others are very smelly, such as Chlorine.

Demonstration Experiment Aim: To investigate if all substances can be classified as a solid, liquid or a gas. Method: Observe the different substances which your teacher will display to the class. Discuss why each substance fits/ does not fit one of the categories. Results: Substance Hair Mousse Shaving Foam Hairspray Custard Properties

Lesson 2: Particle Arrangements LI To state how particles are arranged/spaced out in solids, liquids and gases.

States of Matter Solids, Liquids and Gases are known as the 3 basic STATES OF MATTER. Every substance is made up of matter, or particles, as shown in the diagrams below. The way particles are ARRANGED, how they MOVE and how CLOSE to one another they are explains why they behave the way they do.

TASK 1: States of Matter The worksheet shows the 3 states of matter in a random order. Cut out each of the 9 diagrams and put them into the right order for Solids, Liquids and Gases and glue them into your jotter.

TASK 2: States of Matter The worksheet shows 20 statements about the 3 states of matter. Cut out each statement and place them into a table with the headings Solid, Liquid and Gas. Have these checked BEFORE gluing them in.

Solid Liquid Gas Particles are vibrating Particles move about changing places Will keep the same volume Particles are free to move Takes the shape of the container Particles are free to move Can flow easily Particles unable to move over each other Will keep the same volume Will not flow Will always keep its shape Particles fixed in a regular pattern Particles moving fast in all directions Particles move about changing places

Lesson 3: Heating & Cooling Substances LI To state what happens during heating and cooling – including the changes in state. To be able to state the 3 states of matter.

Changes of State Substances This can change from one state to another. is achieved by HEATING or COOLING. The more energy the particles which make up a substance have, the more they can move around and therefore change their state. THINK! PAIR! SHARE! How can we give a substance more energy and change its state? Can you think of any everyday examples? Discuss

Melting: Solid to Liquid ØIf the temperature around the solid is higher than its melting point, then the particles GAIN energy and the solid will MELT.

Experiment 1 Aim: To investigate the change of state when a solid melts. Method: Use a spatula to put a few crystals of the solid into a boiling tube. Place boiling tube into a beaker of water and gently heat with a Bunsen. Observe what happens. Results: The white solid salol ___________

Evaporating: Liquid to Gas ØIf the temperature around the liquid is higher than its melting point, then the particles GAIN energy and the liquid will EVAPORATE.

Experiment 2 A Aim: To investigate the change of state when a liquid evaporates. Method: Half fill a beaker with water and heat with a Bunsen. Place 5 drops of the liquid acetone into a test tube and plug with cotton wool. Place the test tube into the beaker of hot water and observe what happens. Keep the test tube for the next experiment. Results: The acetone ________

Condensation: Gas to Liquid ØIf the temperature around the gas is cold, then the particles LOSE energy and the gas will CONDENSE back to liquid.

Experiment 2 B Aim: To investigate the change of state when a gas condenses. Method: Place ice/cold water into a different beaker. Remove your test tube containing gas and place into the beaker. Watch what happens. Results: The gas in the test tube ______

Freezing: Liquid to Solid When a liquid is cooled, the energy of the particles decreases so much that they become fixed into position. New bonds form and the liquid becomes a solid.

Lesson 4: The Water Cycle LI To be able to describe the water cycle and the changes of state which occur during it.

The Water Cycle Water is the ONLY substance that can be found naturally on Earth existing in all 3 states.

TASK 3 The worksheet shows the water cycle in all 3 states of matter. Fill in the blanks based on your knowledge how substances can change state and glue into your jotter.

TASK 4 Cut out the 20 statements from the handout. (colouring them in first might help) In your jotter write the four headings: Melting, Evaporating, Freezing and Condensation. Place the statements under the correct headings then stick them into your jotter

FREEZING EVAPORATING MELTING CONDENSATION Paint Drying Puddles disappearing Clothes drying Ice cubes disappearing Ice lolly dripping Dew on the morning grass Water on kitchen tiles Pond becomes skating rink Preparing water for tea ‘Runny’ ice cream Windows mist up after a shower Juice forming a slush Blow drying your hair Tipex covering mistakes Snow forming Hail stones forming Frosty windows in morning Nail Varnish Fog Breath on a cold day

The Water Cycle: What happens? Warm damp air is full of water vapour. The air stays clear as long as the water is all vapour however, the higher you go on land the cooler the air becomes. The vapour condenses into a fine mist of water droplets held up by the air – better known as clouds. Eventually clouds become so big and heavy that the vapour turns to rain or snow, which falls back to the land. Rain water collects in lakes or rivers which take it back to the sea and the cycle begins all over again.

TASK 5 Use the word bank at the bottom of the page to fill in the blanks on the Water Cycle handout. Staple into your jotter once complete.

Lesson 5: Solutions LI To be able to state the definition of solutes, solvents and solubility. To describe solubility.

Solutions: No Lumps A solution is made by dissolving a substance in a liquid, for example, dissolving sugar in a cup of tea. The substance that dissolves is called the solute. The liquid which allows it to dissolve is called the solvent. THINK! PAIR! SHARE! What other everyday examples of solutions can you think of? Can you identify the solute and the solvent? Discuss

Water as a Solvent In order for a solid to be dissolved easily, it is important that the correct solvent is used. Many solids will easily dissolve in water – sugar, salt, dirt etc. However there are many more solids, for example, plastic, metals, inks and cotton wool will not.

Experiment 3 Aim: To investigate water as a solvent. Method: Add approx. 3 cm of water into a test tube. Add a very small quantity of the substance into the test tube and shake the test tube from side to side. Observe if the substance has dissolved and complete your results table. Results: Substance being tested Soluble or Insoluble?

Experiment 4 Aim: To investigate different solvents Method: Collect a slide with streaks of nail varnish painted on it. Put one drop of solvent onto a cotton bud. Try to remove the nail polish streak using the bud counting how many strokes it takes. Note your results in the table below. Results: Solvent Used Number of strokes to remove it

Lesson 6: Solubility LI To describe how increasing the temperature affects solubility. To be able to draw a graph and extract information from it.

Factors Affecting Solubility can be affected by temperature. A solvent can dissolve more solute if the particles have more energy. This is because the spaces between the particles are bigger so more solute can fill them. THINK! PAIR! SHARE! What everyday examples help to show that warmer solvent can dissolve more solute? What happens when no more of the solute can dissolve?

Crystallisation Once a solvent can not dissolve any more solute it is said to be fully SATURATED. Saturated solution are important to chemists as they allow the process of crystallisation to occur. Crystallisation is used to make substances very pure such as sugar cane or medicines including penicillin, aspirin and insulin.

Experiment 5 Aim: To investigate saturated solutions and crystal formation. Method 1: Pour 50 cm 3 of water into a beaker (or cup). Add one spatulaful of copper sulphate and stir until no more is dissolved. Repeat this until no more copper sulphate dissolves. Heat the solution on a Bunsen and add more copper sulphate – ensuring you stir until it has all dissolved. You have now made a SATURATE SOLUTION. Method 2: Tie a ‘seed’ crystal onto thread and hang the crystal over the beaker so that it dips into your saturated solution. Leave experiment till the next day. What has happened to your crystal? Why? Results: The crystal __________________

Lesson 7: Separating Techniques LI To be able to describe which methods are used to separate different mixtures.

Separating Mixtures contain different substances and are often joined up together. Depending on the mixture, it is possible to separate the substances again. For example, a mixture of sand peas could be separated by filtering. Chemical separation techniques include: 1. Filtration 2. Evaporation 3. Distillation 4. Chromatography

Distillation is a process used to obtain a solvent from a solution. Distillation is a very famous process used in the alcohol industry. Distillation allows many countries to get pure water to drink from salty sea water as shown in the demonstration experiment.

Evaporation separates a soluble solid from a liquid. Evaporation is the technique most commonly used to obtain salt crystals from sea water in hot desert countries. The suns heat boils off the water from the shallow pools, leaving the salt to be collected, purified and sold around the world.

Experiment 6 Aim: To investigate evaporation to obtain a soluble solid. Method: Make a saturated salt solution and pour contents into an evaporating basin. Heat the basin using a Bunsen burner until only a small quantity of liquid remains and turn the Bunsen off. Observe what happens in the basin. Results: After the liquid had evaporated, ___________________

Filtration is the process used to separate an insoluble solid from a liquid. Filtration is most commonly used on a daily basis to make coffee in shops such as Costa, Starbucks and Café Nero. The filter prevents the ground coffee from entering the cup whiles allowing the flavoured water to fill it.

Experiment 7 Aim: To obtain an insoluble solid from a solution. Method: Into a small beaker measure 20 cm 3 of potassium iodide and add the same volume of lead nitrate to the beaker. Stir the mixture well. Set up the apparatus as shown and slowly and carefully transfer the contents of the beaker to the filter funnel and filter paper. Results: After _______minutes the ______ was in the beaker under the filter funnel.

Chromatography The final separation technique Chemists use is called chromatography and is used to separate dissolved substances from one another. Chromatography is used in: 1. Forensics to identify samples taken from crime scenes. 2. Pollution monitoring for unknown pollutants in air and water samples. 3. Studying complex mixtures such as in food, perfume, oil and drug production. A big advantage of chromatography is that only tiny samples are needed.

Experiment 8 Aim: To identify the various inks that make up black ink. Method: Measure 10 ml of water in a small beaker. Use a pencil to draw a line 2 cm from the bottom of the paper and add a spot of black in the centre. Attach the paper to a wooden split so that it stands in the beaker and lower into the water. Remove paper after 8 -10 mins and leave to dry. Results: Stick in paper chromatography results.

Lesson 8: Climate Change LI To be able to describe the cause and effect of global warming.

TASK 5 Read through the passage in the work cards and answer the questions at the bottom in sentences. Complete handout 7 and staple into your jotter.

Lesson 9: Rocks LI To be able to describe the characteristics and uses basic types of rocks.

Earth: A Rocky Planet The 1. 2. 3. 4. Earth is made up of different rock components: Core; solid rock Outer Core; liquid rock Mantle: Mostly liquid rock Crust: solid rock

Experiment 9 Aim: To examine three different rock types. Method: Test the rocks provided with a) A magnifying glass b) Nail c) Acid Note what happens in each case. Results: Rock Name Appearance Hardness (soft/hard/ very hard) Reaction with acid (Fizz/no fizz)

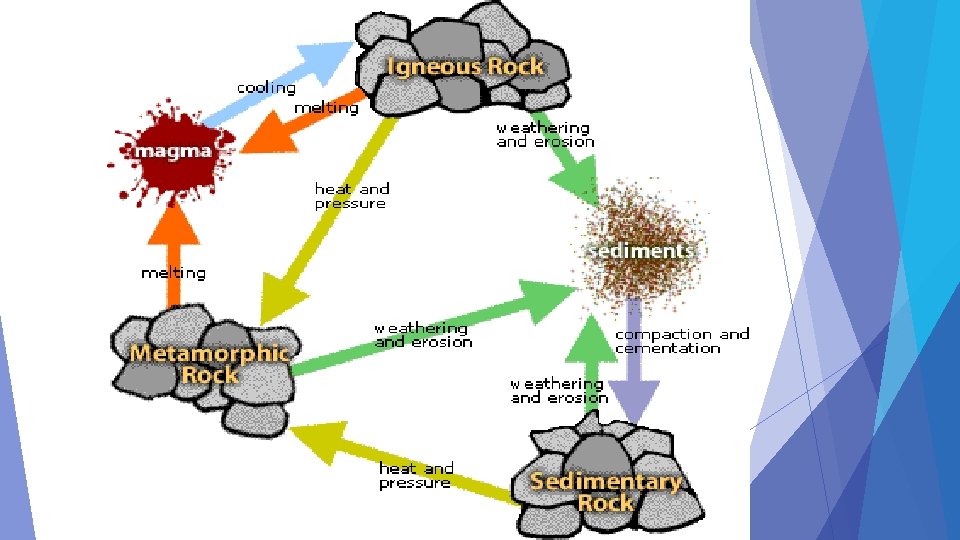
Rock Types There are 3 main rock types found on earth and each has its own unique set of properties. The 3 type of rock are called: 1. Igneous 2. Sedimentary 3. Metamorphic

1. Igneous Rocks Igneous rocks are made by molten lava, therefore these molten rocks are sometimes called magma. If the molten lava is cooled quickly it traps gases which create bubbles in the rocks. If the molten lava is cooled slowly then large crystals are often seen inside the rock. Examples: Granite & Pumice

2. Sedimentary Rock Sedimentary rock is made from rocks that have been eroded by the wind and rain. They are carried down rivers to the seabed (sometimes allowed to dry out) and then pressurised into layers. Examples: Sandstone &

3. Metamorphic Rock When either igneous or sedimentary rocks are exposed to extreme heat and pressure they turn into new structures with different properties. These rocks are known as Metamorphic rocks. If these rocks are exposed to excessive heat and pressure they will simply melt back into lava. Examples: Marble and Slate

The Rock Cycle The rock cycle shows the transition of different rock types through time. This cycle shows how the three rock types are related and how different conditions and processes can change them from one type of rock to another.

Lesson 10: Soils LI To be able to describe the characteristics and uses of soils & minerals.

Soils Soil is made of: mineral particles, humus, water, nutrient ions, air and living organisms. Soil is made from withered rock over time. There are 3 types of soil: Clay – Tightly packed, does not drain well but retains nutrients Sandy – Loosely packed because of large particles, drain quickly, nutrients are washed away easily. Loam – (Contains clay and sandy particles)

Loam is a soil which contains: - Less than 52% sand - 28 -50% silt - 7 -27% clay Loam is the best soil for growing plants. It can hold water and nutrients very well but does not become too waterlogged. You cannot make your own loam – it would end up looking like cement. Making loam is an ongoing process which involves working organic matter into the soil, every year.
- Slides: 59