RESTORATION OF ENDODONTICALLY TREATED TOOTH Introduction A tooth


- Slides: 43
RESTORATION OF ENDODONTICALLY TREATED TOOTH
Introduction A tooth that has been properly treated endodontically should have a good prognosis. It can resume full function and if necessary serve satisfactorily as an abutment for a fixed or removable partial denture. However, special techniques are needed to restore such a tooth.
• Different clinical techniques have been proposed to solve these problems, and opinions differ as to the most appropriate one. Recent experimental data have improved our understanding of the difficulties inherent in restoring an endodontically treated tooth
TREATMENT PLANNING • Existing endodontically treated teeth need to be assessed care fully for the following: Ø Good apical seal Ø No sensitivity to pressure Ø Noexudate Ø No fistula Ø No apical sensitivity Ø No active inflammation
One piece post crowns were once made, these prostheses are of historical interest only and are no longer attempted A superior result can be obtained with a two step technique. Currently a metal post is used to retain a core that replaces lost tooth structure and results in the shape of a conventional preparation Morphologic and functional differences between anterior teeth and posterior teeth require that they be treated differently after endodontic therapy
Considerations for anterior teeth • Anterior teeth do not always need complete coverage, except when plastic restorative materials would have limited prognosis in view of the extent of coronal destruction. Many function with composite resin restorations. • when the tooth is loaded, stresses are greatest at the facial and lingual surfaces of the root and an internal post, being only minimally stressed, does not help prevent fracture
Disadvantages to the routine use of a cemented post: 1. Placing the post requires an additional operative procedure. 2. Preparing a tooth to accommodate the post removes additional tooth structure. 3. It may be difficult to restore the tooth later, when a complete crown is needed, because the cemented post may have failed to provide adequate retention for the core material. 4. The post can complicate or prevent future endodontic retreatment if this becomes necessary.
Considerations for posterior teeth Endodontically treated posterior teeth are subject to greater loading than anterior teeth are because of their position closer to the insertion of the masticatory mus cles. This, combined with their morphologic character istics, makes them more susceptible to fracture. Complete coverage is recommended on teeth with a high risk of fracture, especially maxillary premolars, because complete coverage gives the best protection against fracture
PROCEDURES
Tooth preparation for endodontically treated teeth can be considered as a three-stage operation Removal of the root canal filling material to the appropriate depth, Enlargement of the canal Preparation of the coronal tooth structure.
Removal of the endodontic filling material • It is recommended that the root canal system first be completely obturated and then space made for a post. This will ensure that lateral canals are sealed. A post can not be placed if the canal is filled with a full length silver point, so these must be removed and the tooth retreated with gutta percha.
• There are two commonly used methods for removing gutta percha: with a warmed endodontic plugger and with a rotary instrument: the rotary instru ment is sometimes used in conjunction with a chemical agent such as chloroform
1. Before removing gutta percha, calculate the appropriate length of the post. 2. Avoid the apical 5 mm if possible. Curvatures and lateral canals may be found in this segment 3. To prevent aspiration of an endodontic instru ment, apply a rubber dam before preparing the post space. 4. Select an endodontic condenser large enough to hold heat well but not so large that it binds against the canal walls. 5. Mark it at the appropriate length normally endodontic working length minus 5 mm, hi at it. and place it in the canal to soften the gutta percha. 6. If the gutta percha is old and has lost iu thermo plasticity. use a rotary instrument, making sure that the instrument follows the gutta percha and does not engage dentin lest it cause a root perforation.
7. If using a rotary instrument, choose it to be slightly narrower than the canal. 8. Be careful that the instrument follows the center of the gutta percha and does not cut dentin. 9. When the gutta percha has been removed to the appropriate depth, shape the canal as needed This is accomplished with endodontic hand instru ments or a low speed drill. The purpose is to remove undercuts and prepare the canal to receive an appro priately sized post without excessively enlarging the canal. It has been recommended that the post be no more than one third the diameter of the root, with the root and walls at least 1 mm thick
Enlargement of the canal • Prior to enlargement of the canal, a decision must be made regarding the type of post system that will be used for fabrication of the post and core.
For prefabricated posts • 1. Enlarge the canal one or two sizes with a drill, endodontic file, or reamer that matches the configuration of the post. • 2. Use a prefabricated post that matches standard endodontic instruments. • 3. Be especially careful not to remove more dentin at the apical extent of the post space than is necessary.
For custom-made posts 1. Use custom made posts in canals that have a non circular cross section or extreme taper. Enlarging canals to conform to a preformed post may lead to perforation. 2. Be most careful on molars to avoid root perforation. In mandibular molars the distal wall of the mesial root is particularly susceptible. In maxillary molars the curvature of the mesiobuccal root makes mesial or distal perforation more likely.
Preparation of the coronal tooth structure • After the post space has been prepared, the coronal tooth structure is reduced for the extracoronal restoration. Anterior teeth requiring a post and core will best be restored with a metal ceramic crown.
• 1. Ignore any missing tooth structure from previous restorative procedures, caries, fracture, or endodontic access and prepare the remaining tooth as though it were undamaged. • 2. Be sure that the facial surface of the tooth is ade quately reduced for good esthetics. • 3. Remove all undercuts that would prevent with drawal of the pattern. • 4. Remove any unsupported tooth structure, but be careful to preserve as much of the crown as possible. • 5. Be sure also that part of the crown is prepared per pendicular to the post • 6. Complete the preparation by eliminating sharp angles and establishing a smooth finish line.
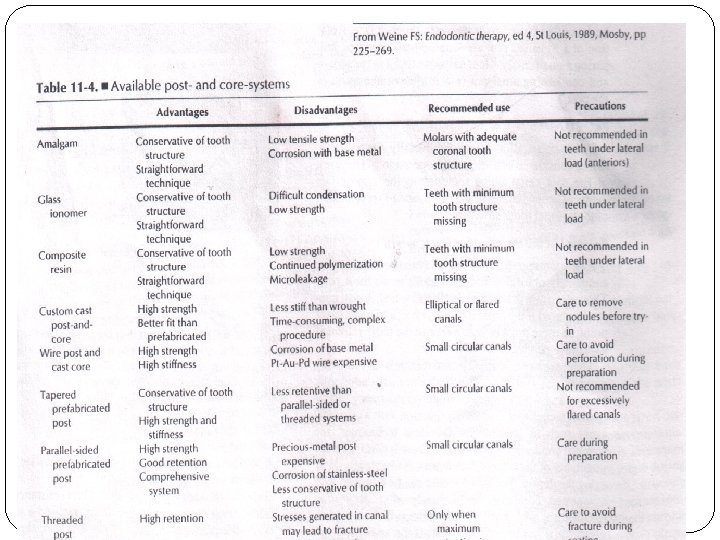
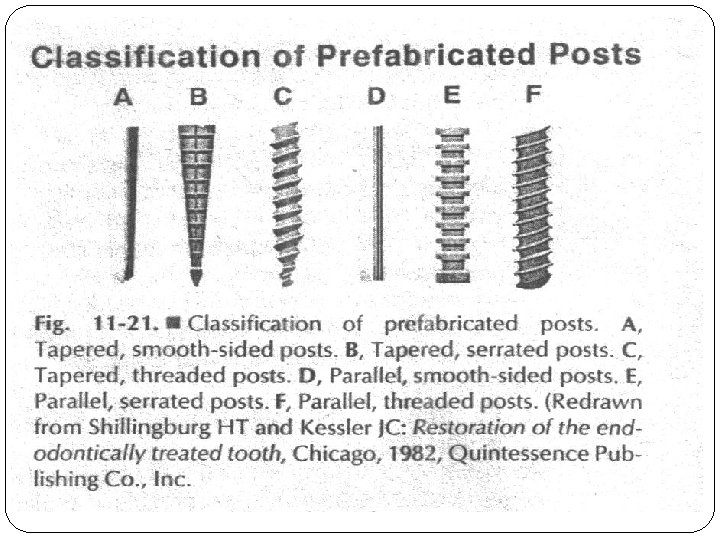
Available materials Prefabricated parallel sided posts are made of Platinum gold palladium (Pt Au Pd or PGP), Nickel chromium (Ni Cr) Ccobalt chromium (Co Cr) stainless steel clasp wire. Serrated posts come in stainless steel, titanium, or nonoxidizing noble alloy. • Tapered posts are available in Au Pt, Ni Cr. and titanium alloys. • All these posts have a high modulus of elasticity and an elongated grain structure, which con tribute to their more suitable physical properties as com pared to cast posts. Essentially, they are more rigid. • • •
Custom-made posts • A custom made post can be cast from a direct pattern or an indirect one. A direct technique utilizing autopolymerizing resin is recom mended for single canals whereas an indirect procedure is more appropriate for multiple canals.
Direct procedure 1. Lightly lubricate the canal and notch a loose fitting plastic dowel. It should extend to the full depth of the prepared canal. 2. Use the bead brush technique to add resin to the dowel and seat it in the prepared canal. This is best done in two steps: Add resin only to the canal orifice first. An alter native is to mix some resin and roll it into a thin cylinder. This is introduced into the canal and pushed to place with the monomer moistened plastic dowel. 3. Do not allow the resin to harden fully within the canal. Loosen and reseat it several times while it is still rubbery. 4. Once the resin has polymerized, remove the pat tern 5. Form the apical part of the post by adding addi tional resin and reseating and removing the post, taking care not to lock it in the canal. 6. Identify any undercuts that can be trimmed away carefully with a scalpel. The post pattern is complete when it can be inserted and removed easily without binding in the canal. Once the pattern has been made, additional resin is added for the core.
Indirect procedure Any elastomeric material will make an accurate impression of the root canal if a wire reinforcement is placed to prevent distortion. 1. Cut pieces of orthodontic wire to length and shape them like the letter J 2. Verify the fit of the wire in each canal. It should fit loosely and extend to the full depth of the post space. 3. Coat the segment with tray adhesive. If subgingival margins are present, tissue displace ment may be helpful. Lubricate the canals to facilitate removal of the impression without distortion (die lubricant is suitable). 4. Using a lentulo, fill the canals with elastomeric impression material.
5. Seat the wire reinforcement to the full depth of each cavity, syringe in more impression material around the prepared teeth, and insert the impres sion tray. 6. Remove the impression, evaluate it, and pour the final cast Access for waxing is generally adequate with out trimming or sectioning the cast. 7. Roughen a loose fitting plastic post (a plastic toothpick is suitable) and, using the impression as a guide, make sure that it extends into the entire depth of the canal. 8. Apply a thin coat of sticky wax to the plastic post and add soft inlay wax in increments. It is best to start from the most apical and make sure that the post is correctly oriented as it is seated to adapt the wax. When this post pattern has been fab ricated, the wax core can be added and shaped. 9. Use the impression to evaluate whether the wax pattern is completely adapted to the post space.
CORE FABRICATION
• The core of a post and core restoration replaces missing coronal tooth structure, and thereby forms the shape of the tooth preparation. • Cast metal cores • Plastic restorative material such as amalgam, glass ionomer, or composite resins
Plastic filling materials. The advantages of amalgam, glass ionomer, or resin are that maximum tooth structure can be conserved because undercuts do not need to be removed, treatment requires one less patient visit there are fewer laboratory procedures testing generally shows good strength characteristics, possibly because of the good adaptation to tooth structure.
Disadvantages • Corrosion of amalgam cores • the low strength of glass ionomer • the continued polymerization and high thermal expansion coefficients of composite resin cores • Microleakage with temperature fluctuations (thermocycling) is found to be greater under composite resin and amalgam cores than conventional crown preparations • Difficulty may be encountered with certain operative procedures such as rubber dam or matrix application particularly on badly damaged teeth.
Amalgam cores • Amalgam cores are suitable for restoring posterior teeth, particularly when some coronal structure remains
Step by step procedure for amalgam • 1. Apply the rubber dam and remove gutta percha from the pulp chamber as well as 2 to 4 mm into each root canal if less than 4 mm of coronal height remains Use a warmed endodontic instrument. • 2. Remove any existing restoration, undermined enamel, or carious or weakened dentin. Establish the cavity form using conventional principles of resistance and retention form. • 3. If you suspect that the floor of the pulp chamber is thin, protect it from condensing pressures with a cement base.
• 4. Fit a matrix band. • 5. Condense the first increments of amalgam (select a material with high early strength) into the root canals with an endodontic plugger. • 6. Fill the pulp chamber and coronal cavity in the conventional manner, • 7. Carve the alloy to shape. The impression can be made immediately. Alternatively, the amalgam can be built up to anatomic contour and later prepared for a complete crown. Under these circumstances care must be taken to avoid forces that would fracture the tooth or newly placed restoration
Cast metal. • Cast metal cores have the following advantages: – they can be cast directly onto a prefabricated post, giving a restoration with good strength characteristics – conventional high noble metal content alloys can be used – an indirect procedure can be employed, making restoration of posterior teeth easier.
Direct procedure 1. Use a prefabricated metal or custom acrylic resin post. 2. Add resin by the "bead" technique, dipping a small brush in monomer and then into polymer and applying it to the post. Some recommend light cured resin to facilitate this step. 3. Slightly overbuild the core and let it polymerize fully 4. Shape the core with carbide finishing burs or paper discs. Use water spray to prevent overheating of the acrylic resin. Correct any small defects with wax. 5. Remove the pattern sprue and invest it immediately.
Indirect pattern for posterior teeth • 1. Wax the custom made posts as described previously. • 2. Build part of the core around the first post. • 3. Remove any undercuts adjacent to other post holes and cast the first section. • 4. Wax additional sections and cast them.
Provisional restorations • To prevent drifting of opposing or adjacent teeth
Investing and casting • A cast post and core should fit somewhat loosely in the canal. • A tight fit may cause root fracture. The casting should be slightly undersized • Casting a core onto a prefabricated post avoids problems of porosity, but the preheating temperature of the investment mold should be restricted if recrystalization of the wrought post is to be avoided.
Try in • The practitioner must be particularly careful that casting defects do not interfere with seating of the post, lest root fracture result. Post and cores should be inserted with gentle pressure • The shape of the foundation is evaluated and adjusted as necessary. No adjustments should be made immediately after cementation because vibration from the bur could fracture the setting cement and cause premature failure
Cementation • It is important that the luting agent fill all dead space within the root canal system. Voids may be a cause of periodontal inflammation via the lateral canals. • A rotary (lentulo) paste filler or cement tube is used to fill the canal with cement.
Removal of existing posts • Occasionally an existing post and core must be removed (e. g. , for retreatment of a failed root canal filling). • If sufficient length of post is exposed coronally, the post can be retrieved with thin beaked forceps. • Vibrating the post first with an ultrasonic sealer will weaken the cement and facilitate removal • post puller • special hollow end cutting tubes (or trephines)
THANK YOU