PUERTO RICO PRACTICAL SHOOTING ASSOCIATION Stage Course Designer


 Course Designer: Roger")


 Course Designer: Bill Quintana CRO Date:")


 Course Designer: J")


- Slides: 171
PUERTO RICO PRACTICAL SHOOTING ASSOCIATION Stage: Course Designer: Date: START POSITION: GUN READY CONDITION: Loaded gun in holster, hands relaxed at sides. STAGE PROCEDURE: Upon start signal, engage targets as required to score. SCORING: TARGETS: SCORED HITS: START-STOP: RULES: Comstock, 00 rounds, 000 points 0 IPSC, 0 PP, 0 USP, 0 Plates Best 2 per paper, KD steel = 1 A Audible - Last shot Last PRPSA 3 gun Rules edition 3 GUN TEMPLATE
PUERTO RICO PRACTICAL SHOOTING ASSOCIATION Stage: Course Designer: Date: START POSITION: GUN READY CONDITION: Loaded gun in holster, hands relaxed at sides. STAGE PROCEDURE: Upon start signal, engage targets as required to score. SCORING: TARGETS: SCORED HITS: START-STOP: RULES: Comstock, 00 rounds, 000 points 0 IPSC, 0 PP, 0 USP, 0 Plates Best 2 per paper, KD steel = 1 A Audible - Last shot Per last IPSC rule book edition IPSC TEMPLATE
Out & Back NS
A
Low Port
Low Port
Board Box A
Pistol Targets Rifle Targets
250 yds. 200 yds. 100 yds.
250 yds. 200 yds. 100 yds.
Rifle targets Pistol targets
A B
Rifle Targets 50 yards Shotgun Targets Pistol Targets
Push Port
Max Trap
Blanket
Shooting Area Box A
Out & Back NS
Pressure Plate
B C A A
T 1 T 2 T 3 PP 1 PP 2 PP 3 2 ft 1 ft T 4 2 ft 1 ft 4 ft 30 ft 40 ft C 50 ft B A T 5 4 ft 1 ft T 6
T 1 T 2 45 ft 75 ft CL T 3 15 ft C B A 6 ft
Out & Back NS
180 Deg ree
Out & Back NS
Out & Back NS Out & Back Target Drop Out Shoot Drop Out Penalty Flop-Up Can-Can Array USP 2 PP 2 USP 1 PP 1 Flop-Up T 10 Plate Flop-Up
Free Fire Zone
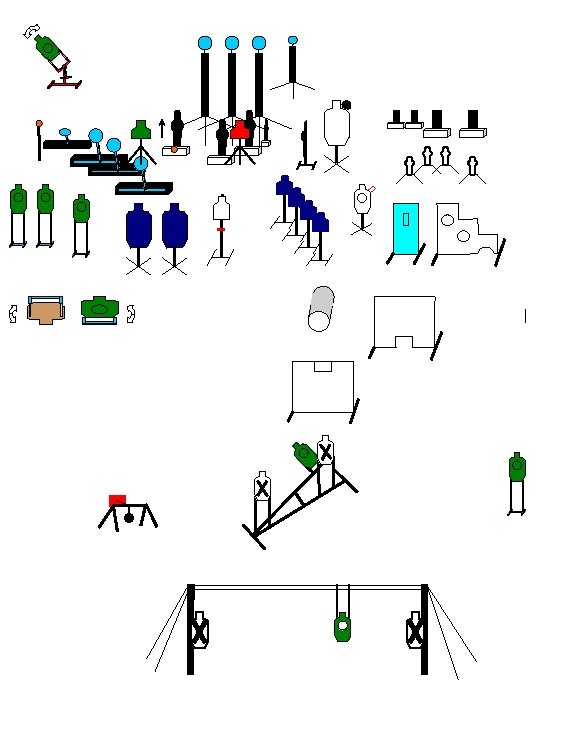
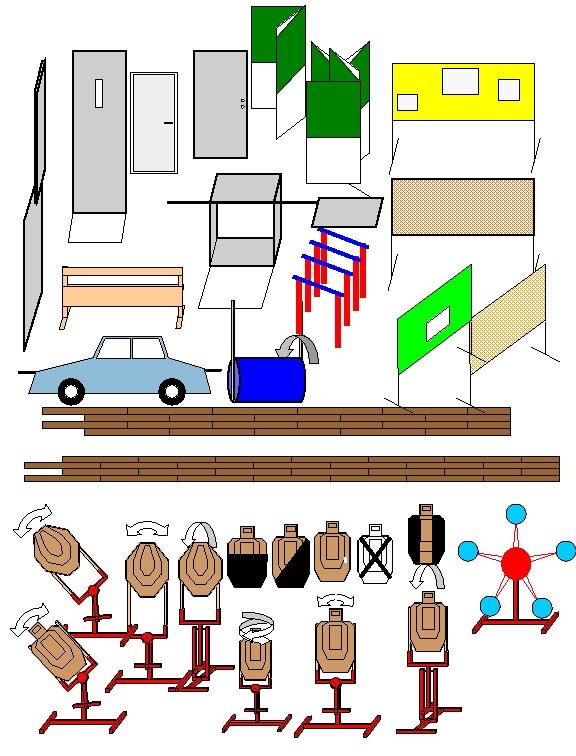
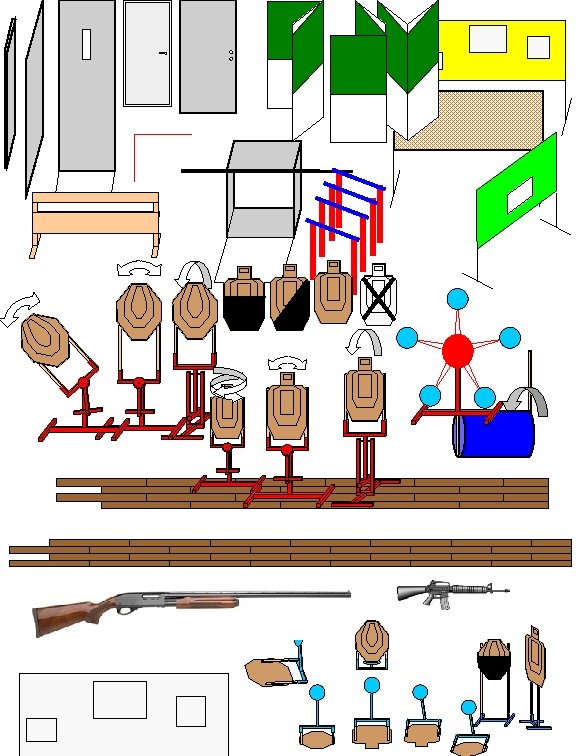
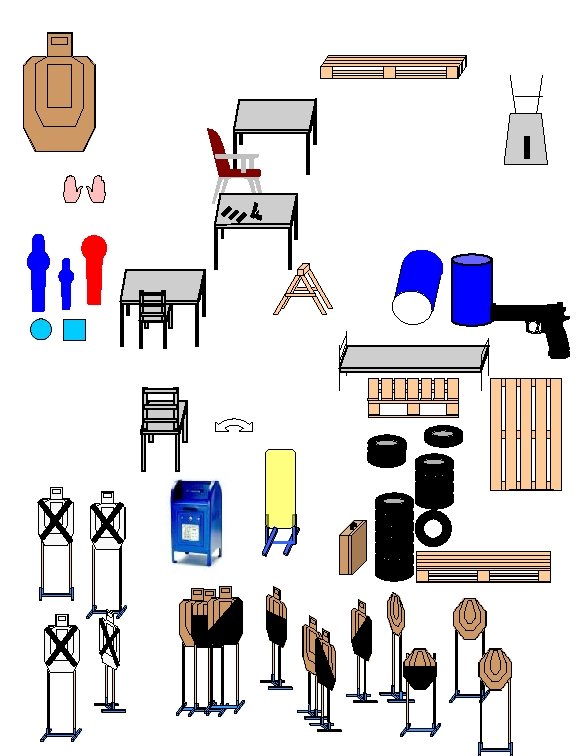
Ungroup a wall section, select some boards and remove them to create a port, then group the object again.
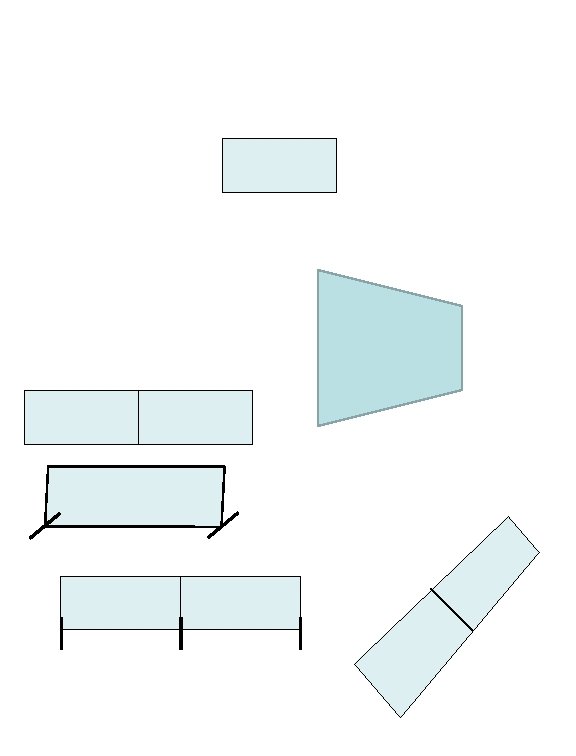
Walls with see-thru ports PORT COVER, copy and paste to cover or change size of see-thru ports Ungroup this wall, then click above, below, left or right of the port and resize the opening, then group the object again.
Walls with see-thru doorways & removable doors Copy and paste, resize or edit points of this panel to cover or change a see thru doorway. Doors- copy and paste these to make a door wall.
Title RULES: Practical Shooting Handbook, Latest Edition COURSE DESIGNER: Ronnie Casper START POSITION: Handgun is loaded and holstered as per ready condition 8. 1. 1 and 8. 1. 2. STAGE PROCEDURE At the signal, enter shooting area and engage targets as visible within fault lines. SETUP NOTES: SCORING: TARGETS: SCORED HITS: START-STOP: PENALTIES: SCORING Comstock, rounds, points IPSC, PP, USP, Plates Best 2 per IPSC, steel down = 1 A Audible - Last shot Per current edition of USPSA Practical Shooting Handbook RO NOTES: Maintain target and prop position integrity throughout the match.
Rulers for taking measurements and scaling drawings. Red marks indicate the minimum distance for steel targets. To size a drawing to a different grid scale, group the drawings ruler with the drawing. Next copy and paste the ruler for the grid scale you want to resize to next to the drawings ruler. Now resize the drawing until its ruler matches the length of the 2 nd ruler. (press & hold Shift & Alt during resizing). 32 Yard Grid Ruler: Scale = Feet 20 Yard Grid Ruler: Scale = Feet 15 Yard Grid Ruler: Scale = Feet Pressure Plates
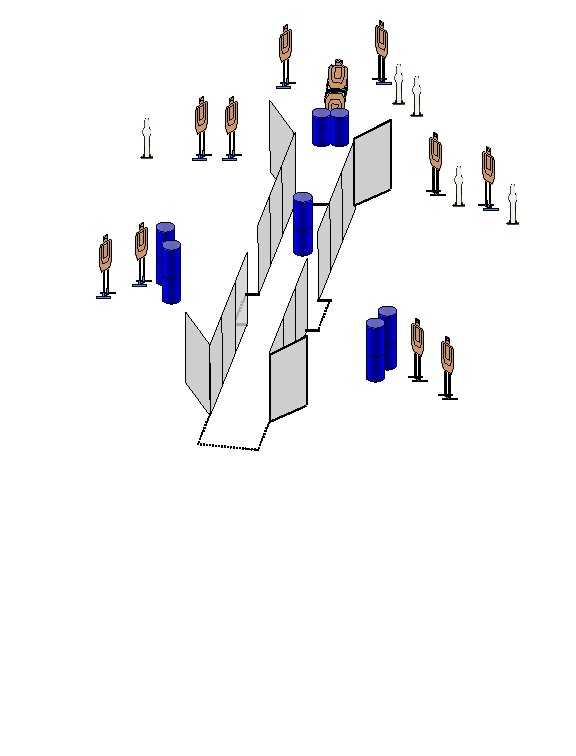
Background Drawing Grid: 15 Yards x 21 Yards READ THIS BEFORE DELETING THIS TEXT BOX GRID BACKGROUND INSTRUCTIONS The grid lines on this page are a background object. You cannot select, resize or move them. WARNING: If you reformat this background, and save this template, you will loose the background grid permanently. To remove the background for printing or viewing, use the Format Menu to Format the Background as White. To preserve the original template, save your work to a new filename by selecting File, Save as from the file menu. Another method is to copy this slide and add it to the template as a new slide. If you use this method, you will protect yourself from inadvertently deleting the grid permanently. After copying the slide, do your work on the copy instead of the original. Remove any text boxes and the ruler as you need. HELPFUL HINTS DO NOT RESIZE THE RULER Use this grid to do overhead view setup drawings. This will yield a properly scaled drawing you may use to eliminate shoot through targets, etc, and use as a measured drawing for match setup. To maintain the proper scale, size all your objects by using the ruler as a guide. Placing 2 Stages on 1 Range After completing your drawing, place the ruler at the bottom of the drawing and Group it with your drawing. Now you can copy and paste multiple drawings onto one slide. Next, resize your drawings relative to each other. Do this by placing one drawing on top of the 2 nd drawing, then resize the drawing (press and hold SHIFT and ALT to maintain the proper ratio when resizing) and resize until both rulers are the same length. This will put both drawings into the same scale, something you will need to do if one is drawn on a 15 yard grid another is drawn on a 20 yard grid, etc. After rescaling you can move and rotate the stages to properly place them on the range you are designing for. This is a must for designing 2 stages that occupy the same range. It is the only way to eliminate setup headaches on match day. No more shoot through problems on adjacent stages! See example on last page. Ruler Scale = Feet Move and rotate ruler as need for measurements Grid Background Scale = Yards
Background Drawing Grid: 18 Yards x 23 Yards READ THIS BEFORE DELETING THIS TEXT BOX GRID BACKGROUND INSTRUCTIONS The grid lines on this page are a background object. You cannot select, resize or move them. WARNING: If you reformat this background, and save this template, you will loose the background grid permanently. To remove the background for printing or viewing, use the Format Menu to Format the Background as White. To preserve the original template, save your work to a new filename by selecting File, Save as from the file menu. Another method is to copy this slide and add it to the template as a new slide. If you use this method, you will protect yourself from inadvertently deleting the grid permanently. After copying the slide, do your work on the copy instead of the original. Remove any text boxes and the ruler as you need. HELPFUL HINTS DO NOT RESIZE THE RULER Use this grid to do overhead view setup drawings. This will yield a properly scaled drawing you may use to eliminate shoot through targets, etc, and use as a measured drawing for match setup. To maintain the proper scale, size all your objects by using the ruler as a guide. Placing 2 Stages on 1 Range After completing your drawing, place the ruler at the bottom of the drawing and Group it with your drawing. Now you can copy and paste multiple drawings onto one slide. Next, resize your drawings relative to each other. Do this by placing one drawing on top of the 2 nd drawing, then resize the drawing (press and hold SHIFT and ALT to maintain the proper ratio when resizing) and resize until both rulers are the same length. This will put both drawings into the same scale, something you will need to do if one is drawn on a 15 yard grid another is drawn on a 20 yard grid, etc. After rescaling you can move and rotate the stages to properly place them on the range you are designing for. This is a must for designing 2 stages that occupy the same range. It is the only way to eliminate setup headaches on match day. No more shoot through problems on adjacent stages! See example on last page. Ruler Scale = Feet Move and rotate ruler as need for measurements Grid Background Scale = Yards
Background Drawing Grid: 20 Yards x 28 Yards READ THIS BEFORE DELETING THIS TEXT BOX GRID BACKGROUND INSTRUCTIONS The grid lines on this page are a background object. You cannot select, resize or move them. WARNING: If you reformat this background, and save this template, you will loose the background grid permanently. To remove the background for printing or viewing, use the Format Menu to Format the Background as White. To preserve the original template, save your work to a new filename by selecting File, Save as from the file menu. Another method is to copy this slide and add it to the template as a new slide. If you use this method, you will protect yourself from inadvertently deleting the grid permanently. After copying the slide, do your work on the copy instead of the original. Remove any text boxes and the ruler as you need. HELPFUL HINTS DO NOT RESIZE THE RULER Use this grid to do overhead view setup drawings. This will yield a properly scaled drawing you may use to eliminate shoot through targets, etc, and use as a measured drawing for match setup. To maintain the proper scale, size all your objects by using the ruler as a guide. Placing 2 Stages on 1 Range After completing your drawing, place the ruler at the bottom of the drawing and Group it with your drawing. Now you can copy and paste multiple drawings onto one slide. Next, resize your drawings relative to each other. Do this by placing one drawing on top of the 2 nd drawing, then resize the drawing (press and hold SHIFT and ALT to maintain the proper ratio when resizing) and resize until both rulers are the same length. This will put both drawings into the same scale, something you will need to do if one is drawn on a 15 yard grid another is drawn on a 20 yard grid, etc. After rescaling you can move and rotate the stages to properly place them on the range you are designing for. This is a must for designing 2 stages that occupy the same range. It is the only way to eliminate setup headaches on match day. No more shoot through problems on adjacent stages! See example on last page. Ruler Scale = Feet Move and rotate ruler as need for measurements Grid Background Scale = Yards
Background Drawing Grid: 32 Yards x 43 Yards READ THIS BEFORE DELETING THIS TEXT BOX GRID BACKGROUND INSTRUCTIONS The grid lines on this page are a background object. You cannot select, resize or move them. WARNING: If you reformat this background, and save this template, you will loose the background grid permanently. To remove the background for printing or viewing, use the Format Menu to Format the Background as White. To preserve the original template, save your work to a new filename by selecting File, Save as from the file menu. Another method is to copy this slide and add it to the template as a new slide. If you use this method, you will protect yourself from inadvertently deleting the grid permanently. After copying the slide, do your work on the copy instead of the original. Remove any text boxes and the ruler as you need. HELPFUL HINTS DO NOT RESIZE THE RULER Use this grid to do overhead view setup drawings. This will yield a properly scaled drawing you may use to eliminate shoot through targets, etc, and use as a measured drawing for match setup. To maintain the proper scale, size all your objects by using the ruler as a guide. Placing 2 Stages on 1 Range After completing your drawing, place the ruler at the bottom of the drawing and Group it with your drawing. Now you can copy and paste multiple drawings onto one slide. Next, resize your drawings relative to each other. Do this by placing one drawing on top of the 2 nd drawing, then resize the drawing (press and hold SHIFT and ALT to maintain the proper ratio when resizing) and resize until both rulers are the same length. This will put both drawings into the same scale, something you will need to do if one is drawn on a 15 yard grid another is drawn on a 20 yard grid, etc. After rescaling you can move and rotate the stages to properly place them on the range you are designing for. This is a must for designing 2 stages that occupy the same range. It is the only way to eliminate setup headaches on match day. No more shoot through problems on adjacent stages! See example on last page. Ruler Scale = Feet Move and rotate ruler as need for measurements Grid Background Scale = Yards
Drawing Grid Object: 16 Yards x 21 YRDS This is an object that is click selectable, may be reformatted, etc. You can change the line color, move it, resize it, etc. Use this page for printing your own graph paper.
Drawing Grid Object: 18 Yards x 23 YRDS This is an object that is click selectable, may be reformatted, etc. You can change the line color, move it, resize it, etc. Use this page for printing your own graph paper.
Drawing Grid Object: 23 Yards x 27 YRDS This is an object that is click selectable, may be reformatted, etc. You can change the line color, move it, resize it, etc. Use this page for printing your own graph paper.
Drawing Grid Object: 32 Yards x 42 YRDS This is an object that is click selectable, may be reformatted, etc. You can change the line color, move it, resize it, etc. Use this page for printing your own graph paper.
Port
Box A T 1 Box A US PP
Box Box
Stage Name Rules: Current IDPA Handbook Designer: Start Position: Procedure: Scoring: rounds Targets: paper Scored Hits: best 2 on paper Start Stop: Audible & last shot fired Penalties:
Out & Back NS Out & Back Target Drop Out Shoot Drop Out Penalty Flop-Up Can-Can Array USP 2 PP 2 USP 1 PP 1 Flop-Up T 10 Plate Flop-Up
Free Fire Zone
Walls with see-thru ports PORT COVER, copy and paste to cover or change size of see-thru ports Ungroup this wall, then click above, below, left or right of the port and resize the opening, then group the object again.
Walls with see-thru doorways & removable doors Copy and paste, resize or edit points of this panel to cover or change a see thru doorway. Doors- copy and paste these to make a door wall.
Lewiston Pistol Club, Inc Stage: Course Designer: Date: LPC START POSITION: GUN READY CONDITION: Loaded gun in holster, hands relaxed at sides. STAGE PROCEDURE: Upon start signal, engage targets as required to score. SCORING: TARGETS: SCORED HITS: START-STOP: RULES: SAVE Comstock, 00 rounds, 000 points 0 IPSC, 0 PP, 0 USP, 0 Plates Best 2 per paper, KD steel = 1 A Audible - Last shot USPSA current edition
Lewiston Pistol Club, Inc Stage: Course Designer: Date: LPC START POSITION: GUN READY CONDITION: Loaded gun in holster, hands relaxed at sides. STAGE PROCEDURE: Upon start signal, engage targets as required to score. SCORING: TARGETS: SCORED HITS: START-STOP: RULES: SAVE Comstock, 00 rounds, 000 points 0 IPSC, 0 PP, 0 USP, 0 Plates Best 2 per paper, KD steel = 1 A Audible - Last shot USPSA current edition
Lewiston Pistol Club, Inc Stage: Course Designer: Date: LPC START POSITION: GUN READY CONDITION: Loaded gun in holster, hands relaxed at sides. STAGE PROCEDURE: Upon start signal, engage targets as required to score. SCORING: TARGETS: SCORED HITS: START-STOP: RULES: SAVE Comstock, 00 rounds, 000 points 0 IPSC, 0 PP, 0 USP, 0 Plates Best 2 per paper, KD steel = 1 A Audible - Last shot USPSA current edition
Out & Back NS Out & Back Target Drop Out Shoot Drop Out Penalty Flop-Up Can-Can Array USP 2 PP 2 USP 1 PP 1 Flop-Up T 10 Plate Flop-Up
Free Fire Zone
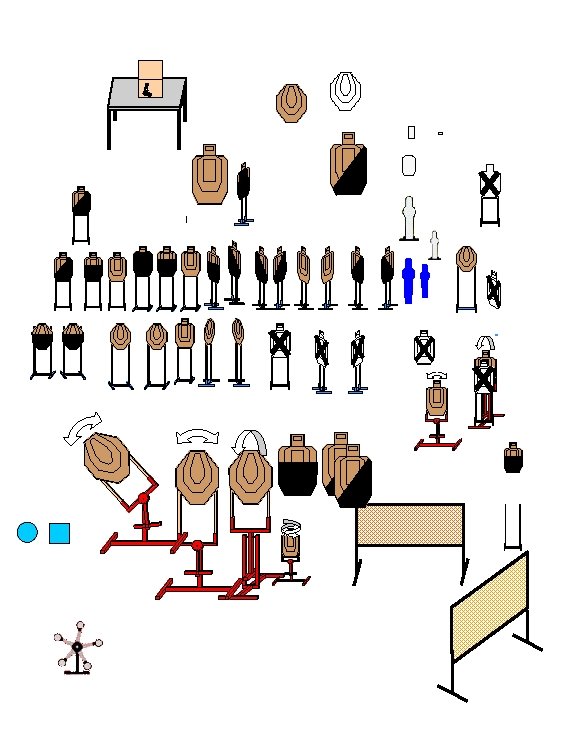
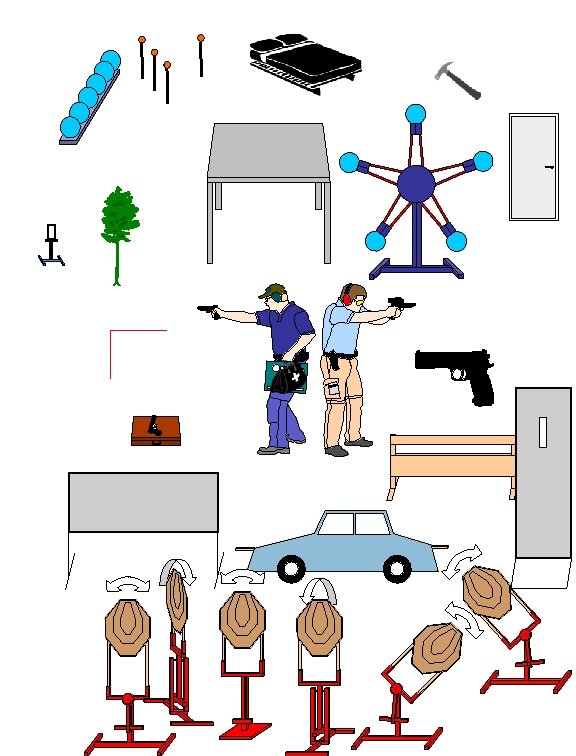
LPC items Nickelodeon Drop Out Penalty B I A N C H I
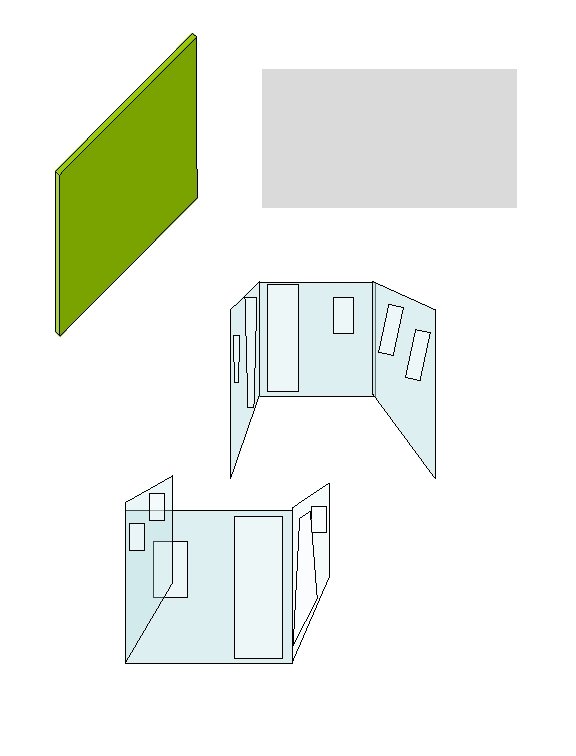
Ungroup a wall section, select some boards and remove them to create a port, then group the object again.
Walls with see-thru ports PORT COVER, copy and paste to cover or change size of see-thru ports Ungroup this wall, then click above, below, left or right of the port and resize the opening, then group the object again.
Walls with see-thru doorways & removable doors Copy and paste, resize or edit points of this panel to cover or change a see thru doorway. Doors- copy and paste these to make a door wall.
Lewiston Pistol Club, November 7, 2010 God Damnit, Roger! Course Designer: Roger Watson START POSITION: Hands relaxed at side in box A GUN READY CONDITION: Loaded gun in holster. STAGE PROCEDURE: Upon start signal, engage targets as required to score. SCORING: TARGETS: SCORED HITS: START-STOP: RULES: Comstock, 27 rounds, 135 points 8 IPSC, 11 Plates Best 2 per paper, KD steel = 1 A Audible - Last shot USPSA current edition 8 yards Fault line Box A
Lewiston Pistol Club Run and Fun (upper bay at BP Range) Course Designer: Roger Watson START POSITION: Hands relaxed at sides. GUN READY CONDITION: Loaded gun in holster. STAGE PROCEDURE: Upon start signal, engage targets as required to score. SCORING: TARGETS: SCORED HITS: START-STOP: RULES: Comstock, 30 rounds, 150 points 13 IPSC, 4 PP Best 2 per paper, KD steel = 1 A Audible - Last shot USPSA current edition 8 yards Fault line Shooting box
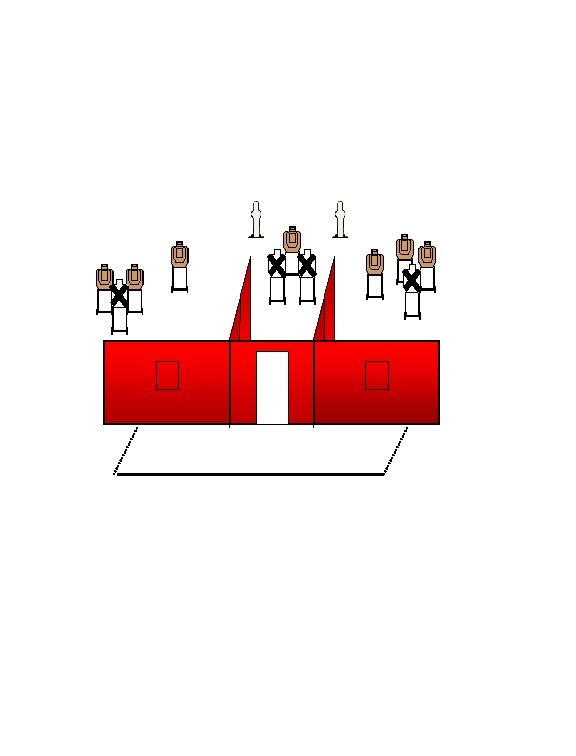
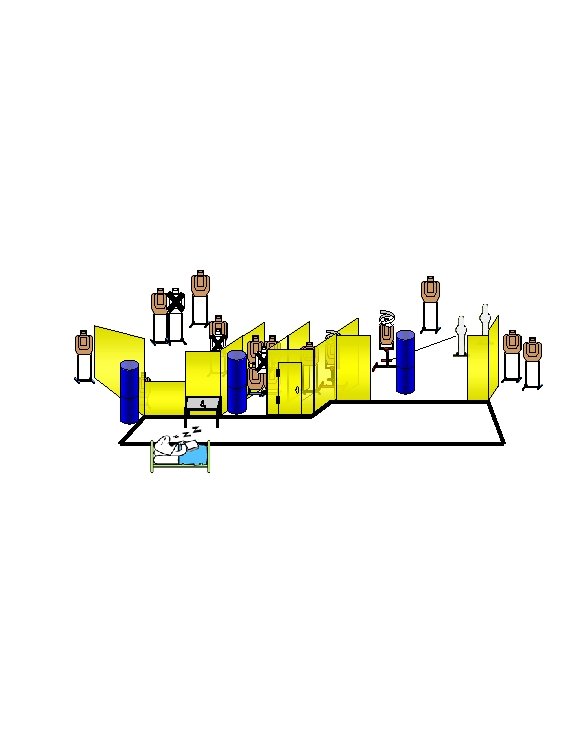
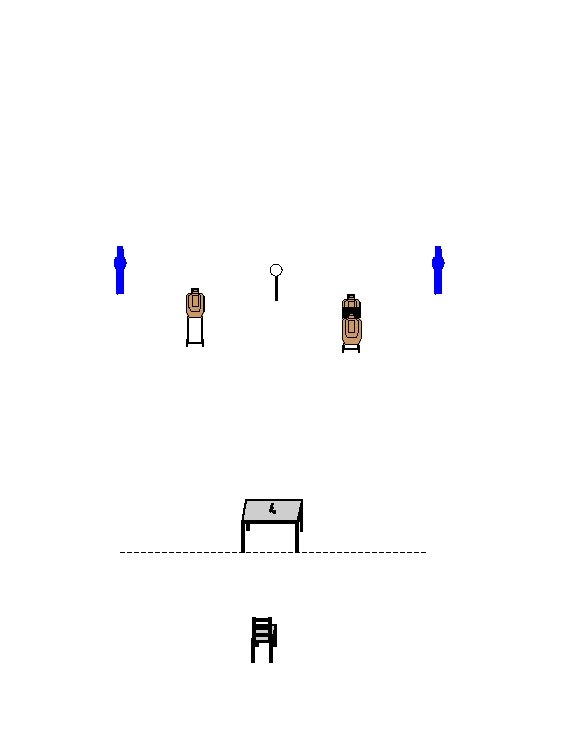
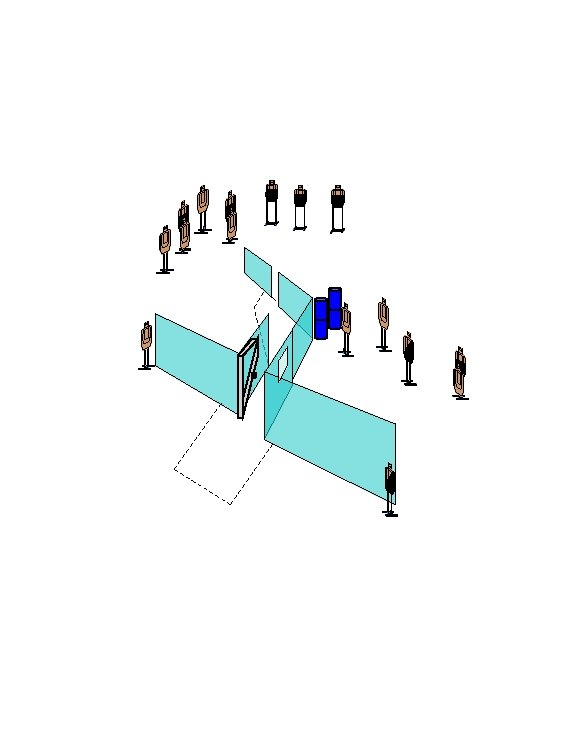
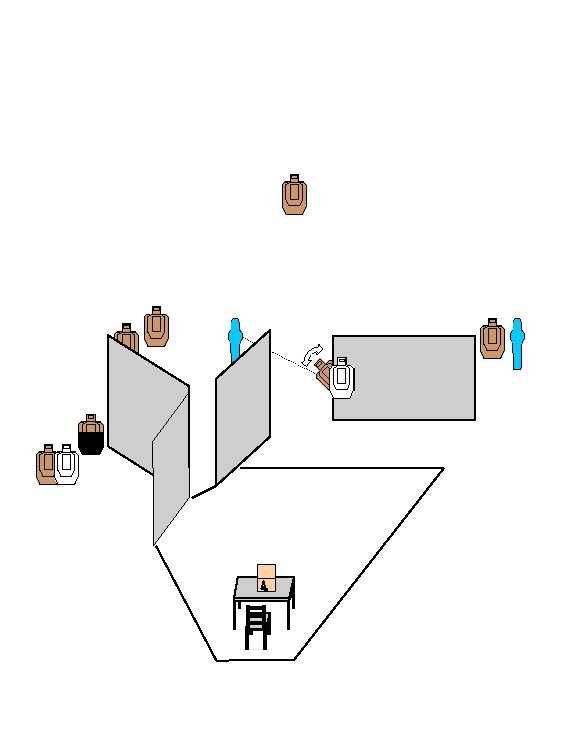
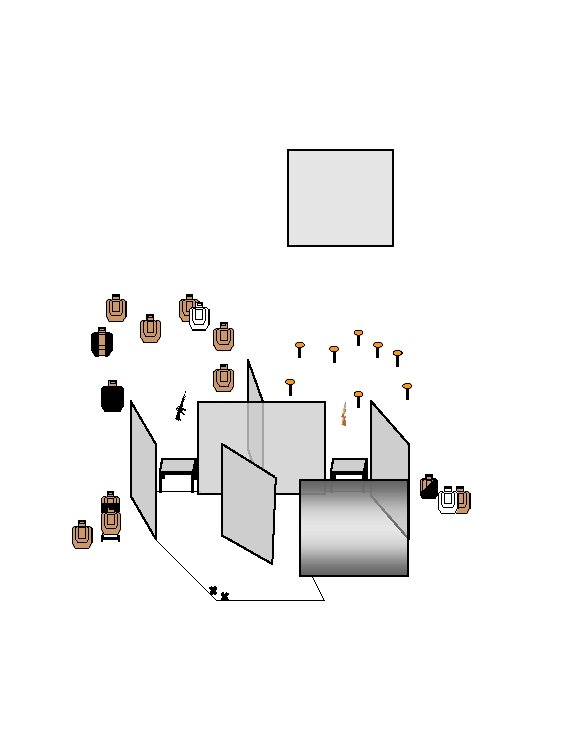
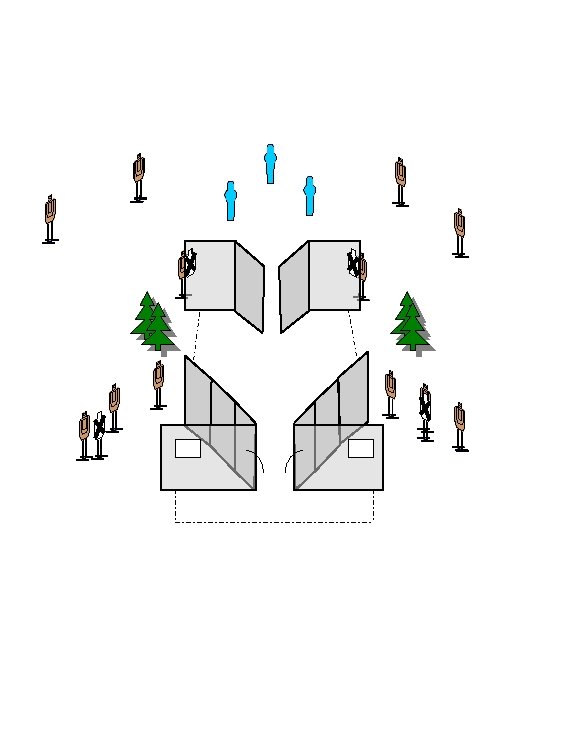
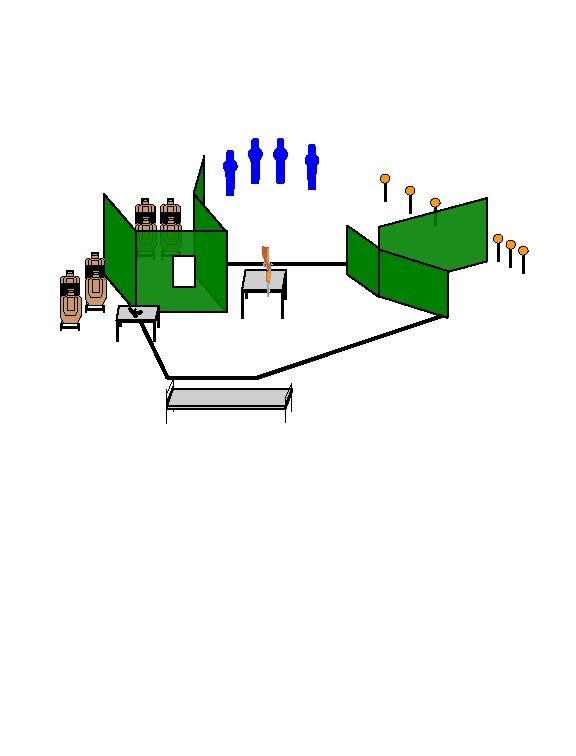
Lewiston Pistol Club November 7, 2010 Shoot up the saloon! Course Designer: The Roger Watson START POSITION: Hands at side, pistol loaded and holstered, standing behind door. GUN READY CONDITION: Loaded gun in holster. STAGE PROCEDURE: Upon start signal, engage targets as required to score. Do not shoot the dance hall girls! SCORING: TARGETS: SCORED HITS: START-STOP: RULES: Comstock, 20 rounds, 100 points 10 IPSC, 0 PP, 0 USP, 0 Plates Best 2 per paper, KD steel = 1 A Audible - Last shot USPSA current edition Saloon mirror Fault line 5’ 5’
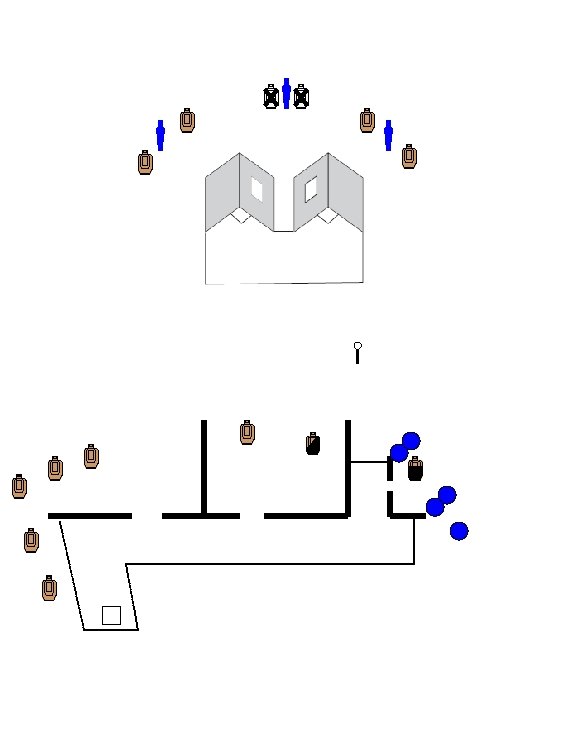
Lewiston Pistol Club, Inc Stage: Door What? Course Designer: Don Woods Date: 12/5/2010 LPC START POSITION: GUN READY CONDITION: Loaded gun in holster, hands relaxed at sides. STAGE PROCEDURE: Upon start signal, engage targets as required to score. SCORING: TARGETS: SCORED HITS: START-STOP: RULES: Comstock, 00 rounds, 000 points 0 IPSC, 0 PP, 0 USP, 0 Plates Best 2 per paper, KD steel = 1 A Audible - Last shot USPSA current edition
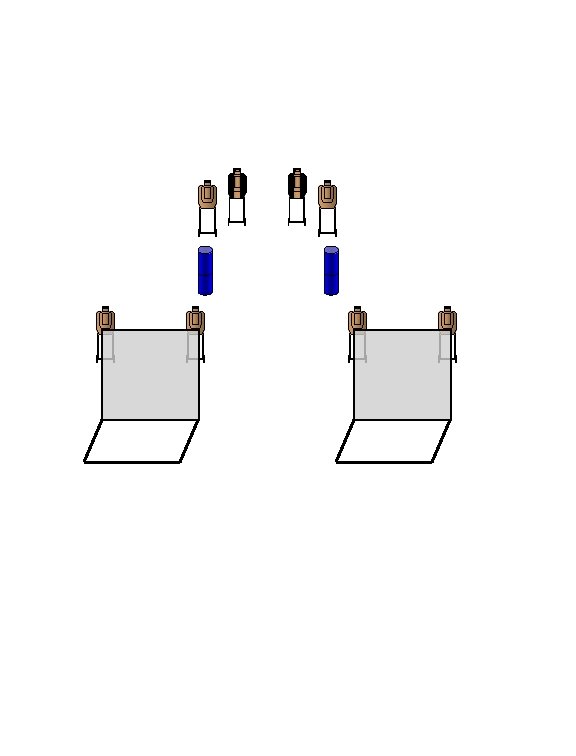
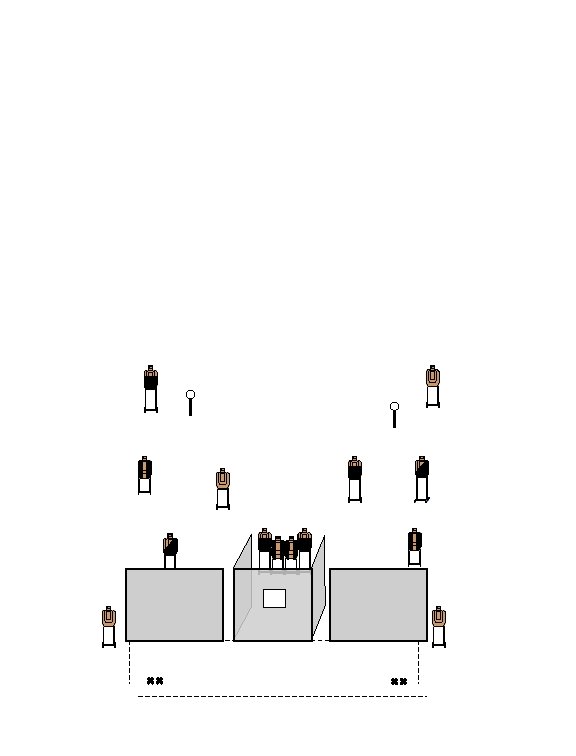
Lewiston Pistol Club, Inc Stage: Double Tap Pairs Course Designer: Don Wood LPC Date: 12/5/2010 START POSITION: Standing in Box A, engage all steel targets. Move to Box B and engage paper targets with 2 rounds each. GUN READY CONDITION: Loaded gun in holster, hands relaxed at sides. STAGE PROCEDURE: Upon start signal, engage targets as required to score. SCORING: TARGETS: SCORED HITS: START-STOP: RULES: Comstock, 12 rounds, 60 points 03 IPSC, 3 PP, 3 Plates Best 2 per paper, KD steel = 1 A Audible - Last shot USPSA current edition 3’ 15’ 30’ B A
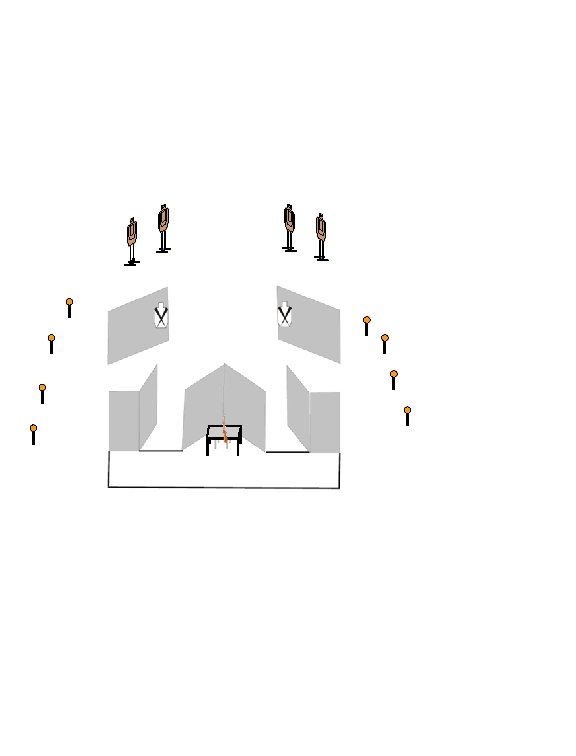
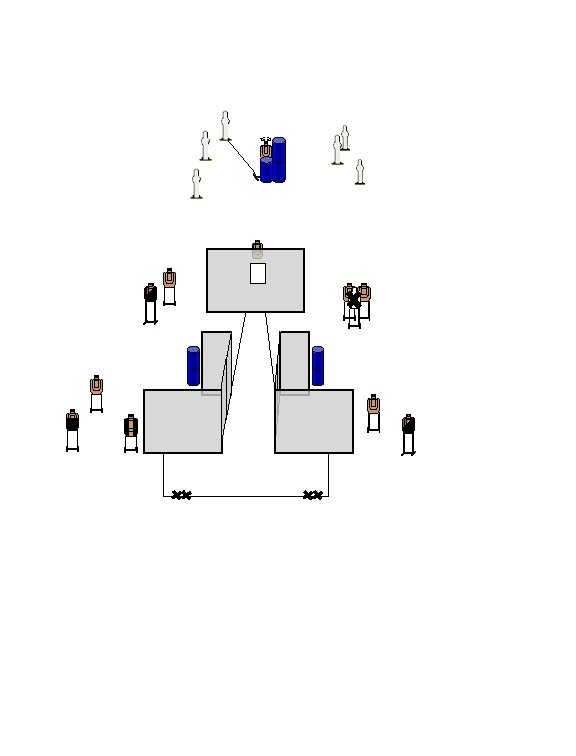
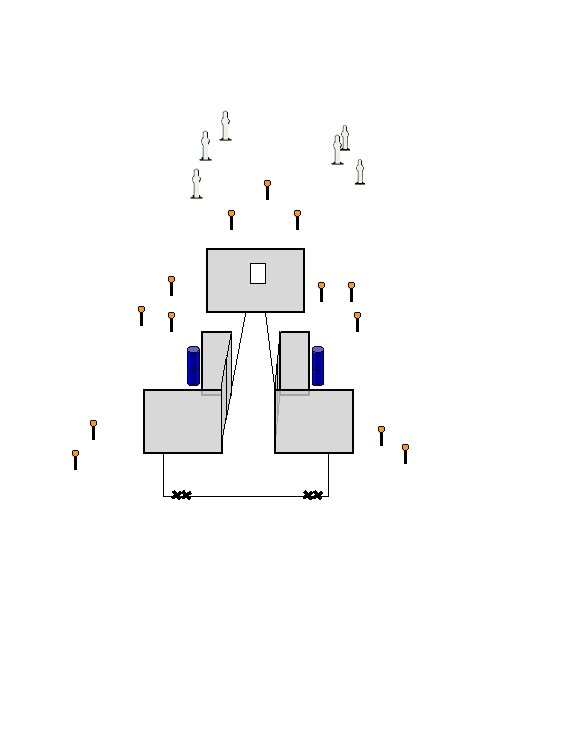
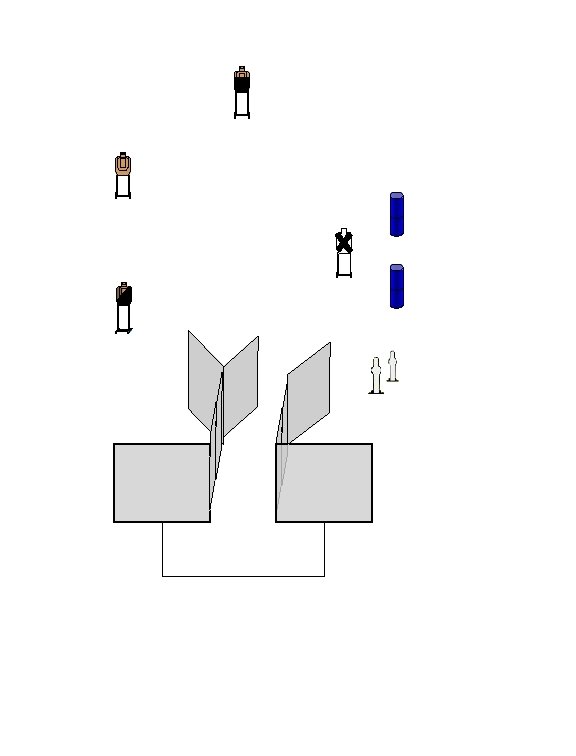
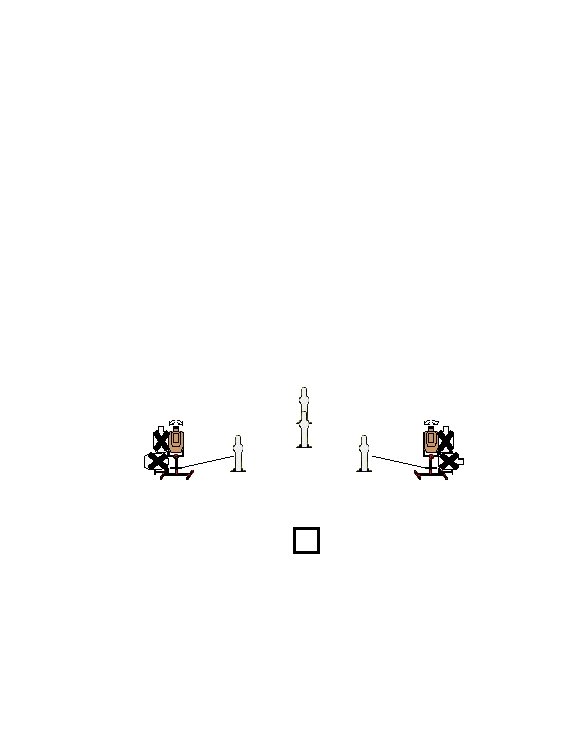
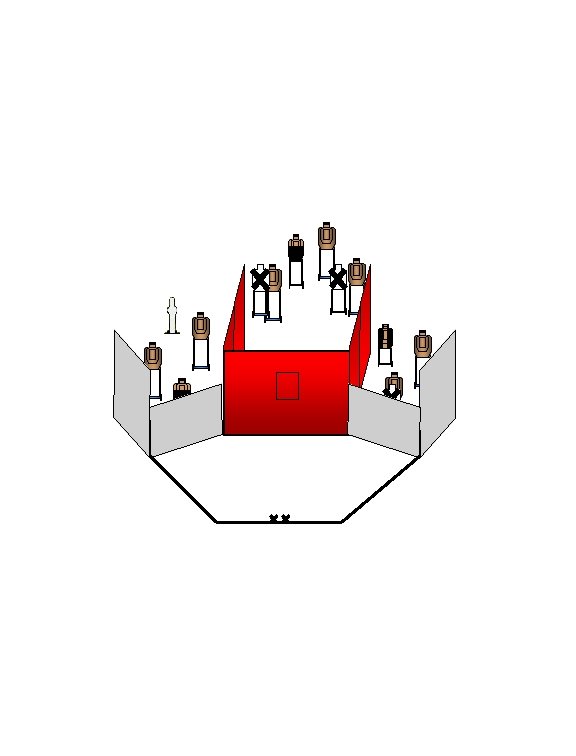
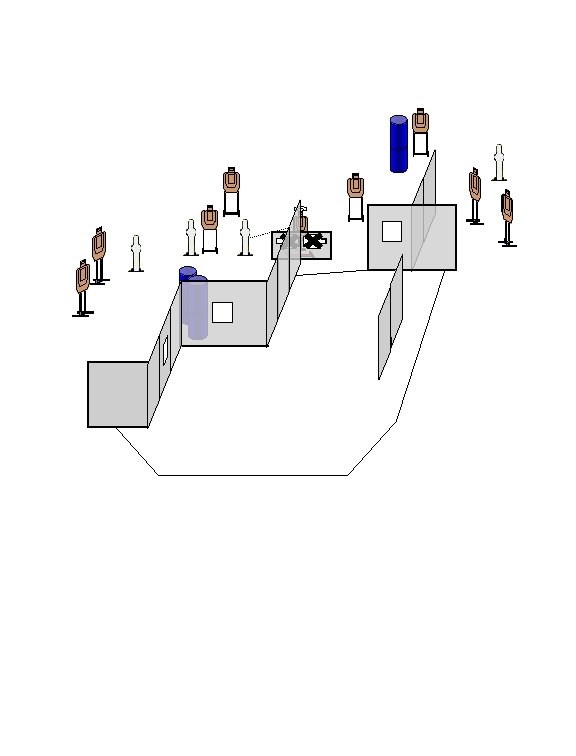
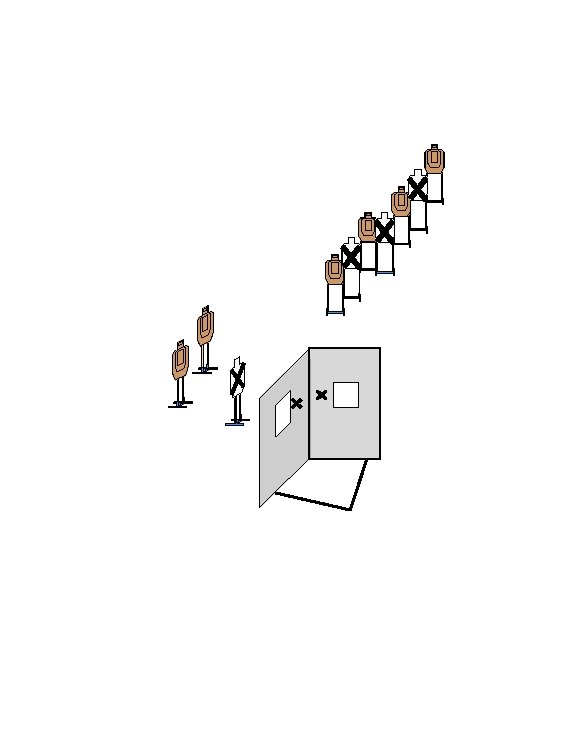
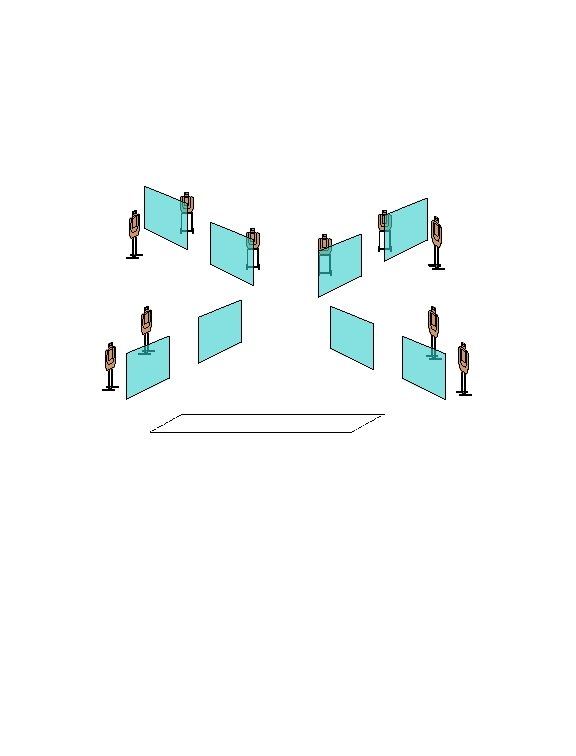
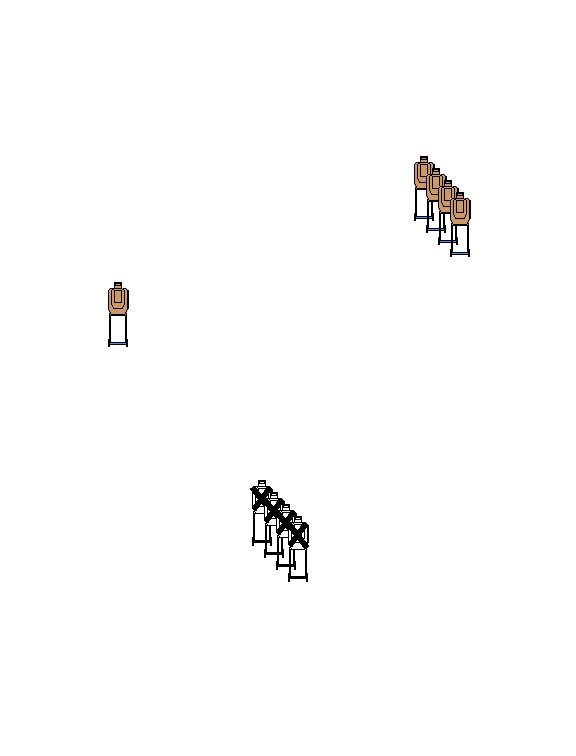
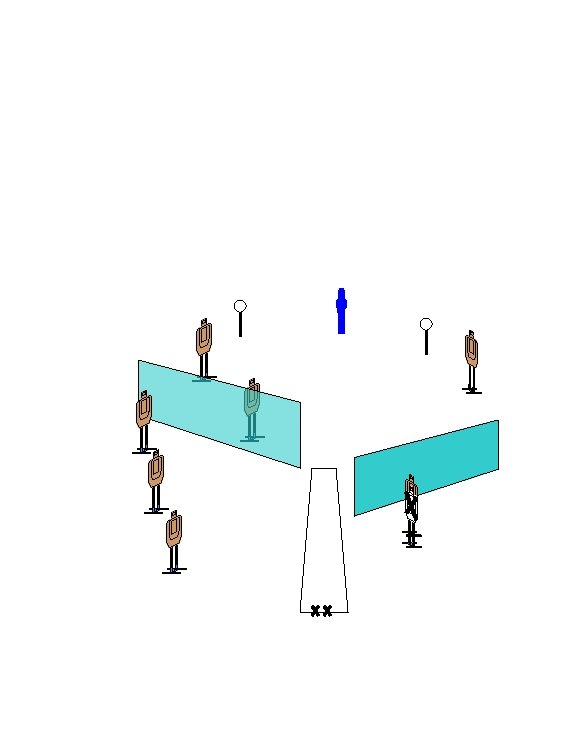
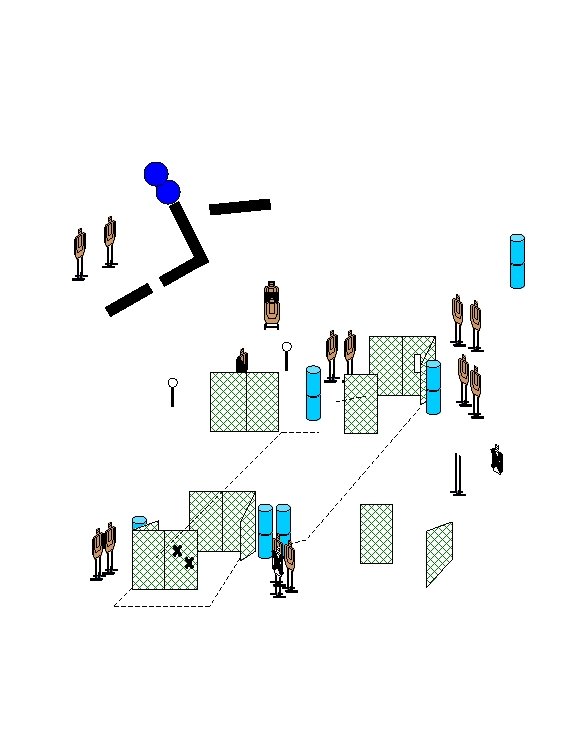
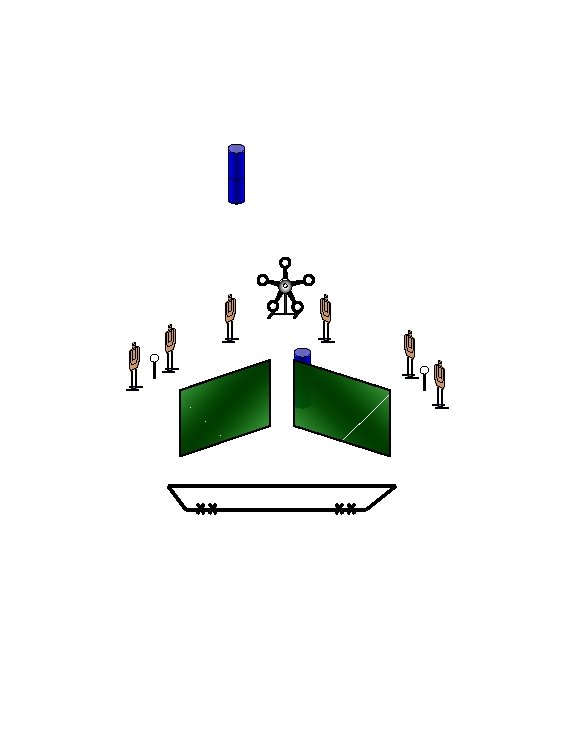
Lewiston Pistol Club, Inc Stage: Voodoo Medicine (adapted) Course Designer: Bill Quintana CRO Date: 12/5/2010 LPC START POSITION: Standing with palms flat against both Xs on wall. GUN READY CONDITION: Loaded gun in holster. STAGE PROCEDURE: Upon start signal, engage targets as visible X SCORING: TARGETS: SCORED HITS: START-STOP: RULES: X Comstock, 18 rounds, 90 points 9 IPSC Best 2 per paper, KD steel = 1 A Audible - Last shot USPSA current edition
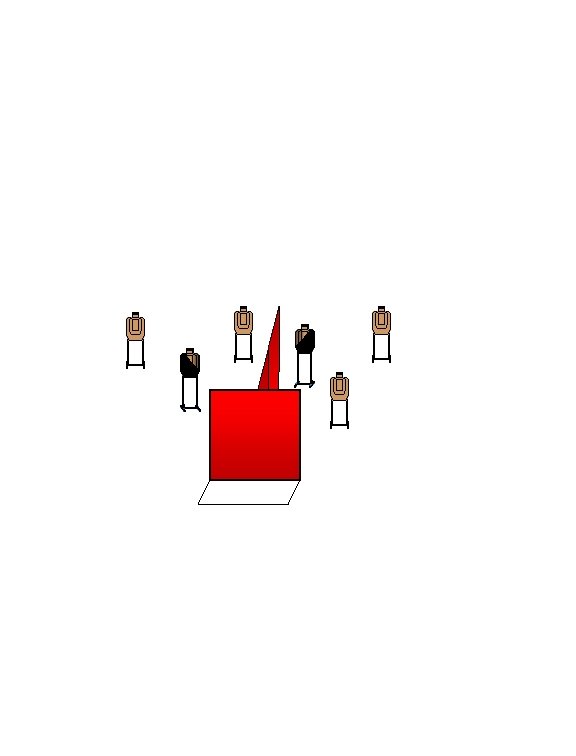
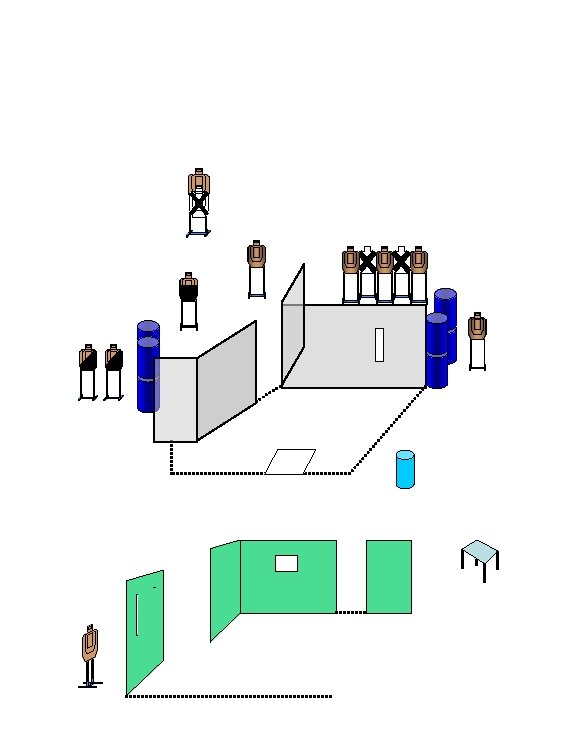
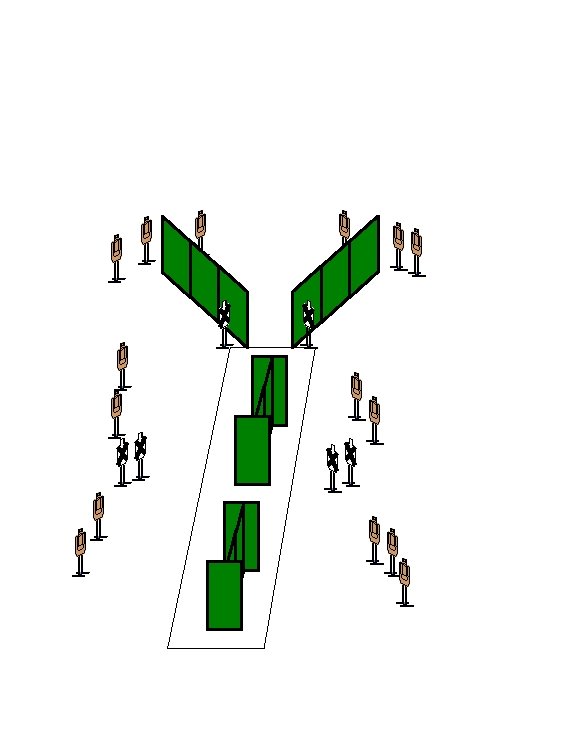
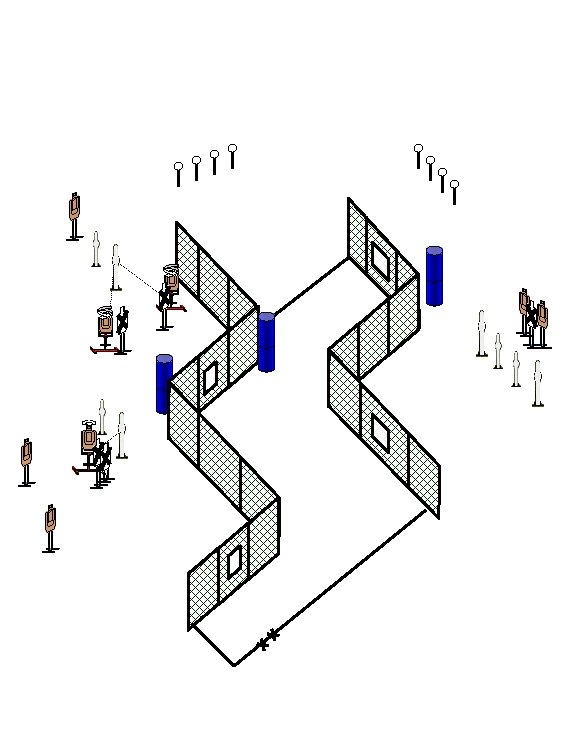
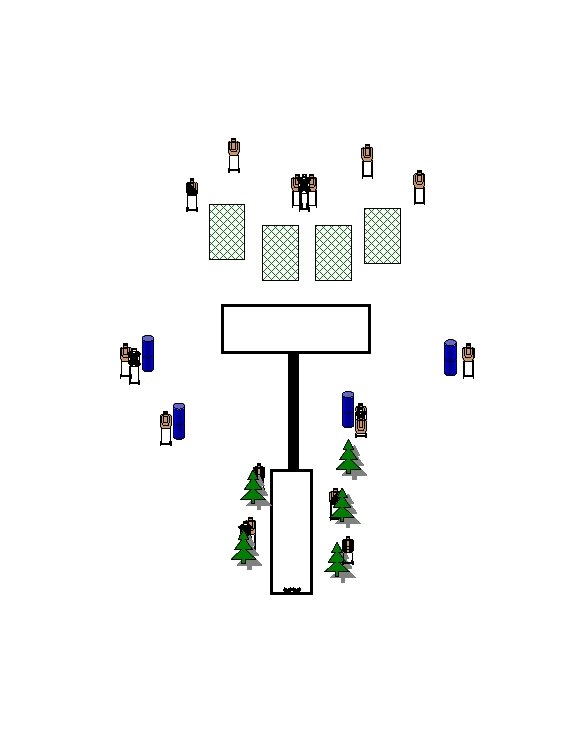
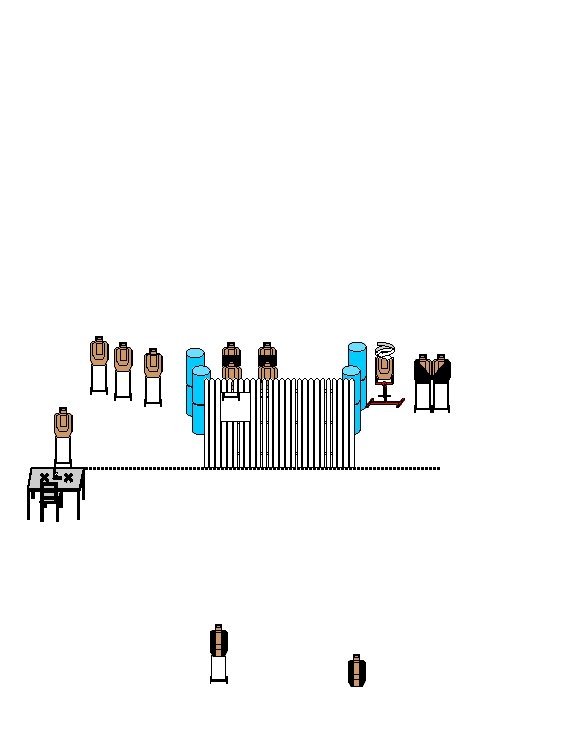
Lewiston Pistol Club, Inc Stage: Drug Smuggling Tunnel Course Designer: Roger Watson Date: 8 -7 -2011 LPC START POSITION: Standing on second step of step ladder, facing up range. GUN READY CONDITION: Loaded gun in holster, hands in surrender position. STAGE PROCEDURE: Upon start signal, engage targets as required to score. 3 seconds added to score assessed if shooter does not use step ladder. SCORING: TARGETS: SCORED HITS: START-STOP: RULES: Snow fencing 6’ Comstock, 14 rounds, 70 points 7 IPSC Best 2 per paper, Audible - Last shot USPSA current edition
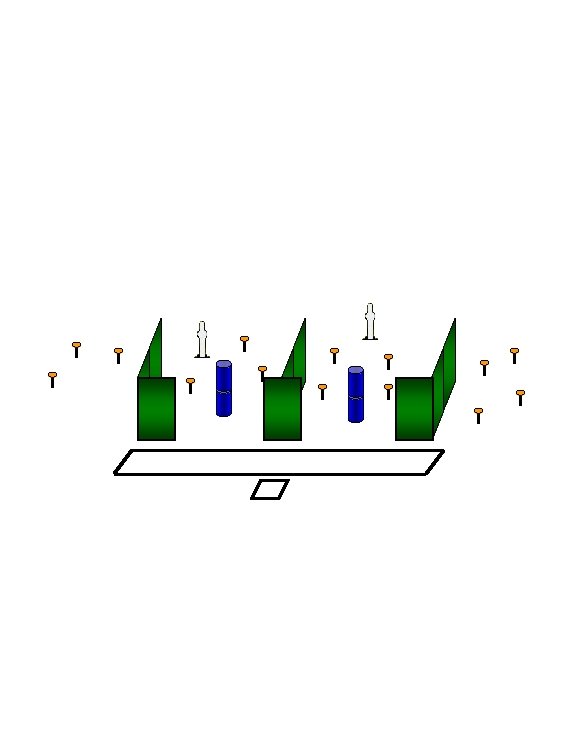
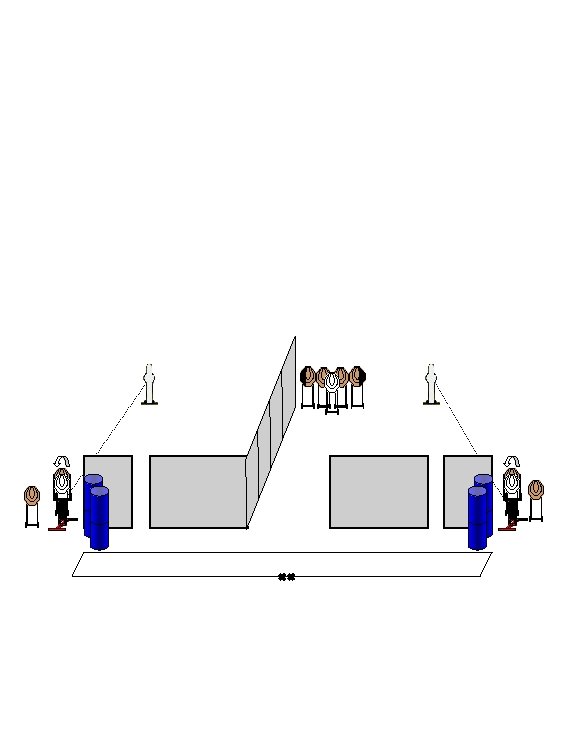
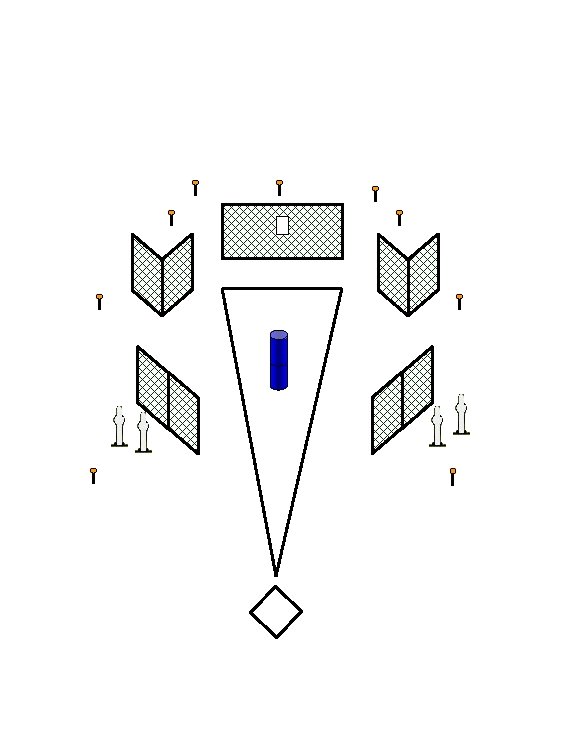
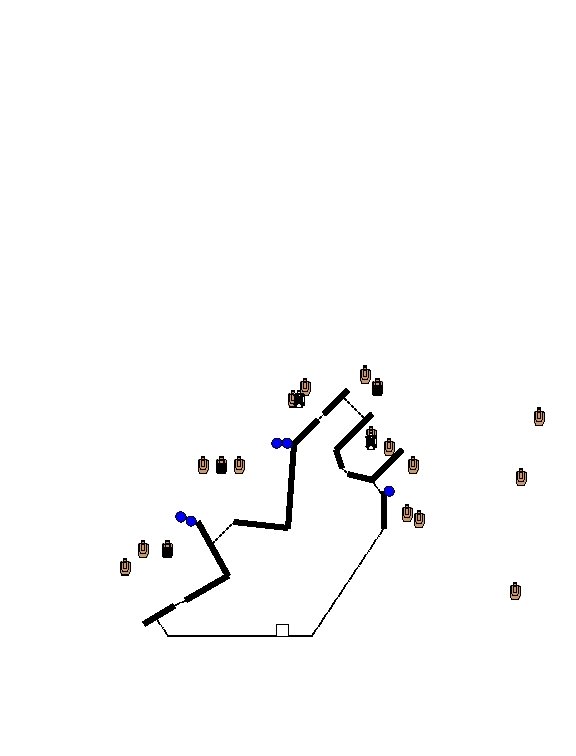
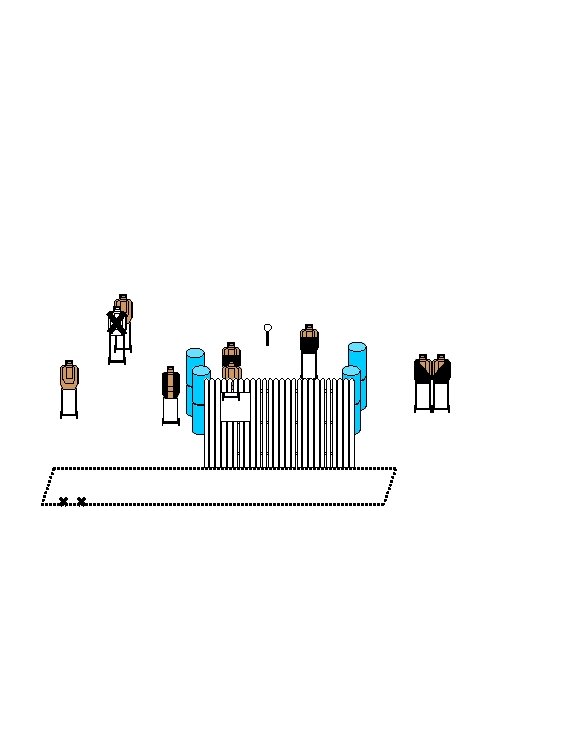
Lewiston Pistol Club, Inc Stage: Shoot Both Sides Course Designer: Roger Watson LPC Date: 8 -7 -2011 START POSITION: Standing in Start box, facing down range GUN READY CONDITION: Loaded gun in holster, hands relaxed at sides. STAGE PROCEDURE: Upon start signal, engage targets as available. Snow fencing is hard cover. SCORING: TARGETS: SCORED HITS: START-STOP: RULES: Comstock, 23 rounds, 115 points 8 IPSC, 7 Steel Best 2 per paper, Steel KD = 1 A Audible - Last shot USPSA current edition 24’ line t l u Fa Fa ul Snow fencing 6’ A tl in e
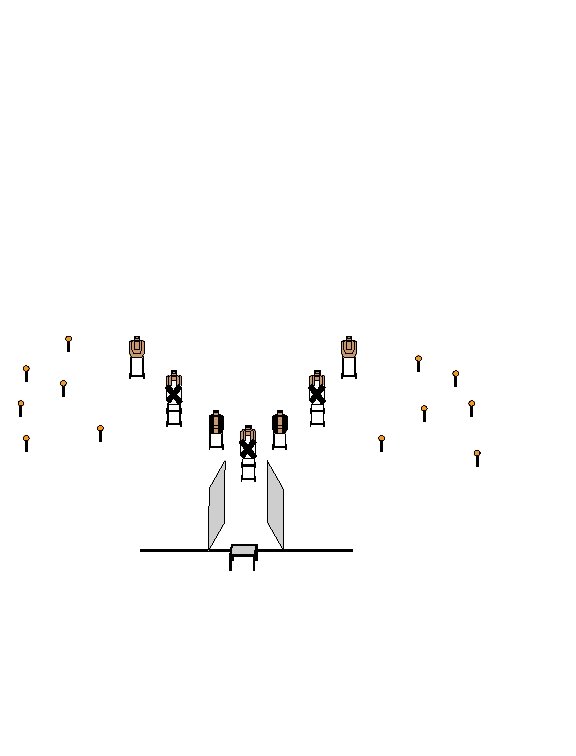
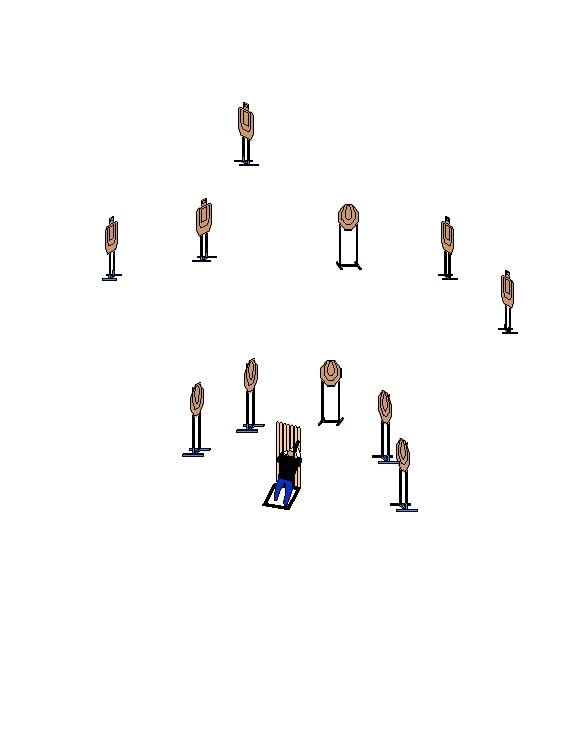
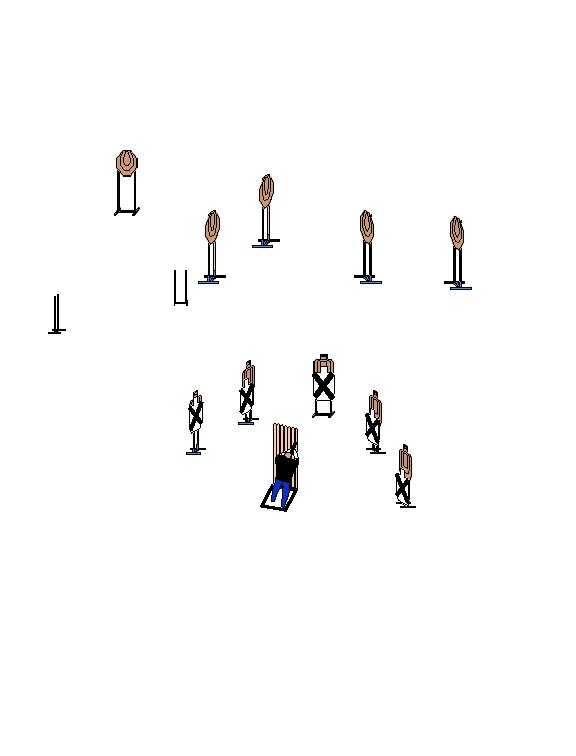
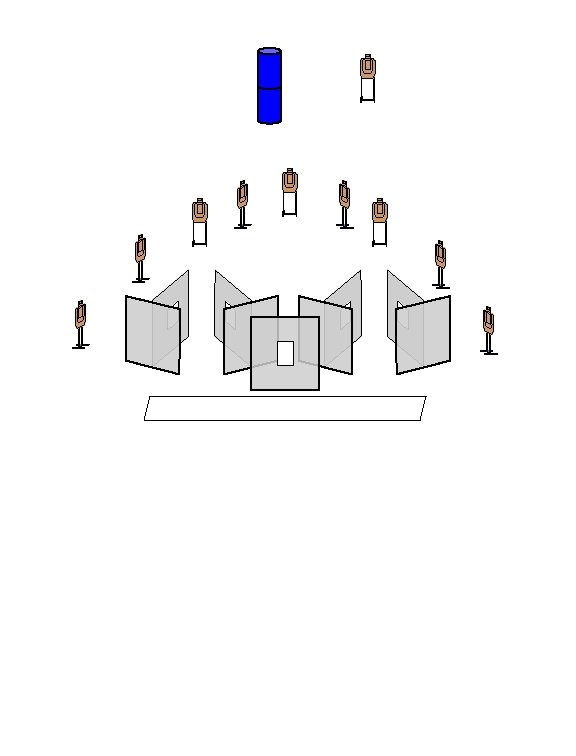
Lewiston Pistol Club, Inc Stage: Shoot from behind the Barricade Course Designer: Roger Watson Date: 8 -7 -2011 LPC START POSITION: Standing in Bianchi Barricade shooting box. GUN READY CONDITION: Loaded gun in holster, hands relaxed at sides. SCORING: TARGETS: SCORED HITS: START-STOP: RULES: Wooden partitions STAGE PROCEDURE: Upon start signal, engage targets as required to score. Shooter must stay in shooting box. B I A N C H I Comstock, 16 rounds, 80 points 6 IPSC, 4 PP Best 2 per paper, KD steel = 1 A Audible - Last shot USPSA current edition
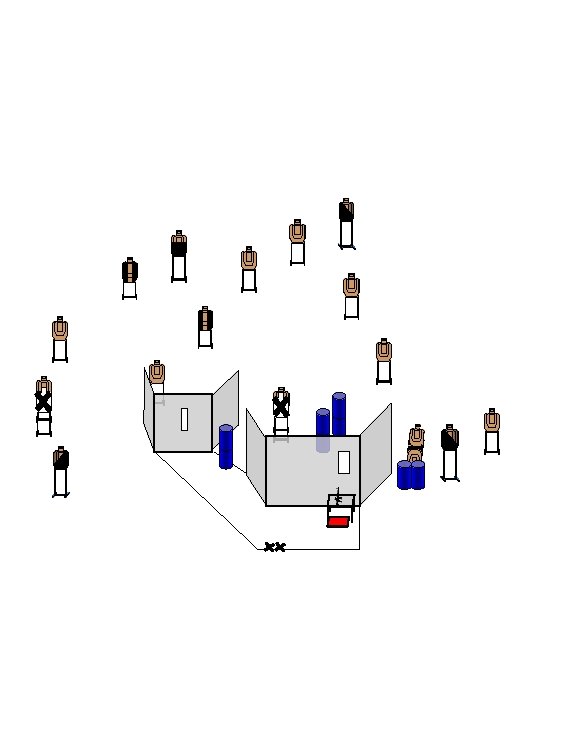
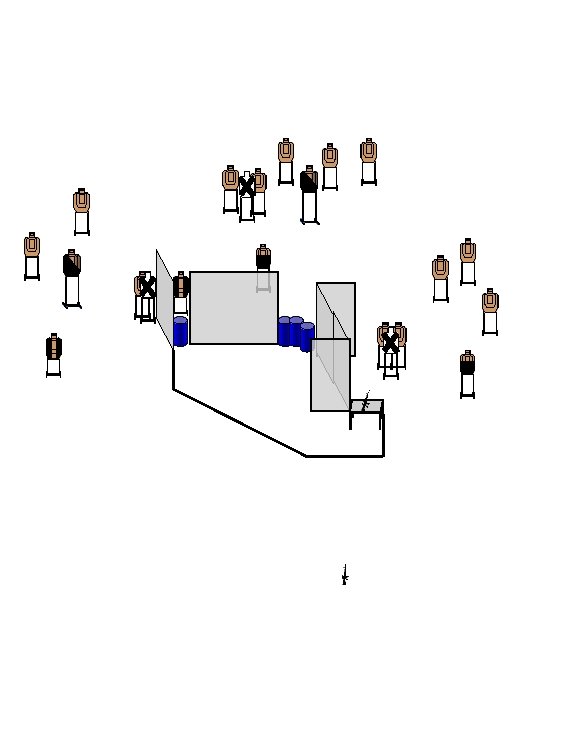
Lewiston Pistol Club, Inc Stage: No Shoot, Sherlock! Course Designer: J Grimes Date: 12/4/2011 LPC START POSITION: Standing in box A, facing up range GUN READY CONDITION: Loaded gun in holster, hands relaxed at sides. STAGE PROCEDURE: Upon start signal, turn and engage targets as required to score. Targets T 1 – T 3 and P 1 & P 2 must be engaged from between the Bianchi barriers. A SCORING: TARGETS: SCORED HITS: START-STOP: RULES: Comstock, 19 rounds, 125 points 5 IPSC, 2 PP, 7 Plates Best 2 per paper, KD steel = 1 A Audible - Last shot USPSA current edition
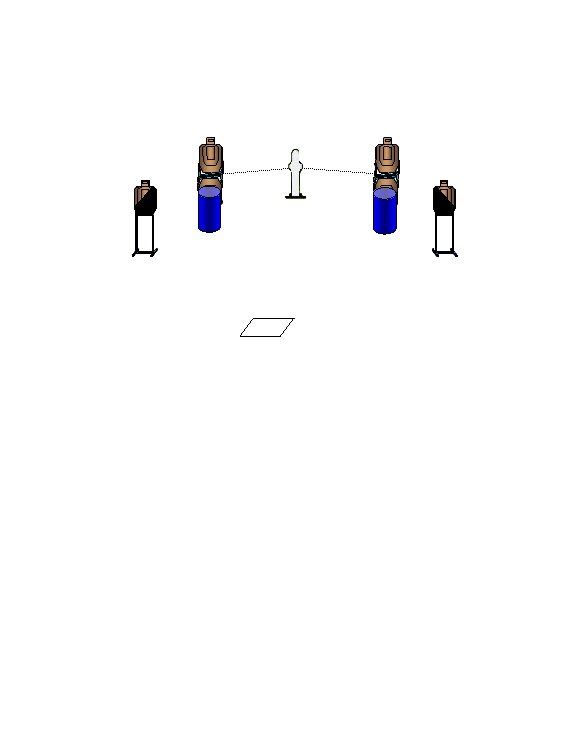
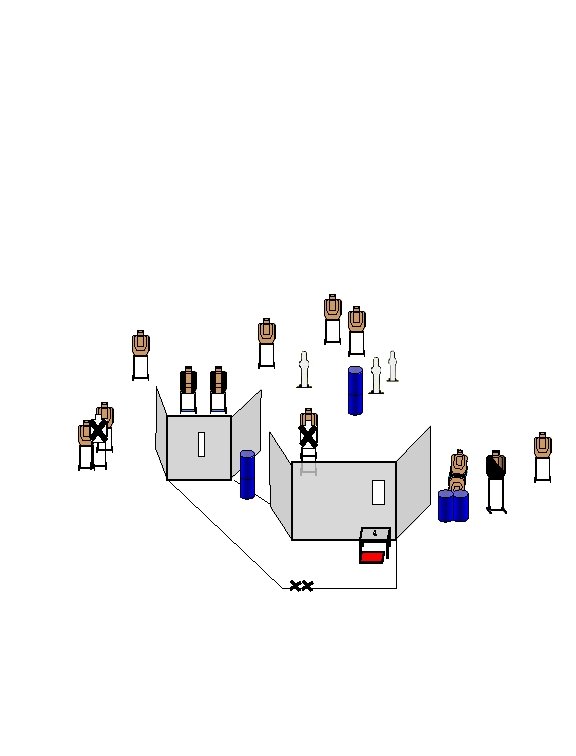
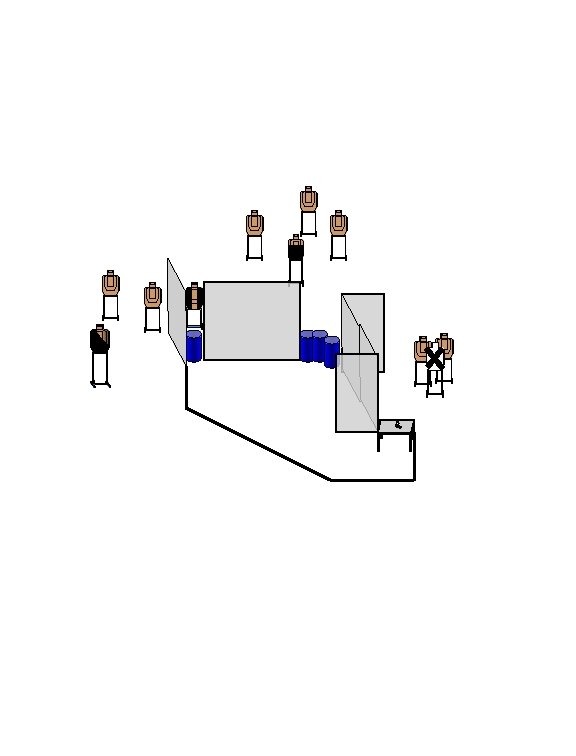
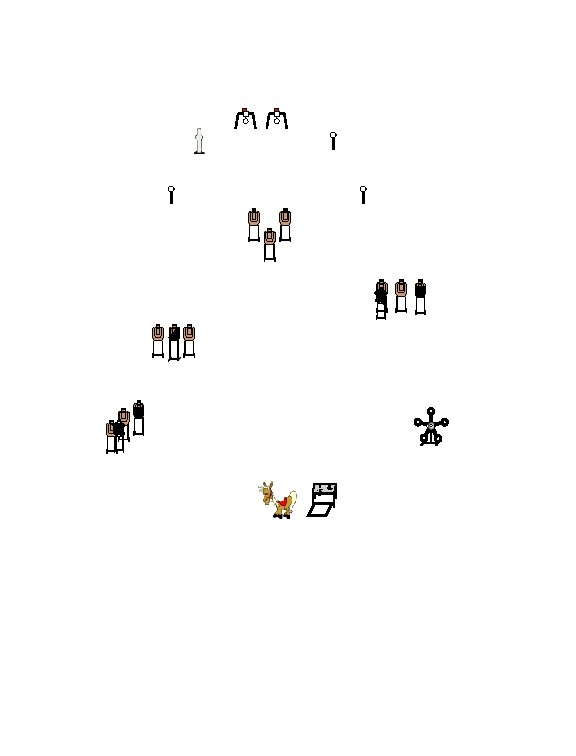
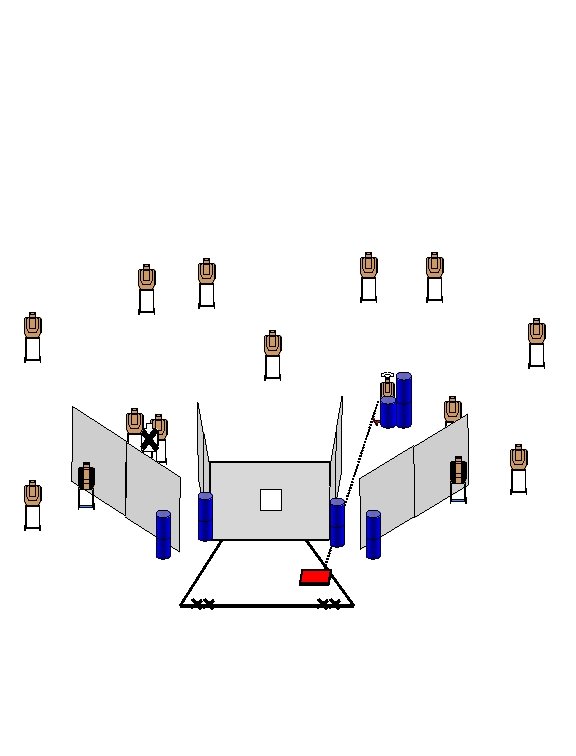
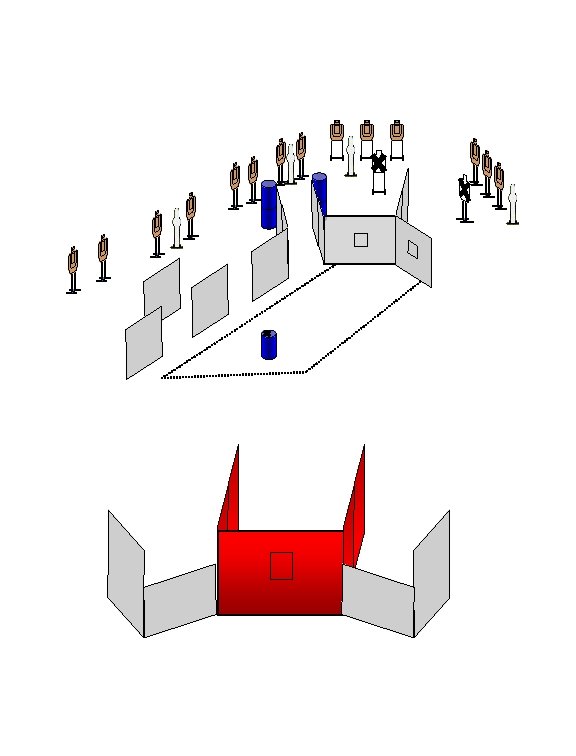
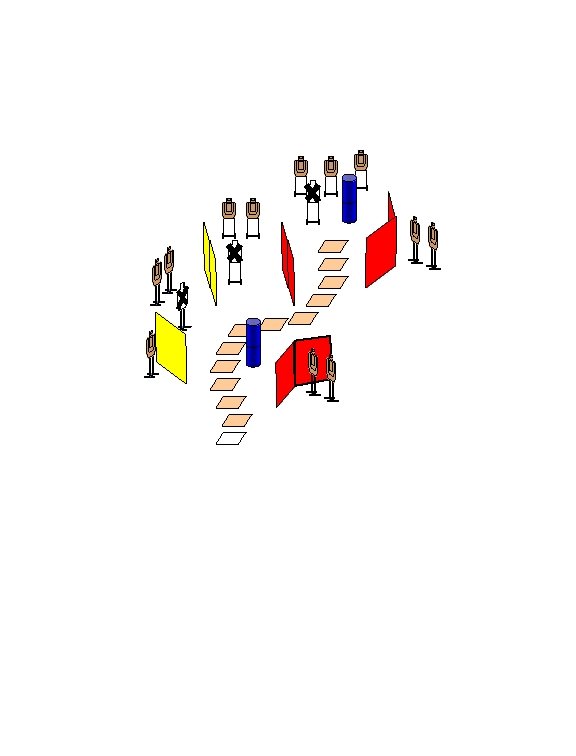
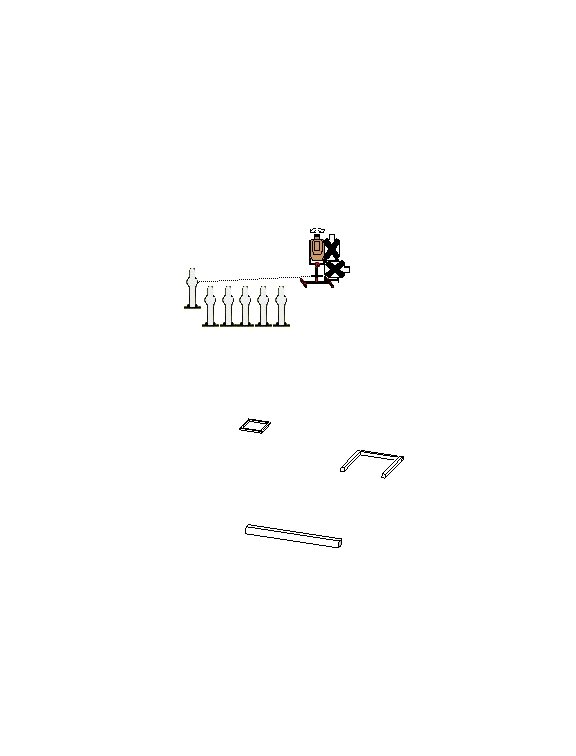
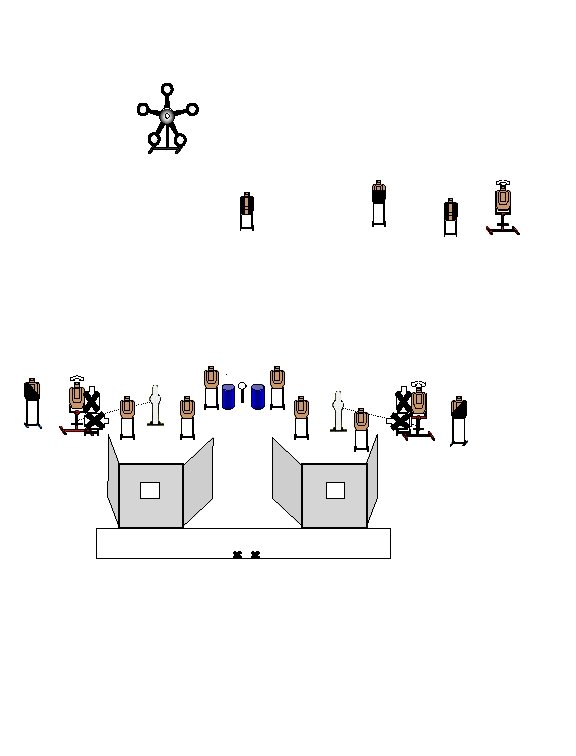
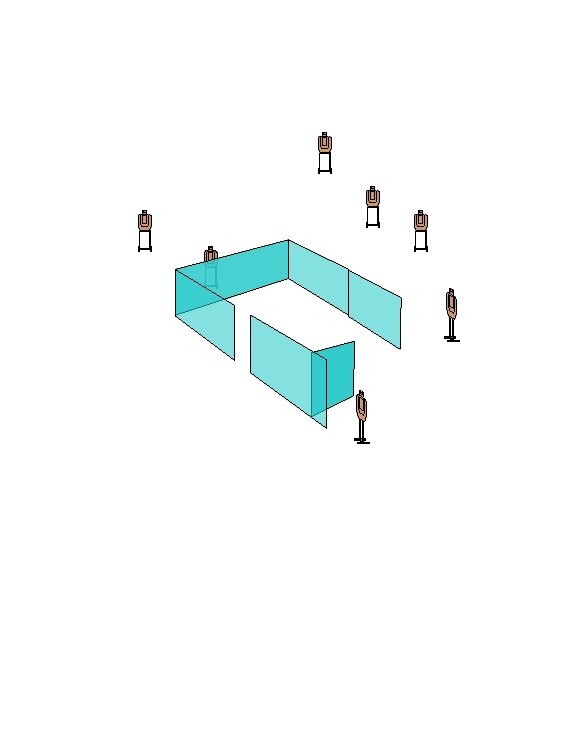
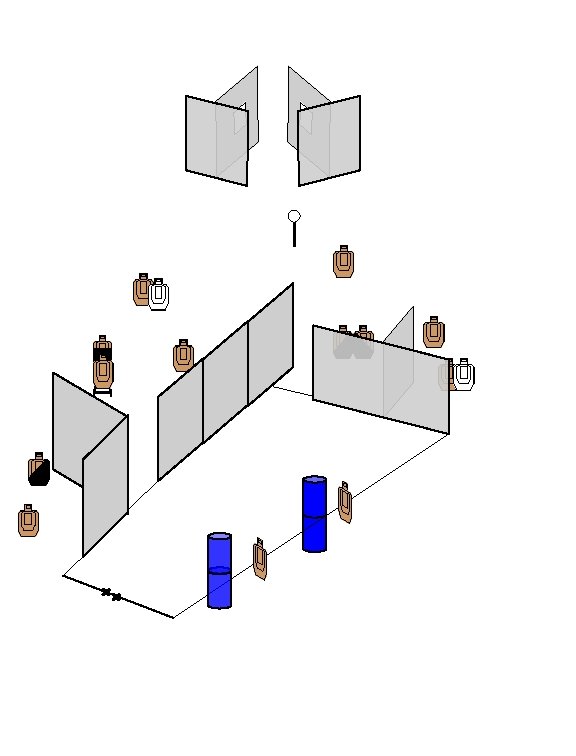
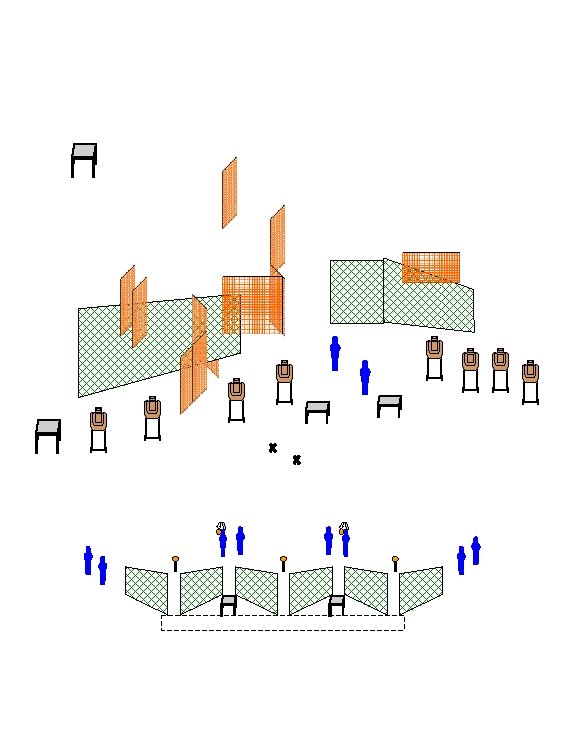
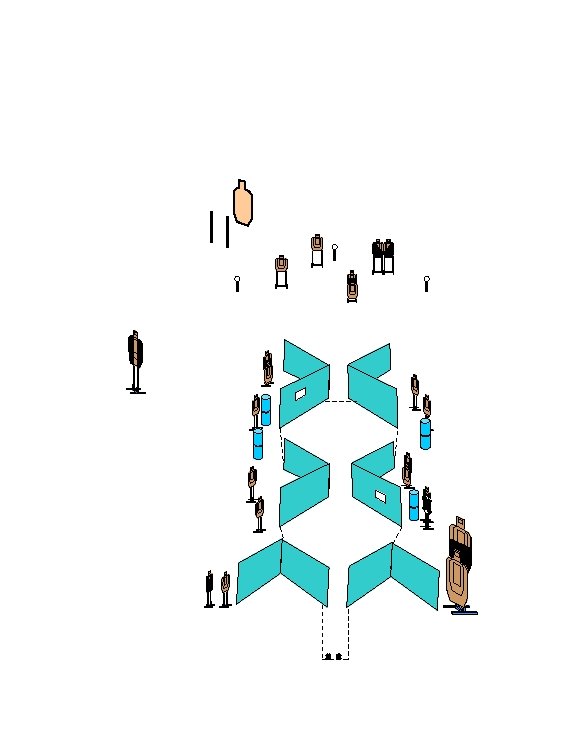
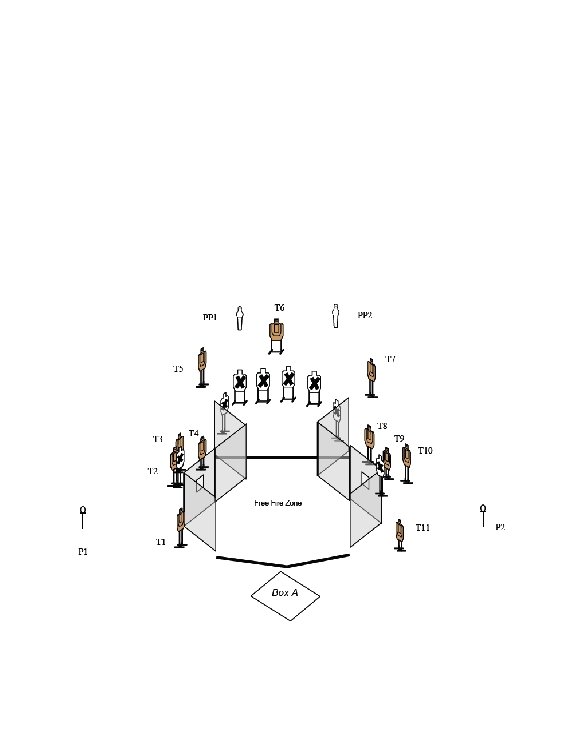
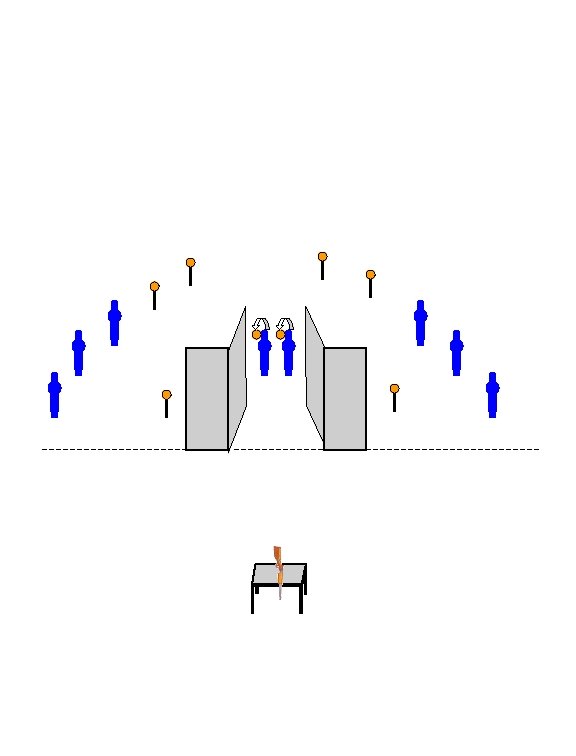
Lewiston Pistol Club, Inc Stage: Judge Roy Bean (J Kimball, adapted) Course Designer: J Grimes LPC Date: 12/4/2011 START POSITION: Seated at the bench with gavel in strong hand. Loaded pistol lying on mat in front center of bench. Pistol may not be propped up in any way. GUN READY CONDITION: Seated at the bench with gavel in SCORING: strong hand. Loaded pistol lying on mat in front center of bench. TARGETS: Pistol may not be propped up in any way. SCORED HITS: START-STOP: STAGE PROCEDURE: On the command “Are you ready? ” the judge begins banging the gavel on block and continues to RULES: the beep. Targets T 1, T 2, PP 1, USP 1 must be engaged from between the two NS in front of the bench only. Targets T 3, T 4, T 5, T 6, USP 2, USP 3 may be engaged any where. Targets T 7, T 8, P 1 P 2 must be engaged from the “doorway” only. B I A N C H I Comstock, 25 rounds, 125 points 8 IPSC, 2 PP, 7 Plates Best 2 per paper, KD steel = 1 A Audible - Last shot USPSA current edition
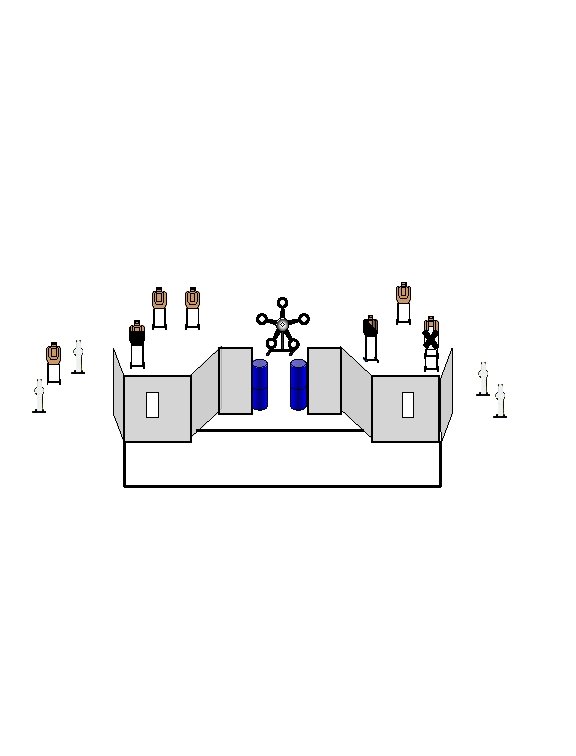
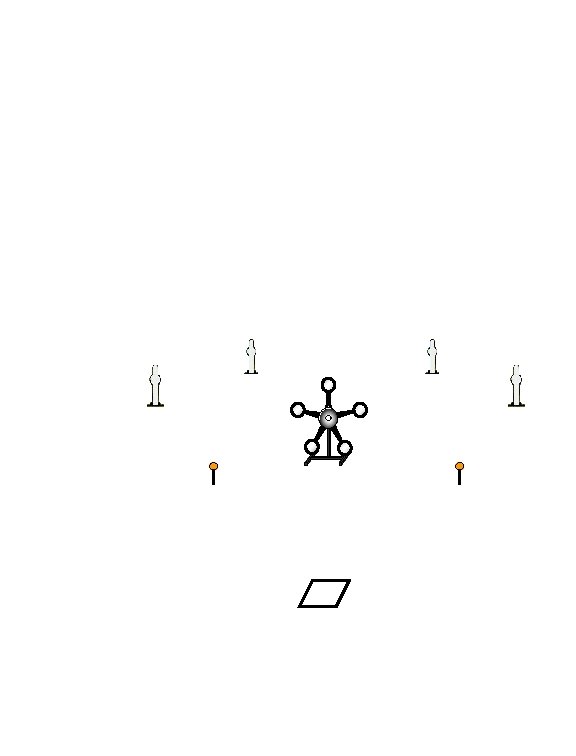
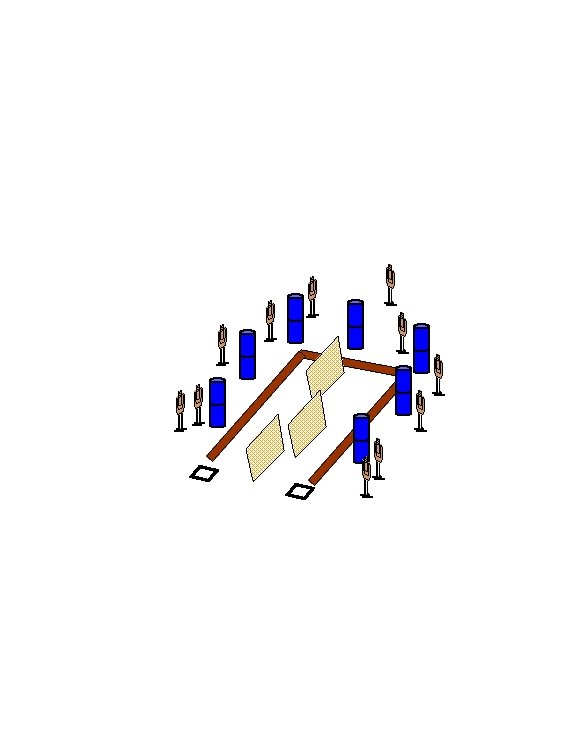
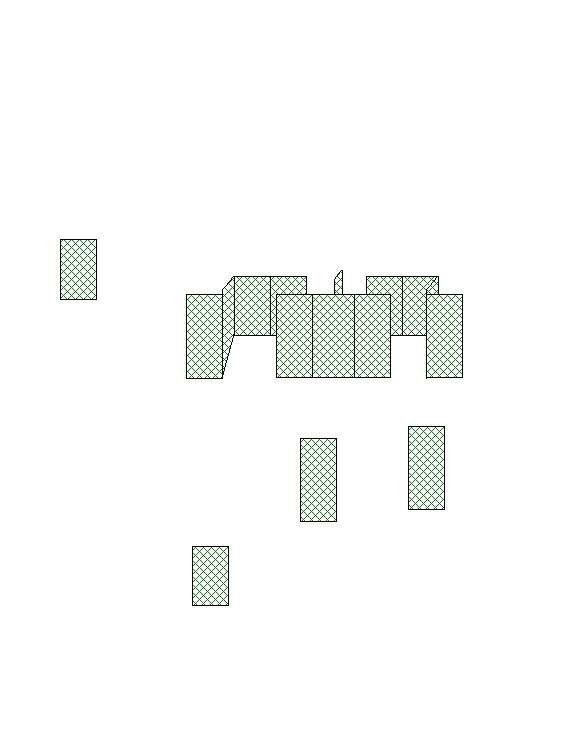
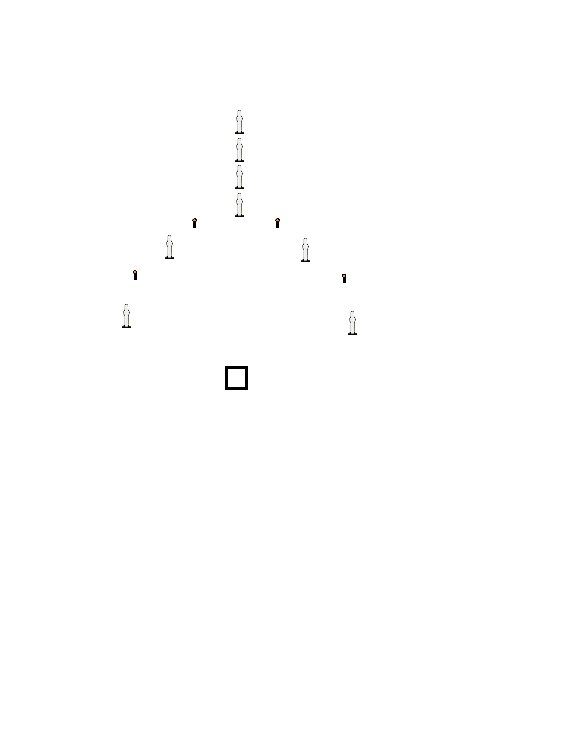
Lewiston Pistol Club, Inc Stage: Barrels of Fun Course Designer: Roger Watson Date: 1/8/2012 LPC START POSITION: GUN READY CONDITION: Loaded gun in holster, hands relaxed at sides. SCORING: TARGETS: SCORED HITS: START-STOP: RULES: STAGE PROCEDURE: Upon start signal, engage targets as required to score. A Comstock, 14 rounds, 70 points 7 IPSC, 0 PP, 0 USP, 0 Plates Best 2 per paper, KD steel = 1 A Audible - Last shot USPSA current edition
Lewiston Pistol Club, Inc Stage: Hollywood & Vine Course Designer: Roger Watson Date: 1/8/2012 LPC START POSITION: GUN READY CONDITION: Loaded gun in holster, hands relaxed at sides. Vine STAGE PROCEDURE: Upon start signal, engage targets as required to score. SCORING: TARGETS: SCORED HITS: START-STOP: RULES: Hollywood Blvd Truck Pink tape = curbs A Comstock, 12 rounds, 60 points 6 IPSC, 0 PP, 0 USP, 0 Plates Best 2 per paper, KD steel = 1 A Audible - Last shot USPSA current edition
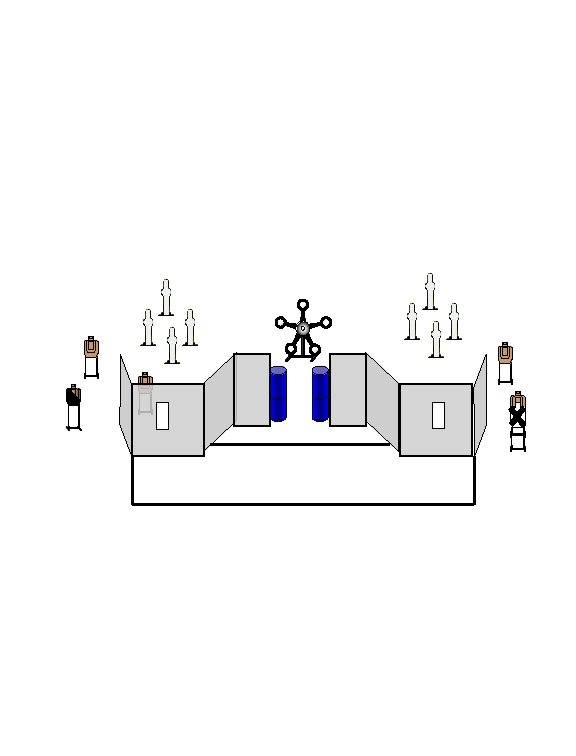
Lewiston Pistol Club, Inc Stage: Double Barricade Course Designer: Roger Watson LPC Date: 1/8/2012 START POSITION: 24’ STAGE PROCEDURE: Upon start signal, engage targets as required to score. SCORING: TARGETS: SCORED HITS: START-STOP: RULES: Fault line B I A N C H I Comstock, 22 rounds, 70 points 5 IPSC, 3 PP, 2 USP, 7 Plates Best 2 per paper, KD steel = 1 A Audible - Last shot USPSA current edition 24’ GUN READY CONDITION: Loaded gun in holster, hands relaxed at sides. B I A N C H I
Lewiston Pistol Club, Inc Stage: No Shoot! Quit moving! Course Designer: J Grimes LPC Date: 2/26/2012 – Upper Bay START POSITION: Shooter’s choice on start position & timekeeping. GUN READY CONDITION: Loaded gun in holster, hands relaxed at sides. STAGE PROCEDURE: Upon start signal, engage targets. SCORING: TARGETS: SCORED HITS: START-STOP: Comstock, 38 rounds, 190 points 16 IPSC, 2 PP, 2 USP, 2 Plate Best 2 per paper, KD steel = 1 A Audible - Last shot Nickelodeon Beginning in Box A Drop Out Shoot 24’ Fault line
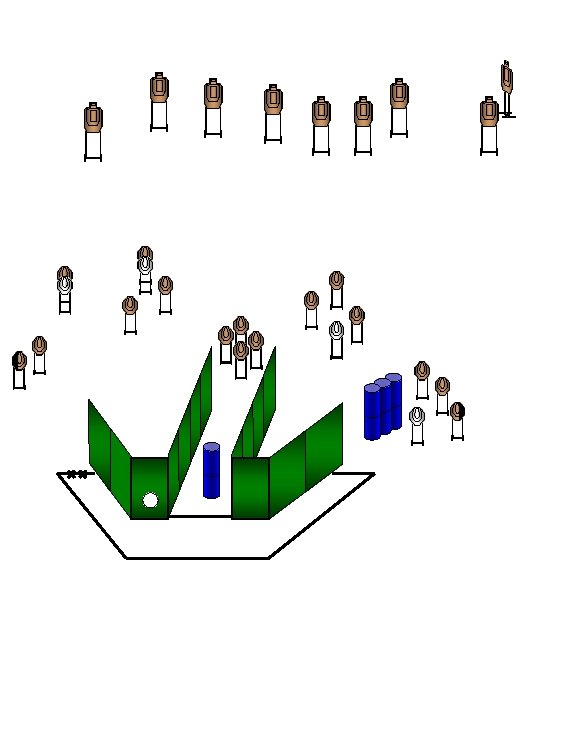
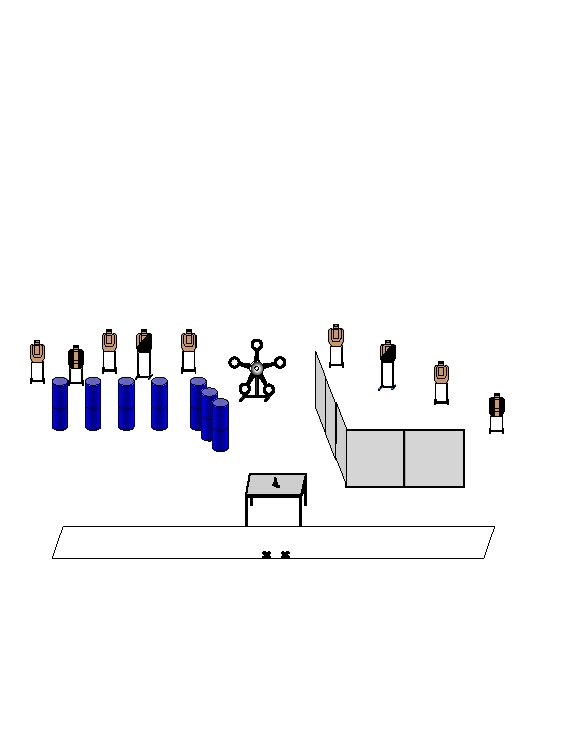
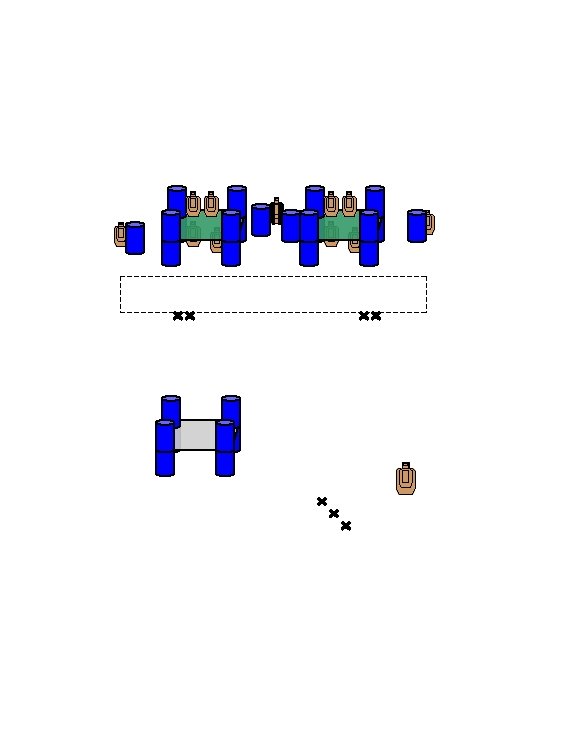
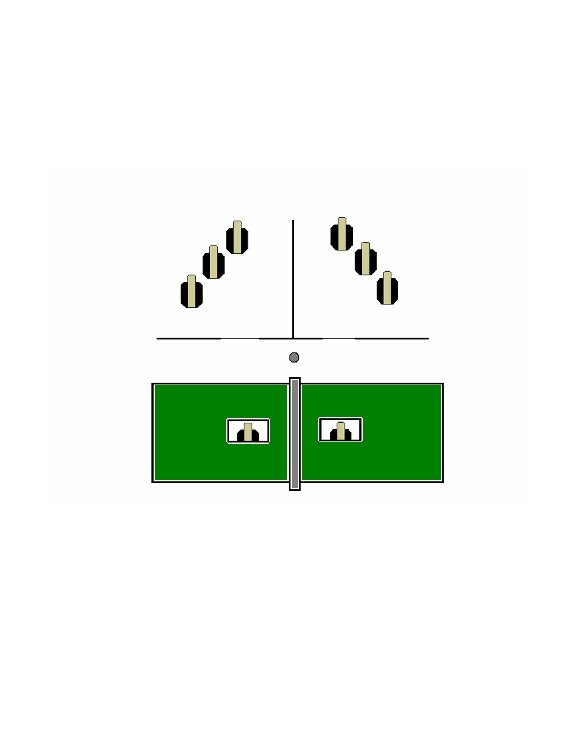
Lewiston Pistol Club, Inc Stage: Deep in the heart of Texas! Course Designer: J Grimes LPC Date: 2/26/2012 - Middle Bay START POSITION: Shooter’s choice on start position & timekeeping. GUN READY CONDITION: Loaded gun in holster, hands relaxed at sides. STAGE PROCEDURE: Upon start signal, engage targets. SCORING: TARGETS: SCORED HITS: START-STOP: Comstock, 36 rounds, 180 points 10 Bowling Pins, 31 Plates Best 2 per paper, KD steel = 1 A Audible - Last shot 24’ Fault line
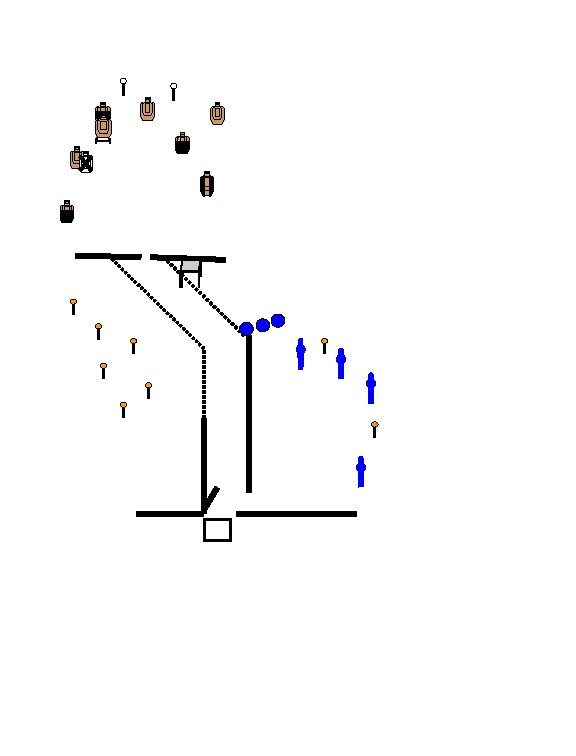
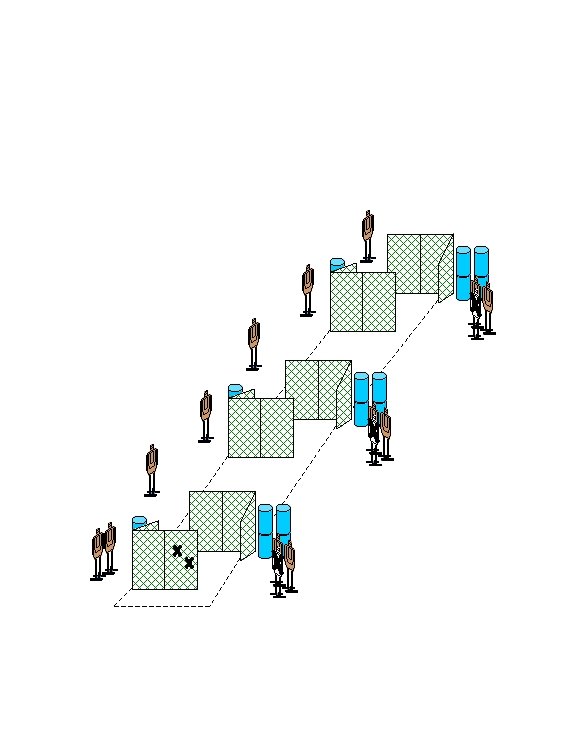
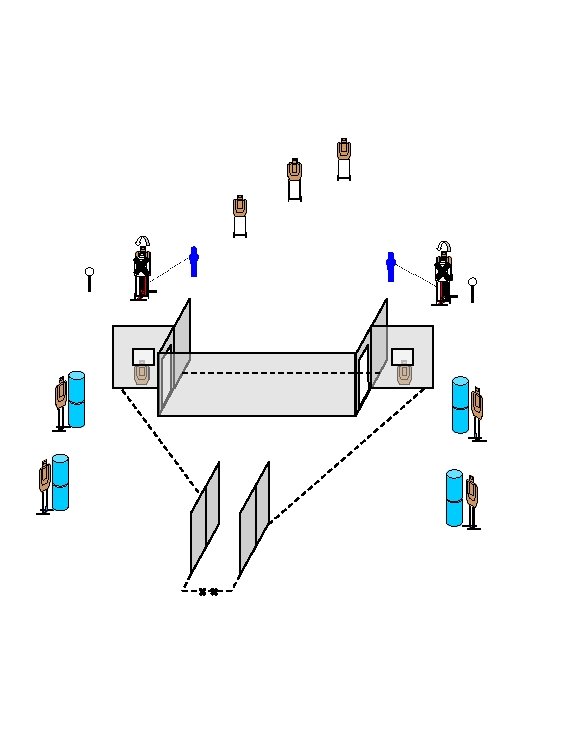
Lewiston Pistol Club, Inc Stage: Tueller Drill / Action Corridor Course Designer: J Grimes LPC Date: 2/26/2012 – Lower Bay START POSITION: Shooter’s choice on start position & timekeeping. GUN READY CONDITION: Loaded gun in holster, hands relaxed at sides. STAGE PROCEDURE: Upon start signal, engage targets. Corridor: Shooter may start at either end of corridor. Runner: Begin each shooter with new target (T 1) if desired. Runner PM shooters must stay in Box A. Use IDPA targets. Corridor: Runner: TARGETS: SCORED HITS: START-STOP: T 1 Fault Line Runner AM Corridor T 1 Hi & low ports A Runner PM Comstock, 30 rounds, 150 points Comstock, Score all hits Corridor 15 IPSC/Runner - IDPA Best 2 per paper, KD steel = 1 A Audible - Last shot
Lewiston Pistol Club, Inc Stage: Rock, Paper, Steel Course Designer: J Grimes LPC Date: 3/4/2012 - Action Bay 2 START POSITION: Shooter’s choice on start position & timekeeping. GUN READY CONDITION: Piston unloaded and in holster, hands relaxed at sides. SCORING: TARGETS: STAGE PROCEDURE: Standing in Box A, holding rock SCORED HITS: START-STOP: in each hand. Upon start signal, load handgun and engage targets. Comstock, 18 rounds, 80 points 5 IPSC, 8 Plates Best 2 per paper, KD steel = 1 A Audible - Last shot Not used in any action match 24’ Fault line A