PS 20362 SYSTEM LEVEL DESIGN REVIEW The Balls

PS 20362 SYSTEM -LEVEL DESIGN REVIEW The Balls of Fury October 8 th, 2019
 • Functional Decomposition • Benchmarking")
AGENDA • Team Vision • Background (What’s Changed? ) • Functional Decomposition • Benchmarking • Concept Generation • Selection Criteria • Pugh Charts • Feasibility • Concept Selection • Systems Architecture • Risk Assessment

BACKGROUND ERs and CRs have been refined, here’s what’s changed: ● Team has shifted focus away from game play-time and difficulty ● Priority has been lowered for comprehensive user manual at this time We’ve reached out to George Gomez and have been put in contact with Orin Day who recommended visiting Silverball Saloon As a result of the problem definition review we are focusing less on final game experience and more about creating a mechanically and electrically functional pinball framework.

FUNCTIONAL DECOMPOSITION

BENCHMARKING

BENCHMARKING

BENCHMARKING

BENCHMARKING

BENCHMARKING

BENCHMARKING

BENCHMARKING

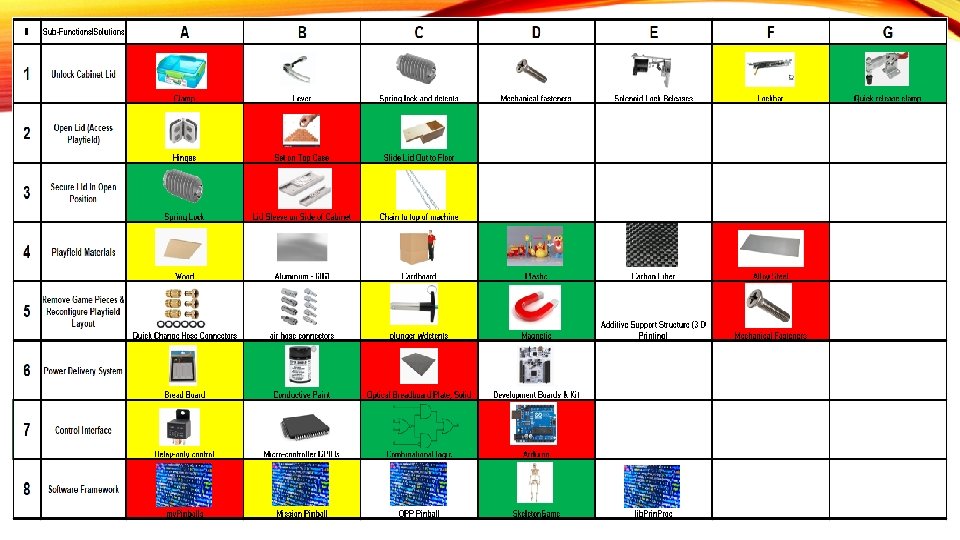
MORPHOLOGICAL CHART

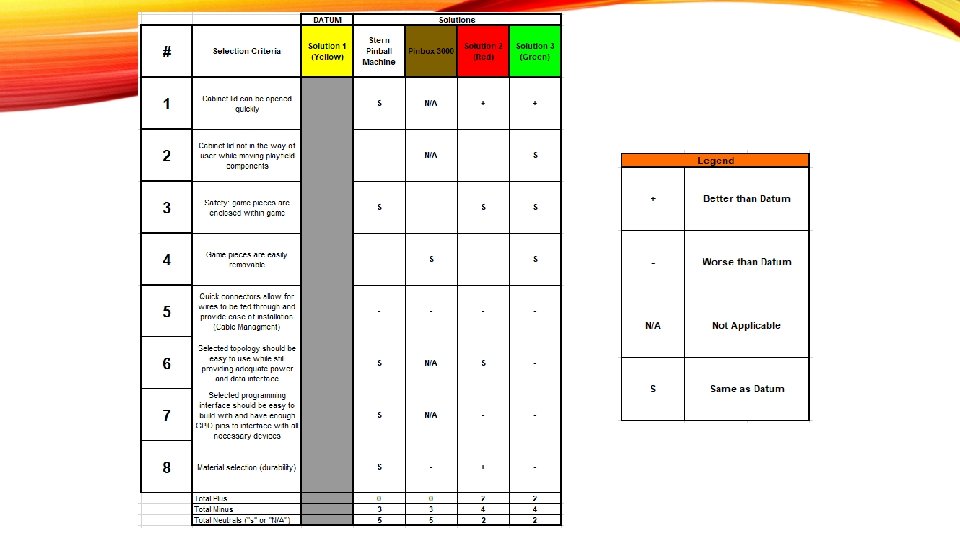
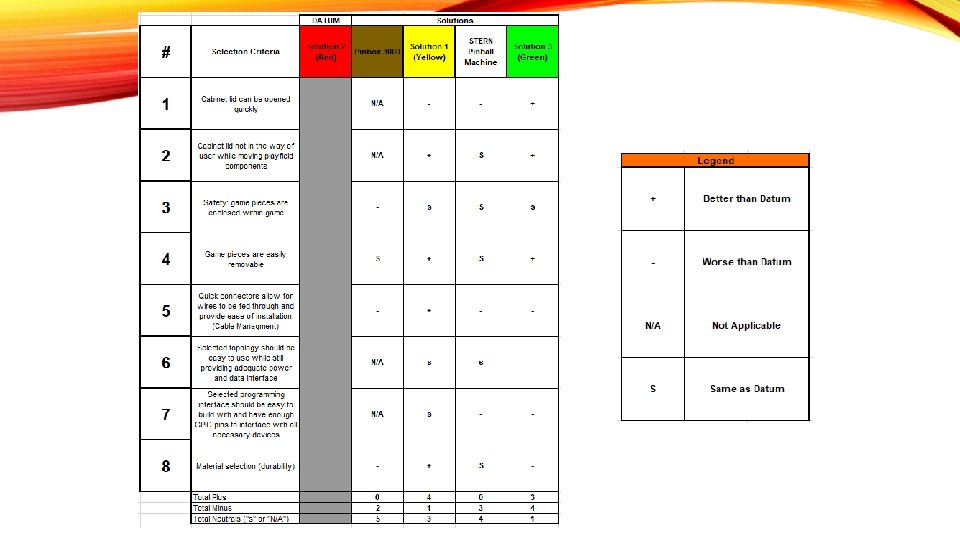
SELECTION CRITERIA

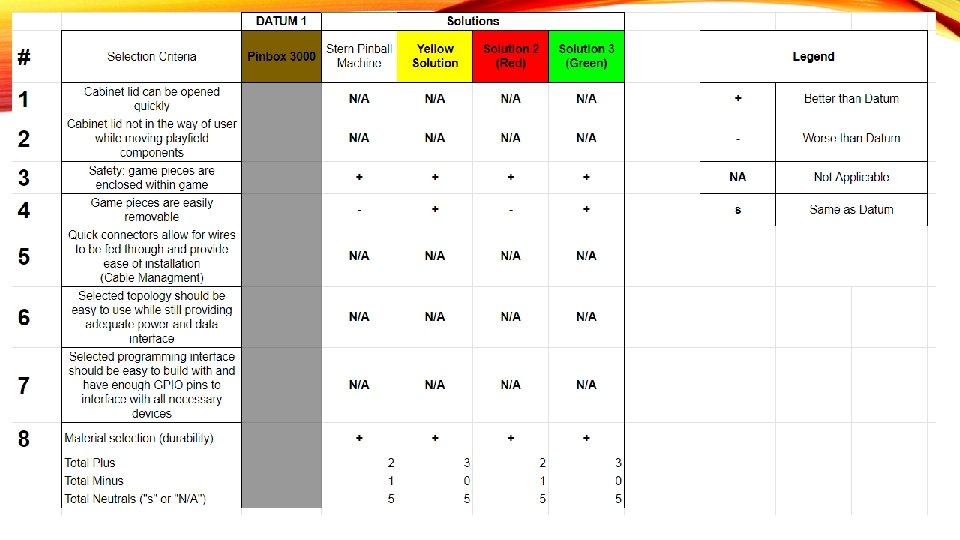
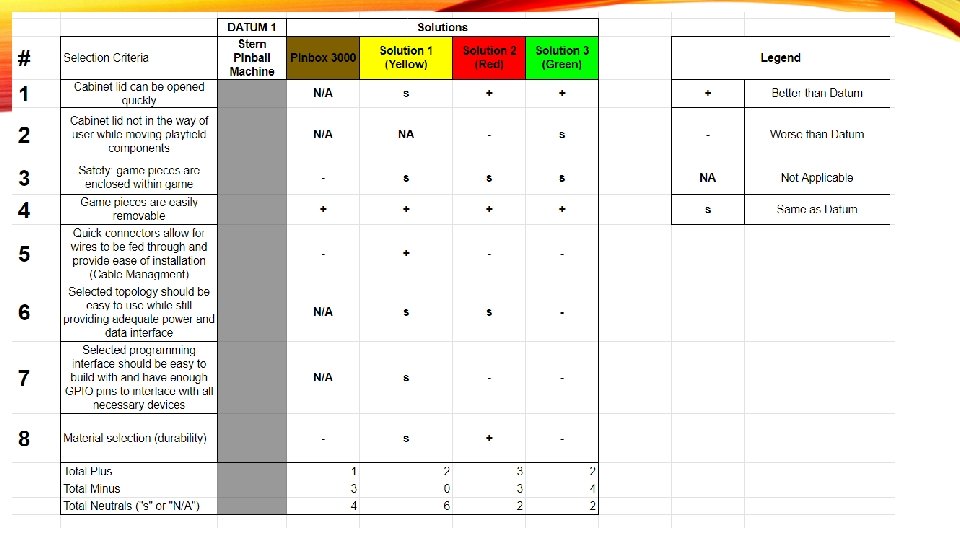
PUGH CHARTS
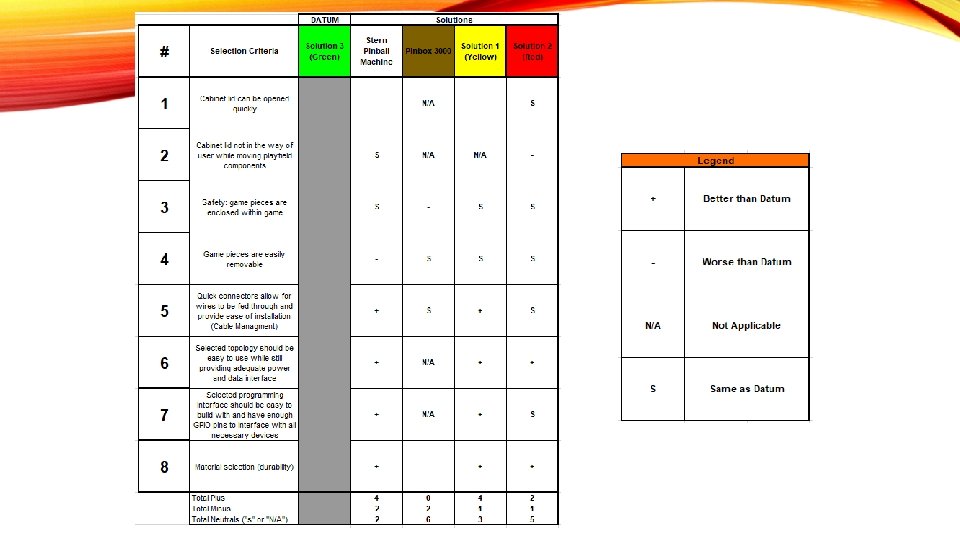

CONCEPT SELECTION

Open Cabinet Lid

CABINET LID OUT OF WAY

GAME PIECES EASILY REMOVABLE

SOFTWARE FRAMEWORK

MATERIAL SELECTION

PRELIMINARY DESIGN SELECTIONS Lid latching mechanism Clamp Lid opening/closing Top hinges Game piece interchangeability Custom socket with plungers/detents Software framework Mission Pinball Play surface material Wood Lid Material Plexiglass

SYSTEM ARCHITECTURE

FEASIBILITY How much power will the machine need to source for all the playfield configurations? Major Power Draws: Pop Bumper: will draw large current for very brief amount of time when activated. Difficult to accurately model without being able to test physical components and make measurements, but worst-case estimation at 48 V is 10 A -> 480 W Microcontroller: Atting 84: max (100 m. A @ 5 V, padded worst-case from datasheet) -> 0. 5 W LCD Display: ● ● LCD: max – (3. 6 V)(0. 37 A) = 1. 332 W Backlight max – (13. 2 V)(0. 63 A) = 8. 316 W LED: typ. (2. 0 V)(0. 02 A) = 0. 04 x 50 = 2 W Total Power = ~500 W Benchmarking of power supplies shows that there are many options for power supplies that fit these criteria.

FEASIBILITY How big of a pinball machine can our group design/build? Will it fit through a standard doorway? Benchmarking/prototyping dimensions will best answer the question. We can look at the different specs of pinball machines to pick out the best dimensions to use. We can also prototype the design of the case to prove this. Assumptions: ● ● ● Assume that the pinball machine is light for now and does not weigh 200 -300 pounds (80 pounds max). Assume prototype is made of wood case is screwed together by a wood screw and cannot be torn apart. Assume the smallest door way is 36” wide and 80” tall. Benchmarking Data for all configurations, wide/standard machines (pinball) *The table above is a simple guide to help our team see all the options we have to make the pinball machine moveable and light weight. Benefits: Able to lower the height with removable legs, and backboard. We should not make any permanent designs. We should be able to take everything apart with ease and get it to fit through a standard doorway.

FEASIBILITY What is the minimum tilt angle a cost-effective tilt-switch can measure, and does this work for the maximum tilt angle we can allow before an alarm goes off? Assumption: Allowable tilt angle before the alarm goes off is 1⁰ (This is most likely an underestimate, but brief online searches did not yield an actual value. ) This can be approached with benchmarking. a) b) c) d) Manufacturer: Level Developments a. Part #: ETS-4 -11. 5 -S : single axis, range ± 4⁰ to ± 11. 5⁰ b. Price = $101. 80 c. Switching threshold from 4⁰ to 11. 5⁰, with tilt switch warning d. With the desired max allowable angle defined above as 8⁰, this sensor would work Manufacturer: Level Developments a. Part #: ELS-DR-2 -2 -1 : single axis, ± 0. 2⁰ to ± 1. 7⁰ b. Price = $114. 70 c. This sensor does not work for a tilt of 8⁰ and is more expensive Manufacturer: Elitegroup a. Name: NORMALLY OPEN/NORMALLY CLOSED TILT SWITCH b. Price = $4. 25 c. No specs on Amazon, but reviews suggest it must be tilted far beyond 10⁰, no good Manufacturer: Adafruit Technologies a. Part #: ADXL 335 : 3 -axis accelerometer development board b. Price = $15 c. Requires analog pins on controller and some trigonometry calculations to use, but a very versatile angle reading sensor for both front-back and side-side tilt detection

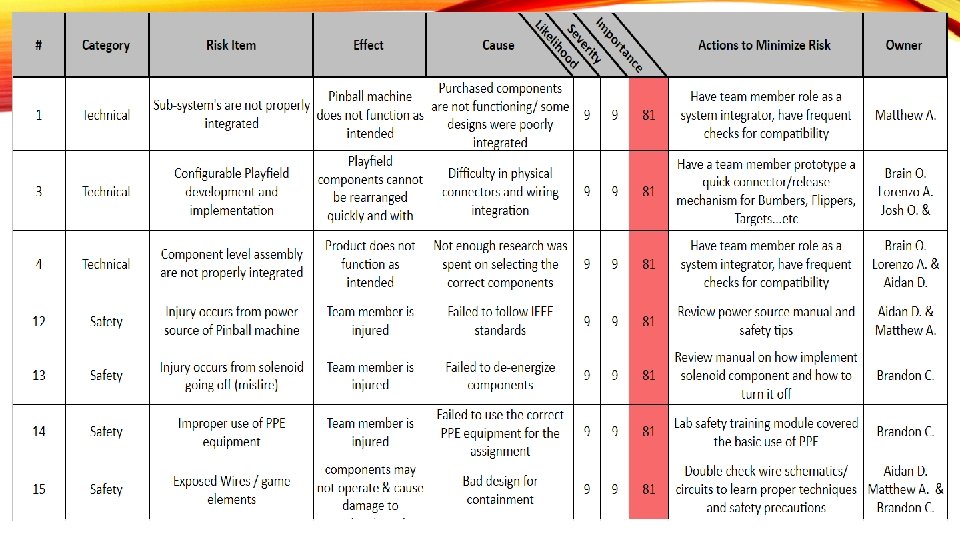
RISK ASSESSMENT

PRELIMINARY TEST PLANS Playfield Configuration • Calculate power distributions to ensure that each component connection point has sufficient energy provided • Launch balls over configurable playfield surface to verify that there aren’t excessive energy losses travelling over the surface Prototyping • Construct prototyping cabinet with removable walls to facilitate mid-test adjustments • Calculate dynamic ball travel paths • Prototype cabinet built to include specified front-back tilt angle to verify ball travel distances and begin analyzing ball dynamics and comparing to calculations Tilt Sensing • Calculate accelerometer analog voltage → acceleration conversion factors. • Calculate 3 -axis acceleration → tilt angle conversion factors • Purchase accelerometer development board and collect data points to verify that conversion factors are correct.

NEXT STEPS 1. Proof of concept: we will do further analysis on our design and prototype a system we believe will work for the interchangeable playfield. 1. Continue to update our risk assessment and mitigation plans 1. Create preliminary mechanical engineering drawings of the case and playfield layout 1. Have a full bill of materials

Backup

Customer Requirements

Engineering Requirements
- Slides: 38