Project Based Learning Carol Rosen Technology Staff Developer

Project Based Learning Carol Rosen Technology Staff Developer for Region 7

What is Project Based Learning? Project Based Learning • Assessment – Using Rubrics http: //rubistar. 4 teachers. org/index. php

What are the Standards? • • New York City Performance Standards New York State Learning Standards Technology Standards for Leaders

Technology Based Project • Native Americans—Searching for Knowledge and Understanding What are the components of this project?

How to Build Projects Technology Integration What questions should you ask yourself before you create a project?

Online Resources To be used for Planning Lessons Math matti. usu. edu/nlvm/nav/vlibrary. html English http: //readwritethink. org Web Quest http: //www. webquest. org All Subject areas NYlearns. org

Online Resources Appropriate for Students • Kids Save Google Search http: //www. onekey. com • Dmoz • Yahooligans www. yahooligans. com Appropriate for students 7 -12 • Cybersleuth Http: //dmoz. org/Kids_and_Teens/ • Kids Click http: //sunsite. berkeley. edu/Kids. Click!/ • Awesome Library http: //www. awesomelibrary. org • Ask Jeeves for kids http: //www. ajkids. com/ http: //cybersleuth-Kids. com/

Additional Online Resources Search Engines • Google • Altavista • Teoma Web Sites – Tekmon. com – Wikipedia. org A web site from Region 7: • www. region 7 online. com A site to access videos: • www. unitedstreaming. com

Getting Started with Word • Click Start, • all Programs, • then M. S. Word All Programs Start Word

Title Bar Parts of the Word Screen Minimize Button Menu Formatting Toolbar Ru le rs Standard Toolbar Task Pane Scroll Bars Close Button Maximize Button

Activity 1 • Type one paragraph answering the following questions: What grade and subject area do you teach? ü What are you currently teaching in your class? ü How could you use Word in your lesson? ü What is your e-mail personal contact? ü

Naming & Saving a Document on a Diskette File or Folder to Save in • First time you name a file you use Save As command • Click Save button on Standard Toolbar • Choose Drive A • Type file name • Save as Word Document • Click Save button to regularly save work Type File Name Click Save Button Save as Word Document

Inserting Text • To insert a letter, word or line of text just place the insertion point at the location you want to insert the text. • Then type the text. Mar went there to. Insert “Y” Insert “o”

Select & Delete Text • You can use different methods to select text with the mouse or keyboard. • Use the mouse to quickly select any amount of text—a letter, a line, or the entire document. • To select a single line or more, click in the selection bar, which is the blank space in the left margin where the cursor turns into an arrow. • After the text is selected, you can perform many actions, including deleting the highlighted text by pressing the Delete key.

Type Specifications Italic Font Sizes Left Alignment Font Typefaces Left Alignment Bold Underscore Font Color Center Justified

Cut, Copy & Paste Text • Cutting or copying and then pasting text is another way to move text from one location to another. – Cutting text removes it from its original location – Pasting places it in a new location – Copying leaves the text in its original location, but places a copy of the text in the new location when you paste • Cut and copied items are stored on the Clipboard. • In Word 2002, a maximum of 24 items can be stored on the Clipboard.

Drag-and-Drop Text To drag and drop text, first select the text to be moved. Next, press and hold down the mouse button until the pointer changes into the drag-and-drop pointer shown below. Finally, drag the text to its new location and release the mouse button.

Keystrokes used to Move the Insertion Point The various keystrokes for moving the insertion point are displayed in this figure. Clicking the mouse at any location in the document is also a method for positioning the insertion point.

Using Shortcuts • • • Control + End = End of document Control + Home = Beginning of document Home = Beginning of sentence End = End of sentence Control + a = Highlighting the whole document Control + o = Open document Control + s = Save document Control + 2 = double space Control + 1 = single space

The Spelling and Grammar dialog box This figure shows the Spelling and Grammar checker with a suggested correction. Select a suggestion and click the Change button. The error will be corrected and the checker will continue to examine the rest of the document.

Creating a Newsletter in M. S. Word 1. Click on Page Set up under File 2. In Page Setup box change top, bottom, left & right margins to. 5 inches.

Spring 2005 True Life Stories 1. The horizontal line • Open Drawing Toolbar • • • Click on Black Slanted line • • Create line by dragging mouse • Click on down arrow Pen in Dawing toolbar and choose color 2. Insert Word Art for Title 3. Insert Picture • Open Google. com • Type your subject & click on Images Vol. 1, No. 1 Select picture Right Click on picture & click copy Click on Paste under Edit on Newsletter page 4. The ID Line • Create Text Box • Type the above info in box • Click on down arrow in pail icon on drawing toolbar and choose color

1. Type Introductory paragraph 2. Create Section Break 3. Create three columns 4. Type a column heading & by line 5. Type a few lines for your first paragraph

Right Wrap Around Left Wrap Around

Why Use Power. Point in the Classroom?

The Advantages of using Power. Point • Students easily learn the software. • Provides a thoughtful integration of text and images. • Useful for projecting color images and charts. • Useful as a tool to inspire and guide discussions. • Promotes whole language learning and the balanced literacy agenda. • Promotes New York State Standards.

Evaluating Power. Point Presentations • A Power. Point Rubric

Tips for Effective Power. Point Presentations

Getting Started • Click once on Start Button • Slide your pointer to Programs • Choose Power. Point Programs Getting Started Power. Point

The Power. Point Screen Standard Toolbar Formatting Toolbar Task Pane Title Slide Drawing Toolbar This is the View that appears when clicking on BLANK PRESENTATION and selecting the TITLE SLIDE

Type the following info on title slide: • In title box type the title of your Power. Point Presentations. • In subtitle box type “by and your name”

Formatting Text Change Typeface Change Font Style Change Font Size Slide Layout

Inserting a new slide To add a new slide to your presentation go to Insert, click on New Slide select Slide Layout.

Selecting a Slide with Graphics

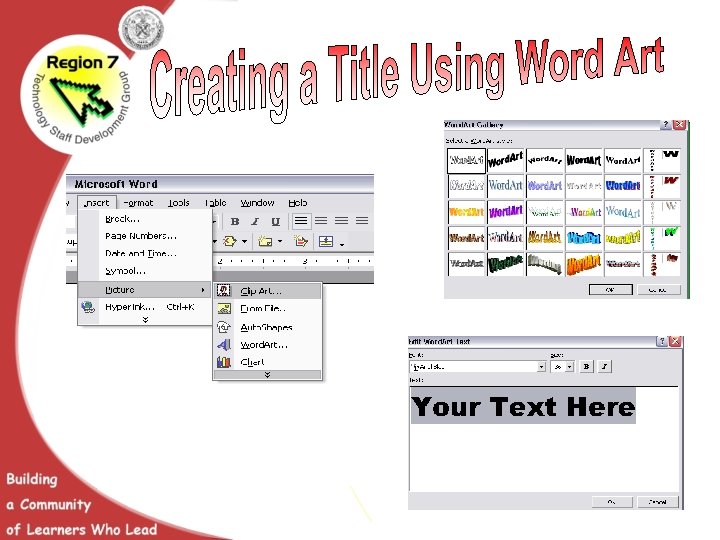
Entering Graphics • Go to Insert, click on Picture, then select from the following choices: • Clip Art • From File • Word Art Insert Picture Menu

Inserting Clip Art • Go to Picture, click on Clip Art. The Insert Clip Art box will open to the right side of your screen. • Or • Go to Format, Click on Slide Layout, then select a slide which includes a area for an image

Slide Animation • Highlight the text or graphic to be animated. • Go to Slide Show click on custom animation. • A dialog box opens on the right side of your window. • Click “Add Effect” then select the effect.

Action Button The Action Button allows you to add an action like: moving from slide to slide, opening another presentation, or even opening a web site. Go to Slide Show click on Action Button, then select the button of choice.

Creating the Slide Show Go to Slide Show: click on Set Up Show to select options for: – Show type – Show options – Show slides – Pen color Click on Rehearsal Timings to set a delivery time for each slide. Click on Slide Transitions to select options, set speed, and apply sound Click on View Show to evaluate the appearance of your presentation.

Saving a Presentation To initially Save your work: go to File, click on Save As, type in a name for your presentation, and choose a location for saving your document. After using the Save As feature, in the future save your work by going to File and clicking on Save.
- Slides: 41