Production Production Layout Background Painting Animation Exposure sheet

Production
 Pencil Test")
Production • • • Layout Background Painting Animation Exposure sheet (X- Sheet) Pencil Test Clean up and in betweens Scanning Ink and Paint Compositing Export

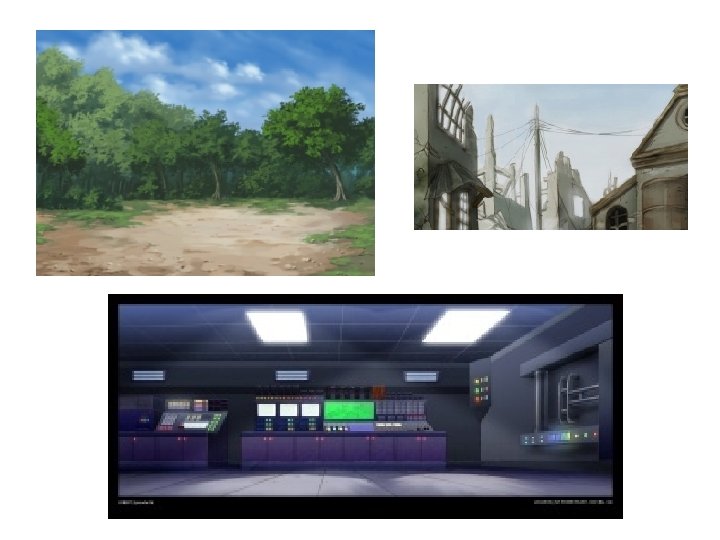
Layout Ø The layout and posing process link the storyboard artist and the animator. Ø The layout artist uses the storyboard and prepares an organized folder for an animator. Ø This folder contains a field guide that shows the proper camera move and the right size of the scene. Ø It also includes the character’s main poses from the storyboard following the official design, the effects, backgrounds and all the other information necessary to the animator. Ø The backgrounds are done directly out of the storyboard and the location design. The background artist refers to the storyboard and draws the background for each scene.

Pose - 2 Pose - 1

Colored Layout Background

Background Painting • Once the background layouts are completed, they are ready to be painted. • The background painter will take the final layout and paint them using the palettes created by the color stylists. • Once the backgrounds are painted, they will be sent to the Scene Setup team or the Compositing team.

Animation • Once we have the Model Pack, Storyboard, Layout, and Backgrounds approved we can now proceed to Animation. • The animators create scenes by acting out the situations that the character in the scene requires, they based their timing and noted it down using the Exposure Sheet (X-Sheet).
 • Also referred to as camera instruction sheet, dope sheet or")
Exposure Sheet (X-Sheet) • Also referred to as camera instruction sheet, dope sheet or X-sheet is a traditional animation tool. • it allows an animator to organize his thinking and give instructions to the cameraman on how the animation is to be shot. • It consists of five sections and is a bit longer and narrower than an A 4 size paper. • Every eighth line down is marked thicker than the rest and shows half a foot of film. One second animation would take three of these sections. • The sound breakdown was often done on separate sheets called bar sheets made by the editor and given to the animator who would transpose them to his dope sheet.
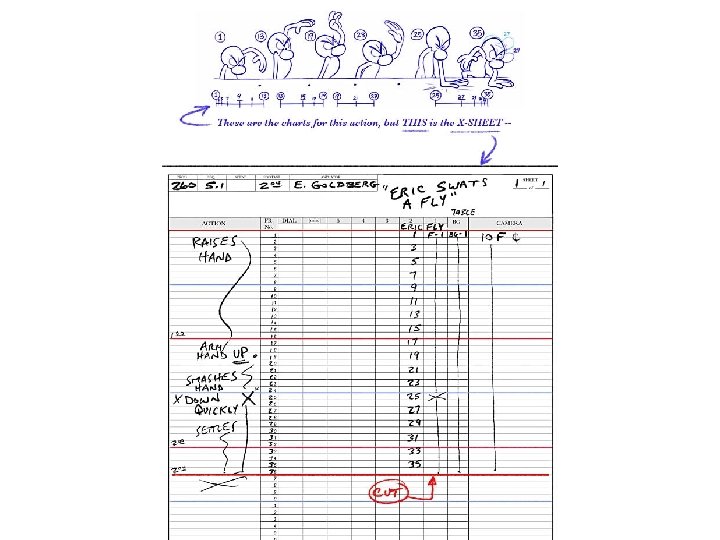
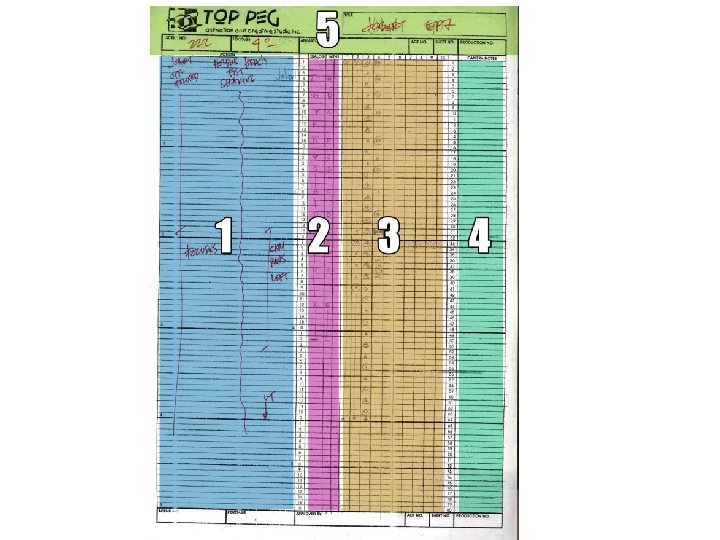

• 1. The column in the far left is where the notes from the director, which are suggestions on how the animation would flow. • 2. The next column is where the “dialogue” is written and the mouths (MTH) that are needed to be drawn for the dialogues recorded earlier. • 3. The center section is where all the animation drawings are located. It is split into 10 smaller columns, each one represents one level of animation. During the pre-digital days of animation, when all the drawing were still done on acetate, this was limited to only 6 columns. 5 levels of acetate, any more would make the video darker, and the extra level of the background. The number of each drawing is written according to the order that they will be shot. • 4. The final column is for the camera instructions, giving information for the panning (moving left to right or up and down), trucking (zooming in or out) and field size (drawing size). • 5. The top is where the show title (Jobert Episode 7), scene number (222), footage length (4º or 4 feet), animator’s name, act number, sheet number, and production numbers.

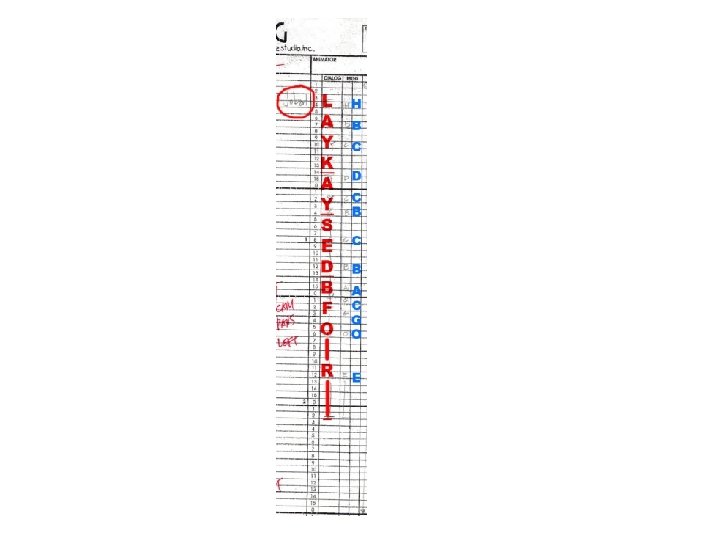
• Next is the dialogue column and the mouth drawings needed. • The sound reader is in charge of listening to the dialogue and writing the dialogue in the X-sheet (red). • The character who spoke is also indicated (encircled in red). As you can see, the sound reader wrote the dialogue as it sounds instead of the correct spelling of each word. • Instead of “Like I said before”, he wrote it as “LAYK AY SED BEFOR”, because words can have different ways of being said or pronounced depending on the voice actor’s pronunciation, diction, and accent. The animator then matches the sound with the mouth opening (blue) to be used in his animation.

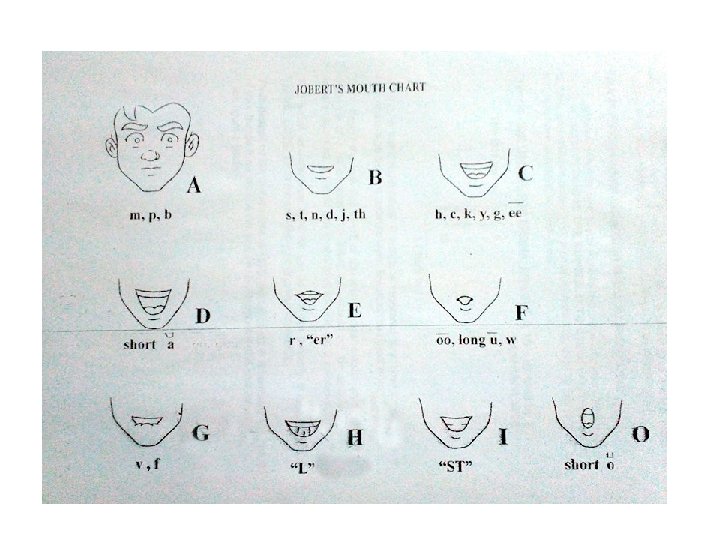
• The animators use a Mouth Chart as a guide. Each opening has a code and the sound that mouth opening produces. • For example, the “A” mouth produces the sound for the letters M, P and B. Don’t confuse the mouth code with the sound it makes. In Japanese Anime, the codes are numbers, they use fewer mouth openings.

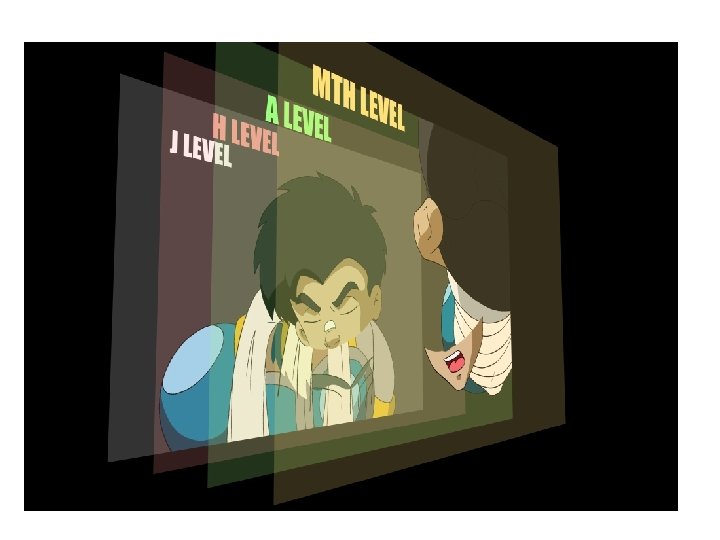
• Next is the Animation Levels column. This is where you will find the animation numbered in sequence. • Level 1 being the lowest, each level can indicate parts of the overall animation or different characters in a scene. this can also indicate props or objects that are included in a scene.
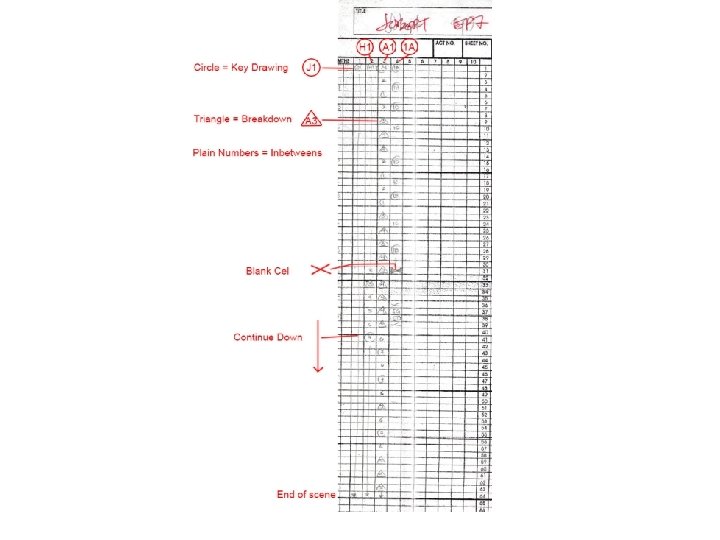
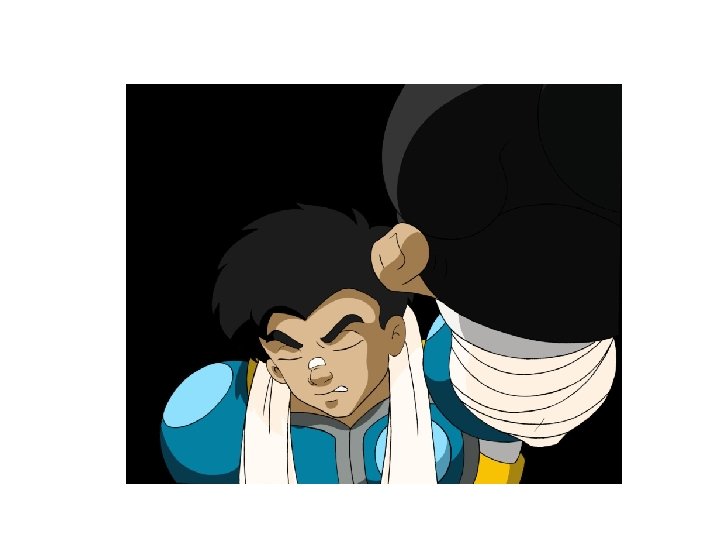

• At the left, we can see what numbers stand for. And at the above image are what the image looks like when arranged. The animator uses letters to indicate a body part and a number to indicate the sequence of drawings.
 which is the body is the lowest level followed")
• J level (Jobert) which is the body is the lowest level followed by the H Level being the Head. A level is an Arm. For the Mouths (MTH), a number is followed by a letter is used; the number is where the mouth is registered to and the letter being the mouth code. For example, 1 A means an “A” mouth (see chart) that is registered to H 1 or Head 1.

• A circle around a number means that it is a Key drawing or one of the main poses of the animation, these are done by the Animators. • The numbers without boundaries are In-betweens, these are provided by the Assistant Animators based on the Key Drawings. • A triangle means that these are Breakdowns, special Inbetweens provided by the Animator. Usually, Animators provide breakdowns if they want a different path of action rather than an In-between. • A Cross means that it is a blank cell. • A straight line after a number means this drawing is held or it is exposed continuously. • Now we know how important X-Sheet is

Pencil Test • After all the drawings are cleaned-up, they are then photographed on an animation camera, usually on black and white film stock. Nowadays, pencil tests can be made using a video camera and computer software. • For the project, the Exposure Sheets were written based on the sound cut, what the time length of the sound cut was also the length of the whole x-sheet. The dialogue is also written here. After this, the director will draw sketches for timing on where the actions will occur. This will be the guide for the animators to follow.

• Animation 01, 09, 10 and 12 are the Key Drawings drawn by the Animators… from the Layout poses, the animator makes more poses to complete the action, he also charts them to the Exposure Sheet. He will provide instructions for the Clean-Up and the number of In-betweens needed.

Clean-up and In-between • Once the key animation is approved, the lead animator forwards the scene on to the clean-up department, made up of the clean-up animators and the in-betweeners. • The clean-up animators take the lead and assistant animators’ drawings and trace them onto a new sheet of paper, taking care all of the details present on the original model sheets, so that it appears that one person animated the entire film.

• The in-betweeners will draw whatever frames are still missing in-between the other animators’ drawings. This procedure is called tweening. The resulting drawings are again pencil-tested and sweat boxed until they meet approval.

• Clean-up and in-betweening is the entry level for all artists, and most of the artists at Top Peg are these kinds of artists. • This is the most tedious process of the production part because this will have the most workload. • A regular artist at a big studio is required to do at least 100 drawings a week. Most of our artists can only do about 50 a week.

• Clean Up 01, 09, 10 and 12 are the Key drawings of the Animators traced into a nice line with shadow lines (red) added. This will be ready for scanning after it is inbetweened.

• In-between 02 to 08 and 11 are the in-betweens, the Animations and Clean up are numbered to see how many in-betweens are needed, there is also a timing grid on the animators drawing as a guide for the inbetweeners. • After this is done, it will be given to the scanners. Combine the CUIB numbers 1, 9, 10, 12 and IB number 2 to 8 and 11 to have a complete animation of the character movement from numbers 1 to 12.

Scanning • After all the hand drawings are done, those are now scanned into the computer. In large studios, they use a large scanner with an auto feeder. These type of scanners, together with the right software, can read paper holes. So even if the paper was misaligned, the software automatically puts all the pages in the right position.

Ink and Paint • When the color models are ready, the drawings are scanned and properly exposed, the colorist can start cleaning the artwork and start applying the colors using a digital paint software. When the drawings are cleaned, inked and painted, they are ready for compositing. • Since the Ink and Paint process and software was simple; we hired non-artist to do the painting. One problem we encountered, was the hired non-artists didn’t have the creative eye on what they were coloring. They were confused on what parts were shadows and what was not; an artist can easily distinguish this. So there were a lot of retakes and we only had one Ink and Paint supervisor.


Compositing • The compositor imports the colored background, the animatic reference and the sound as required. • Referring to the exposure sheet, the animatic, and the animation, the compositor assembles all of these elements and create the camera moves and other necessary motions. • Finally, the compositor adds any digital effects required by the scene. These can include tones, highlights, and shadows. When the compositing is finished, the final step is rendering.
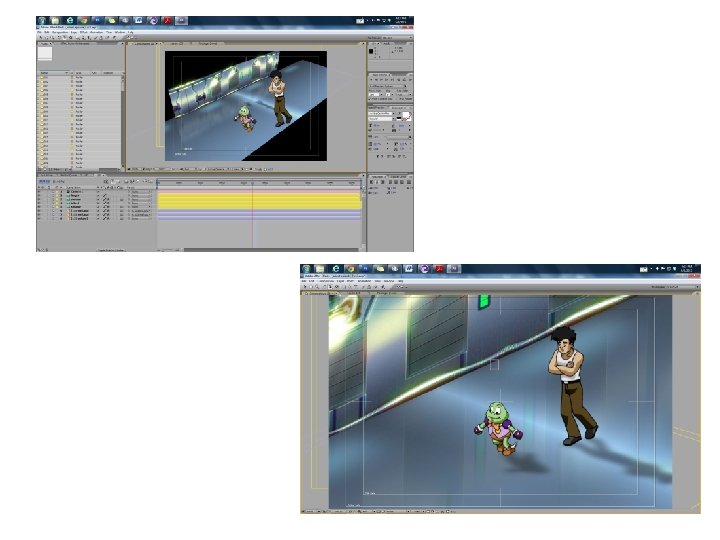

Export • Once the compositing is completed, the final step is to render the scene as a movie or an image sequence. Generally, the compositor will be the same person to do the rendering. • Even with 2 powerful computers, rendering is time-consuming. It would take about 15 hours to render one episode in Standard Definition
- Slides: 38