PRODUCTION PART APPROVAL PROCESS Based on PPAP Manual
PRODUCTION PART APPROVAL PROCESS Based on PPAP Manual 4 edition Copyright © 2009 Fideltronik 17. 06. 2015
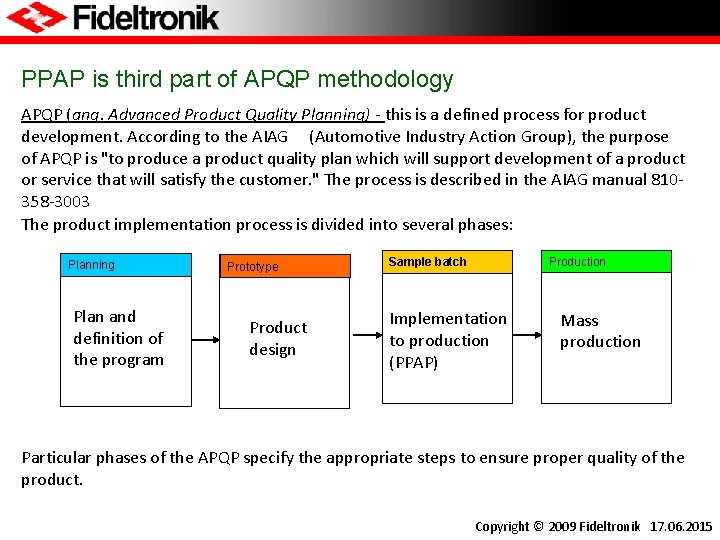
PPAP is third part of APQP methodology APQP (ang. Advanced Product Quality Planning) - this is a defined process for product development. According to the AIAG (Automotive Industry Action Group), the purpose of APQP is "to produce a product quality plan which will support development of a product or service that will satisfy the customer. " The process is described in the AIAG manual 810358 -3003 The product implementation process is divided into several phases: Planowanie Planning Plan and definition of the program Prototype Product design Partia próbna Sample batch Implementation to production (PPAP) Produkcja Production Mass production Particular phases of the APQP specify the appropriate steps to ensure proper quality of the product. Copyright © 2009 Fideltronik 17. 06. 2015
PPAP – Production Part Approval Process created by AIAG (Automotive Industry Action Group) PPAP is used to establish confidence in suppliers and their processes, by demonstrating that: - Customer design record and specifications and other requirements are properly understood by the supplier. - Process proposed by the supplier has the potential to produce product consistently meeting these requirements with defined production rate. PPAP is required for: - A new part or product (i. e. , a specific part, material, or color not previously supplied to the specific Customer). - Correction of a discrepancy on a previously submitted part. - Product modified by an engineering change to design records, specifications, or material. - Any situations required by Customer. Copyright © 2009 Fideltronik 17. 06. 2015
There are 5 Submission Levels The items and/or records specified by the level as requested by the customer must be submitted by the supplier: Level 1 – Warrant only (and for designated appearance items, an Appearance Approval Report) submitted to the Customer. Level 2 - Warrant with product samples and limited supporting data submitted to the Customer. Level 3 - Warrant with product samples and complete supporting data submitted to the Customer. Level 4 - Warrant and other requirements as defined by the Customer. Level 5 - Warrant with product samples and complete supporting data available for review at the supplier’s manufacturing location. Important: PPAP samples must be produced at mass production conditions (Significant Production Run – PPAP ptk. 2. 1) using chosen for mass production tool, production plant, production line, cavity etc. . Copyright © 2009 Fideltronik 17. 06. 2015
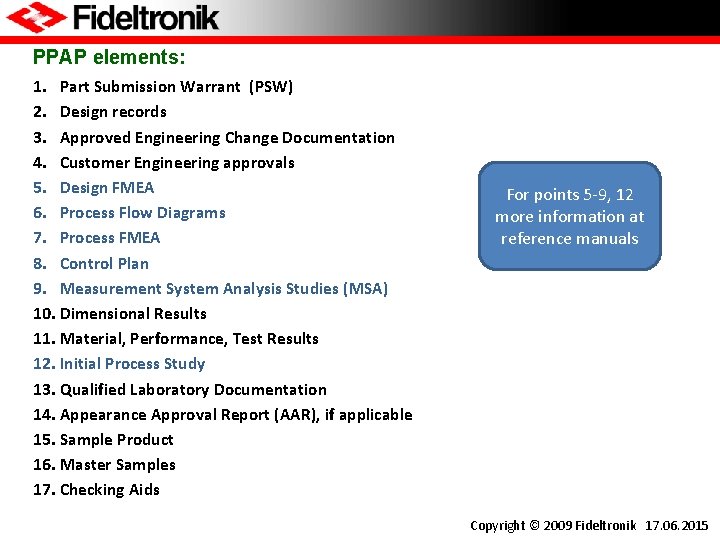
PPAP elements: 1. Part Submission Warrant (PSW) 2. Design records 3. Approved Engineering Change Documentation 4. Customer Engineering approvals 5. Design FMEA 6. Process Flow Diagrams 7. Process FMEA 8. Control Plan 9. Measurement System Analysis Studies (MSA) 10. Dimensional Results 11. Material, Performance, Test Results 12. Initial Process Study 13. Qualified Laboratory Documentation 14. Appearance Approval Report (AAR), if applicable 15. Sample Product 16. Master Samples 17. Checking Aids For points 5 -9, 12 more information at reference manuals Copyright © 2009 Fideltronik 17. 06. 2015
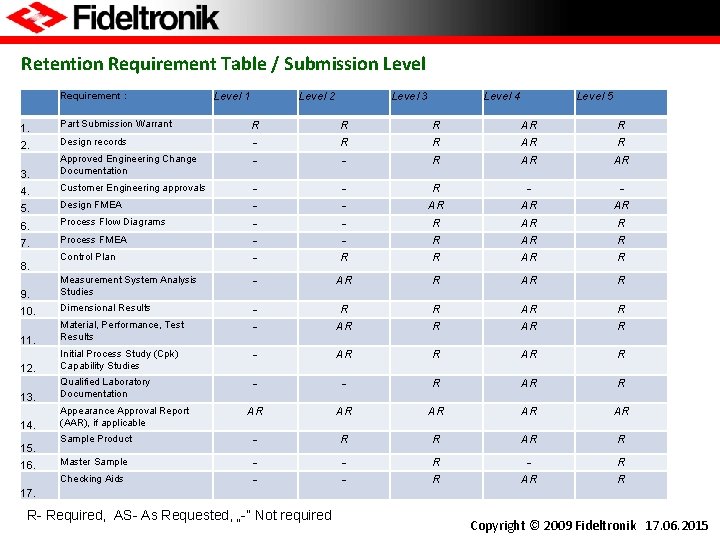
Retention Requirement Table / Submission Level Requirement : Level 1 Level 2 Level 3 Level 4 Level 5 1. Part Submission Warrant R R R AR R 2. Design records - R R AR R - - R AR AR 3. Approved Engineering Change Documentation 4. Customer Engineering approvals - - R - - 5. Design FMEA - - AR AR AR 6. Process Flow Diagrams - - R AR R 7. Process FMEA - - R AR R AR R 9. Measurement System Analysis Studies 10. Dimensional Results R AR R R AR AR R R 11. Material, Performance, Test Results - AR R 12. Initial Process Study (Cpk) Capability Studies - - R AR R 13. Qualified Laboratory Documentation AR AR AR 14. Appearance Approval Report (AAR), if applicable Sample Product - R R AR R Master Sample - - R R AR R R 8. 15. 16. Control Plan - Checking Aids 17. R- Required, AS- As Requested, „-” Not required Copyright © 2009 Fideltronik 17. 06. 2015
1. Part Submission Warrant (PSW) Standard form (available in PPAP Manual – page: 22 -25) Copyright © 2009 Fideltronik 17. 06. 2015
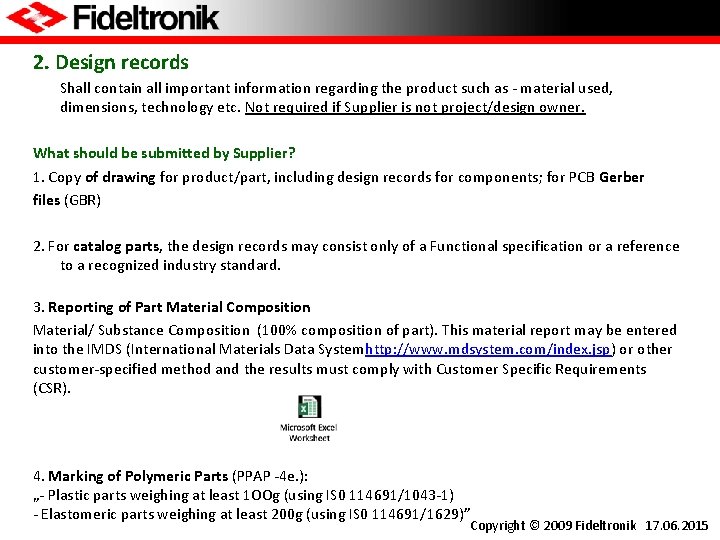
2. Design records Shall contain all important information regarding the product such as - material used, dimensions, technology etc. Not required if Supplier is not project/design owner. What should be submitted by Supplier? 1. Copy of drawing for product/part, including design records for components; for PCB Gerber files (GBR) 2. For catalog parts, the design records may consist only of a Functional specification or a reference to a recognized industry standard. 3. Reporting of Part Material Composition Material/ Substance Composition (100% composition of part). This material report may be entered into the IMDS (International Materials Data Systemhttp: //www. mdsystem. com/index. jsp) or other customer-specified method and the results must comply with Customer Specific Requirements (CSR). 4. Marking of Polymeric Parts (PPAP -4 e. ): „- Plastic parts weighing at least 1 OOg (using IS 0 114691/1043 -1) - Elastomeric parts weighing at least 200 g (using IS 0 114691/1629)” Copyright © 2009 Fideltronik 17. 06. 2015
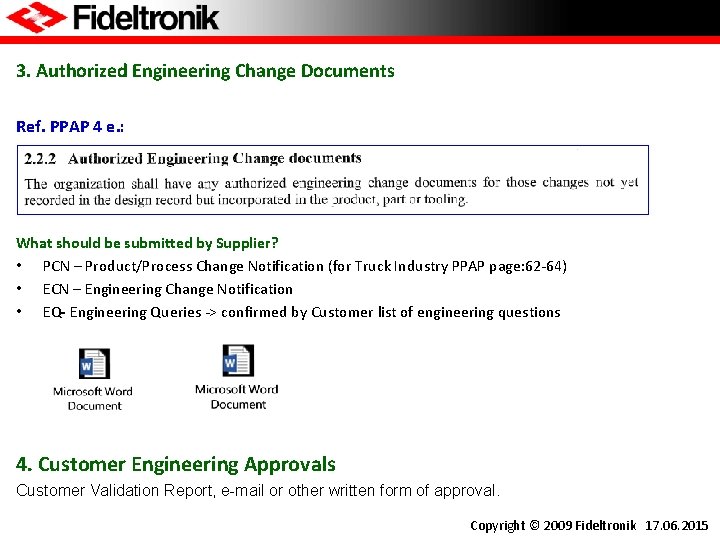
3. Authorized Engineering Change Documents Ref. PPAP 4 e. : What should be submitted by Supplier? • PCN – Product/Process Change Notification (for Truck Industry PPAP page: 62 -64) • ECN – Engineering Change Notification • EQ- Engineering Queries -> confirmed by Customer list of engineering questions 4. Customer Engineering Approvals Customer Validation Report, e-mail or other written form of approval. Copyright © 2009 Fideltronik 17. 06. 2015
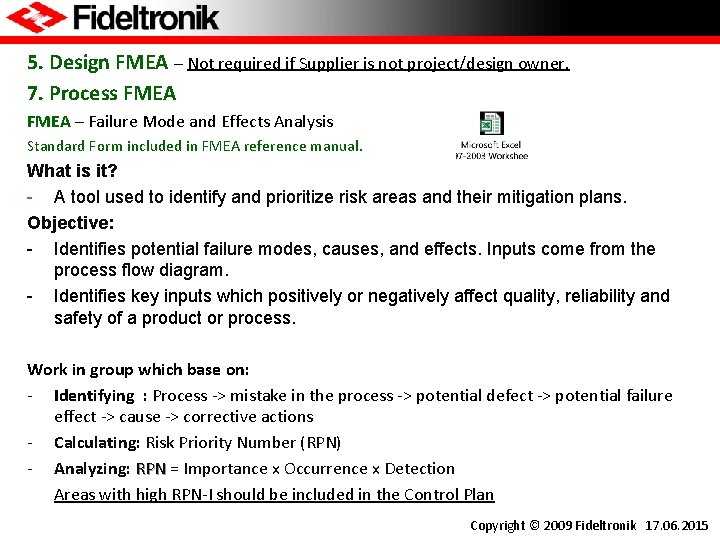
5. Design FMEA – Not required if Supplier is not project/design owner. 7. Process FMEA – Failure Mode and Effects Analysis Standard Form included in FMEA reference manual. What is it? - A tool used to identify and prioritize risk areas and their mitigation plans. Objective: - Identifies potential failure modes, causes, and effects. Inputs come from the process flow diagram. - Identifies key inputs which positively or negatively affect quality, reliability and safety of a product or process. Work in group which base on: - Identifying : Process -> mistake in the process -> potential defect -> potential failure effect -> cause -> corrective actions - Calculating: Risk Priority Number (RPN) - Analyzing: RPN = Importance x Occurrence x Detection RPN Areas with high RPN-I should be included in the Control Plan Copyright © 2009 Fideltronik 17. 06. 2015
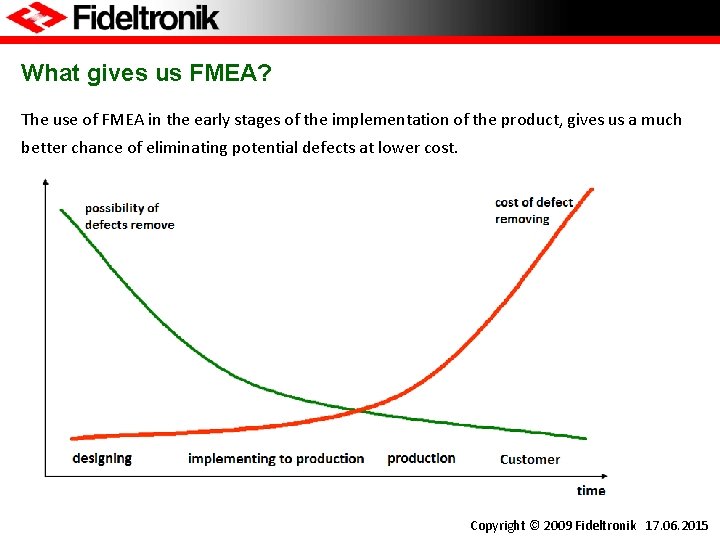
What gives us FMEA? The use of FMEA in the early stages of the implementation of the product, gives us a much better chance of eliminating potential defects at lower cost. Copyright © 2009 Fideltronik 17. 06. 2015
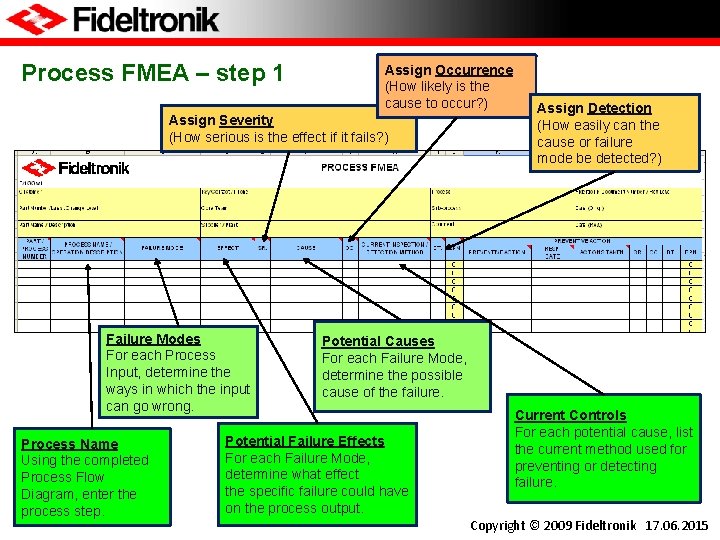
Process FMEA – step 1 Assign Occurrence (How likely is the cause to occur? ) Assign Severity (How serious is the effect if it fails? ) Failure Modes For each Process Input, determine the ways in which the input can go wrong. Process Name Using the completed Process Flow Diagram, enter the process step. Assign Detection (How easily can the cause or failure mode be detected? ) Potential Causes For each Failure Mode, determine the possible cause of the failure. Potential Failure Effects For each Failure Mode, determine what effect the specific failure could have on the process output. Current Controls For each potential cause, list the current method used for preventing or detecting failure. Copyright © 2009 Fideltronik 17. 06. 2015
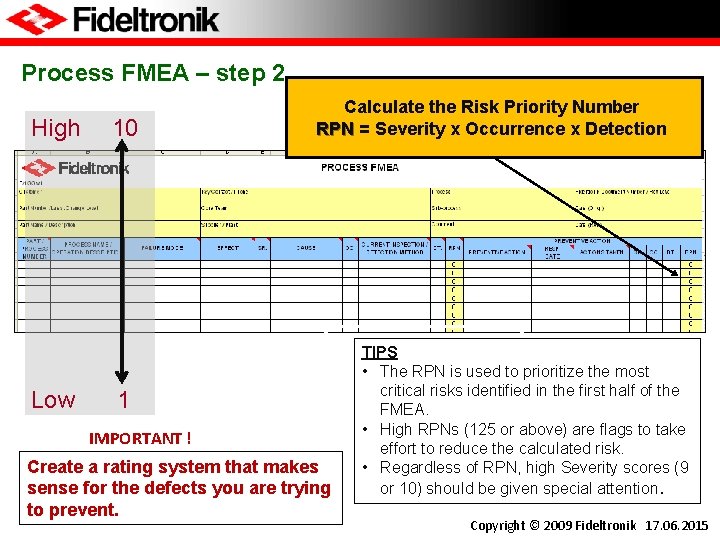
Process FMEA – step 2 High Low 10 Calculate the Risk Priority Number RPN = Severity x Occurrence x Detection 1 IMPORTANT ! Create a rating system that makes sense for the defects you are trying to prevent. TIPS • The RPN is used to prioritize the most critical risks identified in the first half of the FMEA. • High RPNs (125 or above) are flags to take effort to reduce the calculated risk. • Regardless of RPN, high Severity scores (9 or 10) should be given special attention. Copyright © 2009 Fideltronik 17. 06. 2015
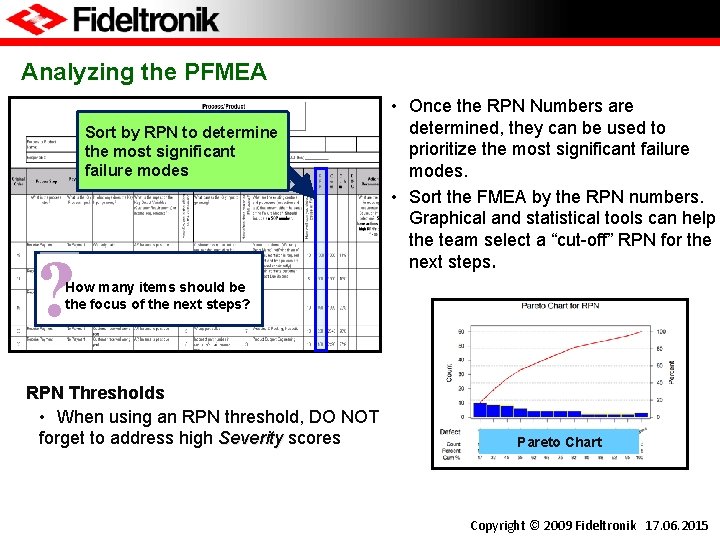
Analyzing the PFMEA Sort by RPN to determine the most significant failure modes ? • Once the RPN Numbers are determined, they can be used to prioritize the most significant failure modes. • Sort the FMEA by the RPN numbers. Graphical and statistical tools can help the team select a “cut-off” RPN for the next steps. How many items should be the focus of the next steps? RPN Thresholds • When using an RPN threshold, DO NOT forget to address high Severity scores Severity Pareto Chart Copyright © 2009 Fideltronik 17. 06. 2015
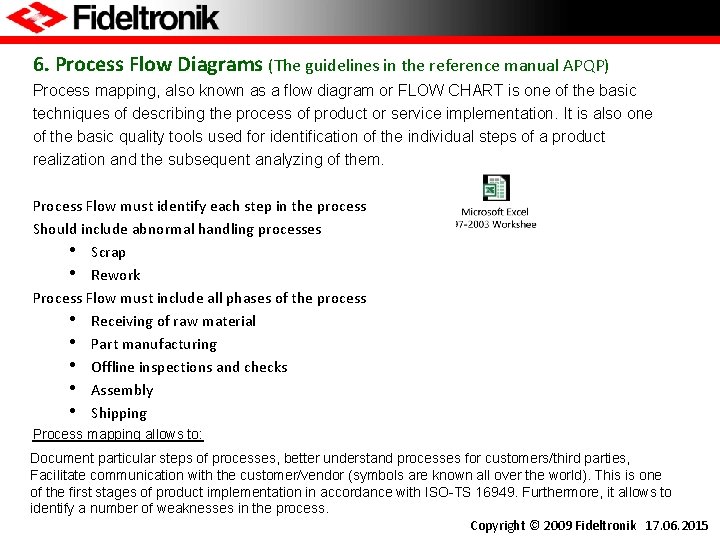
6. Process Flow Diagrams (The guidelines in the reference manual APQP) Process mapping, also known as a flow diagram or FLOW CHART is one of the basic techniques of describing the process of product or service implementation. It is also one of the basic quality tools used for identification of the individual steps of a product realization and the subsequent analyzing of them. Process Flow must identify each step in the process Should include abnormal handling processes • Scrap • Rework Process Flow must include all phases of the process • Receiving of raw material • Part manufacturing • Offline inspections and checks • Assembly • Shipping Process mapping allows to: Document particular steps of processes, better understand processes for customers/third parties, Facilitate communication with the customer/vendor (symbols are known all over the world). This is one of the first stages of product implementation in accordance with ISO-TS 16949. Furthermore, it allows to identify a number of weaknesses in the process. Copyright © 2009 Fideltronik 17. 06. 2015
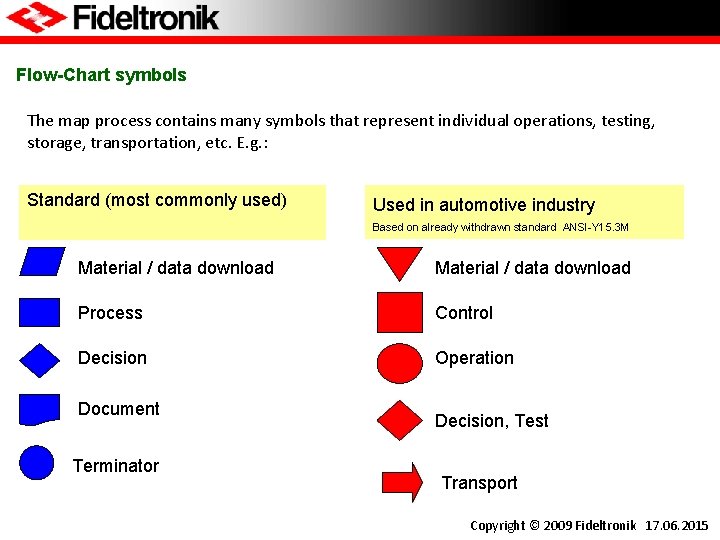
Flow-Chart symbols The map process contains many symbols that represent individual operations, testing, storage, transportation, etc. E. g. : Standard (most commonly used) Used in automotive industry Based on already withdrawn standard ANSI-Y 15. 3 M Material / data download Process Control Decision Operation Document Terminator Decision, Test Transport Copyright © 2009 Fideltronik 17. 06. 2015
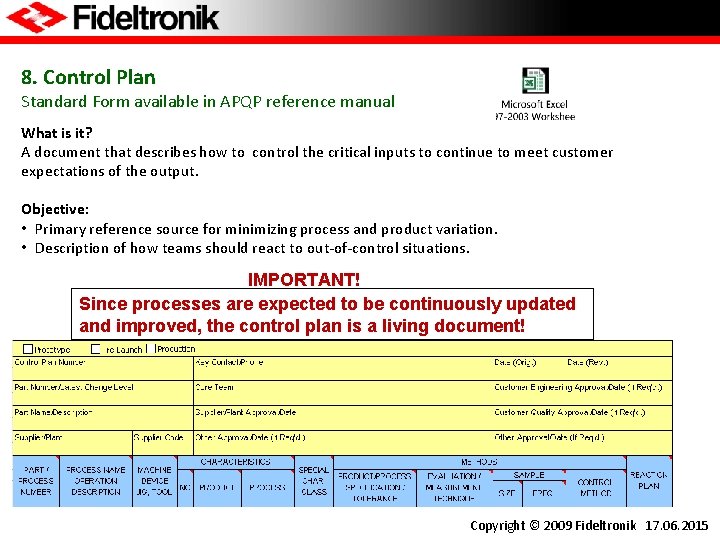
8. Control Plan Standard Form available in APQP reference manual What is it? A document that describes how to control the critical inputs to continue to meet customer expectations of the output. Objective: • Primary reference source for minimizing process and product variation. • Description of how teams should react to out-of-control situations. IMPORTANT! Since processes are expected to be continuously updated and improved, the control plan is a living document! Copyright © 2009 Fideltronik 17. 06. 2015
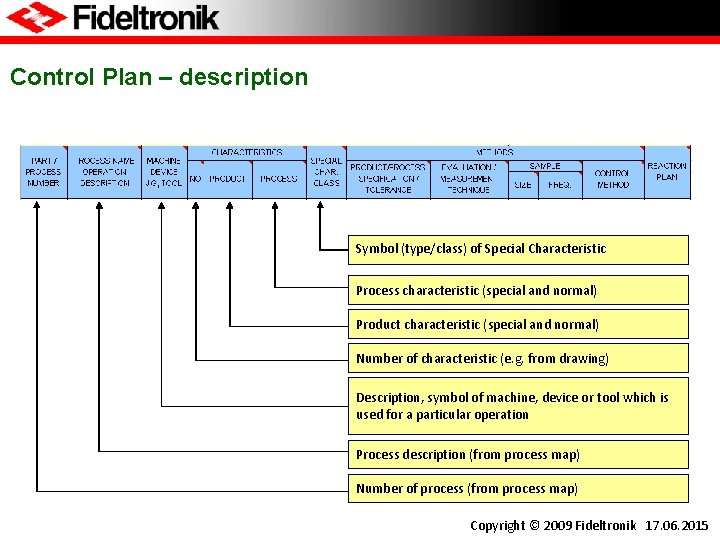
Control Plan – description Symbol (type/class) of Special Characteristic Process characteristic (special and normal) Product characteristic (special and normal) Number of characteristic (e. g. from drawing) Description, symbol of machine, device or tool which is used for a particular operation Process description (from process map) Number of process (from process map) Copyright © 2009 Fideltronik 17. 06. 2015
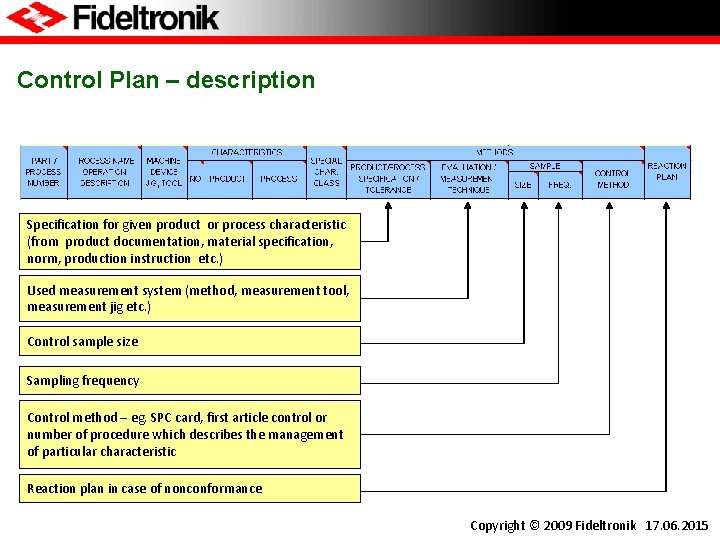
Control Plan – description Specification for given product or process characteristic (from product documentation, material specification, norm, production instruction etc. ) Used measurement system (method, measurement tool, measurement jig etc. ) Control sample size Sampling frequency Control method – eg. SPC card, first article control or number of procedure which describes the management of particular characteristic Reaction plan in case of nonconformance Copyright © 2009 Fideltronik 17. 06. 2015
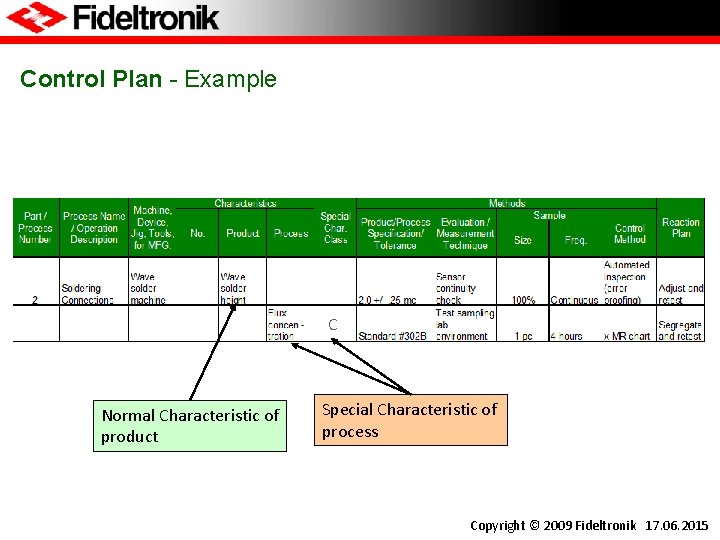
Control Plan - Example C Normal Characteristic of product Special Characteristic of process Copyright © 2009 Fideltronik 17. 06. 2015
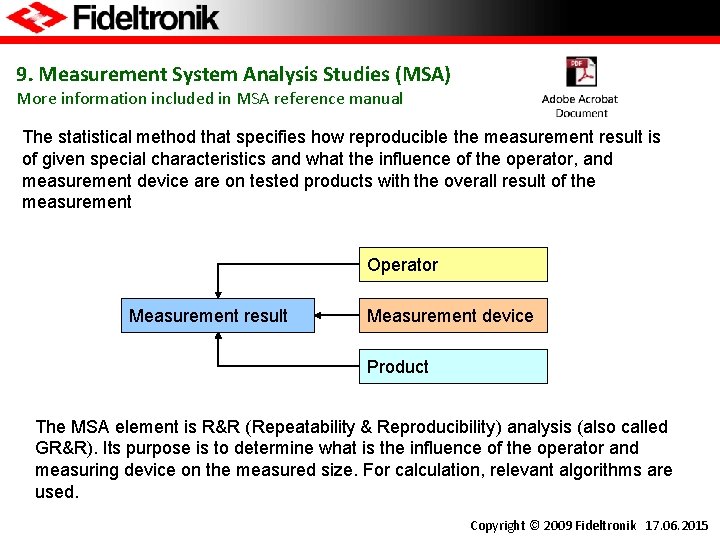
9. Measurement System Analysis Studies (MSA) More information included in MSA reference manual The statistical method that specifies how reproducible the measurement result is of given special characteristics and what the influence of the operator, and measurement device are on tested products with the overall result of the measurement Operator Measurement result Measurement device Product The MSA element is R&R (Repeatability & Reproducibility) analysis (also called GR&R). Its purpose is to determine what is the influence of the operator and measuring device on the measured size. For calculation, relevant algorithms are used. Copyright © 2009 Fideltronik 17. 06. 2015
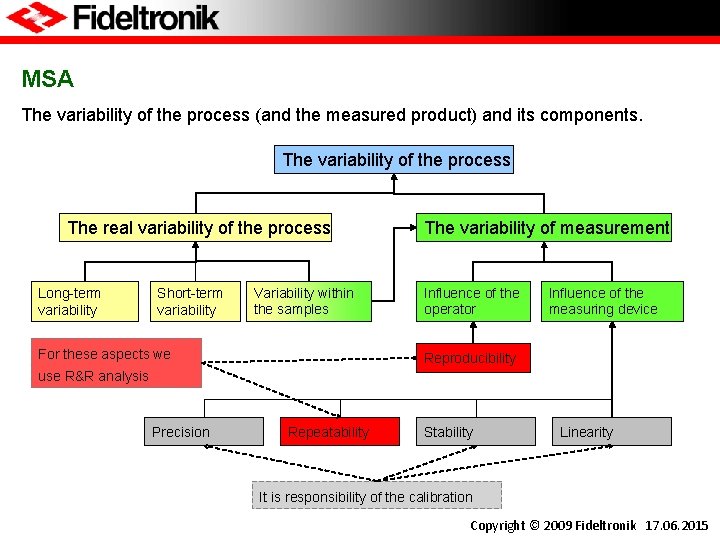
MSA The variability of the process (and the measured product) and its components. The variability of the process The real variability of the process Long-term variability Short-term variability Variability within the samples For these aspects we The variability of measurement Influence of the operator Influence of the measuring device Reproducibility use R&R analysis Precision Repeatability Stability Linearity It is responsibility of the calibration Copyright © 2009 Fideltronik 17. 06. 2015
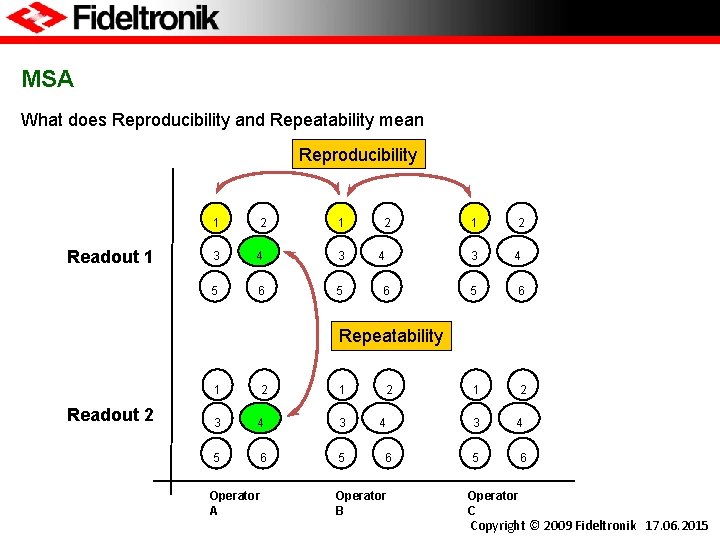
MSA What does Reproducibility and Repeatability mean Reproducibility 1 Readout 1 2 1 3 4 3 5 6 5 2 4 1 3 6 2 4 5 6 1 2 Repeatability 1 Readout 2 2 1 3 4 3 5 6 5 Operator A 2 4 6 Operator B 3 4 5 Operator C 6 Copyright © 2009 Fideltronik 17. 06. 2015
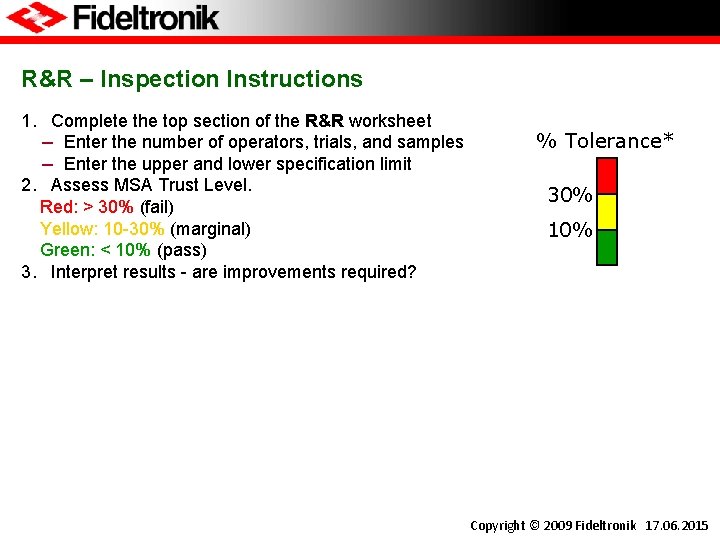
R&R – Inspection Instructions 1. Complete the top section of the R&R worksheet − Enter the number of operators, trials, and samples − Enter the upper and lower specification limit 2. Assess MSA Trust Level. Red: > 30% (fail) Yellow: 10 -30% (marginal) Green: < 10% (pass) 3. Interpret results - are improvements required? % Tolerance* 30% 10% Copyright © 2009 Fideltronik 17. 06. 2015
10. Dimensional Results Standard Form, PPAP str. 29 • Shall contain all dimensions marked on the drawing, characteristics and specifications for each individual process (with an accuracy of production line, form/mold, cavity etc. see PSW). • Quantity of samples which should be measured and production run size must be agreed with the Customer. PPAP/2. 1: Significant Production Run (1 -8 h, 300 pcs min) VDA 2: Production run size shall be agreed with Customer taking into consideration type of a product– this standard is practiced by Fideltronik • Customer can choose one of the submitted samples and approved (by signature or stamp) as Master Sample (see pt. 16. Master Sample) Copyright © 2009 Fideltronik 17. 06. 2015
11. Material, Performance, Test Results Material Test Results „The organization shall perform tests for all parts and product materials when chemical, physical, or metallurgical requirements are specified by the design record or Control Plan. „ Standard Form, PPAP p. 31 • E. g. Supplier Manual/ p. 15 wires: „The supplier shall additionally (if the specification does not explicitly quote other quality standards): • take samples of clamped cables and measure the stripping force of the clamp tips at start up, in progress and at the end of the clamping process. The measurements must be made for each type of clamped tips. Minimum stripping force is defined in the standard PN-EN 60352 -2. „ Performance Test Results „The organization shall perform tests for all part(s) or product material(s) when performance or functional requirements are specified by the design record or Control Plan. „ Standard Form, PPAP p. 33 • Copyright © 2009 Fideltronik 17. 06. 2015
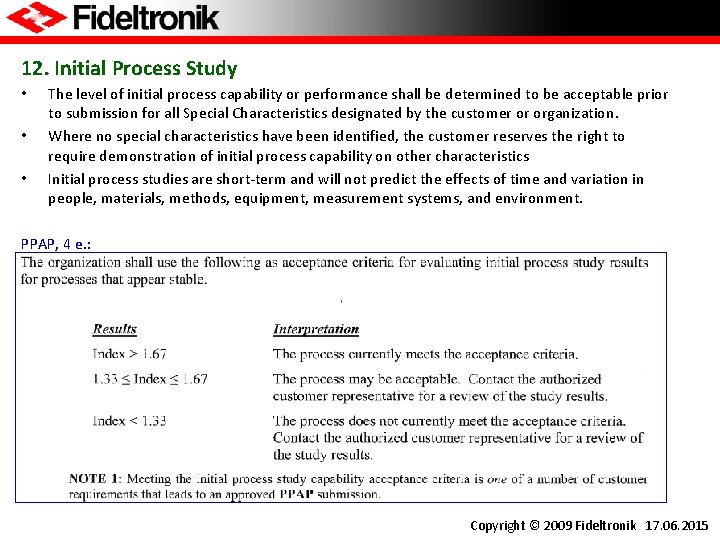
12. Initial Process Study • • • The level of initial process capability or performance shall be determined to be acceptable prior to submission for all Special Characteristics designated by the customer or organization. Where no special characteristics have been identified, the customer reserves the right to require demonstration of initial process capability on other characteristics Initial process studies are short-term and will not predict the effects of time and variation in people, materials, methods, equipment, measurement systems, and environment. PPAP, 4 e. : Copyright © 2009 Fideltronik 17. 06. 2015
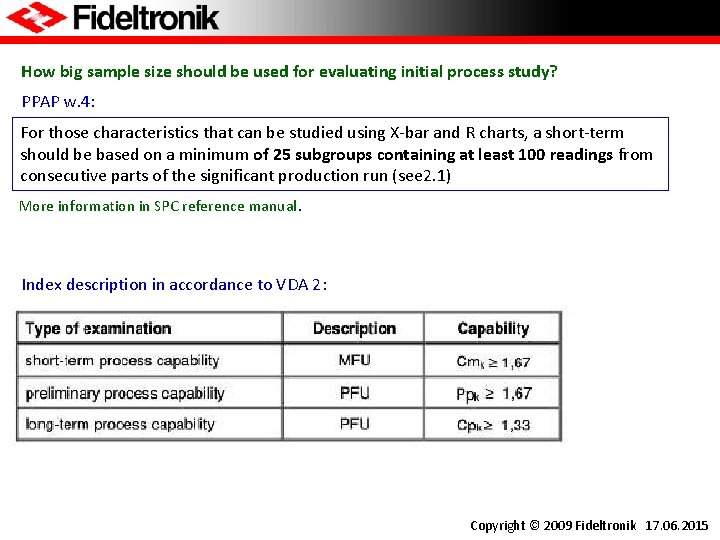
How big sample size should be used for evaluating initial process study? PPAP w. 4: For those characteristics that can be studied using X-bar and R charts, a short-term should be based on a minimum of 25 subgroups containing at least 100 readings from consecutive parts of the significant production run (see 2. 1) More information in SPC reference manual. Index description in accordance to VDA 2: Copyright © 2009 Fideltronik 17. 06. 2015
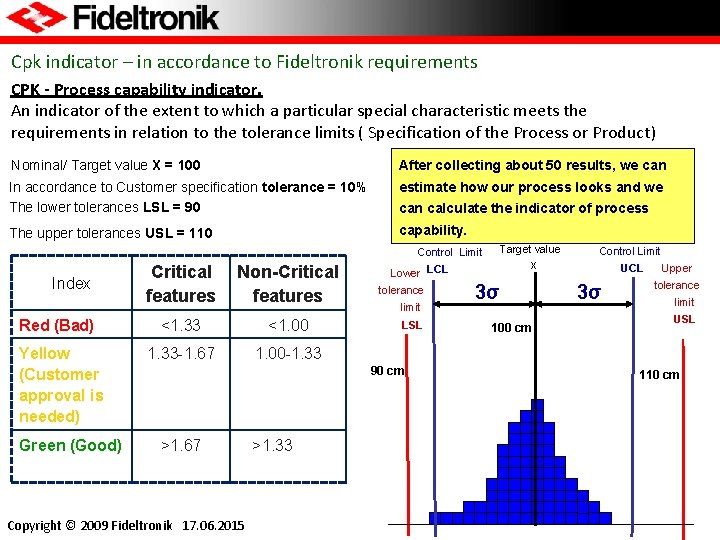
Cpk indicator – in accordance to Fideltronik requirements CPK - Process capability indicator. An indicator of the extent to which a particular special characteristic meets the requirements in relation to the tolerance limits ( Specification of the Process or Product) Nominal/ Target value X = 100 After collecting about 50 results, we can In accordance to Customer specification tolerance = 10% The lower tolerances LSL = 90 estimate how our process looks and we The upper tolerances USL = 110 capability. Lower can calculate the indicator of process Control Limit Target value Critical features Non-Critical features Red (Bad) <1. 33 <1. 00 Yellow (Customer approval is needed) 1. 33 -1. 67 1. 00 -1. 33 Index Green (Good) LCL Lower tolerance limit LSL 90 cm >1. 67 Copyright © 2009 Fideltronik 17. 06. 2015 >1. 33 Upper Control Limit X 3σ 100 cm UCL 3σ Upper tolerance limit USL 110 cm
13. Qualified Laboratory Documentation Ø Material tests specified for the approved parts should be carried out by accredited laboratories. The Supplier shall provide the following: - A copy of the certificate of accreditation of this laboratory and - Measurement report which should include: name of the laboratory, the test date the standard by which the test was made Ø If tests have not been done in an accredited laboratory supplier must provide the following: - List of competence and training of personnel to perform the test - A list of all test equipment used in the process - List of methods and standards used to calibrate devices 14. Appearance Approval Report (AAR), if applicable Standard Form, PPAP p. 26 -28 Copyright © 2009 Fideltronik 17. 06. 2015
15. Sample Product/ „reference samples” or „first samples/VDA 2” • • Delivered on Customer request together with measurement report (see p. 10) Produced under mass production conditions PPAP/2. 1: Significant Production Run (1 -8 h, 300 pcs min) VDA 2: Production run size shell be agreed with Customer taking into consideration type of a product. – this standard is practiced by Fideltronik 16. Master Sample • produced under mass production conditions, identified and approved by Customer PPAP/2. 2. 15/ Master Sample. . ”the master sample shall be identified as such, and shall show the customer approval date on the sample. The organization shall retain a master sample for each position of multiple cavity die, mold, tool or pattern, or production process unless otherwise specified by customer. ”. . Copyright © 2009 Fideltronik 17. 06. 2015
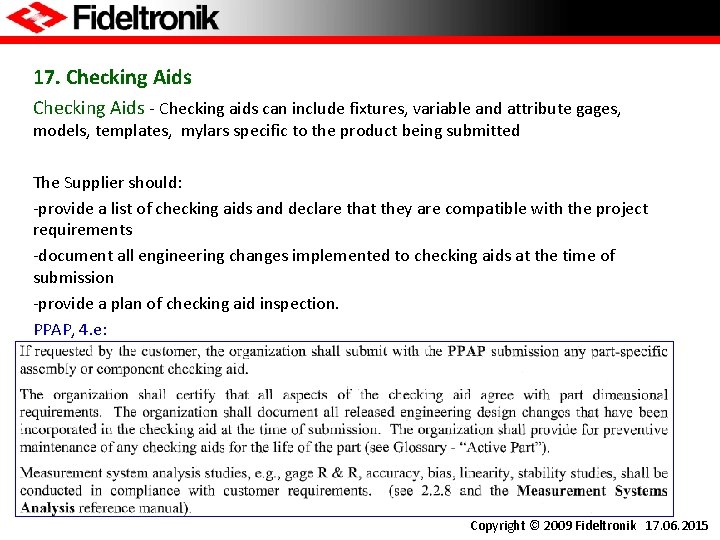
17. Checking Aids - Checking aids can include fixtures, variable and attribute gages, models, templates, mylars specific to the product being submitted The Supplier should: -provide a list of checking aids and declare that they are compatible with the project requirements -document all engineering changes implemented to checking aids at the time of submission -provide a plan of checking aid inspection. PPAP, 4. e: Copyright © 2009 Fideltronik 17. 06. 2015
THE END Copyright © 2009 Fideltronik 17. 06. 2015
- Slides: 33