PRINT WEB GRAPHICS FUNDAMENTALS MODULE 2 HOW COLOR

PRINT & WEB GRAPHICS FUNDAMENTALS MODULE 2

HOW COLOR WORKS

Additive Color: Color On screen RGB • It takes just three — red, green, and blue — to produce all the colors you see onscreen. So to create color, monitors add individual pixels of colored light. • In the additive color system, areas where red, green, and blue light overlap appear white

Subtractive Color: Printed Color CMYK • Colors result from a combination of light that’s reflected (which you see) and light that’s absorbed (which you don’t see). • A mix of cyan, magenta, and yellow ink absorbs most of the primary colors — red, green, and blue — so you see what’s left over: dark brown.

Perceiving color in pigment/ink

CMY + K =? • In order to produce true black, grays, and shades of color (colors mixed with black to produce darker colors), printing presses added black as a fourth printing ink. – B for black might be confused with blue (as in RGB), so K is used instead — as in “blac. K. ” That’s where the abbreviation CMYK comes from.

CHOOSING A COLOR MODE File Menu > New

Unless you choose a different color mode, Photoshop automatically uses RGB. The Color Mode menu gives you the following options: COLOR MODE WHEN TO USE IT RGB Color For images destined for onscreen viewing or inkjet printing CMYK Color For images you plan on sending to a commercial printing press Bitmap Restricts you to two colors: black and white. Good for high-contrast items like black-and-white text documents or creating graphics for handheld devices that don’t have color

Grayscale Expands on Bitmap mode by adding shades between pure black and pure white. The higher the document’s bit depth, the more shades of gray. Lab Color Based on the way we see color, it lets you use all the colors human eyes can detect. Whereas RGB and CMYK modes limit a file’s colors to what’s visible onscreen or in a printed document, respectively.

TRANSLATING COLORS FROM SCREEN TO PRINT
 is an acronym for “What you see is what")
WYSIWYG • WYSIWYG (pronounced “wiz-e-wig”) is an acronym for “What you see is what you get. ” It describes the elusive goal of getting prints to match what’s onscreen.

COLOR ACCURACY • The only way to achieve consistent printing results is to know: – which printer your image is headed for, – which color mode that printer wants the image to be in, – which range of colors that printer can reproduce, and – exactly what type of paper you’re using.

Color Gamut • A color gamut is the range of colors a given device can reproduce – While the color ranges of monitors and printers frequently overlap, they’re never identical.

Color Profile • A color profile is a set of instructions that determine how computer monitors and printers display or print your document’s colors. – Color profiles contain detailed info about the printer’s color gamut and, in some cases, the paper you’re using, though usually that info lives in a separate file called a paper profile.

Common Generic Color Profiles Photoshop comes with a variety of all-purpose, generic profiles, but you can also get profiles from the printer and paper manufacturers. • Paper Output Profiles • Created by manufacturers like Epson, who make profiles to match almost every kind of paper they sell: glossy, luster, matte, and so on

• The default color profile is set to “s. RGB IEC 61966 -2. 1. ” • Leave this setting alone unless you know you need to use a specific color profile for your project; EDIT MENU > COLOR SETTINGS

Monitor Calibration • To ensure accurate prints, it’s also important to make sure your monitor is displaying color accurately. – All computers come with a built-in calibration program – For best results, use an external measuring device like a colorimeter or spectrophotometer (handsized gadgets that clamp onto your monitor and measure the color it displays) instead.

• The calibration process involves adjusting your monitor so that it displays a series of colors and images consistently. Having a calibrated monitor also lets you more accurately preview how images and colors will print External Calibration device

Calibrating in Windows 1. Open Display Color Calibration by clicking the Start button Picture of the Start button, and then clicking Control Panel. 2. In the search box, type calibrate display, and then click Calibrate display color. 3. In Display Color Calibration, click Next to continue.

THE COLOR CHANNELS

• At the heart of any Photoshop file lie channels — storage containers for all the color information in your image, selections you’ve saved, masks you’ve created, and instructions for printing with special inks.

RGB CHANNELS CMYK CHANNELS

KINDS OF CHANNELS Composite channels • Technically, these aren’t really channels; they’re combinations of channels and are for your viewing pleasure only.

KINDS OF CHANNELS Alpha Channel • Grayscale representations of a temporary selection you’re in the process of making using Quick Mask mode, or a selection that you’ve saved in your Photoshop document.

KINDS OF CHANNELS Spot Channel • Used only in commercial printing, these channels let you define areas in your image that should be printed with special premixed inks (like Pan-tone colors)

DISTINGUISHING FILE FORMATS

File→Save Mac: press ⌘-S PC: Ctrl+S on a PC The Save As dialog box lets you save a copy of your file with a different name in a different location and in a different format.
 • Adobe Photoshop’s native format that keeps all your layers and")
PSD (Photoshop Document) • Adobe Photoshop’s native format that keeps all your layers and Smart Objects intact in case you need to go back and change them later. This is the format you want to use while editing images.

PRINT OUTPUT FILE FORMAT WHEN TO USE TIFF Considered the print-safe gold standard, and works with almost any program. Saving a file in this files format doesn’t compress it, so the quality remains as good as that of the original. PDF (portable document format) While it can compress files, it doesn’t do so automatically, which makes it perfect for images you plan to print, plus it preserves the smooth edges of vectors. And if you need to email the file or upload it to an online print company, PDF is a better choice than TIFF because PDFs were designed for online use. EPS Ideal for multitonal image (Printing Duotone (Multitonal) Images) or one with spot colors (tagged image file format) (Encapsulated Postscript)

WEB OUTPUT FILE FORMAT WHEN TO USE JPEG Commonly used for graphics that include a wide range of colors, like photos. It compresses images so they take up less space, but the smaller file size comes at a price: loss of quality. GIF Use GIF for images with solid blocks of color. If you’re dealing with line art or images made from areas of solid color (logos, comic strips, and so on). PNG Use PNG for super high-quality files. If quality is more important than download speed, save your image as a PNG. It also offers true transparency and better image quality than a JPEG, but it generates larger files. WBMP Use for black-and-white images headed for mobile devices. If you’re designing black-and-white images for handheld devices (cell-phones, smart phones, and so on), choose WBMP. (joint photographic experts group) (graphics interchange format) (Portable Network Graphics) (Wireless Bitmap)

*Note on transparencies • Use GIF or PNG for images with transparent backgrounds. – Use one of these formats when you want a graphic (a logo, say) to blend seamlessly into the background of a web page.

IMAGE RESAMPLING: COMPRESSION AND INTERPOLATION

RESAMPLING • Resampling is the process by which Photoshop responds to your size-change request by either adding or subtracting pixels.

TWO KINDS OF RESAMPLING • Downsampling – To make an image smaller, you have to decrease its pixel dimensions. • Upsampling – When you upsample, Photoshop adds pixels that weren’t originally there through a mathematical process called interpolation, in which it uses the pixels that are there to guess what the new ones should look like.

Resampling through the IMAGE SIZE dialog box

• RESAMPLING ON – which tells the program to increase or decrease the number of pixels in the image — processes that reduce image quality because Photoshop either invents pixels or picks ones to eliminate, respectively.

• RESAMPLING OFF – protect the image’s quality by locking the pixel dimensions. This lets you fiddle with the resolution without altering the quality because you’re just changing pixel size, not pixel quantity.

Original Image Resampled Image

THE PHOTOSHOP ENVIRONMENT Part 2

Application Frame • When you launch Photoshop CS 6 for the first time, you’re greeted by the Application Frame. This frame confines all things Photoshop to a single resizable and movable window.
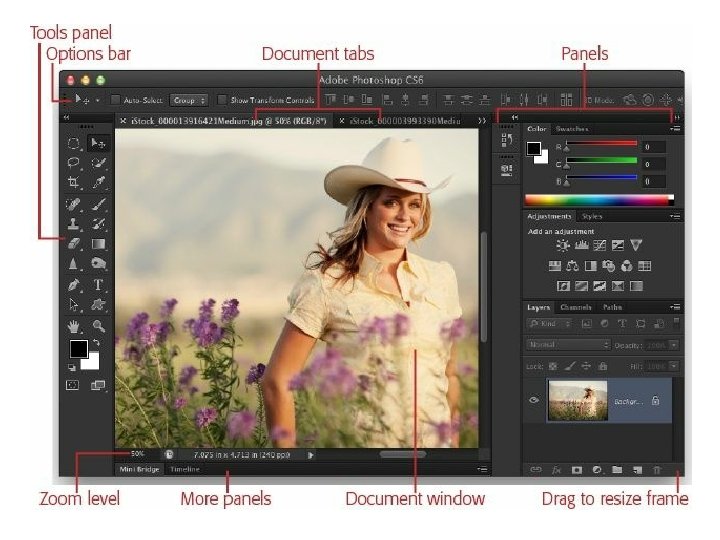

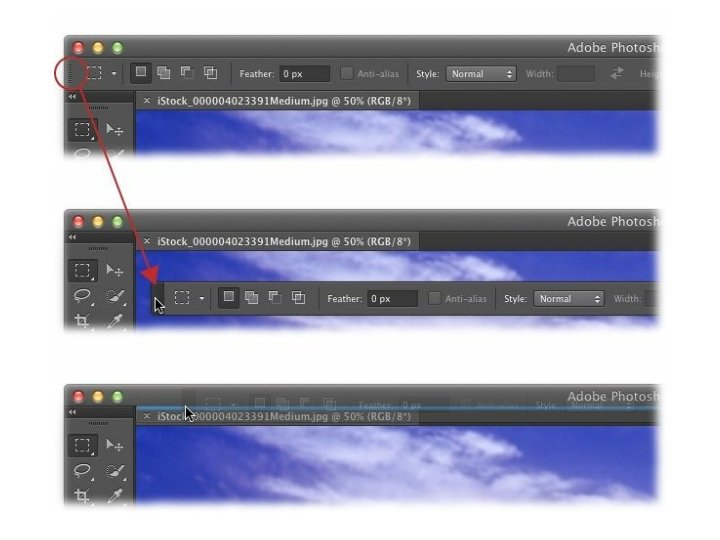
Options Bar • Lording over the document window is the Options bar, which lets you customize the behavior of nearly every item in the Tools panel. This bar automatically changes to include settings related to the tool you’re currently using.

Screen Modes • Photoshop includes three different screen modes for your document-viewing pleasure. Depending on what you’re doing, one will suit you better than the others.

Standard Screen Mode Full Screen Mode With Menu Bar Standard Screen Mode

Panels • The right side of the Application Frame is home to a slew of small windows called panels (years ago, they were called palettes), which let you work with commonly used features like colors, adjustments, layers, and so on. – You’re free to organize the panels however you like and position them anywhere you want. Panels can be free floating or docked (attached) to the top, bottom, left, or right sides of your screen. And you can link panels together into groups, which you can then move around.

Collapse Panels

Grouping Panels Drag to unto each other to group

Docking Panels

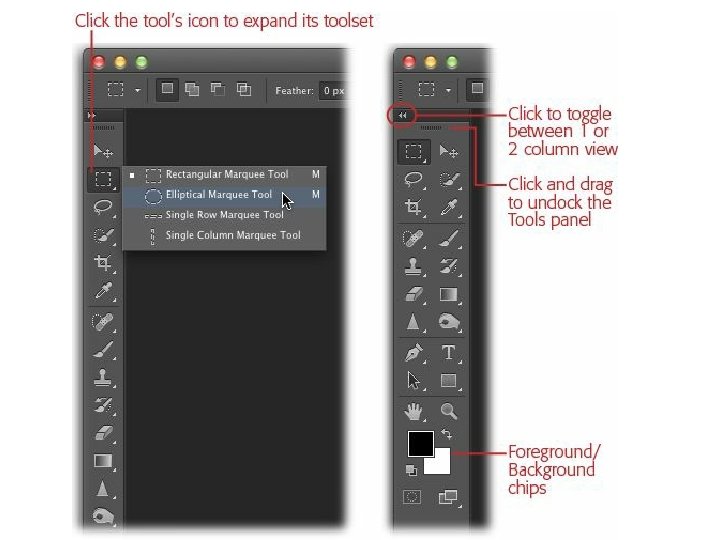
Tools Panel • The Tools is the home base for all of Photoshop’s editing tools, and it’s included in all the built-in workspaces. – When you first launch the program, you’ll see the Tools panel on the left side of the screen, but you can drag it anywhere you want by clicking the tiny row of vertical dashes near its top

Undo • You’ve got several ways to retrace your steps, including the lifesaving Undo command. – Just choose Edit→Undo or press ⌘-Z (Ctrl+Z on a PC). • If you need to go back more than one step, use the Step Backward command instead: – Choose Edit→Step Backward or press Option-⌘-Z (Alt+Ctrl+Z on a PC). • Out of the box, this command lets you undo the last 20 things you did, one at a time.

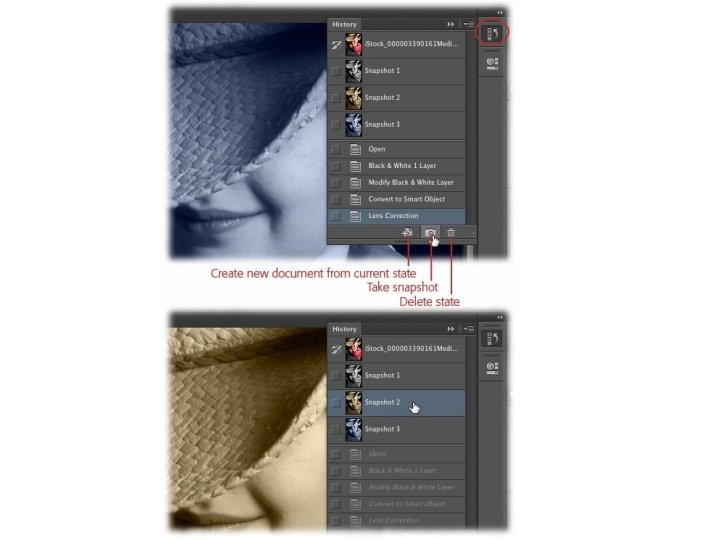
History Panel • The History panel lets you jump back several steps at once. It gives you a nice list of exactly what you’ve done to the image — in chronological order from top to bottom — letting you pinpoint the exact state you want to jump back to. – History states don’t hang around forever: As soon as you close the document, states are deleted – Take a snapshot instead

Create NEW Document • File→New, but it’s faster to press ⌘-N (Ctrl+N on a PC). Either way, you’ll be greeted with the New dialog box

Opening and Saving • The simplest method is to choose File→Save or press ⌘-S (Ctrl+S on a PC). – If you haven’t previously saved the file, Photoshop summons the Save As dialog box so you can pick where to save the file, give it a name, and choose a file format (your options are explained in the next section).

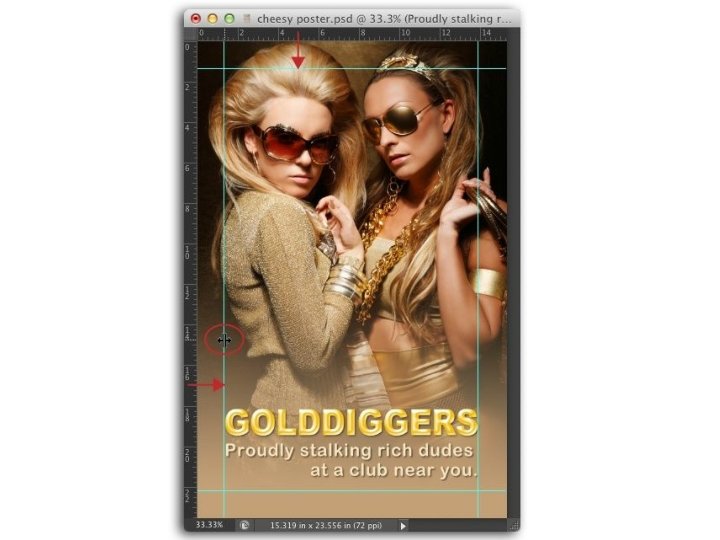
Moving Objects • The move tool allows you to move a selection or entire layer by dragging it with your mouse or using your keyboard arrows keys. When the move tool is selected, click and drag anywhere in the image. By default, if an area is selected the selection will be moved, otherwise the whole layer will be moved. See the options bar for more options. • Alternatively, use your arrow keys to move the selection or layer in small increments.

Changing you View • Zoom Tool – Zoom tool, which looks like a magnifying glass. You can click its icon at the bottom of the Tools panel or simply press Z – hold down your mouse button, and drag right to zoom in or left to zoom out. – You can also zoom using your keyboard, which is faster if your hands are already on it: Press ⌘ and the + or – key (Ctrl+plus or Ctrl+minus).

Hand Tool • Once you’ve zoomed in on an image, you can use the Hand tool to move to another area without zooming back out. – Grab this tool from the Tools panel or just press and hold the space bar on your keyboard

Guides and Rulers • Before you can create guides, you need to turn on Photoshop’s rulers. – The fastest way to do that is by pressing ⌘-R (Ctrl+R on a PC), but you can also turn them on by choosing View→Rulers. • Once you’ve turned rulers on, you can add a guide by clicking either the horizontal or vertical ruler, and then dragging the guide into your document

Using the Document Grid • If you want lots of guides without all the work of placing them, you can add a grid to your image instead by choosing View→Show→Grid.

Layer Basics

Activating a Layer • About the easiest thing you’ll ever do in Photoshop is activate a layer — just mouse over to the Layers panel and click the layer you want to work on.

The LAYERS PANEL

Hiding and Showing Layers • The little visibility eye to the left of each layer lets you turn that layer off and on

Restacking Layers • Once you start adding layers, you can change their stacking order — the order they’re listed in the Layers panel — to control what’s visible and what’s not.

 or choose Layer→New→“Layer via Copy”")
Duplicating Layers • Press ⌘-J (Ctrl+J on a PC) or choose Layer→New→“Layer via Copy” to copy the active layer onto another layer just like it.

Renaming Layers • Double-click a layer’s name in the Layers panel and rename it right there (Photoshop highlights the name when you double-click it, so you can just start typing). When you’re done, press Return (Enter on a PC).
, activate")
Deleting Layers • To delete a layer (save for a locked Background layer), activate it in the Layers panel and then do one of the following: – Press Delete (Backspace on a PC). – Drag it onto the trash can Control at the bottom of the Layers panel. – Click the trash can icon.

Copying and Pasting Layers • To copy and paste a whole layer into another document: – choose Select→All (or press ⌘-A [Ctrl+A]) to select everything on the layer and then press ⌘-C (Ctrl+C). – Next, click the other document’s window and press ⌘-V (Ctrl+V) to add the layer.

• To copy part of a layer into another document: – create your selection first and then press ⌘-C (Ctrl+C on a PC) to copy it. Then open the other document and press ⌘-V (Ctrl+V); Photoshop pastes those pixels onto a new layer.

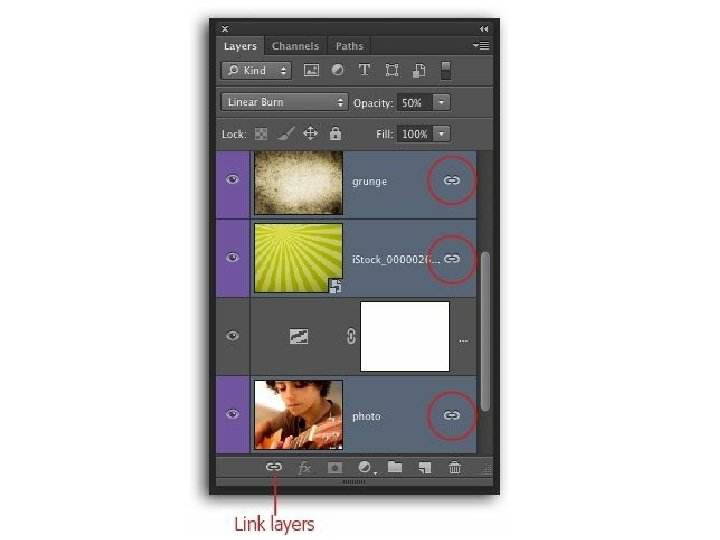
Linking Layers • If you need to move something in your image that’s made from several layers, you can link layers before you grab the Move tool so that they travel as a single unit

Locking with Layers • You can add a more serious level of protection with layer locks, which prevent layers from being edited or moved. At the top of the Layers panel is a row of four buttons that you can use to lock various aspects of layers
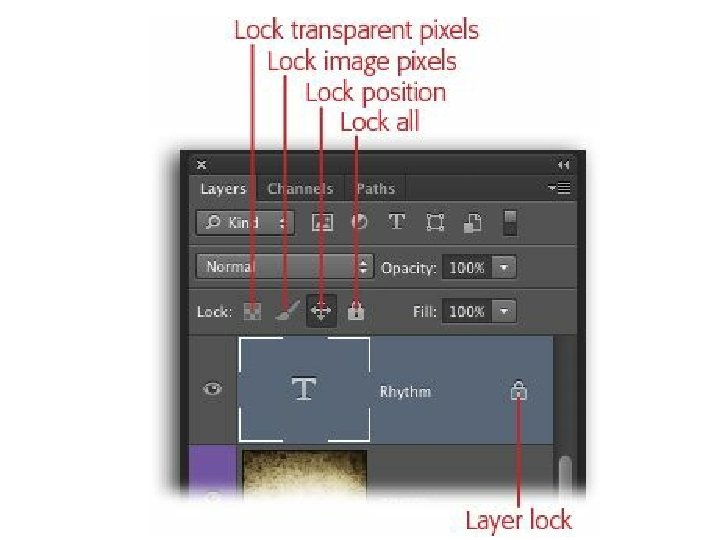

• Lock transparent pixels. – This protects the layer’s transparent pixels so they don’t change even if you paint across them or run the Edit→Fill command. • Lock image pixels. – This won’t let you do anything to a layer but nudge it around with the Move tool. The button for this lock looks like the Brush tool. • Lock position. – If you’ve carefully positioned a layer and want to make sure it stays put, click this button, which looks like a four-headed arrow. You can still edit the layer, you just can’t move it. • Lock all. – This is your deadbolt: Use it to prevent the layer from being edited or moved. You know this lock means business because its button is a padlock.

Resizing & Rotating Layers • To resize the contents of a layer — or many layers — without changing the size of your document, you can use the Free Transform tool – To resize the contents of a layer — or many layers — without changing the size of your document, you can use the Free Transform tool

• Grab any of the white corner handles and drag diagonally inward to decrease the layer content’s size. • To resize the content proportionately so it doesn’t get squished or stretched, hold down the Shift key as you drag.
, position your cursor outside the bounding box and")
• To rotate the layer(s), position your cursor outside the bounding box and then — when the cursor turns into a curved, double-headed arrow — drag up or down in the direction you want to turn the layer(s).

Group Layers into Folders • You can rein in a fastgrowing Layers panel by tucking layers into folders called layer groups.

Merging Layers • To merge two visible layers that live next to each other in the Layers panel — and the bottom one is a pixel-based layer — activate the top layer and then choose Layer→Merge Down, choose Merge Down from the Layers panel’s menu – or press ⌘-E (Ctrl+E on a PC).

Filling a Layer with Color • One of the most common things you’ll do with a new layer is fill it with color. • Fill an existing layer with color. – Edit→Fill – You can also fill the active layer with your foreground color by pressing Option-Delete (Alt+Backspace on a PC), or your background color by pressing ⌘-Delete (Ctrl+Delete on a PC).

Create a Fill Layer • . If you’re not sure which color you want to use, choose Layer→New Fill Layer→Solid Color, or click the half-black/half-white circle at the bottom of the Layers panel and choose Solid Color. – Fill layers also come with their own layer masks, making it super simple to hide part of the layer if you need to.

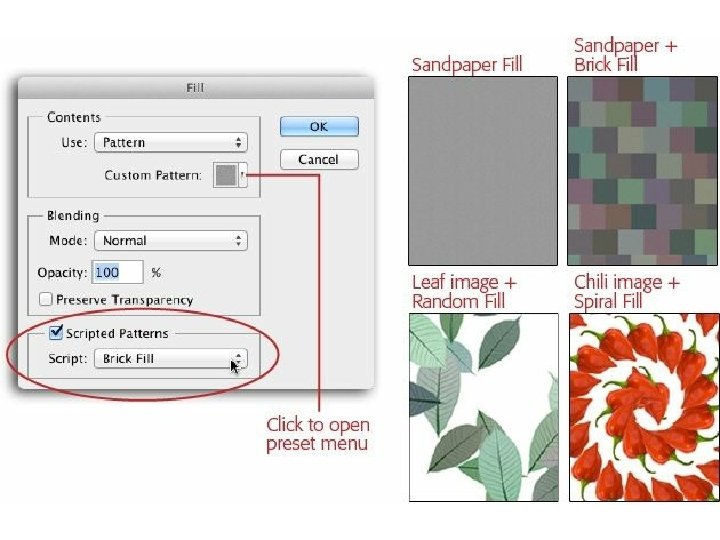
• Unlike image layers, the whole layer gets filled with color even if you enlarge the canvas. – In addition to using Fill layers to create solid backgrounds, you can use them to fill a layer with a gradient or a repeating pattern
- Slides: 87