Principles of Removable Partial Denture Design Dalhousie University

Principles of Removable Partial Denture Design Dalhousie University

Basic Principles

No Treatment Prior to RPD Design Approval! • Emergency Treatment Only • RPD design part of Treatment Planning • Draw design RPD on surveyed cast FIRST • Can affect restorations • Can affect Crown/Preparatio

Minimize Tissue Contact ✗ • • Minimal coverage soft & hard tissues Avoid plating unless unavoidable ✔

Whenever Possible, Avoid Plating • More plaque, bleeding, loss of attachment, root caries when framework near or covering gingival margins Yeung et al, J Oral Rehab 2000 Budtz-Jorgensen, Quintess 1999 Jacobson, Compend 1987 Chandler & Brudvik, JPD 1983 Runov et al, J Oral Rehab 1980, Brill, JPD 1977, etc • More comfortable • Prefer Ling bar: Ling plate 3: 1 Campbell JPD 1977 ✗ ✔

Optimizing Periodontal Health with RPD’s • Hygienic RPD design • OHI, yearly maintenance & patient compliance • Long term periodontal health is feasible Bergman et al, 25 year longtitudinal study (1971 -1995) • • • Baseline assessment & yearly maintenance 63% of survivors still wearing same RPD No change in periodontal status

Minimize components ✗ • Improved hygiene with simple shapes & fewer components Jacobson, Compend 1987 Budtz-Jorgensen, Quintess 1999 Runov et al, J Oral Rehab 1980, Brill, JPD 1977, etc • Minimize indirect retainers - effectiveness is controversial ✔

Minimize Framework Elements • Cingulum rests join proximal plates, rather than having separate minor connectors, whenever possible ✘ ✘ ✔ ✔

Utilize What’s Present • • Select design that fits hard & soft tissues, rather one that requires tissue alteration If rest seats present, use them

Plan for the Future • • Partial denture can be adapted if abutment is lost Design crowns with rest seats and guiding planes

Don’t Design Using Cast Alone • • • Can’t assess: • • abutment mobility compressibility of mucosa floor of mouth, prominent frena occlusion Check tissues intraorally Mounted models to assess occlusion
 Avoid incisal rests")
Rests • • Ensure sufficient rest seat depth/clearance (1. 5 mm) Avoid incisal rests • • • Poor esthetics Increased tilting Use bonded cingulum rest, if no prominent cingulum
 • Ensure adequate bulk,")
Avoid Rests on Restorations • • If possible (not always) • Ensure adequate bulk, retention If restoration fails, restoration will be more complex, expensive

Avoid Rests in Areas of Heavy Occlusal Contact • • Extruded, tilted teeth Check for clearance for maxillary cingulum rests (intraorally, and on cast)
 adjacent edentulous space Tissue Borne")
Rests • • Tooth Borne (Cl III & IV) adjacent edentulous space Tissue Borne (Cl I & II) mesial preferred, except if: restoration tilted (access) heavy occlusal contact • • •

Direct Retainers Cl III & IV • Clasp of Choice: Cast Circumferential • • If can’t use tooth next to edentulous space: Double Embrasure If Tilted: • • Cast Circumfertial with lingual retention Ring Clasp

Direct Retainers Cl I & II • Clasp of Choice: RPI • • If no room for I-bar: RPA If mesial rest not possible: • Combination Clasp

Rationale for RPI as Clasp of Choice Cl I & II • • • Esthetics • hidden by lip Hygiene • just tip of clasp contacts tooth Stress Release

How RPI Reduces Stress • Whole retainer rotates less • Retentive clasp disengages from tooth

• • I-bars Gently curve from gridwork Originate from gridwork posterior to 1 st replacement tooth • Do not use L-bars (less flexible) • Do not flatten retentive tip ✔ ✗

Direct Retainers • Minimize need for direct retention • • Broad, intimate denture base adaptation Use of minor soft tissue undercuts Guiding planes Indirect retainers

Circumferential Clasps Design Retentive Arm Correctly Incorrect S-shaped Too Straight Correctly Designed But below H of C - lower height of contour

Retentive Undercuts • If retentive tip too close to gingiva: • • • Prepare undercut (move clasp higher) Add composite resin to raise height of contour Must be marked!

Abutment Mobility • Use stress releasing retainers • More load transferred to residual ridge RPI RPA Combination Clasp

Indirect Retainers • Class I & II • • • As far from primary fulcrum as possible (90°) Normally not required for tooth borne RPD’s Don’t use if a direct retainer elsewhere will provide indirect retention

• • • Number of Direct Retainers 4 - Greatest amount of retention • • (e. g. Cl. III, mod 1) Clasps can be omitted, if supplemental retention is substituted 3 - Less retentive, (Class II) 2 - Absolute minimum (Class I)

• If Omit a Direct Retainer Find some other factor to substitute for missing retention • • Long guideplanes Many guideplanes More soft tissue coverage Use soft tissue undercuts

The Tilted Posterior Abutment • If severe - possible extraction, • orthodontic uprighting If moderate - heavy guide planes • • prevent food impaction, hygiene problems so clasp arms can be placed lower • • comfort prevent occlusal interference

Major Connectors • Assess tori, height of floor of mouth, frenal attachments, which may affect major connector choice

• Major Connectors Maxilla • • Tooth borne: Palatal Strap Distal Extension • • A-P Strap Full palatal plate if extensive, or need extra stability or retention

Point to Hamular Notch • • • Only on a side where butting with acrylic Where denture base terminating in hamular notch i. e. distal extension side ONLY! No Yes

• Maxillary Major Connectors Posterior extensions of distal extension framework should point to hamular notches

Major Connectors • Mandible – Lingual Bar if possible – Lingual Plate if: • • High frenum, floor of mouth Want to stabilize teeth May need to add teeth to partial Want to avoid torus

Distal Extension Bases • Extended to : • • Retromolar pads Hamular Notches

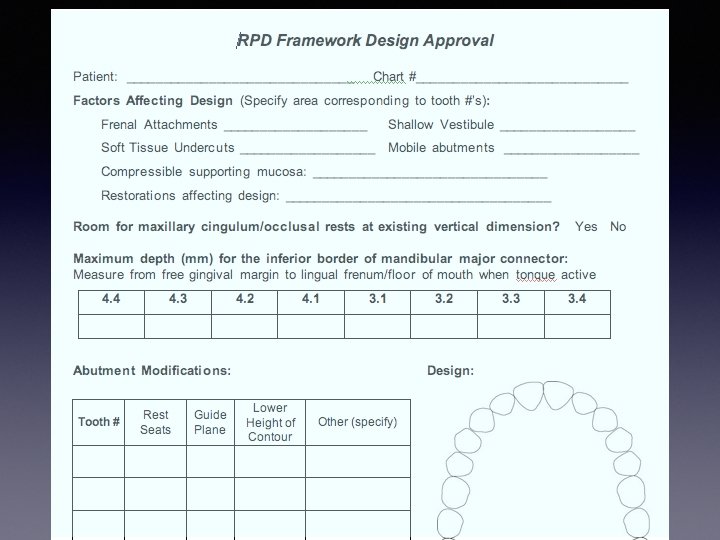
Mand. Major Connector • ALWAYS measure distance for inferior border from FGM

Major Connectors • Avoid abrupt changes of contour or bulky contours, particularly at junctions with the acrylic denture bases

Minor Connectors • Unless using plating, do not wrap cingulum rest minor connectors into embrasures Correct Incorrect

Consider Soft Tissue Variables • • • Frenal Attachments Vestibular depth / undercuts • Mark extent on cast Compressibility of attached mucosa
 Tori Access to")
• • • Consider Hard Tissue Variables Opposing occlusion (mark) Tori Access to embrasures Positions of undercuts Mobilities Restorations
 (adjacent edentulous spaces) Identify if abutment(s) needed")
Design Sequence • • Identify primary abutment(s) (adjacent edentulous spaces) Identify if abutment(s) needed for indirect retention in Cl I & II cases (only if required) Select a path of insertion Determine rest position Select direct retainers Select major connector Select minor connectors

Drawing the Design • Red – Retentive undercut – Wrought wire arms • Blue – All other elements – WW Retentive undercut

Drawing the Design • Absolute Accuracy • Technician to place elements in proper position & proportions

Drawing the Design • Absolute Accuracy • • Single distinct lines No guessing involved

How to Improve? • • Just not neat enough Tripod marks too close to each other, not clear

Major Connector Keep away from FGM at posterior Do NOT plate unless necessary

How to Improve? • • Too ‘Sketchy’ Major connector too close to FGM #3. 4, 3. 5

Tripod Marks Keep away from design lines Mark with carbon marker, circle in red

No I-bars if Interferes with Soft Tissues Frenal attachments, Shallow Vestibule

How to Improve? • No S-shaped clasps

How to Improve? • • Clasps too short, too straight Drawing accurately counts!

How to Improve? • • Major Connector way too narrow Proportions count!

How to Improve? Tooth borne RPD’s or modification spaces • • Rests adjacent edentulous space No mesial rest #35

How to Improve? • Clasp arm too high

How to Improve? • Arm too straight

How to Improve? • • Arms too thick Arms too high

Border Contours • No sharp edges unless acrylic junction

Drawing • Be neat and in proportion I-bar too thick

Major Connectors Contact with Abutments • No tiny strut from abutment to grid work or major connector Yes No
- Slides: 59