Primary Health Care PHC Laboratory toolkit Session 2
 Laboratory toolkit Session 2")
Primary Health Care (PHC) Laboratory toolkit Session 2

Session 2 Objectives • By the end of Session 2 you will be able to: • Describe the step-by-step process as outlined in the PHC Laboratory Handbook • Highlight new or amended processes, procedures or practices. • Explain impacts on PHC service delivery of pre and post-analytical errors.

Session format • PHC Laboratory Handbook overview • Understanding the PHC Laboratory Handbook in a patient-centric PHC service • PHC Laboratory Handbook Step by Step Guide Section 1 - 8 • Principles, procedures and processes; • Implementation guidelines

PHC Laboratory Handbook Overview Session 2

Placing laboratory services within a patient-centric PHC health service

PHC Laboratory Handbook The handbook is a tool that aims to improve the clinic-laboratory interface The PHC Laboratory handbook and the NHLS national laboratory handbook • The PHC laboratory handbook does not replace the NHLS national laboratory handbook PHC laboratory handbook aims to: • • Provide guidance for the selection of appropriate laboratory tests, specimen collection and preservation, storage, recording and tracing of courier collections. Define available platforms to obtain lab results PHC laboratory handbook helps to prevent or minimise: • • • Incorrect test selection Incomplete/ poorly completed request forms Unlabelled and leaking specimens Contaminated / aseptically collected specimens Unnecessary tests duplications Tracing and retrieval of results
 sections Each")
Overview of the PHC Laboratory handbook The handbook consists of eight (8) sections Each section describes the steps of each of the core elements

PHC Laboratory Handbook Step by Step Guide Section 1 - 8 Session 2

Section 1: Complete request form Identify test/s to be performed Efficiency considerations: Laboratory investigations: Should be requested for specific clinical indication, not as a routine procedure; Do not replace clinical examinations; Should not be repeated because results are not available Important principles to inform test identification: • Which test to request? • Was the test requested previously, is there any reason to repeat? • Will the result modify or change the diagnosis, management or treatment? Clinical assessment Key assumption is that the following have been done to inform the selection of the laboratory tests: • Clinic assessment • Examination
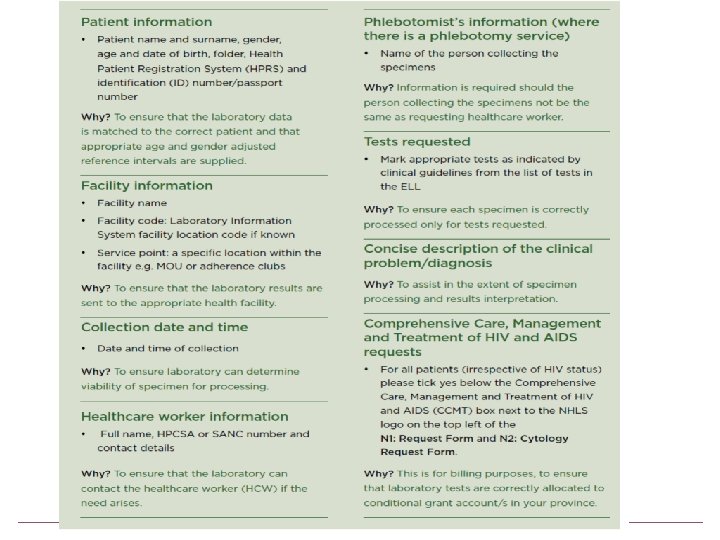

Mandatory Information to be provided

N 1 PHC request form

N 2 Cytology request form

Classroom exercise: Section 1 Complete the Request Form In your group Use the PHC Lab Handbook – go to Section 1: Complete the Request Form. Have a look at the two forms provided- N 1 and N 2. 1. With reference to the N 1 Form, what do you notice about: a) The language/terminology; b) The tests listed; c) Data elements related to HIV and TB; d) The Bar codes 2. Comparing the N 1 and N 2: • What is the difference between the two forms? 3. What are the potential benefits or improvements that can be derived from the use of these two forms?
Terminology used is")
Classroom exercise- expected responses Section 1 Complete the Request Form 1. a)Terminology used is facility based and not hospital based, examples: • Folder number instead of hospital number • Facility name instead of clinic name b) The tests listed reflect the Essential Laboratory List (ELL). The ELL: • identifies all laboratory tests that can be requested by PHC facilities (with and without a doctor). • details estimated turnaround times, specimen types, specimen collection tubes, specimen storage conditions and special instructions for each test. c) There additional data elements to be captured for HIV and TB d) The barcodes will now be used in the facility for recording in the facility specimen register

Classroom exercise- expected responses Section 1 Complete the Request Form 2. The N 1 form list all the routine tests from the ELL, while N 2 form is used specifically for Cytology 3. The potential benefits include: • Streamlining the interface between examination and diagnostic will enable better patient management; • Ideal clinic goal • Integrated

Section 2: Specimen Collection Efficiency considerations: NOTE All specimen collection procedure have special precautions that are critical to avoid improper collection Key Resources to guide specimen collection and handling • PHC Essential Laboratory List (ELL) • Key to specimen handling • Step-by-step procedures outlined in the PHC Lab Handbook Important principles guide specimen collection: • Verify the identity of the patient and make sure that this is correct • Follow guidelines for specimen collection • Check specimen container/s for expiry dates where available
")
PHC Essential Laboratory List (ELL)

Key to specimen handling

Standard infection control precautions 1. Identify and assemble the individual specimen collection materials required i. e. Vacutainer, test/tube/s, sterile specimen jars etc. to perform the tests requested 2. Wash hands using soap and water or disinfectant 3. Dry hands thoroughly 4. Put on gloves 5. Follow strict aseptic technique when collecting specimens 6. Collect recommended specimen quantities for the requested test to avoid specimen rejection due to insufficient specimen

Specimen collection procedure Venipuncture Blood collection Neonates Microbiology Cytology EID

Classroom exercise 2: Section 2 Specimen Collection In your group • Use the PHC Lab Handbook – go to Section 2: Specimen Collection 1. Review the step-by-step procedure 2. Identify any new information, observation or insights

Section 3: Package Specimen Record test request in patient folder Package Specimen Label Specimen • • All specimens must be placed in the appropriate compartment/s of the specimen plastic bags provided Add the N 1/N 2 request form in the space provided • • Place a barcode from the N 1/N 2 request form in the lab investigation section of the patient folder for tracking purposes Indicate the date of test request Note how this is different from the current procedure • • Write the patients name, surname and clinic folder or HPRS number clearly using a pen or marker on each specimen Peel off barcode label/s from the N 1/N 2 request form and attach to specimen Place the barcode horizontally for Vacutainer

Label Specimen

Record test request in patient folder

Package specimen

Section 4: Specimen Storage of Specimen Record in the N 4 facility specimen register • • • Specimen Storage condition for each ELL test must be adhered to • There are two parts to the N 4 Register Cover Page • Register number • Start and end date and Facility name Register • For each sample enter the date, folder number and tests submitted • Attach the barcode label from N 1/N 2 request form Note how this is different from the current procedure
 cover")
Example of completed PHC Facility Specimen Register (N 4) cover
 with patient samples captured prior to")
Example of a Specimen Facility Register (N 4) with patient samples captured prior to courier collection

Section 5 specimen collection by courier Handover samples to the courier • • Staff must check to ensure that the number of specimen packages from the specimen collection box, fridge or cooler box correspond with the number of entries in the N 4: PHC Facility Specimen Register Handover specimens Draw a line in the N 4: PHC Facility Specimen register after the last specimen entered. Sign the NHLS courier log sheet to confirm specimen collection Courier Collection • A courier service is provided by the NHLS to collect patient specimens on a daily basis (or as agreed with the district management team (DMT)) • The courier should arrive daily at the scheduled time. If not, follow the escalation procedure to alert the laboratory manager.

Example of completed N 4 register after courier collection

Section 6: Manage laboratory results File Results in the Patient Folder • • File results in the patient folder Update the Laboratory Test Results form in the Patient Folder Update the N 4 Register to indicate which results have been received Note how this is different from the current procedure Review Results • • • Open envelop ensure it becomes to correct facility Screen all report to identify abnormal results Record date and time of review and update the N 4 register to indicate which test results were delivered Access Results • • • Results can be accessed via: Telephone Printed (Routine/Primary mechanism) SMS NHSL Web. View Portal

Results access methods

Section 7: Order Specimen Collection Materials Receive the specimen collection materials delivered by the NHLS courier. Update the section “Materials Received by Facility Hand completed N 3 form to the courier Ask the courier to complete the section collection by courier before handing over the form Complete N 3 form Review the Facility Specimen Register (N 4) entries Conduct a stock take of specimen collection materials Using the information obtained from the stock take and review of the Facility Specimen Register (N 4) complete the Specimen Collection Order Book (N 3). Review the N 4 Facility Specimen Register to assess the quantity of request forms and specimen collection used in the last two weeks. Conduct a stock take of all specimen collection materials in the health facility.
")
PHC Order Book: Materials for Specimen Collection (N 3)
 Cover")
PHC Order Book for Specimen Collection (N 3) Cover

Section 8: Access to additional information • This section provides resources for additional information and contact details about laboratory services: • Using the NHLS website to obtain details about national laboratory handbook (for all levels of care) and laboratory contact details.

Discussion
- Slides: 38