Practical Medical Microbiology PHT 226 By Elmutasim O

Practical Medical Microbiology PHT 226 By Elmutasim O. Ibnouf Lecturer of Microbiology Department of Pharmaceutics & Microbiology College of Pharmacy Alkharj University

• LABORATORY RULES & USING OF MICROSCOPE

LABORATORY RULES Many of the microorganisms used in this course may be pathogenic for humans. Certain rules are necessary to insure safety for you. 1. The laboratory benches must be kept free of articles not actually used. 2. Wear a coat during the laboratory period to protect your clothes. 3. Smoking, eating, drinking and gum chewing are not permitted. 4. A jar of disinfectant is provided on each bench for holding the contaminated pipettes. 5. Please return all reagents, cultures and glassware in their respective places. 6. A void unnecessary conversation, noise, or movement. 7. Laboratory notes should include results obtained from the experiments, a drawing of each microscopic observation, and explanation of results reported. 8. Close doors, and windows to prevent contamination.

9. Record the results of your experiments directly in your laboratory notebook. Do not record your results on a piece of paper with the idea that they will be transcribed later. 10. When you have finished using the microscope, clean excess oil from the oil immersion lens with lens paper and xylene. 11. At the end of laboratory period, turn off the Bunsen burner, and re-arrange your staining rack before leaving 12. Each student should have a white coat and marker.

THE MICROSCOPE Microbiology is the science that deals with the living organisms very small to be seen with the naked eye, thus the advent of microbiology dates from the invention of the microscope. Types of Microscopy: 1. Light Microscopy: a. Bright field microscopy b. Dark field microscopy ● The source of light set at the side of the specimen, and so the light reaching the objective lens is the light which is reflected from the specimen. The organism appears bright in the dark background.

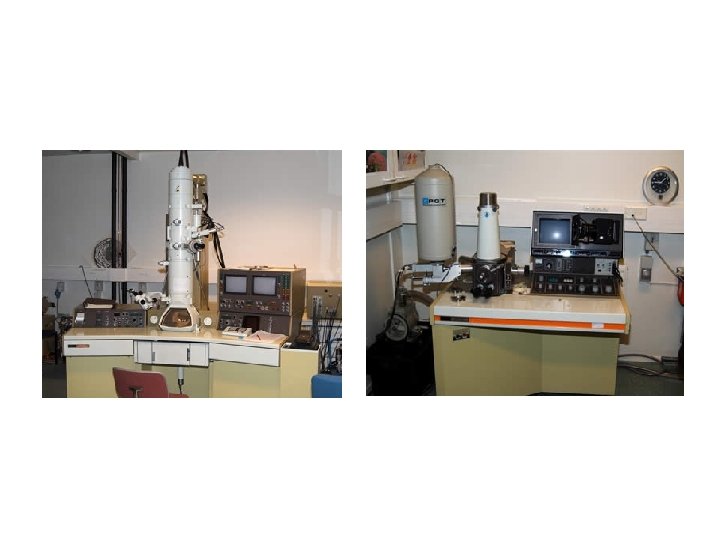
c. Florescent microscopy ● The bacteria stained with florescent dye and U. V. light is used. d. Phase contrast microscopy ● Here the object appears dark in bright background. ● This can be used to illustrate the structure of the specimen. 2. Electron Microscopy: ● Has a very high resolution and very high magnification power. a. Transmission electron microscopy (TEM) b. Scanning electron microscopy (SEM)

Light Microscope: The compound light microscopy is composed of: • Two lens system of magnification : a. Ocular lens: Usually has a magnification of X 10. b. Objective lens: The objective lenses are of two types: 1. Dry lenses: a. Low power objective lens, magnification is X 10. b. High power objective lens, magnification is X 40. 2. Oil immersion lens: Magnification is X 100.
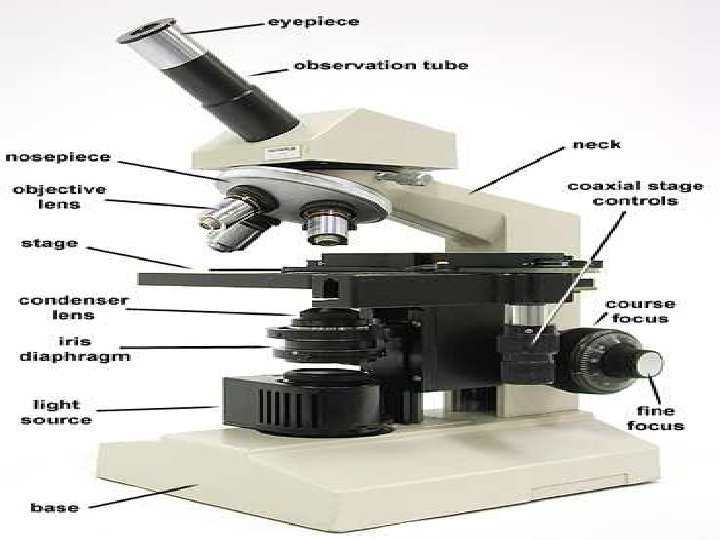

Magnification: The total magnification power = magnification of the ocular lens X magnification of the objective lens. Total magnification with low power = 10 X 10 = X 100 Total magnification with high power = 10 X 40 = X 400 Total magnification with oil immersion = 10 X 100 = X 1000 Resolution: ● It is the ability of the lenses to distinguish two adjacent points as separate entities, and it is controlled by wavelength (λ) of the light used and a numerical aperture of the lens. ● The shorter wavelength (λ) and the bigger numerical aperture, gives more resolution. ● Resolving power (RP) = smallest visible distance = λ / numerical aperture. So magnification enlarges the object and the resolution clarifies the object.

2. Stage: On which the slide will be placed. In the center of the stage, there is a hole through which the object can be illuminated from below. Its movement is controlled by the coarse adjustment knob and fine adjustment. 3. Illuminating system: Its composed of: a. Lamp. b. Condenser Lenses gather the light from lamp. c. Iris of diaphragm Regulate the amount of light passed through an opening in the stage to the slide .

Importance of oil utilization: Because the refractive index of air is less than that of glass, light rays are refracted as they pass from the microscope slide into the air. Thus many of the light rays passed from the specimen are refracted as so great angle that they completely miss the objective. Placing oil that has the same refractive index as glass between the slide and the objective lens will greatly decrease refraction so increase the amount of light passed from the specimen to the objective Direction for using the microscope with oil immersion lens: Procedure: 1. Place the slide provided on the stage, specimen side up, and center the section to be examined as accurately as possible over the hole in the center of the stage.

2. With the low power objective in position, adjust the lamp until it gives maximum amount of light through the specimen with the aid condenser and iris of diaphragm. 3. Rotate the nosepiece until the oil immersion objective clicks into position. 4. Place a drop of cider wood oil on the portion of the slide directly under the objective. 5. Watching the objective from the side carefully lower it into the oil. Don’t allow the objective to touch the slide, look through the ocular, and slowly focus with the coarse adjustment. Then, fine adjustment until a good sharp image will appear. 6. Record your results as shown below: Name of stain: Name of organism: Description: Shape of cell: Arrangement of cells: Colour reaction: 7. Each time after using the oil immersion lens, clean the oil from the objective lens with lens paper moistened with xylene.

SOURCES OF CONTAMINATION The purpose of this is to identify some of the sources of contamination present in the laboratory in order to avoid them. Material: You have been provided with 4 Nutrient Agar plates. a. Contamination from hands: 1. Take a Nutrient Agar plate and divide it into 4 sections: a. Unwashed. b. Washed. c. Disinfected. d. Control. 2. Imprint your finger print on (a) unwashed area. 3. Wash your hands throughly, dry your hands in air and imprint the same finger prints on (b) washed area.

4. Wash your hands with soap, water and disinfectant, dry your hands in air, do not use hand towel. Imprint the same finger on the (c) disinfectant area, leave section (d) as control. 5. Incubate your plates for 1 day at 370 C and record the appearance of the plate. b. Contamination from breath: 1. Take a Nutrient Agar plate. 2. Hold it in front of your mouth. 3. Cough and breath vigorously. 4. Invert the plate and incubate for 1 day at 370 C. 5. Record the appearance of the plate. c. Contamination from air: 1. Expose a Nutrient Agar plate to the air on the bench for 1 hour. 2. Invert the plate and incubate for 1 day at 370 C. 3. Record the colonial appearance.

EXAMINATION OF THE MICROORGANISMS UNDER THE MICROSCOPE 1. a. I. ● ● II. There are two ways in which the microorganisms may be examined under a microscope, in the living state or in the fixed state. In the living state: Wet Mount: The purpose of this exercise is the examination of living microorganisms in a liquid phase. It is used to observe certain activity e. g. : Reproduction Motility Used in case where staining and other manipulations affect the structure of microorganisms.
. ● Slides")
Materials: ● Suspension of microorganisms in a mixed culture bottle, marked (W). ● Slides and cover slips. Method: 1. Take a clean slide, pass through the flame of the bunsen burner. 2. Add a loopful of culture on to the centre of the slide. 3. Carefully place a cover slip over the drop. 4. Look under the microscope under the dry lenses (X 10 and X 40). 5. Record the results. b. Hanging Drop Preparation: The object of this exercise is to observe the microorganism and test of its motility.
 and (N) (One is motile and the other is non-motile).")
Materials: ● Culture (M) and (N) (One is motile and the other is non-motile). ● plastacine. ●Slide and cover slip. Method: 1. Take a clean slide. 2. Roll plasticine in between your palms to make a thin elongated roll, and make a ring out of it. 3. Place it over the slide making a circle, smaller in size than the cover slip. 4. Place drop of bacterial culture in the centre of cover slip, by a loop. 5. Invert the slide over the cover slip and gently press the slide against the plasticine ring. 6. Turnover the slide quickly, so that the cover slip is on top and the slide at the bottom, allowing the drop to hang. 7. Look under the dry lens X 10 and X 40 later, record your observations.

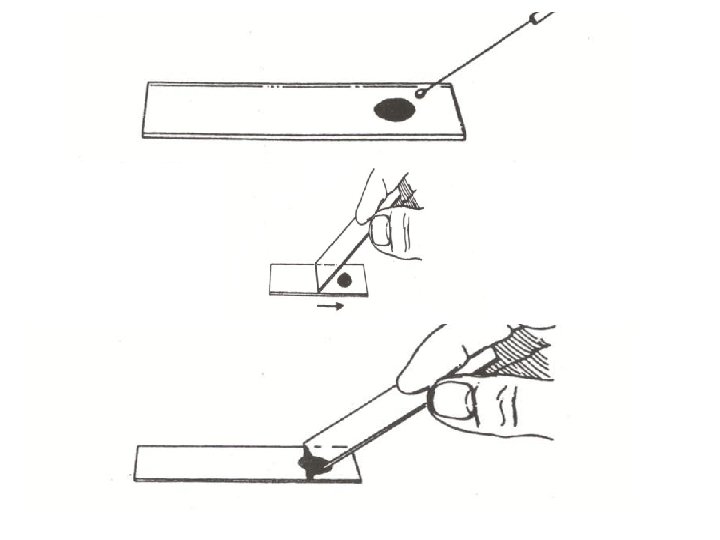
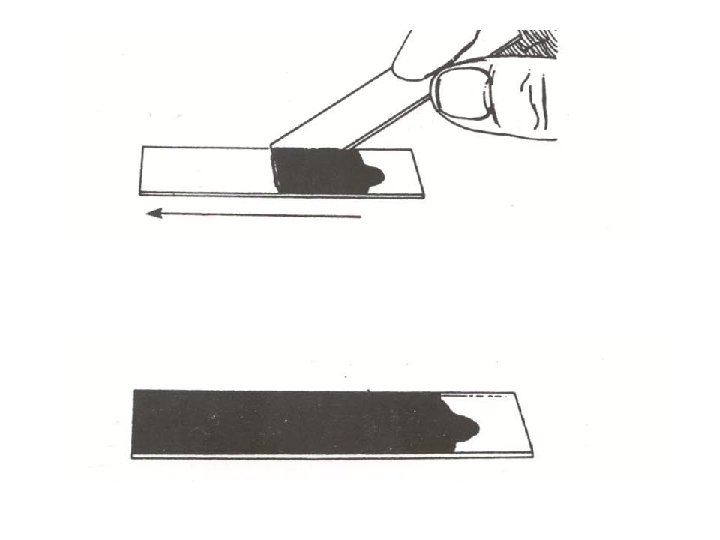
2. In the fixed state: Staining: Most microorganisms are transparent, so special techniques are used to visualize microorganisms, one of those techniques is staining. 1. Staining enhances the morphological appearance. 2. It is used to identify structural parts. 3. It is used to differentiate microorganisms (e. g. Gram +ve , Gram ve). Smear preparation: The purpose of this technique is to prepare the microorganism for staining and preventing them from being washed during the process of staining. a. From liquid culture: 1. Take a clean slide, and pass through the flame 2. Place a loopful of culture in the centre of the slide and spread evenly.

3. 4. 5. b. 1. 2. 3. 4. 5. 6. Allow it to dry in air. Pass through the flame three times quickly to heat kill and fix the organism to the slide. Smear is ready to be stained. From solid culture: Take a clean slide and path through the flame. Place a loopful of saline in the centre of the slide. Take a little amount of solid culture on to the loop, emulsify in the saline evenly. Allow it to dry in air, and pass through the flame to heat kill and fix the organism to the slide. Smear is ready to be stained. Stain the slide and record the results.

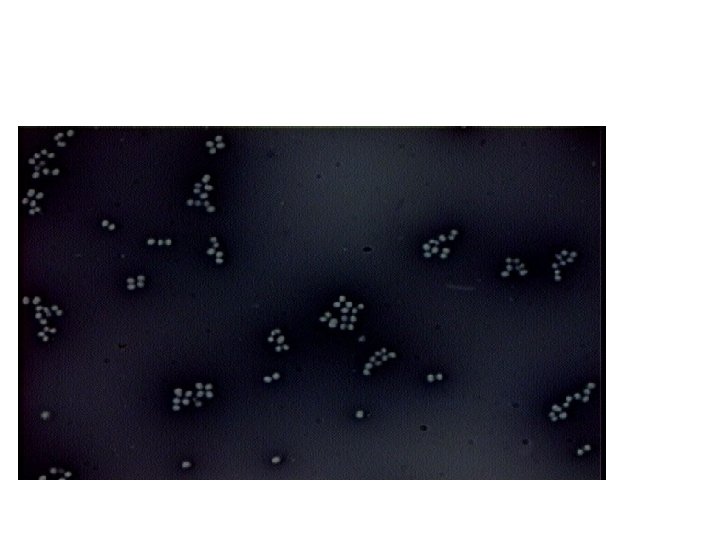
TYPES OF STAINING Simple Staining: The object of this exercise is to see the shape, size of different microorganisms, protozoa and fungi, by using a simple stain like Methylene Blue, a dye to stain microorganisms. Materials: ● A basic dye (methylene blue). ● Bacteria (Staphylococci) labled (S). ● Fungus (Candida) labled (C). Method: 1. Make a smear of the microorganism provided, as mentioned previously. 2. Place the smear on to the staining rack. 3. Add methylene blue stain (for 2 minutes). 4. Wash the strain off the slide with water. 5. Blot the smear with filter paper.

6. 7. Dry the slide, put the oil and look under the oil immersion lens (X 100). Record your observations. Negative staining: Certain microorganisms are very difficult to stain (e. g. Spirochetes), and can be visualized by staining the background (negative staining) by certain dye (India ink, nigrosine) leaving the cell transparent, negative staining will not give any information about the cell contents, however the cell shape and size are easily determined. Materials: ● Culture of Bacillus species (marked B). ● Nigrosine stain.

Method: 1. Take a clean slide and place a drop of Nigrosin at one end of the slide. 2. Emulsify organisms in Nigrosin. 3. Using the edge of another clean slide spread the drop out into a film ( like a blood film). 4. Allow it to dry in air and examine under oil immersion objective.


Differential Staining: It is used to differentiate between microorganisms or parts of same cell. More than one dye is used in differential staining. 1. Gram staining: Discovered by Christian Gram in 1884. This staining process divides bacteria into two groups, Gram-positive bacteria which retain the blue/violet color after decolourization by alcohol and colored blue/violet. Gram-negative bacteria loose their blue/violet color after treatment with alcohol and color red by counter staining. Material: ● Bacteria labeled as (P) and (N). ● Gram stain. Method: 1. Prepare the smear as mentioned before. 2. Place the slide on the slide rack. 3. Add crystal violet for 1 minute, then wash with water. 4. Add iodine and leave on the slide for 1 minute, then wash with water. 5. Decolorize with alcohol for 10 to 20 seconds, then wash with water.

6. Add safranin on the slide for 30 seconds, then wash with water, blot dry. 7. Examine under the oil immersion lens (X 100). 8. Record your results. Results: Name of the stain, colour reaction, shape, arrangement, name of the microorganism.
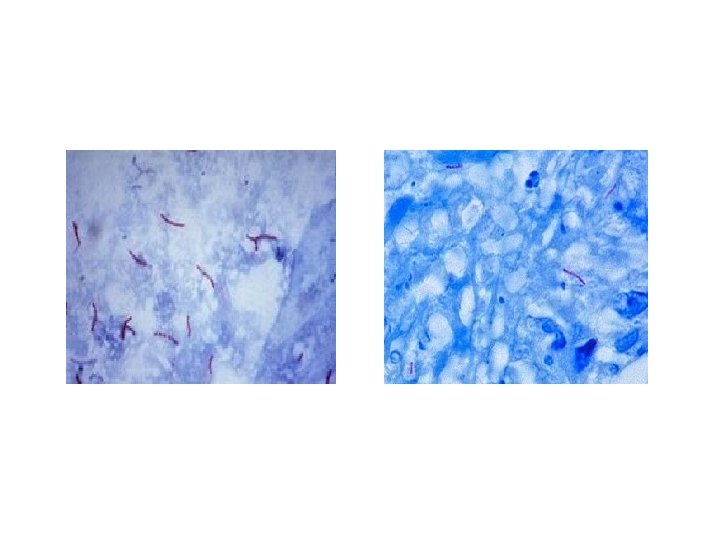
: Acid-fast bacteria (Mycobacteria) are difficult to stain by ordinary")
2. Acid-Fast Staining (Ziehl-Neelsen’s Stain): Acid-fast bacteria (Mycobacteria) are difficult to stain by ordinary dye (due to high lipid contents), so special techniques should be applied in order to stain such bacteria. For example applying of heat will facilitate the penetration of specific dye (Carbol-fuchsin). Once the cells are stained they retain the dye even after a very strong decolorizing agent (acid alcohol) have been used. This treatment decolorize other bacteria. Materials: ● Culture of Mycobacterium plate labeled as (Mb). ● Ziehl-Neelsen’s stain. ● Alcohol, saline.

Method: 1. Prepare smear of Mycobacterium. 2. Allow the film to dry in air. Heat fix the smear. 3. Cover the slide with concentrated carbol fuchsin. 4. Gently heat, till the steam rises. 5. Wash the slide with tap water. 6. Decolorize the smear with acid alcohol for 10 to 30 seconds. 7. Wash the slide with tap water. 8. Apply methylene blue for 30 to 45 seconds. Wash and blot dry and examine under oil immersion objective.
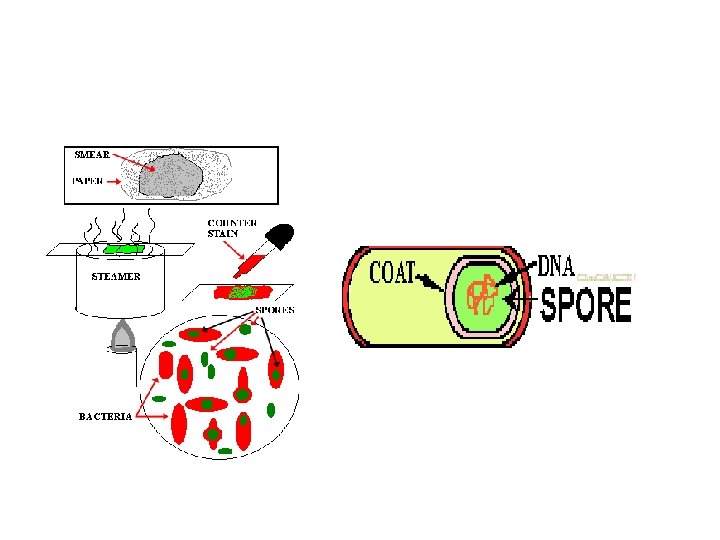
 form endospores. Bacterial spores do")
Spore Staining: Introduction: Certain bacteria (e. g. Bacillus, Clostridium) form endospores. Bacterial spores do not take up stains readily and conventional techniques merely stain the vegetative portions of the cell, leaving the spore as a clear one. By vigorous treatment (e. g. strong stains and prolonged heat) it is possible to stain the spore but, once introduce, the stain is resistant to decolorizing agents. The latter bleach the vegetative parts of the cell, which may then be counter-stained. The presence of spores, their size, shape, position and whether they bulge the walls of the parent cell are important characters in the identification of bacteria. Materials: ● Culture of Bacillus species marked (B). ● Malachite green. ● Safranin.

Method: 1. Prepare and fix the smear with bacteria provided. 2. Cover the slide with malachite green stain. 3. Gently heat until you see steam rising (DO NOT BOIL THE SMEAR). 4. Allow the stain to remain for 5 minutes. 5. Wash with tap water. 6. Counter-stain with safranin for 30 seconds. 7. Blot dry, and look under oil immersion objective.

Microbiological Culture Media Cultivation of microorganisms in the laboratory is essential for the study of their morphological and physiological properties, also for their isolation in pure form and identification. This cultivation is possible by using an artificial medium. The medium may be in liquid (broth) form, solid (containing agar) form or semisolid (containing low concentration of agar as solidifying agent) form. Media may be classified on the basis of content into complex, chemically defined (synthetic) and living media. 1. Complex Media: Contain extract or digest of animals (beef or meat extract), plants (soya bean digest), or microbes (yeast extract) that supply all the essential nutrients. 2. Chemically Defined (Synthetic) Media: Essential nutrient is provided by a pure chemical of known composition e. g. K 2 HPO 4 , KH 2 HPO 4 , (NH 4)2 SO 4 , glucose, etc…

3. Living Medium: Designed specifically for obligate intracellular microorganisms e. g. viruses. Complex media may be classified as follow: 1. Ordinary or Basic Media support the growth of ordinary microorganisms not a fastidious one: a. Nutrient Broth is the basis for most media used for growth of microorganisms, it contains: meat extract, peptone and sodium chloride. b. Nutrient Agar is nutrient broth solidified by 1. 5 -2% agar. It is the basis for other solid selective or enriched media. 2. Enriched Media certain organisms e. g. gonococcus, pneumococcus are so nutritionally that they can’t grow on the ordinary media. They require more complex organic body fluids for their growth. Media containing such substances are called enriched media, for example:

a. b. Blood Agar: -It is a nutrient agar enriched with sterile blood (5 -10%). -Blood agar is very useful not only as an enriched medium supporting the growth of most fastidious organisms, but also as indicator medium, differentiating organisms according to their action on the blood. -Some causes complete haemolysis and those are called β-haemolytic bacteria. -Other causing greenish coloration or partial haemolysis and those are called ά- haemolytic bacteria. -Others producing no change, e. g. gamma-haemolytic bacteria. Chocolate Agar: (or heated blood agar): - Prepared from blood agar by heating of the melted blood agar at 1000 C for 2 minutes. -Used particularly for the culture of the haemophilus group of organisms.

3. Enrichment Media: - They are fluid media - They contain some substances which support the growth of most microorganisms e. g. Thioglycolate medium, or substances which inhibit the growth of unwanted organisms. For example: * Fluid Thioglycolate Medium: - This medium supports the growth of both aerobic, microaerophilic and anaerobic bacteria. - It contains sod. Thioglycolate, cysteine and dextrose as reducing agent. - Aerobic bacteria will grow near the top whereas anaerobic grow at the bottom and microaerophilic grows in between. * Selenite Broth: used for isolation of shigella and salmonella groups from faeces. * Tetrathionate Broth: used for isolation of salmonella causing food poisoning.
: This medium is")
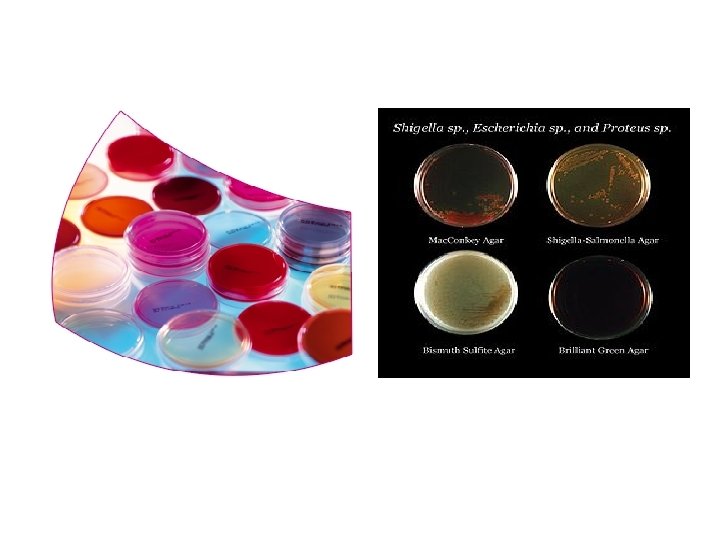
4. a. - b. - Selective Media: Mannitol Salt Agar (MSA): This medium is a selective medium for pathogenic staphylococci. It contains salt (7. 5%) which will inhibit the growth of other microorganisms except staphylococci. Also contain mannitol as a test sugar and phenol red as indicator. Staphylococcus aureus ferments mannitol, producing yellow colonies. Sabouraud Dextrose Agar (SDA): It is a selective media for fungi, it contains high concentration of dextrose, chloramphenicol to inhibit the growth of bacteria and has p. H of 5. 5 – 6.

5. Selective and Differential Media: - Selective media contain some dye or other chemical that inhibits the growth of certain organisms, and allow the growth of others. - Differential media usually contain an indicator which changes its color with certain organisms and not with others. • Mac. Conkey’s Medium: - It is used in the detection and isolation of all types of enterobacteriaceae from stools. - It contains bile salts which will inhibit the growth of all other microorganisms except that of enterobacteriaceae. - Also contains lactose as a test sugar and neutral red as indicator. On this medium the lactose fermenters produce a rose pink colony, and the nonlactose fermenters produce a pale yellow colony.

6. Media for Anaerobic Bacteria: • Cooked meat medium. • Fluid thioglycolate medium. Materials: A. Liquid culture of : 1. E. coli 2. B. subtilis 3. C. albicans 4. C. perfringens 5. S. aureus B. Media: 1. Nutrient broth 2. Nutrient agar

3. Thioglycolate broth 4. Blood agar 5. Sabouraud agar 6. Mannitol salt agar Procedure: 1. Examine each medium for content and colour. 2. Inoculate the media with the exact microorganism following the table. 3. Incubate for 24 hours at 370 C. 4. Record your results in the table. 5. Make a wet mount preparation from the cell culture and examine it under microscope, draw the shapes of these cells.

No Media 1 Nutrient broth 2 Nutrient agar 3 Thioglycolate broth 4 Blood agar 5 Sabouraud dextrose agar 6 Mannitol salt agar E. coli S. aureus B. subtilis C. albicans

CULTIVATION OF MICROORGANISMS Inoculation with the loop: The object to illustrate how to handle the loop in inoculation and the effectiveness of loop flaming. Materials: - 3 tubes containing 5 ml of media. - Culture of Bacillus subtilis lablled B. Procedure: 1. Lable the tubes 1, 2, 3. 2. Pick up the culture (B) in your left hand between your fore and middle fingers. 3. Pick up the loop in your right hand. 4. Sterilize the loop by flaming until it becomes red – hot. 5. Remove the cap of the culture by the little finger of your right hand. 6. Introduce the loop into the tube containing the culture (B) withdraw.

7. 8. 9. 10. 11. 12. Flame the mouth of the tube and cap. Transfer a loopful of the culture to tube (1). Take another loopful from the culture, flame the loop, and inoculate into tube (2). Leave tube 3 as control. Incubate all tubes at 370 C for 1 day. Report your results.

Isolation of bacteria by streaking technique: This method may be used for checking the purity of a bacterial culture, and may also be used for isolating individual species from a mixture. Culture with single type of colony is regarded as a pure culture. Materials: ● Nutrient Agar plates. ● Bacterial culture marked (B). Procedure: 1. With a sterile loop, transfer a loopful on to the surface of a nutrient agar plate. Place the drop near the edge. 2. With the trailing edge draw the loop tightly over surface in parallel line. 3. Flame the loop. 4. Turn the plate at a 900 angle and repeat the streaking across.
 & (5) again at")
5. 6. 7. 8. 9. Flame the loop. Repeat (4) & (5) again at right angle. Label at the back of the plate. Invert the plate and incubate for 1 day at 370 C. Examine and describe the appearance of the growth of the colonies on the plate.

Bacterial Count Measurement of the bacterial growth in liquid medium can be done by: I. Measuring the cell number. II. Measuring the cell mass. III. Measuring the bacterial metabolic activity. (I) Measuring the cell number: (Direct count) This can be done by the following methods: 1. Measuring the total cell number by: a. Using the counting chamber: The counting chamber is divided by lines into small squares by counting the number of organisms in all squares, then the number of organisms per milliliter can be calculated by multiplying the counted number by dilution factor. This is the total count of live and dead organisms.
: The electrical resistance of the fluid in")
b. Using electronic cell counter (Coulter counter): The electrical resistance of the fluid in a small hall is measured, as each cell passes through the hole, the resistance increases highly and the increase is recorded. Also this is the total count of both live and dead cells, but t is faster method than the previous method. 2. Measuring only the live cell (Viable count): This method is used to determine the number of living bacterial cells. The principle of this method is based on the ability of each cell to give rise to a colony if it is allowed to grow over solid medium. Three methods are used in this determination of viable bacteria: A. Spread plate method. B. Pour plate method. C. Dropping on Agar surface.
 Spread plate method: In this method a given volume of sample is serially")
(A) Spread plate method: In this method a given volume of sample is serially diluted and the small amount from highest dilution is pipetted on to surface of hardened Nutrient Agar. Then spread with glass spreader. (B) Pour plate method: From the sample diluted as mentioned above, a constant amount is added from each dilution into a sterile plate and molten Agar is added and mixed well in the plate and Agar allowed to set. (C) Dropping on Agar surface: Miles and Misra’s technique: Here also the sample should be serially diluted, with a standard 50μ pipette add 5 drops from each dilution on the well dried nutrient agar plate. Allow the drops to dry. After each experiment incubate the plates at 370 C for 24 hours. Count the number of colonies and multiply by the dilution to give you the organism / ml in original culture.
. 2. 7 bottles each")
Determination of viable count: Materials: 1. Bacterial culture (E. coli). 2. 7 bottles each containing 9 ml Ringer solution. 3. 1 ml pipettes (7). 4. Petri dish plates (3). 5. 50 μl dropper. 6. Nutrient Agar plates (3). 7. 3× 19 ml molten nutrient agar. Method: 1. Label the bottles from 1 -7. 2. Make a serial dilution as follows:

a. b. 3. A. I. II. III. IV. Discard the used pipette, then by using a sterile pipette mix the contents of bottle # 1 and remove 1 ml into bottle # 2. Repeat this step up to bottle # 7. From the last 3 dilutions (10 -5, 10 -6, 10 -7) do the following: Pour plate: Label 3 petri dishes matching the 10 -5, 10 -6, 10 -7 dilution. From each dilution transfer 1 ml of the diluted culture to petri dish then add 19 ml of melted Agar and mix well. Wait until the Agar solidify, then incubate at 370 C for 24 hours. Count the No. of colonies / dilution. Calculate the # of CFU / ml.

B. I. II. III. IV. V. Surface viable count: Label 3 nutrient agar plates of the dilution (10 -5, 10 -6, 10 -7). Using the dropper (50) μl starting from (10 -7) dilution transfer 5 drops to each Plate, then go to the next dilution (10 -6) using the same dropper. Repeat that with final dilution (10 -5). Wait till the drops dry. Incubate at 370 C for 24 hours. Count the colonies in each drop for average concentration. Take the average of 5 drops. Calculate the # of CFU / ml.
 A. B. C. Measuring the cell mass: Turbidimetric method: This method depends on")
(II) A. B. C. Measuring the cell mass: Turbidimetric method: This method depends on the change in the optical density that occurs due to the increase in the number of bacterial cells. The number of cells is directly proportional to the amount of light absorbed. Determination of net weight: This is done by centrifuging the cells and weighing the pellet of cells obtained. Determination of dry weight: It is done by drying the centrifuged cells mass before weighing by placing it overnight in an oven at 100 -1050 C.
 Measuring the bacterial metabolic activity: By measuring either the metabolic products e. g.")
(III) Measuring the bacterial metabolic activity: By measuring either the metabolic products e. g. , acids or the decrease in the substrates that are consumed in the metabolic activity e. g. sugars.

A. EFFECT OF ENVIRONMENTAL CONDITIONS ON BACTERIAL GROWTH Effect of temperature on bacterial growth: Temperature is one of the most important factors influencing growth of bacteria since temperature effect enzymes activities. In this exercise the effect of different temperatures on growth will be examined. Materials: - Culture of Echerichia coli and Bacillus subtilis. - Eight Nutrient Broth. Methods: 1. Label the tubes as follow: - E. coli (1 -4). - B. subtilis (5 -8). 2. Inoculate tubes (1 -4) with E. coli. 3. Inoculate tubes (5 -8) with B. subtilis.

4. Incubate the tubes as follow: 5. Record your results. Tubes No. Temp. 1, 5 50 C 2, 6 250 C 3, 7 370 C 4, 8 450 C

B. Effect of p. H on bacterial growth: p. H effects bacterial growth since it limits the activity of enzymes required for bacterial growth. Materials: - Culture of E. coli , S. aureus and C. albicans. - Nine Nutrient Broth at p. H 3, p. H 7, and p. H 9. Method: 1. Label tubes with the proper bacterial name at different p. H. 2. Inoculate each tube with the labeled bacteria. 3. Incubate at 370 C for 24 hours. 4. Report your results and comment.

C. Effect of osmotic pressure on bacterial growth: Cell walls protect prokaryotes against changes in osmotic pressure over a wide range. However, sufficiently hypertonic media at concentrations greater than those inside the cell (such as 20% sucrose) cause water loss from the cell by osmosis. Fluid leaves the bacteria causing the cell to contract, which, in turn, causes the cell membrane to separate from the overlying cell wall. This process of cell shrinkage is called plasmolysis. When bacteria are placed in hypotonic media with concentrations weaker than the inside of the cell, water tends to enter by osmosis. The accumulation of this water causes the cell to swell and then to burst, a process called osmotic lysis. Materials: ● Culture of E. coli and S. aureus. ● Nutrient broth at 0. 9% Na. Cl and 5% Na. Cl (2 each).

Methods: 1. Label tubes with proper bacterial name at different salt concentration 2. Inoculate each tube with the labeled bacteria. 3. Incubate at 370 C for 24 hours. 4. Report your results.
 can not")
D. Effect of heat: Destruction by heat: Non-spore forming bacteria (vegetative cells) can not withstand temperature at 600 C within 30 -60 min. Spore forming bacilli can withstand this temperature and can withstand boiling from few minutes to 3 hours but will kill at 1200 C at 2 atmosphere steam pressure within 20 -30 minutes. In this experiment you will compare the heat resistance of Bacillus as example of spore forming bacteria and S. aureus as example of vegetative cells. Materials: 1. Nutrient broth 15 ml each (6 tubes). 2. Culture of S. aureus (S) and of Bacillus subtilis (B). 3. Nutrient broth 5 ml each (30 tubes). 4. 3 water baths set at 600 C, 750 C and 1000 C.

Procedure: 1. Divide the six large tubes into 2 groups each containing 3 tubes. 2. 0. 5 ml of the culture (S) is transferred to each tube of one group, and 0. 5 ml of culture (B) is transferred to each tube of the other group. 3. A tube of each group is taken and placed in water bath set at 600 C, 750 C and 1000 C respectively. 4. On specific time interval 0, 5, 15, 30 and 60 min. , one loopful of each tube is transferred to a labeled tube of 5 ml Nutrient broth. 5. The tubes of 5 ml Nutrient Broth are collected and incubated at 370 C overnight. 6. Read the results and tabulate as follows:

Effect of Heat on Bacteria at 600 C Time Organism S. aureus B. subtilis 0 Min. 5 Min. 15 Min. 30 Min. 60 Min.

Effect of Heat on Bacteria at 750 C Time Organism S. aureus B. subtilis 0 Min. 5 Min. 15 Min. 30 Min. 60 Min.

Effect of Heat on Bacteria at 1000 C Time Organism 0 Min. 5 Min. 15 Min. 30 Min. 60 Min.

CONTROL OF MICROBIAL GROWTH Microbial growth can be controlled either by: - Complete killing of all M. O (sterilization) - Or inhibiting the growth of M. O. Sterilization is an absolute term. This means that the sterile substance is completely free from any M. O. The methods used for sterilization are classified into: - Physical methods. - Chemical methods. Physical methods of sterilization: 1. Heat (Dry & Moist) 2. Radiation (U. V. light) 3. Filtration

1. Dry Heat: The thermal death of M. O. takes place due to inactivation of essential cellular proteins or enzymes through oxidation. Methods: a. Incineration e. g. platinum loop. b. Flaming e. g. mouth of culture tubes. c. Hot air oven e. g. 1600 C for 1 hr. Sterilization of dry glass wares as test tubes, flasks pipette, petri dishes ……. . etc. Sterilization of fixed oils and powders. 2. Moist Heat: The thermal death takes place through coagulation.

Methods: A. At temperature below 1000 C: - Pasteurization of milk (630 C for 30 min. [holder method] or 720 C for 20 sec. [flash method]). Such temperature is enough to kill any pathogenic M. O. that can be transmitted by milk e. g. Mycobacteria, Salmonella and Brucella. - Tyndalization 560 C for 1 hr on several successive days. This method is used only for thermolabile substances in which bacterial spores can germinate between the first and second heating as milk, serum and body fluids. B. At temperature of 1000 C: 1. Boiling at 1000 C for killing of non-spore forming M. O. 2. Steaming at 1000 C e. g. sterilization of sugar media and gelatin media either by: A. Steaming for 90 min.

II. 3. Steaming for 20 -40 min on three successive days. Heating with bactericide e. g. 0. 2% chlorocresol or 0. 002%phenyl mercuric nitrate C. At temperature above 1000 C e. g. Autoclaving: Autoclaves are widely used in sterilization of culture media, surgical supplies and many other instruments. A complete sterilization can occur at 15 Ib per sq. in guage pressure at 1210 C for 15 min. Sterilization by Radiation: 1. Ultraviolet light: The ability of sun light to kill bacteria is mainly due to the ultraviolet rays. The germicidal activity of ultraviolet light increased as it is wavelength (λ) decrease and intensity increase.

- Ultraviolet radiations can be produced by mercury vapour lamps The lethal effect of U. V. rays is due to it is effect on the DNA of the cell through the formation of pyrimidine dimer on the same strand. Ultraviolet rays are used for sterilization of air (e. g. operating theatres), fluids and punches. 2. Ionizing radiation: They are very lethal to cells, and their lethal effect is due to either direct ionizing of the cellular DNA or by the chemical effect of ionized water, e. g. γ-rays which have a very high penetration power, and widely used for sterilization of plastics (e. g. disposable syringes, pipettes and dishes) foodstuffs and drugs. Sterilization by filtration: Fluids can be rendered free from bacteria by passing through special filters. This method is used in making sterile preparations of the soluble products of bacterial growth such as toxins, and for sterilization of liquids that would be damaged by heat such as serum and antibiotic solutions also for oil damage by heat.

CHEMICAL METHODS USED FOR MICROBIAL CONTROL The microbial control can be achieved by using chemical antimicrobial agents. Definition of some terms: Bactericide: An agent which kills bacteria. Bacteriostat: An agent which inhibits the microbial growth. Fungicide: An agent which kills fungi. Fungistat: An agent which inhibits the growth of fungi. Disinfectant: Is a substance which has the ability to kill M. O when applied to the surface of an inanimate object. Antiseptic: Is a substance which has the ability to kill M. O. on living tissues. Preservatives: Are agents which are used in food stuffs and many pharmaceutical preparations to prevent microbial spoilage of the product and to minimized the risk of consumer acquiring infection when the preparation is administered.

Evaluation of the antimicrobial agents: A. Determination of MIC: The principle of evaluation is based on determining the minimum inhibitory concentration MIC of the agent. MIC: Is the lowest concentration of the agent which inhibits the growth of a given microorganism in a given time. Methods which can be applied to determined MIC: 1. Serial dilution in broth (Broth dilution method): A serial dilution of the agent is made in broth, and the tubes are inoculated with the test organism and incubated. The lowest concentration at which no growth occurs in taken as the minimum inhibitory concentration (MIC).
: In this method the dilutions of")
2. Serial dilution in agar (Agar dilution method): In this method the dilutions of the substance under test are made in agar instead of broth. The agar containing the substance under test is subsequently poured onto petri dish. This method has the advantage over the previous one in which on a single concentration of tested substance, several organisms may be tested. Determination of MIC by broth dilution method: Materials: ● A standard solution of disinfectant / antibiotic. ● 9 ml Mueller-Hinton broth tubes (5). ● (E. coli) culture labeled as (E).

Procedure: 1. Label the 5 broth tubes from 1 -5 with marker. 2. Add 1 ml of disinfectant to tube 1 and mix. 3. Add 1 ml from tube 1 to tube 2 and mix. 4. Continue dilutions in this manner to tube 5. 5. Add 50 μl E. coli broth culture in each tube with a dropper. 6. Shake well the tubes and incubate at 370 C for 24 hours. 7. Record the results.

Susceptibility by disk diffusion method: The susceptibility of tested microorganism to the discs of filter paper impregnated in different antimicrobial agents is tested, and the zone of inhibition are observed. Materials: ● Mueller-Hinton agar plates. ● Antibiotic discs. ● E. coli culture labeled (E). Procedure: 1. Using sterile cotton swab inoculate the surface of Mueller-Hinton agar plate with bacterial culture (E). 2. With sterile forceps apply the different discs of provided antibiotics to the surface of the agar plate.

3. 4. 5. Incubate at 370 C for 24 hours. . Measure the zone of inhibition in mm of each disc using the bottom of the plate. Record the results.
: This is a method used to measure")
Evaluation of disinfectants (Determination of Phenol Coefficient): This is a method used to measure the bactericidal power of disinfectants. Phenol is used as the standard and the agents activity is compared to phenol ability that kills standard culture of bacteria at specific time. The Rideal-Walker test: Materials: - Phenol solution 10%. - Disinfectant solution 1%. - Culture of E. coli. - Nutrient broth tubes (40). - Sterile test tubes (20).

Method: 1. Label 5 tubes and make 5 dilutions of phenol with distilled water as follows: 1/95 , 1/100 , 1/105 , 1/110 , 1/115. 2. Take an other set of test tubes (5 tubes) and dilute the disinfectant with distilled water to give the following dilution: 1/100 , 1/200 , 1/300 , 1/450. 3. Label 5 sterile test tubes A, B, C, D and E. From each phenol dilution add 5 ml to each tube. 4. Take an other set of sterile test tubes (5 tubes) and label them K, L, M, N and P. To each tube add 5 ml of the different concentration of disinfectant. 5. For each set of tubes (phenol disinfectant) the following steps are followed: 6. Take 20 tubes of nutrient broth and arrange them in a rack in four rows of five. Label them as below:

A 1 - 4 B 1 - 4 C 1 - 4 D 1 - 4 E 1 - 4 7. 8. 9. 10. K L M N P 1 -4 1 -4 1 -4 Take 1 ml from the culture add 0. 2 ml to tube (A) then at 30 second interval add another 0. 2 ml to tube (B). Continue the addition every 30 seconds until tube (E). (Avoid touching the wall of the tube). After 30 seconds from the previous step, using a loop, transfer a loopful from tube (A) to (A 1). Repeat this step with tube (B), then (C), (D) and (E). Then transfer another loop from (A) to (A 2) and repeat for the other.
. The same")
11. 12. 13. 14. 15. Continue this treatment until tube (E 4). The same procedure is done for (K) - (P) tubes. Incubate all broth tubes for 42 -48 hrs at 320 C. Examine the tubes for growth and record the result as positive and negative in the provided table. Phenol coefficient is the dilution which shows growth in 2. 5 minutes and 5 minutes but not in 7. 5 minutes and 10 minutes, divided by the phenol concentration which shows the same resutls.

A B C D E 2. 5 A 1 B 1 C 1 D 1 E 1 5 A 2 B 2 C 2 D 2 E 2 7. 5 A 3 B 3 C 3 D 3 E 3 10 A 4 B 4 C 4 D 4 E 4
 Bacteria Dilution 2. 5 Phenol Tested Disinfectant 5 7. 5 10")
Exposure time (minutes) Bacteria Dilution 2. 5 Phenol Tested Disinfectant 5 7. 5 10 1/95 1/100 1/105 1/110 1/115 + + + + + 1/100 1/200 1/300 1/450 + + + + +

R-W Coefficient: t. D dilution of disinfectant kill M. O. in 7. 5 min. not at 5 min. 300 __ = _____________________ = 2. 9 p. D dilution of phenol which kill M. O. in 7. 5 min. not at 5 min. 105
- Slides: 85