Powerful Writing Note taking Techniques for Science Middle


 • • • Pen")


 dated &")
 dated & labeled")


- Slides: 51
Powerful Writing & Note -taking Techniques for Science Middle Level through High School Strategic Science Teaching © 2012 Los Angeles County Office of Education Used with Permission from the Los Angeles County Office of Education http: //sst. lacoe. edu
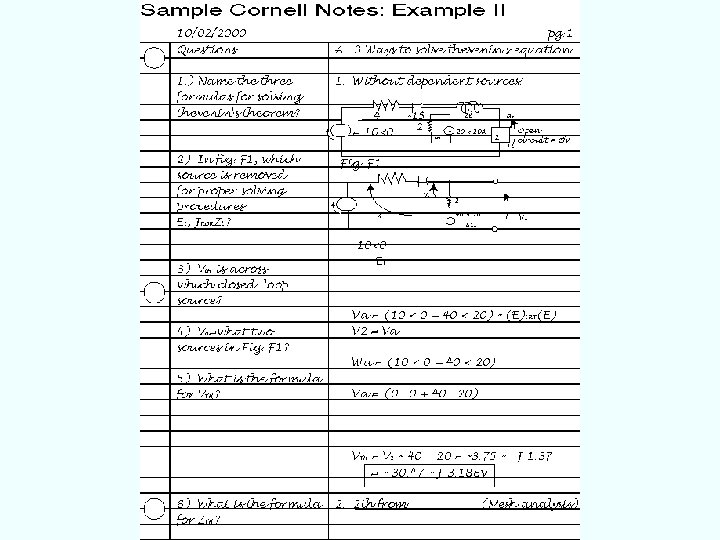
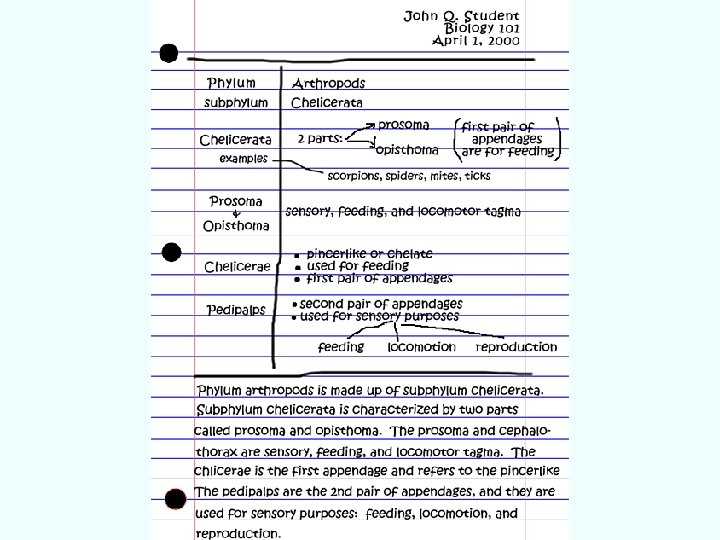
Cornell Notes 1. Since 1949 2. Right side: Input 1. Main ideas 3. Left side: Output 1. Processing 2. Levels of questioning 4. Summary 1. Reflection
• Summary is added at the end of ALL note pages on the subject (not page) • Summary added AFTER questions are finished • Summary should answer the problem stated in the subject.
Ex. Left side Processing
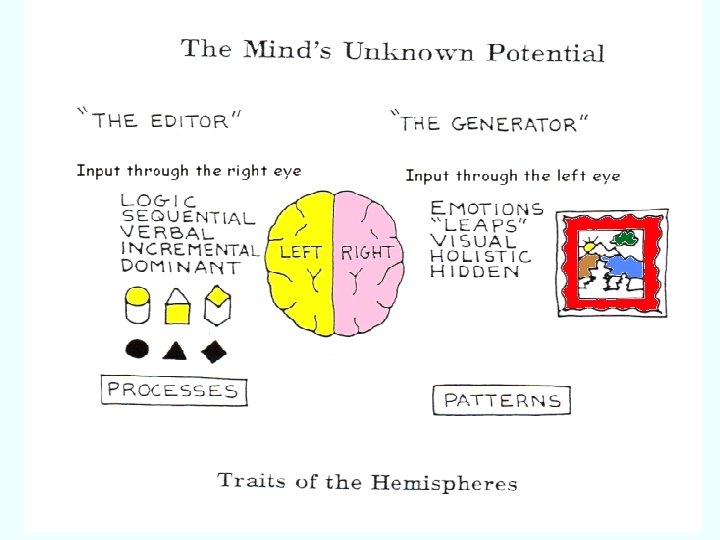
Cornell Note-taking Summary • Right side notes - for main ideas • Left-side - for questions (Using Blooms or Costa’s thinking levels), concept maps, additional diagrams, lab flow-charts & procedures – Added AFTER notes are taken - time to reflect & process • Summary/reflection – Added at the end of ALL note pages on the subject
5 R's of Note-taking 1. Record During the lecture, record in the main column as many meaningful facts and ideas as you can. 1. Reduce As soon after as possible, summarize the facts & ideas concisely in the left column. Summarizing clarifies meanings and relationships, reinforces continuity, and strengthens memory.
5 R's of Note-taking 1. Recite Cover right side, using only your left side, say over the facts and ideas of lecture as fully as you can, not mechanically, but in your own words. Verify what you said. 1. Reflect Draw out opinions from your notes and use them as a starting point for reflections on the course and how it relates to your other courses. Reflection will help prevent ideas from being inert and soon forgotten.
5 R's of Note-taking 1. Review Spend 10 minutes every week in quick review of your notes, and you will retain most of what you have learned.
Brief Review of Bloom’s 6 Levels of Questioning 1. Uses science examples 2. Good for teaching students & tutors to reach for higher-levels of inquiry
Cornell Note-taking Hints • Notes can be graded on levels of questions & diagrams generated • AP courses: Can use computerized notes but: – Leave a wide left margin, to add higher-level questions, diagrams, concept maps – Space at the bottom of all notes, for a summary
1. KNOWLEDGE Recalling Information • What information is given? • What are you being asked to find? • What formula would you use? • What does _____mean? • What is the formula for. . . ? • List the. . . • Name the. . . • Where did. . . ? • What is. . . ? • Who was/were. . . ? • When did. . .
2. COMPREHENSION Understanding Meaning • What are you being asked to find? • Explain the concept of. . . • Give me an example of. . . • Describe in your words what ___ means. • What concepts does this connect to? • Draw a diagram of. . . • Illustrate how _____ works. • Explain how you calculate. . .
3. APPLICATION Using Learning in New Situations • What additional information is needed to solve this problem? • Can you see other relationships that will help you find this information? • How can you put your data in graphic form? • What occurs when. . ? • How would you change your procedures to get better results? • What method would you use to. . . • Does it make sense to. . . ?
4. ANALYSIS Ability to See Parts & Relationships • Compare and contrast _____ to _____. • What was important about. . . • Which errors most affected your results? • What were some sources of variability? • How do your conclusions support your hypothesis? • What prior research/formulas support your conclusions? • How else could you account for. . . ?
5. SYNTHESIS Use Parts to Create a New Whole • Design a lab to show. . . • Predict what will happen to ____ as ____ is changed? • Using a principle of science, how can we find. . . ? • Describe the events that might occur if. . . • Design a scenario for. . . • Pretend you are. . . • What would the world be like if. . .
6. EVALUATION Judgment Based on Criteria • How can you tell if your answer is reasonable? • What would happen to ____ if ____ variable were increased/decreased? • How would repeat trials affect your data? • What significance is this experiment to the subject you're learning? • What type of evidence is most compelling to you? • Do you feel ____ experiment is ethical? • Are your results biased?
"In the science classroom, wondering should be as highly valued as knowing, " F. James Rutherford and Andrew Ahlgren in “Science for All Americans”
Interactive Science Journals • An innovative strategy for students and teachers
What Is It? • Interactive Science Journals are a tool to strengthen student learning of curriculum (the input) through increased student participation (the output). • Simply put: more bang for the buck !
Why Use Them? The Student Perspective • • • Claims ownership & responsibility Chooses ways to process information and gets to reflect on what’s been learned Includes more learning styles Develops higher-level thinking skills Organizes learning over time Work doesn’t get lost!
Why Use Them? The Teacher Perspective • • • Make learning more democratic inclusive Motivate participation Self-evaluate curriculum critically Monitor student progress easily Reduce time spent evaluating work Get ‘real’ student feedback on units • Parent-teacher communication tool &
Interactive Journal Summary • Spiral-bound ONLY - always with you • Right side - INPUT – Cornell notes (input, questions) – Lab data, log research projects • Left-side - OUTPUT – Concept maps, diagrams, lab flow-charts & procedures, photos, graphics • Summary - SELF-REFLECTION – Added at the end of a unit – Feedback on progress, enjoyment, goals
Materials • 8 1/2 x 11 Spiral Notebook (80+ pgs) • • • Pen and pencil with eraser Glue sticks/tape/rubber cement Colored pencils or pens Highlighters Scissors
Journal Fundamentals • Page Numbers • • Title Pages Tables of Contents Unit Introduction or Cover page Input: Right side Output: Left side Evaluation using a holistic rubric Regular student & parent feedback.
Examples of Left Side processing
Sequential Diagram
Self-Reflection • At the end of each UNIT, have students add a special page for selfreflection on the topic • A way to give teachers critical feedback
Reflective Paragraphs Begin your responses on the last left-hand page & continue on the right-hand 1. Choose 6 items, which represent your best interesting work ‑ 3 from left side and 3 from the right side… 2. In several REFLECTIVE paragraphs, write specific reasons why you chose the items, why they are your best work, and what these assignments reflect about your skills as a student
Reflective Paragraphs • Indicate your overall rating of your notebook based on the 6, 5, 4, 3, 2, 1 rubric. – What do you think this notebook deserves on an A‑F scale? – Include several sentences on WHY, using specific details, you've chosen this rating.
Reflective Paragraphs • Using sentences and specifics, respond to the following: – What information was new to you? – Did the notebook help you this term? – What would improve the notebook ? – What are your goals for your next unit? – What improvements or areas to change would you like to see in class?
Self-Reflection Alternative format
Scoring Rubric 6 Excellent • Notebook contents complete, dated & labeled • Pages are numbered (odd: RIGHT‑side even: LEFT‑side) • Right-side/Left-side topics correct & organized • Textbook notes/ writing goes beyond basic requirements • Uses color and effective diagrams • Notebook is neat and shows attention to detail. • Shows impressive, in-depth self-reflection about the work.
Scoring Rubric 5 Above Average • Contents complete, dated & labeled • Pages correctly numbered • Right-side/Left-side topics correct & organized • Uses color and effective diagrams • Most areas meet requirements, but don't go beyond • Includes most of the traits of a "6", but lacks excellence in all areas. • Shows in-depth self-reflection
Scoring Rubric 4 Average • Notebook contents are complete (at least 90%) dated & labeled • Pages correctly numbered • Right‑side/Left‑side topics are correct & contents organized • Uses color and some diagrams • Information shows a basic understanding • Some areas meet requirements, but don't go beyond • Shows limited, but real, self-reflection
Scoring Rubric 3 Below Average • Contents complete (at least 80%) dated & labeled • Pages correctly numbered • Right/Left topics somewhat organized • Uses minimal color, few diagrams • Shows limited understanding • Few areas meet all requirements • Shows some real self-reflection
Scoring Rubric 2 Inadaquate • Notebook contents are incomplete. • Some attempt at dating & labeling • Right-side/left-side inconsistent & contents unorganized • Information & concepts show only a superficial understanding and/or show serious inaccuracies • Notebook is not neatly written, sloppy • Shows little real self-reflection
Scoring Rubric 1 Incomplete • Notebook turned in, but too incomplete to evaluate.
Other Helpful Hints • Keep skeleton samples • Provide feedback immediately by checking a few notebooks in first few days of class. • Graded work can be added after it is returned, just have students leave a labeled space.
Other Helpful Hints • Occasional open notebook quizzes inspire great notebooks. • Share excellent student work often!
Teach Concept Maps to Help Students Access the Big Picture
Science Processes 1. Use 9 words to create a concept map Being objective Qualitative data Experimenting Using a control Controlling variables Analyzing Scientific Modeling Measuring Classifying Observing Quantitative data Hypothesizing Predicting Proper sample size Graphs + Tables Concluding Estimating Comparing Inferring
Using a Control Measuring Qualitative Data Controlling Variables Quantitative Data Hypothesize Proper Sample Size Graphs & Tables Experimenting Analyzing Science Processes Concluding Observing Inferring Objectivity Classifying Comparing Estimating Scientific Modeling Subjectivity
Resources for Teachers General Science Writing: 1. “Write to Learn Science” NSTA book by Bob Tierney Concept Maps 1. NSTA Concept map book 2. Learning How to Learn by Novak
Resources for Teachers Concept Maps: Web Resources 1. teacherweb. com 2. sitesforteachers. com 3. blackboard. com 4. Download ‘INSPIRATIONS’ software to be able to create concept maps
Developed by Anne F. Maben AVID Region 11 © 2001 LACOE All rights reserved