Postfield Processing Collect Data DNR Garmin Transfer Data


 DNR Garmin Toolbar Opened in")


 on Computer Note file path Note additional files")


 on Computer Note file path Note additional files")


 Note Path")
 Background Image (Raster)")

 Note Path")
 Background Feature Data (Vector) Hold Ctrl Key to Select Multiple Files")


")


 Points Selected 2) Alask. Pak Toolbar 3) Points")


 Select Points 2) Alask. Pak Toolbar 3) Points")


 -Insert | Picture -Resize/Position on Map")


- Slides: 128
Post-field Processing Collect Data DNR Garmin Transfer Data & Save Shapefile Edit Shapefile & Make Map
Arc. Map
Connect Garmin to Computer Connect GPS to PC with download cable Connect cable to Serial Port No serial port? Use USB adaptor cable
Turn Garmin On, Turn GPS Off Press Menu Press Enter - Eliminates status messages - Saves battery power
Open DNR Garmin
Verify Connection to Receiver Note Banner Title
Open Arc. Map
View Splashscreen Note Version
Select “A new empty map”
Arc. Map/DNR Garmin Connect Note Banner Title (it changed) DNR Garmin Toolbar Opened in Arc. Map
Arc. Map Window Docked DNRGarmin Toolbar Table of Contents Legend or Key Map
Viewing a Map Data View manipulate data Layout View prepare print version
Save Work. . . Often
Goal: Set Data Frame Properties
Data Frame Collection of Layers - Default name “Layers” - Can rename - Minimum of one required
Rename Data Frame highlight click inside again type new name
Open Data Frame Properties Window right-click or double-click on Data Frame
Select Data Frame Properties 1 2
Select Coordinate System Tab
Select Your Local Projection/Datum
Apply Selection Note information
General Tab – Select Display Units Map Units locked in when Coordinate System selected Display Units select for measuring distance on map
X Goal: Download Points
X Select Waypoint Download – transfers a copy of data, does not remove data from receiver
X View Waypoint Data Table show/hide data table scrollbar
X Note: Total # of Waypoints lists all waypoints “ident” lists waypoint names 4 waypoints total, 0 selected
X Note: Waypoint Coordinates Latitude/Longitude WGS 84 Projected X/Y (NAD 83 UTM Zone 16 N)
X Select Files and. . . highlight all records to be saved verify all records selected Saving Strategy All rows highlighted – all rows saved No rows highlighted – all rows saved Some rows highlighted – those rows saved
X . . . As Text File First! A Text File should always be saved First as a back up file to the ESRI (Arc. View) Shapefile
X Status Window
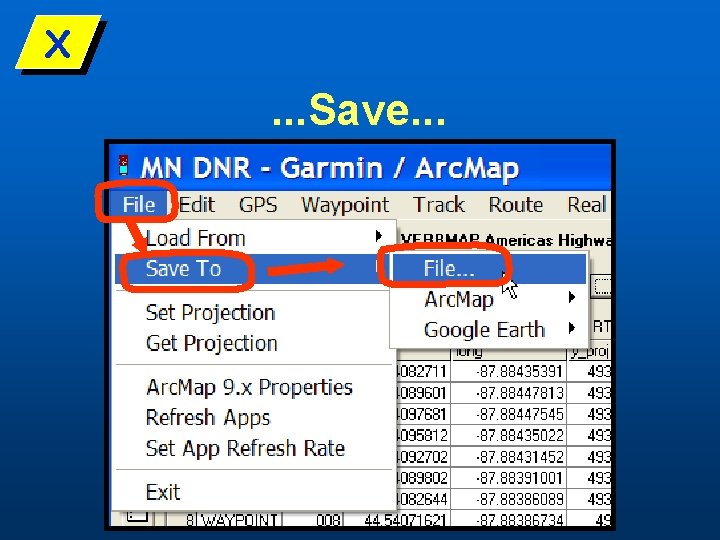
X . . . Save Again. . .
X . . . As Arc. View Shapefile Projected shapefile uses projected coordinates. Unprojected shapefile uses WGS 84 coordinates.
X Shapefile Added To Arc. Map Automatically Adds to TOC Automatically Adds to Map
X Locate Point Shapefile(s) on Computer Note file path Note additional files
Goal: Download Tracks
Select Track Download verify Coordinate System Download – transfers a copy of data, does not remove data from receiver
View Track Data Table show/hide data table scrollbar resize window watch download
Track Information # points from active track log blue -start of new track segment “ident” lists track name. Saved track has name, unsaved tracks called “Active Log” 55 track points total 0 selected
Note: Track Point Coordinates Latitude/Longitude WGS 84 Projected X/Y (NAD 83 UTM Zone 16 N)
Select Track Points
Remember. . . highlight all records to be saved Saving Strategy All rows highlighted – all rows saved No rows highlighted – all rows saved Some rows highlighted – those rows saved
. . . As Text File First! A Text File should always be saved First as a back up file to the ESRI Shapefile Note waypoints file already there
Status Window
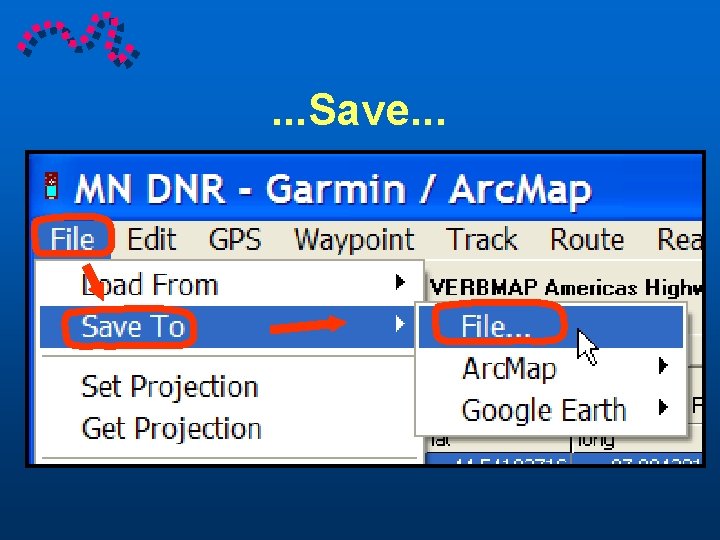
. . . Save Again. . .
. . . As Arc. View Shapefile. . . Note points files already there Projected shapefile uses projected coordinates. Unprojected shapefile uses WGS 84 coordinates.
. . . As a Point
Shapefile Added To Arc. Map Automatically Adds to TOC Automatically Adds to Map
Locate Track Shapefile(s) on Computer Note file path Note additional files
Review of Topics - Setup GPS Receiver - Setup DNR Garmin - Setup Arc. Map - Download Waypoints - Download Tracks X
Arc. Map
Objective Create a map
Summary of Topics -Add Background Data -Edit GPS Data -Create polygons or lines from points -Calculate Acres/Perimeter Miles -Edit Symbols & Names -Make Map
Goal: Add Data
Select Add Data
Select Data File(s) Note Path
Select Data File(s) Background Image (Raster)
Select Add Data
Select Data File(s) Note Path
Select Data File(s) Background Feature Data (Vector) Hold Ctrl Key to Select Multiple Files
View Data
Goal: Edit GPS Data
Turn on Editor Toolbar View | Toolbars | Editor
Start Editing -Editor | Start Editing -Choose Folder -Choose Target Layer
Select Point OR Hold Shift Key for Multiple
Delete Point(s)
Other Edit Options
Save Edits Editor | Stop Editing
Goal: Create Polygons and Line Shapefiles
NPS Alaska. Pak Extension Toolbar
Zoom to Fire Perimeter Points Click on Zoom In Button Click and Drag Around Points
Turn Off Other Layers & Click Select Features Tool Uncheck Box to Turn Off
Select Features Click and Drag Box Selected Points in Blue
Select Features Or… -Select Individual Points -Hold Shift for Multiple Make a Mistake? -Click Outside Feature to Unselect All
Alaska. Pak: Points to Polygon 1) Points Selected 2) Alask. Pak Toolbar 3) Points to Polyline/Polygon
Alaska. Pak: Points to Polygon -Select Feature Type -Name and Save File
Alaska. Pak: Points to Polygon Added To Map
Goal: Calculate Acres & Perimeter Miles
Alaska. Pak: Calculate Acres -Click on Polygon Shapefile in TOC -Alaska. Pak Toolbar -Add Acres/Miles -Set Data Map Units
View Acres -Click Identify Button -Choose Layer for Identify Results Box -Click in Polygon -Acres -Perimeter Miles
View Acres -Right-Click on Layer in TOC -Open Attribute Table: -Acres -Miles
Alaska. Pak: Points to Line 1) Select Points 2) Alask. Pak Toolbar 3) Points to Polyline/Polygon
Alaska. Pak: Points to Line -Select Feature Type -Name and Save File
Alaska. Pak: Points to Line Added To Map
How Many Miles of Dozer Line? -Click on Layer Name in TOC -Alaska. Pak | Add Acres/Miles
How Many Miles of Dozer Line? UTM Data = Meters Attribute Table
Remove Trackpoints Shapefile -Right-click on Layer -Remove *Note…Only removes Layer from TOC/Map. Shapefile still saved on computer
Goal: Edit Symbols and Names
Edit Waypoint Symbology Double-click on Waypoint Layer Single Symbol Change
Edit Waypoint Symbology -Click on Symbol Button -Change Symbol, Color, Size
Unique Value Symbology Double-click on Waypoint Layer Click on Categories
Unique Value Symbology -Click on Unique Values -Select Value Field
Unique Value Symbology -Add All Values -Uncheck <all other values> -Apply
Unique Value Symbology Double-click on symbol to change each point symbol individually
Unique Value Symbology -Click on More Symbols Button -Forestry Palette
Unique Value Symbology Category: Fire Fighting
Edit Line Symbology
Edit Polygon Symbology
Edit Polygon Symbology -Display Tab -Set Transparency
Edit Legend Names -Click twice slowly on name -Type in new name
Goal: Add Labels
Set Label Properties -Right-click on Layer -Properties -Layer Properties: Layer Tab
Set Label Properties -Label Field: IDENT -Select Size -Select Color
Lable Features -Right-click on Layer -Label Features
Convert Labels to Annotation -Right-click on Layer -Convert Labels to Annotation… Annotation Allows Manual Label Changes
Goal: Add Labels -In the map -All features -Convert unplaced labels to unplaced annotation -Convert
Goal: Add Labels -Use Pointer to Select Label -Move Label Position
Goal: Print Map
Set up Data View Zoom In/Out Pan Turn Layers On/Off
Page and Print Setup Modify Settings
Layout View OR
Add STAND Map Elements Scale Bar, Title, Author, North Arrow, Date
Scale Bar -Insert | Scale Bar -Choose Format -Double-click on Map to Edit Properties
Title -Insert | Title -Type in Text -Double-click on Map to Edit Properties -Change Symbol Button
North Arrow -Insert | North Arrow -Choose Style -Double-click on Map to Edit Properties -Change Symbol Button
Author & Date -Insert | Text -Type in Text -Double-click on Map to Edit Properties -Change Symbol Button
Logo (optional) -Insert | Picture -Resize/Position on Map
Legend -Insert | Legend -Legend Wizard Opens -All Layers added by default -Add or Remove Layers -Change Order in Legend
Legend Wizard -Change Legend Title -Edit Font Color, Size or Justification
Legend Wizard -Border -Background -Drop Shadow
Legend Wizard -Line Style -Area Shape
Legend Wizard -Spacing -Accept Defaults
Finished Legend -Double-click to Edit -Legend Properties
Final Map
Review of Topics -Added Background Data -Edited GPS Data -Created polygons or lines from points -Calculated Acres/Perimeter Miles -Edited Symbols & Names -Made Map