Positioning and Draping Protecting Your Patients AND Yourself


 � Pillow under lower abdomen/hips to")


- Slides: 22
Positioning and Draping Protecting Your Patients AND Yourself
Positioning � Why ◦ ◦ ◦ ◦ do we need to learn about positioning? Patient comfort/decrease pain Support and stability to pt’s truck and extremities Easier access to area(s) being treated Decrease edema Increase function Prevent pressure sores (l-t setting) Prevent joint contractures (l-t setting)
Positioning – Key Points � What is most comfortable for the patient may not be the best position for them � May need to be positioned to aid in the treatment of a specific diagnosis or condition
Other Considerations � Who ◦ ◦ is at risk? Elderly Those unable to change to their own position Those with decreased sensation Those who may be unable to communicate their discomfort
Tools of Positioning � Pillows � Blankets � Sheets � Wedges � Bolsters � Others?
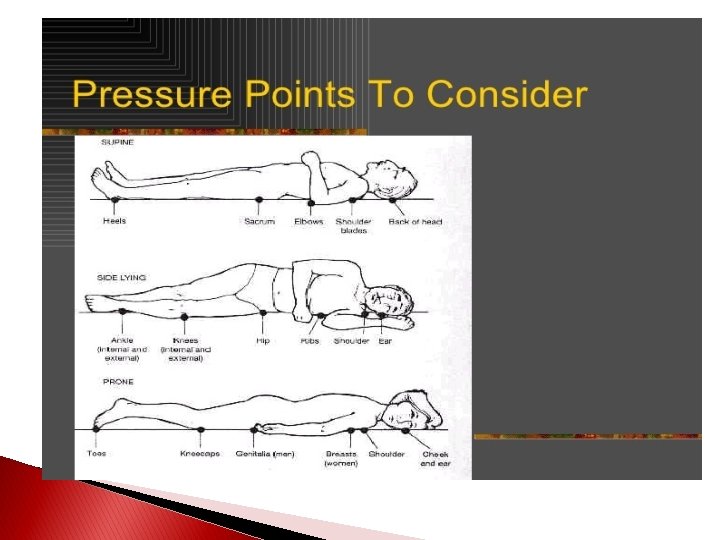
Standard Positions � Supine � Prone � Side-lying � Sitting
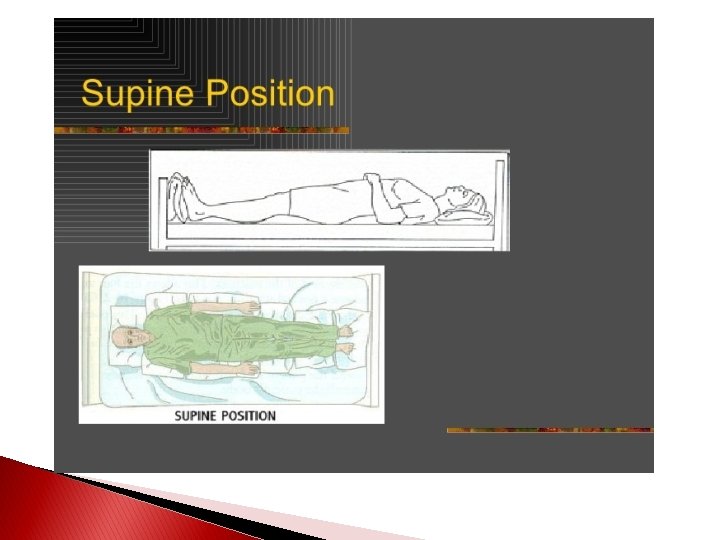
Supine � Pillow under head to keep c-spine neutral � Small pillow or towel roll for cervical support (HP) � Support under popliteal space to decrease lumbar lordosis � Ankle support to relieve pressure under the calcanei � Support under elbows to relieve pressure on bony prominences
Practice – Supine Position � Properly position place your patient in a supine 1: 00 1: 01 1: 02 1: 03 1: 04 1: 05 1: 06 1: 07 1: 08 1: 09 1: 10 1: 11 1: 12 1: 13 1: 14 1: 15 1: 16 1: 17 1: 18 1: 19 1: 20 1: 21 1: 22 1: 23 1: 24 1: 25 1: 26 1: 27 1: 28 1: 29 1: 30 1: 31 1: 32 1: 33 1: 34 1: 35 1: 36 1: 37 1: 38 1: 39 1: 40 1: 41 1: 42 1: 43 1: 44 1: 45 1: 46 1: 47 1: 48 1: 49 1: 50 1: 51 1: 52 1: 53 1: 54 1: 55 1: 56 1: 57 1: 58 1: 59 2: 00 0: 01 0: 02 0: 03 0: 04 0: 05 0: 06 0: 07 0: 08 0: 09 0: 10 0: 11 0: 12 0: 13 0: 14 0: 15 0: 16 0: 17 0: 18 0: 19 0: 20 0: 21 0: 22 0: 23 0: 24 0: 25 0: 26 0: 27 0: 28 0: 29 0: 30 0: 31 0: 32 0: 33 0: 34 0: 35 0: 36 0: 37 0: 38 0: 39 0: 40 0: 41 0: 42 0: 43 0: 44 0: 45 0: 46 0: 47 0: 48 0: 49 0: 50 0: 51 0: 52 0: 53 0: 54 0: 55 0: 56 0: 57 0: 58 0: 59 End
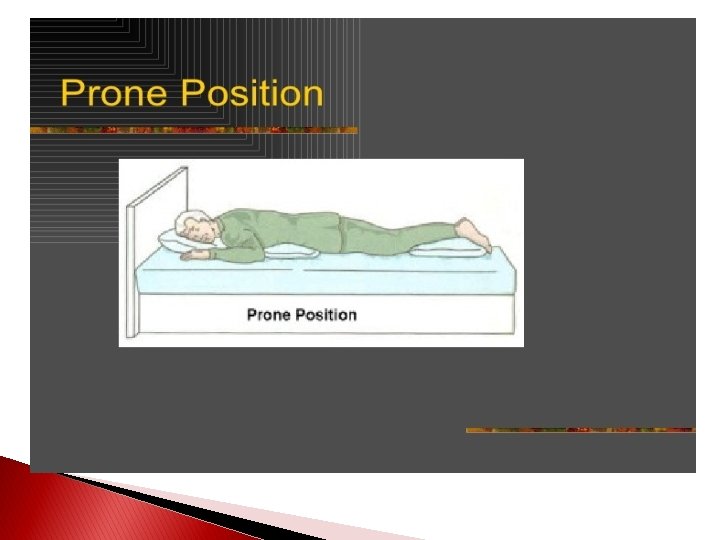
Prone � Pillow under head (or pillow wedge) � Pillow under lower abdomen/hips to decrease lumbar lordosis � Towel rolls under anterior shoulders to retract scapulae � Towel roll/pillow/bolster under ankles to reduce pull on hamstrings and allow the pelvis and low back to relax
Practice – Prone Position � Properly position place your patient in a prone 1: 00 1: 01 1: 02 1: 03 1: 04 1: 05 1: 06 1: 07 1: 08 1: 09 1: 10 1: 11 1: 12 1: 13 1: 14 1: 15 1: 16 1: 17 1: 18 1: 19 1: 20 1: 21 1: 22 1: 23 1: 24 1: 25 1: 26 1: 27 1: 28 1: 29 1: 30 1: 31 1: 32 1: 33 1: 34 1: 35 1: 36 1: 37 1: 38 1: 39 1: 40 1: 41 1: 42 1: 43 1: 44 1: 45 1: 46 1: 47 1: 48 1: 49 1: 50 1: 51 1: 52 1: 53 1: 54 1: 55 1: 56 1: 57 1: 58 1: 59 2: 00 0: 01 0: 02 0: 03 0: 04 0: 05 0: 06 0: 07 0: 08 0: 09 0: 10 0: 11 0: 12 0: 13 0: 14 0: 15 0: 16 0: 17 0: 18 0: 19 0: 20 0: 21 0: 22 0: 23 0: 24 0: 25 0: 26 0: 27 0: 28 0: 29 0: 30 0: 31 0: 32 0: 33 0: 34 0: 35 0: 36 0: 37 0: 38 0: 39 0: 40 0: 41 0: 42 0: 43 0: 44 0: 45 0: 46 0: 47 0: 48 0: 49 0: 50 0: 51 0: 52 0: 53 0: 54 0: 55 0: 56 0: 57 0: 58 0: 59 End
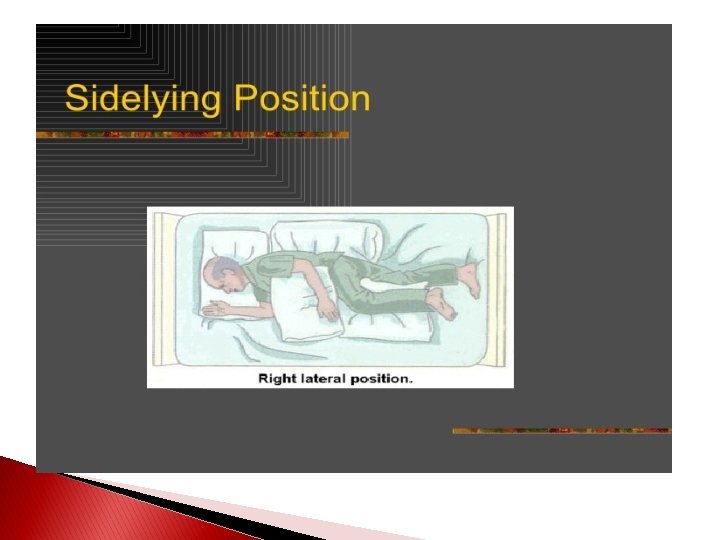
Sidelying � Patient in center of bed � Head, trunk, pelvis in alignment � LEs are flexed at the hips and knees with pillows between knees and top LE slightly forward of bottom LE � Pillow at chest and/or back to keep them from rolling � Pillow under top arm to keep chest open
Practice – Sidelying Position � Properly position place your patient in a side-lying 1: 00 1: 01 1: 02 1: 03 1: 04 1: 05 1: 06 1: 07 1: 08 1: 09 1: 10 1: 11 1: 12 1: 13 1: 14 1: 15 1: 16 1: 17 1: 18 1: 19 1: 20 1: 21 1: 22 1: 23 1: 24 1: 25 1: 26 1: 27 1: 28 1: 29 1: 30 1: 31 1: 32 1: 33 1: 34 1: 35 1: 36 1: 37 1: 38 1: 39 1: 40 1: 41 1: 42 1: 43 1: 44 1: 45 1: 46 1: 47 1: 48 1: 49 1: 50 1: 51 1: 52 1: 53 1: 54 1: 55 1: 56 1: 57 1: 58 1: 59 2: 00 0: 01 0: 02 0: 03 0: 04 0: 05 0: 06 0: 07 0: 08 0: 09 0: 10 0: 11 0: 12 0: 13 0: 14 0: 15 0: 16 0: 17 0: 18 0: 19 0: 20 0: 21 0: 22 0: 23 0: 24 0: 25 0: 26 0: 27 0: 28 0: 29 0: 30 0: 31 0: 32 0: 33 0: 34 0: 35 0: 36 0: 37 0: 38 0: 39 0: 40 0: 41 0: 42 0: 43 0: 44 0: 45 0: 46 0: 47 0: 48 0: 49 0: 50 0: 51 0: 52 0: 53 0: 54 0: 55 0: 56 0: 57 0: 58 0: 59 End
Sitting � There a variety of sitting positions � Remember to soften bony prominences � Support arms and legs (and head if necessary) � Elbows at approx. 90° of flexion
Practice – Seated Position � Properly position place your patient in a seated 1: 00 1: 01 1: 02 1: 03 1: 04 1: 05 1: 06 1: 07 1: 08 1: 09 1: 10 1: 11 1: 12 1: 13 1: 14 1: 15 1: 16 1: 17 1: 18 1: 19 1: 20 1: 21 1: 22 1: 23 1: 24 1: 25 1: 26 1: 27 1: 28 1: 29 1: 30 1: 31 1: 32 1: 33 1: 34 1: 35 1: 36 1: 37 1: 38 1: 39 1: 40 1: 41 1: 42 1: 43 1: 44 1: 45 1: 46 1: 47 1: 48 1: 49 1: 50 1: 51 1: 52 1: 53 1: 54 1: 55 1: 56 1: 57 1: 58 1: 59 2: 00 0: 01 0: 02 0: 03 0: 04 0: 05 0: 06 0: 07 0: 08 0: 09 0: 10 0: 11 0: 12 0: 13 0: 14 0: 15 0: 16 0: 17 0: 18 0: 19 0: 20 0: 21 0: 22 0: 23 0: 24 0: 25 0: 26 0: 27 0: 28 0: 29 0: 30 0: 31 0: 32 0: 33 0: 34 0: 35 0: 36 0: 37 0: 38 0: 39 0: 40 0: 41 0: 42 0: 43 0: 44 0: 45 0: 46 0: 47 0: 48 0: 49 0: 50 0: 51 0: 52 0: 53 0: 54 0: 55 0: 56 0: 57 0: 58 0: 59 End
Draping � Why do we drape? � How do you feel at the doc’s office with no clothes on? ◦ Privacy/modesty/dignity ◦ Warmth ◦ Hygiene
Draping � If you need pt to change into a gown, leave the room; knock before reentering � If patient needs assistance, suggest it; ask permission before helping them � Only the area to be treated should be exposed; the rest of the pt stays covered ◦ Gown, blanket, sheet, towel ◦ Consider which drape is best � Pt comfort is the key when working on difficult areas
Draping � Be sure you keep legal considerations in mind ◦ What is the policy of the facility on doors being closed/slightly open? Curtains? ◦ Comments and touch mean different things to different people – keep in mind appropriate vs. inappropriate � Protect yourself and your employer by being professional at all times
Practice - Draping � Practice draping for: � Shoulder � Low back � Groin � Mid-upper back