Portraits 3 POINT STUDIO LIGHTING Threepoint lighting It


 creates a bright line around the")


 lighting Best for most faces- slimming effect Subject is angled")


- Slides: 27
Portraits 3 - POINT STUDIO LIGHTING
Three-point lighting It is a standard method used in visual media such as video, film, still photography A typical three point setup with a shoulder or back-side lamp to create contrast between the background and center object so as to give a three dimensional appearance.
Three-point lighting
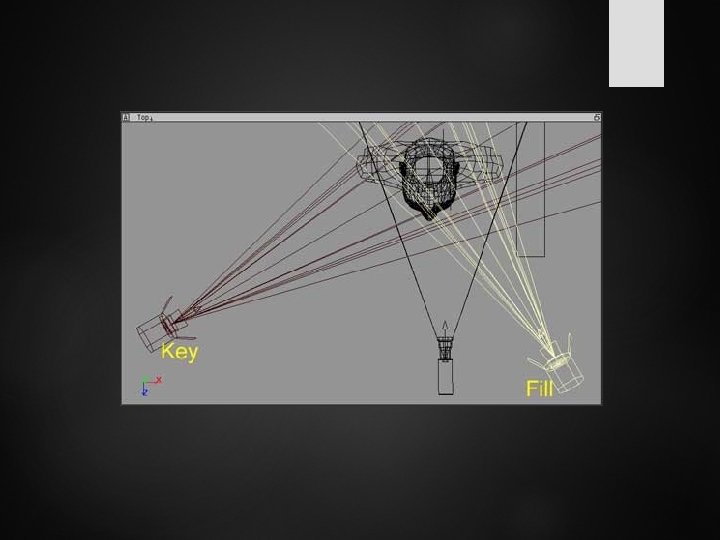
Different types of lights Key light Fill light Background lights (also called a rim light) Hair light
Key light The main purpose of key lights is to illuminate all parts of a subject. The light(s) is set up directly in front of the model from where the camera is placed It shines directly upon the subject and serves as its principal illuminator; more than anything else. Softbox, and beauty dish are some of the lights that are used as key lights in the studio. Outside the sun acts as a key light
Key light placement 1. It is placed at forty-five degree angle in front of the subject and to the side of the camera to provide some modeling. 2. The light is positioned above the subject, but not too high, in order to shine into the face of the subject.
Fill light The fill lights are used for erasing shadows produced by the key lights. They are usually placed on either side of the subject. They are also set above the head of the subject. Umbrella and other similar kind of soft light sources are used the purpose Instead of a light you can use a reflector to fill in the shadows a Fill Light should come from a generally opposite angle than the Key - if the Key is on the left, the Fill should be on the right - but don't make all of your lighting 100% symmetrical! The Fill can be raised to the subject's height, but should be lower than the Key.
1: 1 1: 2 - good starting point 1: 4 How much fill light to give? 1: 1, where the key and fill are equal intensity. 1: 2 the fill is ½ the intensity as the key 1: 4 the fill is ¼ the intensity as the key 1: 8 the fill is 1/8 the intensity as the key 1: 2 is a good starting point, it produces subtle shadows 1: 8
Fill light Where is the key light in this picture? Where is the fill?
Backlights The Rim Light (also called Back Light) creates a bright line around the edge of the object, to help visually separate the object from the background. From the top view, add a spot light, and position it behind your subject, opposite from the camera. From the right view, position the Back Light above your subject.
Adjust the Rim Light until it gives you a clear, bright outline that highlights the top or side edge for your subject. Rim Lights can be as bright as necessary to achieve the glints you want around the hair or sides of your subject. No back light
Hair light A hair light is really important if you are shooting a model with dark hair against a dark background. It’s very easy to lose the model in the background without a hair light. But even if you don’t have a dark-haired model on a dark background, hair lights still make a big difference in the photo by adding interest and highlights to the model’s hair. A hair light is generally placed behind the model and about 3 feet above the head, with the light angled down and slightly forward to strike the top of the head and shoulders.
No hair light With hair light
Example
What is a “catchlight? ” See how the bright spot in the subject’s eyes? This is what is known as the “catchlight”. Without the eye of the subject catching this light, the eyes will appear dark, dead and lifeless. You need to ensure that at least one eye has a catchlight to give the subject life. Notice it also lightens the iris and brightens the eye overall. This also adds to the feeling of life and gives them a sparkle.
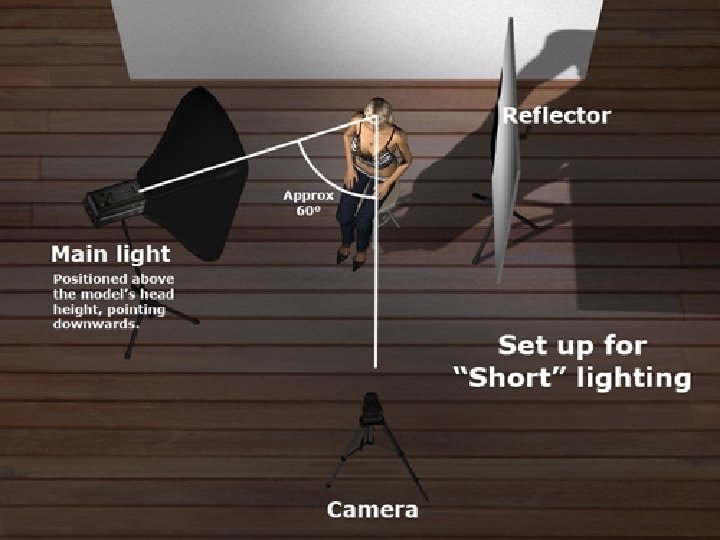
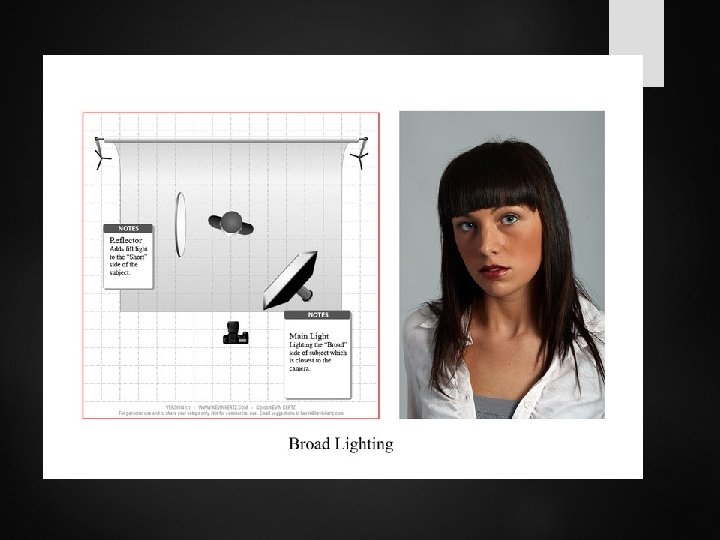
Broad Lighting VS Short Lighting
Short (also called narrow) lighting Best for most faces- slimming effect Subject is angled toward the key light Short lighting puts the side turned toward the camera in more shadow, making the other side of the face turned toward the key light (which is a narrow area of light. ) It is often used for low key, or darker portraits. It puts more of the face in shadow, is more sculpting, add 3 D qualities, and is slimming and flattering for most people.
Short lighting examples
Broad lighting To create broad lighting the face is turned away from the light source. Notice how the side of the face that is towards the camera has the most light (or broad amount) on it and the shadows are falling on the far side of the face, furthest from the camera. Simply put broad lighting illuminates the largest part of the face showing toward the camera.
Broad light examples
Which one is short, which one is broad?
Using a light meter Set your shutter speed on your camera no more than 1/125 th of second and no less than 1/60 th ISO 400
Press the M button and toggle over to the “t” using the left/right arrow which means time value (shutter speed) Use the up and down arrow keys to set the light meter shutter speed to the same shutter speed your camera is on Have the subject hold the light meter up to their face for a light reading, you fire off the strobes Whatever f/stop the light meter tells you to be on, turn the f/stop to the same on your camera