
Pneumatic tools Encyclopedia Ingersoll Rand Construction Technologies Table
Pneumatic tools Encyclopedia Ingersoll Rand Construction Technologies
Table of contents • Application What are the tools used for? • Technology How a tool is working? • IR Range Ingersoll Rand tools specifications • Points & Chisels Points, chisels, cutters, drills… • Best practices Operation, safety, lubrication • Maintenance Typical service operations • Nuisances Coping with noise and vibrations 2
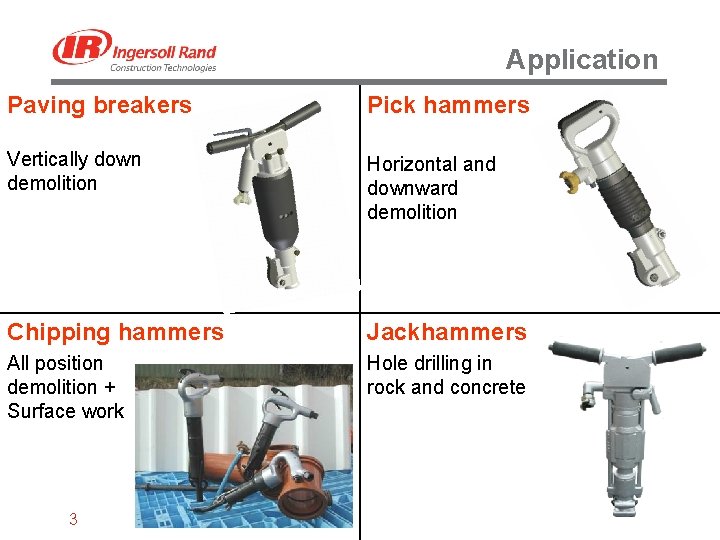
Application Paving breakers Pick hammers Vertically down demolition Horizontal and downward demolition Chipping hammers Jackhammers All position demolition + Surface work Hole drilling in rock and concrete 3
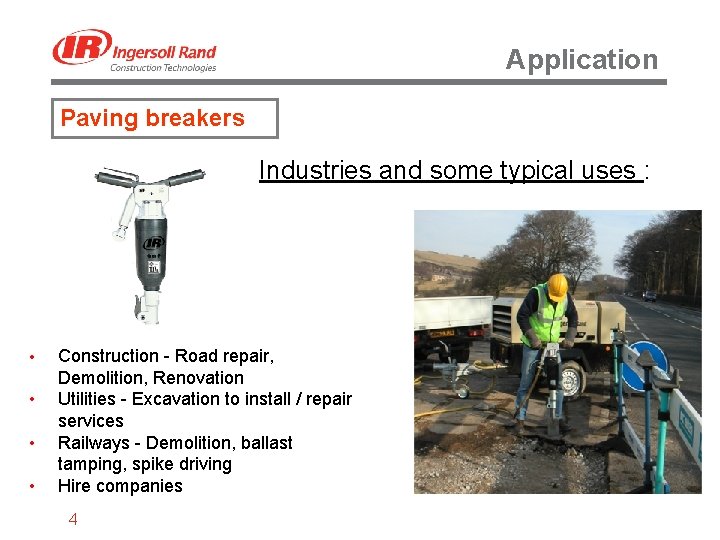
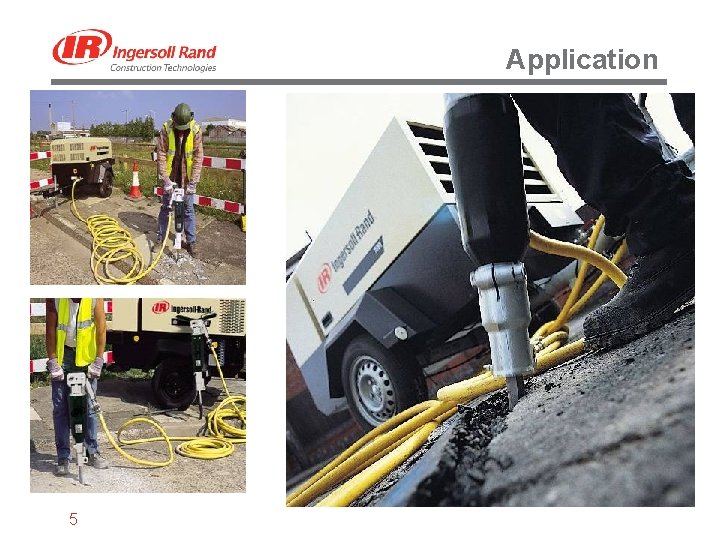
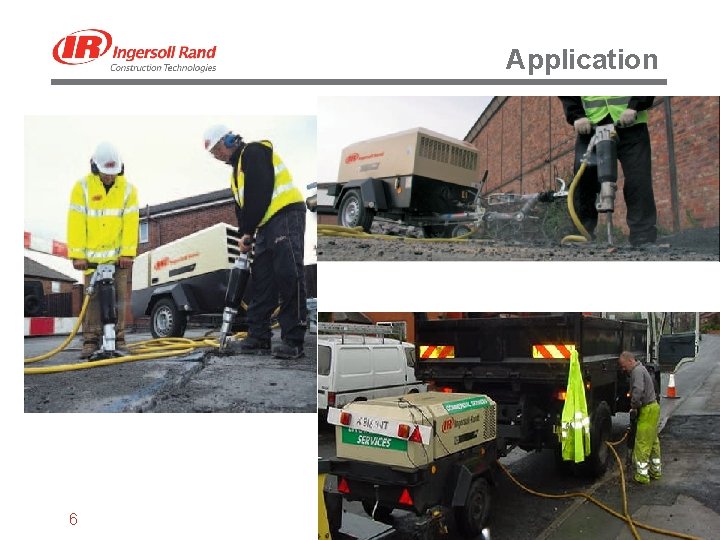
Application Paving breakers Industries and some typical uses : • • Construction - Road repair, Demolition, Renovation Utilities - Excavation to install / repair services Railways - Demolition, ballast tamping, spike driving Hire companies 4
Application 5
Application 6
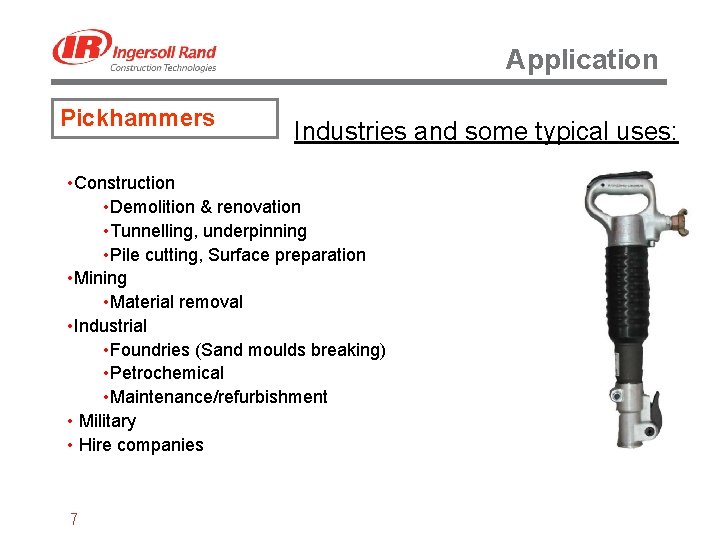
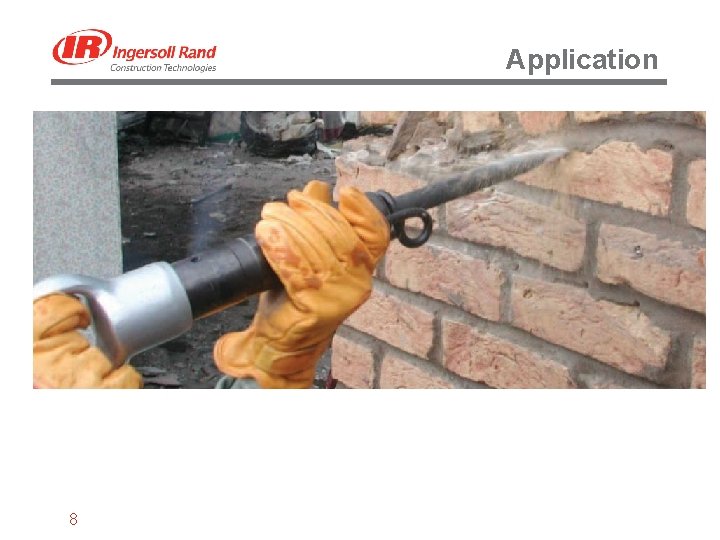
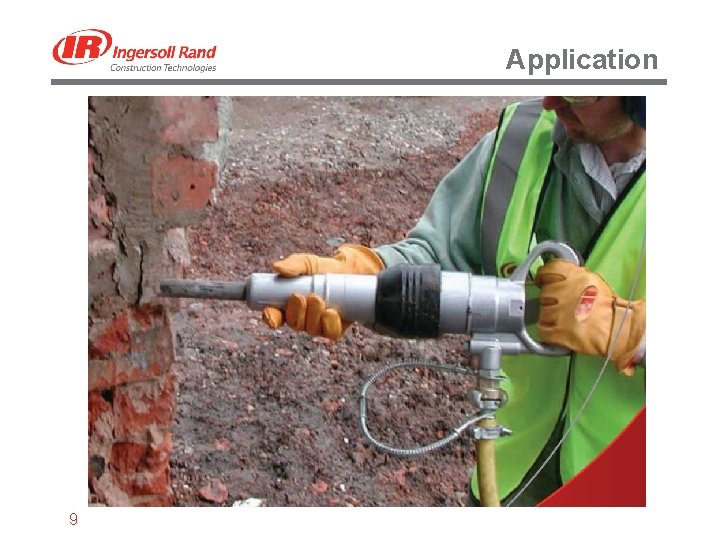
Application Pickhammers Industries and some typical uses: • Construction • Demolition & renovation • Tunnelling, underpinning • Pile cutting, Surface preparation • Mining • Material removal • Industrial • Foundries (Sand moulds breaking) • Petrochemical • Maintenance/refurbishment • Military • Hire companies 7
Application 8
Application 9
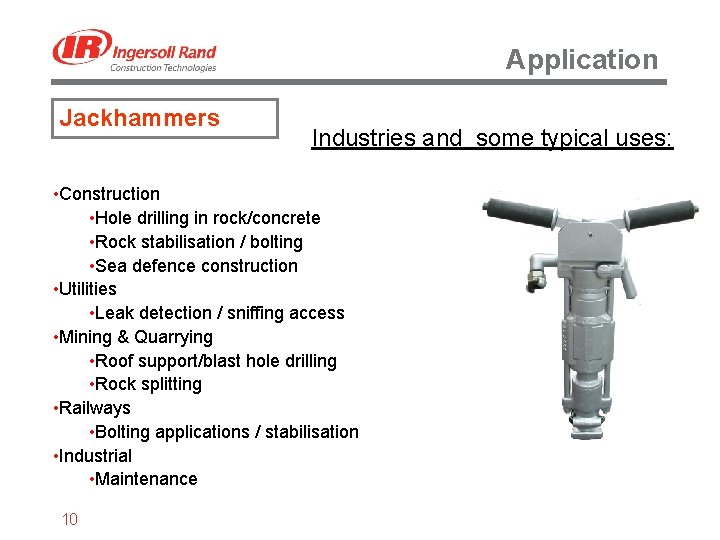
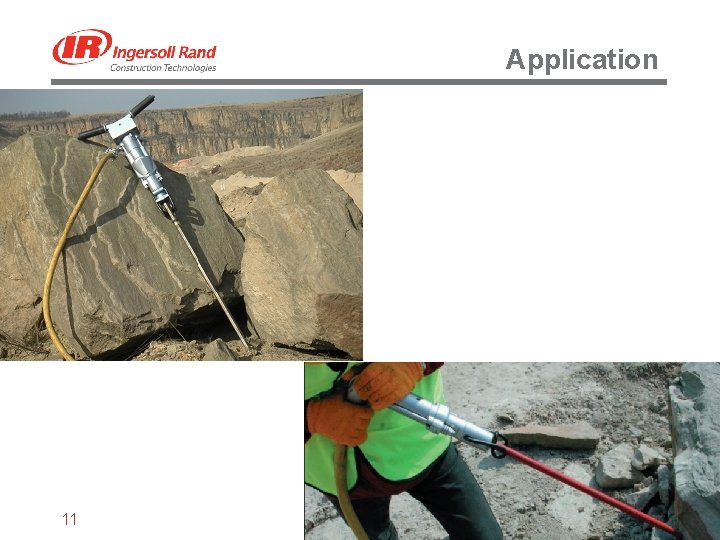
Application Jackhammers Industries and some typical uses: • Construction • Hole drilling in rock/concrete • Rock stabilisation / bolting • Sea defence construction • Utilities • Leak detection / sniffing access • Mining & Quarrying • Roof support/blast hole drilling • Rock splitting • Railways • Bolting applications / stabilisation • Industrial • Maintenance 10
Application 11
Table of contents • Application What are the tools used for? • Technology How a tool is working? • IR Range Ingersoll Rand tools specifications • Points & Chisels Points, chisels, cutters, drills… • Best practices Operation, safety, lubrication • Maintenance Typical service operations • Nuisances Coping with noise and vibrations 12
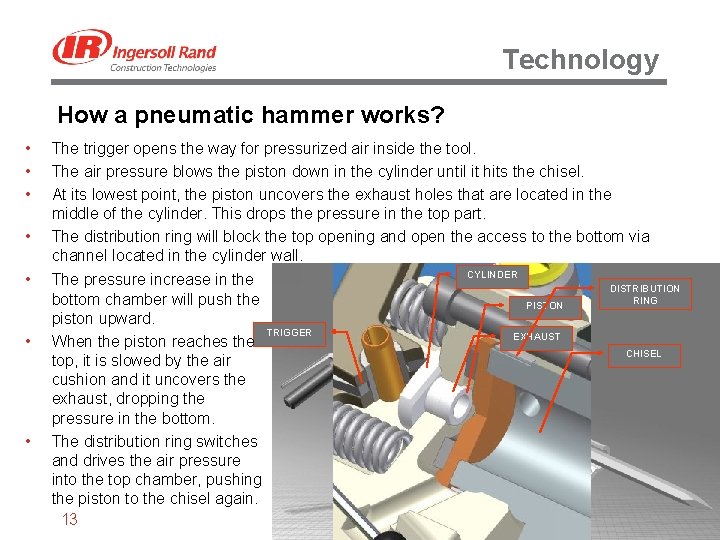
Technology How a pneumatic hammer works? • • The trigger opens the way for pressurized air inside the tool. The air pressure blows the piston down in the cylinder until it hits the chisel. At its lowest point, the piston uncovers the exhaust holes that are located in the middle of the cylinder. This drops the pressure in the top part. The distribution ring will block the top opening and open the access to the bottom via channel located in the cylinder wall. CYLINDER The pressure increase in the DISTRIBUTION RING bottom chamber will push the PISTON piston upward. TRIGGER EXHAUST When the piston reaches the CHISEL top, it is slowed by the air cushion and it uncovers the exhaust, dropping the pressure in the bottom. The distribution ring switches and drives the air pressure into the top chamber, pushing the piston to the chisel again. 13
Technology A tool is characterized by: • Portability and application: – Weight – Shape – Tool bit type • Performance aspect – Piston diameter (related to the weight of the piston) – Piston stroke (or traveling distance of the piston) – Frequency (number of bumps per minute) These elements influences the stroke energy or power of the tool. • Safety aspects – Noise reduction – Vibrations dampening The best tool is handy, powerful and still maintains low nuisance. 14
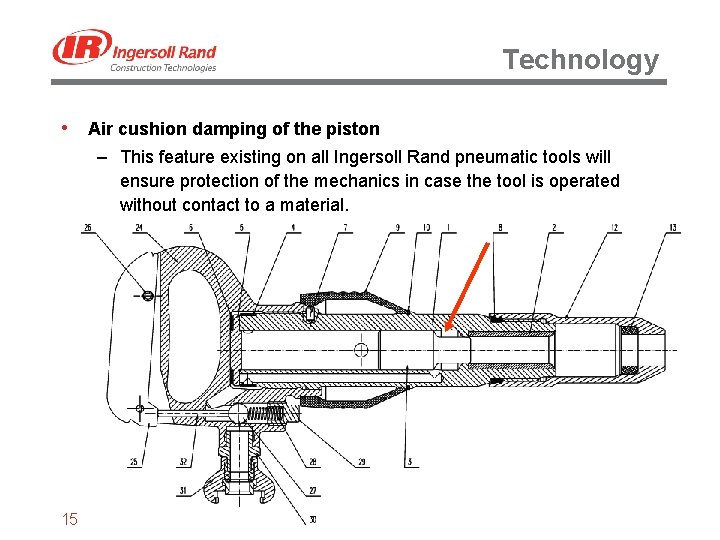
Technology • Air cushion damping of the piston – This feature existing on all Ingersoll Rand pneumatic tools will ensure protection of the mechanics in case the tool is operated without contact to a material. 15
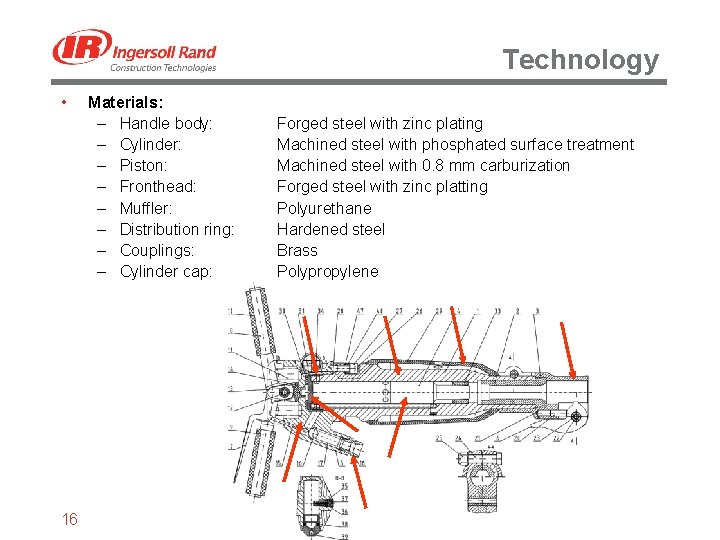
Technology • 16 Materials: – Handle body: – Cylinder: – Piston: – Fronthead: – Muffler: – Distribution ring: – Couplings: – Cylinder cap: Forged steel with zinc plating Machined steel with phosphated surface treatment Machined steel with 0. 8 mm carburization Forged steel with zinc platting Polyurethane Hardened steel Brass Polypropylene
Table of contents • Application What are the tools used for? • Technology How a tool is working? • IR Range Ingersoll Rand tools specifications • Points & Chisels Points, chisels, cutters, drills… • Best practices Operation, safety, lubrication • Maintenance Typical service operations • Nuisances Coping with noise and vibrations 17
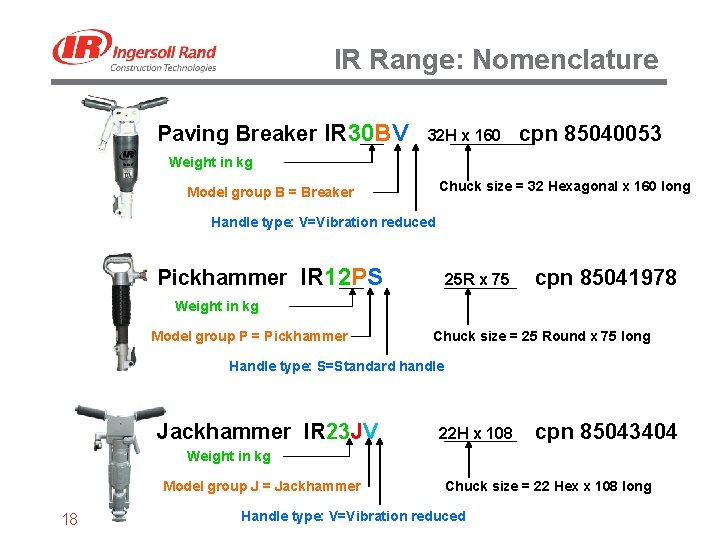
IR Range: Nomenclature Paving Breaker IR 30 BV 32 H x 160 cpn 85040053 Weight in kg Chuck size = 32 Hexagonal x 160 long Model group B = Breaker Handle type: V=Vibration reduced Pickhammer IR 12 PS 25 R x 75 cpn 85041978 Weight in kg Model group P = Pickhammer Chuck size = 25 Round x 75 long Handle type: S=Standard handle Jackhammer IR 23 JV 22 H x 108 cpn 85043404 Weight in kg Model group J = Jackhammer 18 Chuck size = 22 Hex x 108 long Handle type: V=Vibration reduced
IR Range 19
IR Range 20
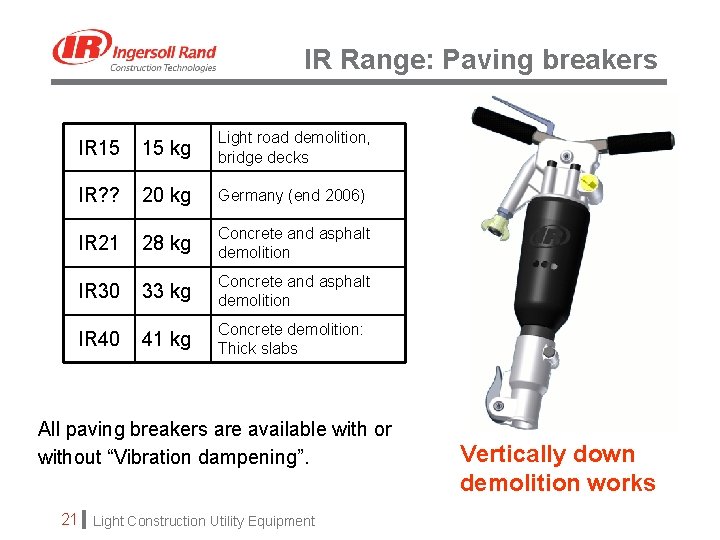
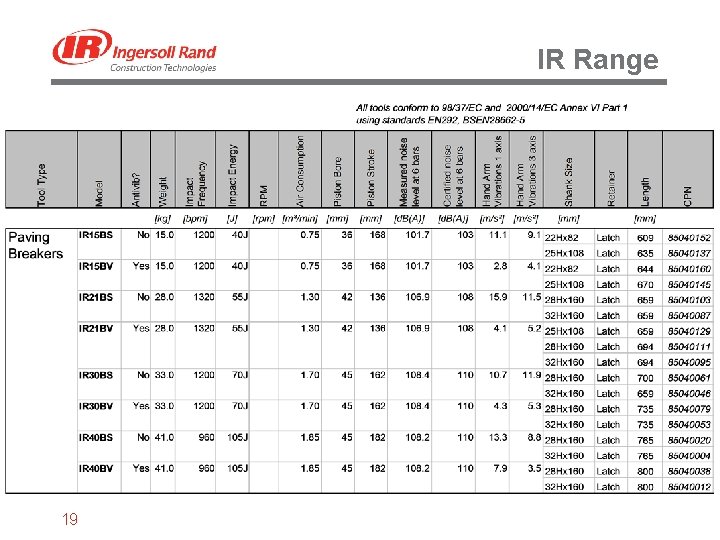
IR Range: Paving breakers IR 15 15 kg Light road demolition, bridge decks IR? ? 20 kg Germany (end 2006) IR 21 28 kg Concrete and asphalt demolition IR 30 33 kg Concrete and asphalt demolition IR 40 41 kg Concrete demolition: Thick slabs All paving breakers are available with or without “Vibration dampening”. 21 Light Construction Utility Equipment Vertically down demolition works
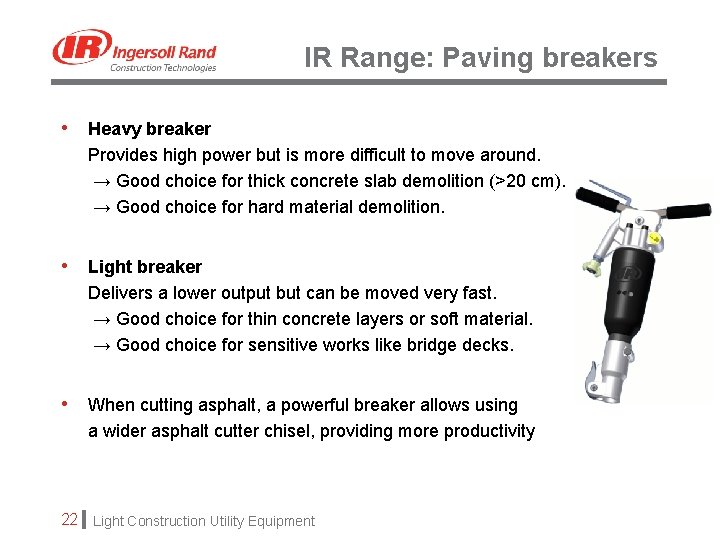
IR Range: Paving breakers • Heavy breaker Provides high power but is more difficult to move around. → Good choice for thick concrete slab demolition (>20 cm). → Good choice for hard material demolition. • Light breaker Delivers a lower output but can be moved very fast. → Good choice for thin concrete layers or soft material. → Good choice for sensitive works like bridge decks. • When cutting asphalt, a powerful breaker allows using a wider asphalt cutter chisel, providing more productivity 22 Light Construction Utility Equipment
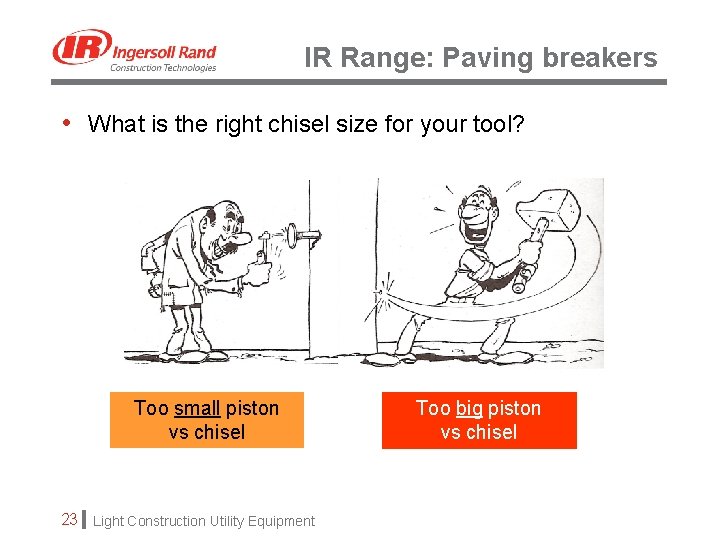
IR Range: Paving breakers • What is the right chisel size for your tool? Too small piston vs chisel 23 Light Construction Utility Equipment Too big piston vs chisel
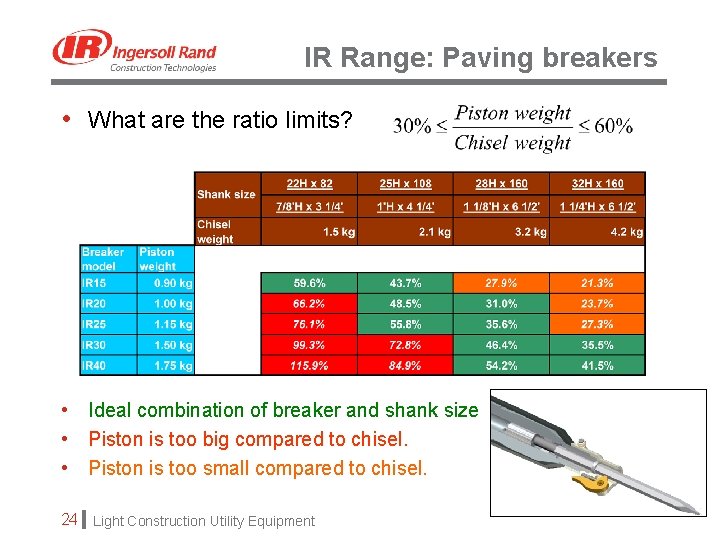
IR Range: Paving breakers • What are the ratio limits? • Ideal combination of breaker and shank size • Piston is too big compared to chisel. • Piston is too small compared to chisel. 24 Light Construction Utility Equipment
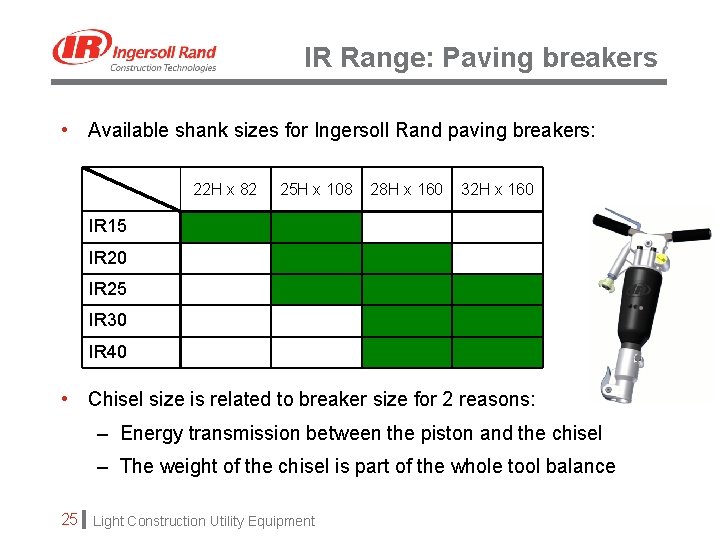
IR Range: Paving breakers • Available shank sizes for Ingersoll Rand paving breakers: 22 H x 82 25 H x 108 28 H x 160 32 H x 160 IR 15 IR 20 IR 25 IR 30 IR 40 • Chisel size is related to breaker size for 2 reasons: – Energy transmission between the piston and the chisel – The weight of the chisel is part of the whole tool balance 25 Light Construction Utility Equipment
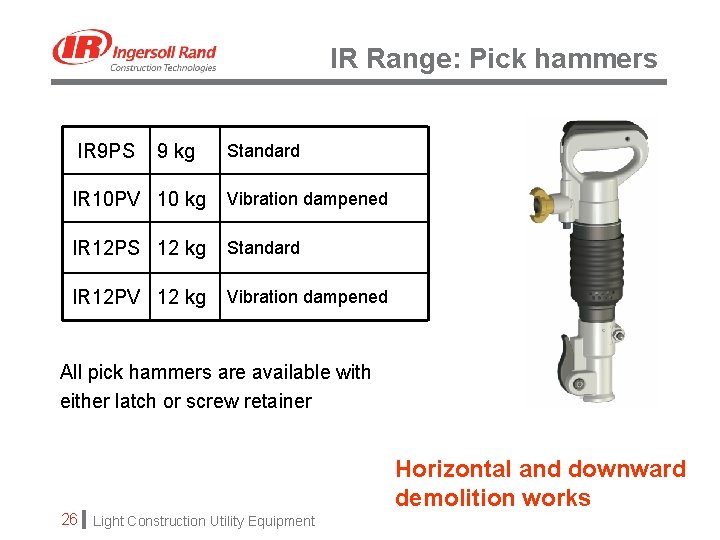
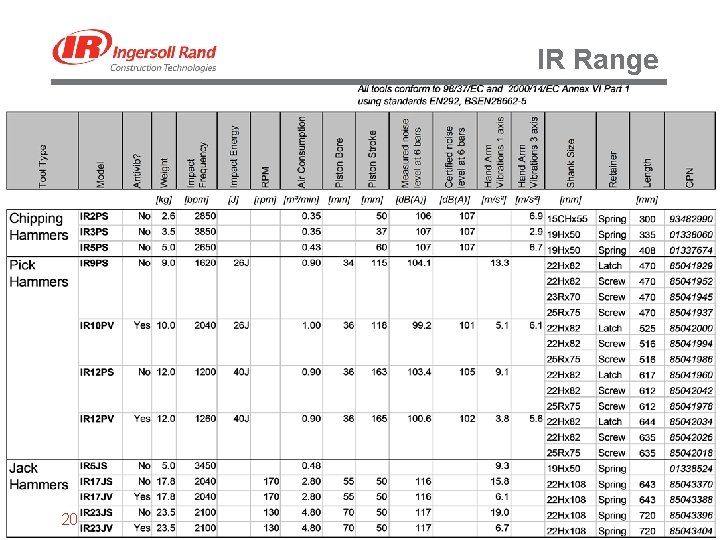
IR Range: Pick hammers IR 9 PS 9 kg Standard IR 10 PV 10 kg Vibration dampened IR 12 PS 12 kg Standard IR 12 PV 12 kg Vibration dampened All pick hammers are available with either latch or screw retainer 26 Light Construction Utility Equipment Horizontal and downward demolition works
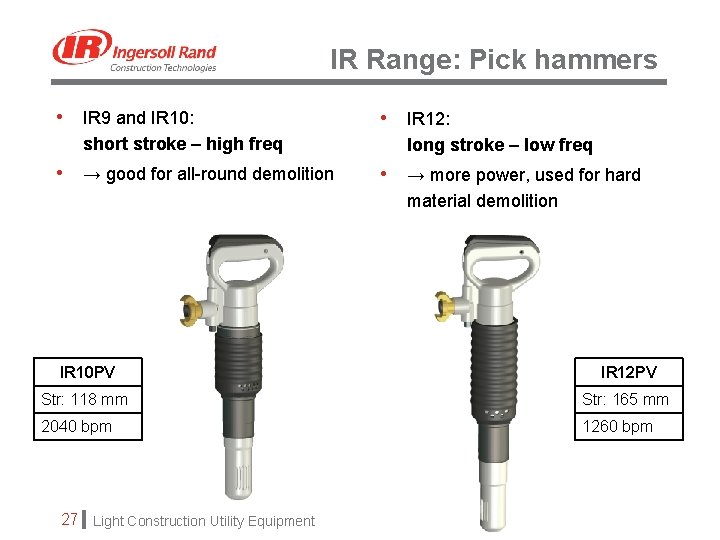
IR Range: Pick hammers • IR 9 and IR 10: short stroke – high freq • → good for all-round demolition • IR 12: long stroke – low freq • → more power, used for hard material demolition IR 10 PV IR 12 PV Str: 118 mm Str: 165 mm 2040 bpm 1260 bpm 27 Light Construction Utility Equipment
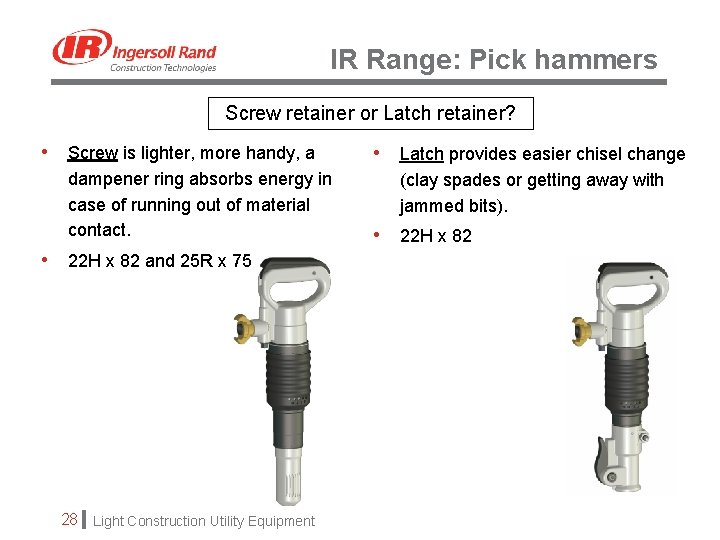
IR Range: Pick hammers Screw retainer or Latch retainer? • Screw is lighter, more handy, a dampener ring absorbs energy in case of running out of material contact. • 22 H x 82 and 25 R x 75 28 Light Construction Utility Equipment • Latch provides easier chisel change (clay spades or getting away with jammed bits). • 22 H x 82
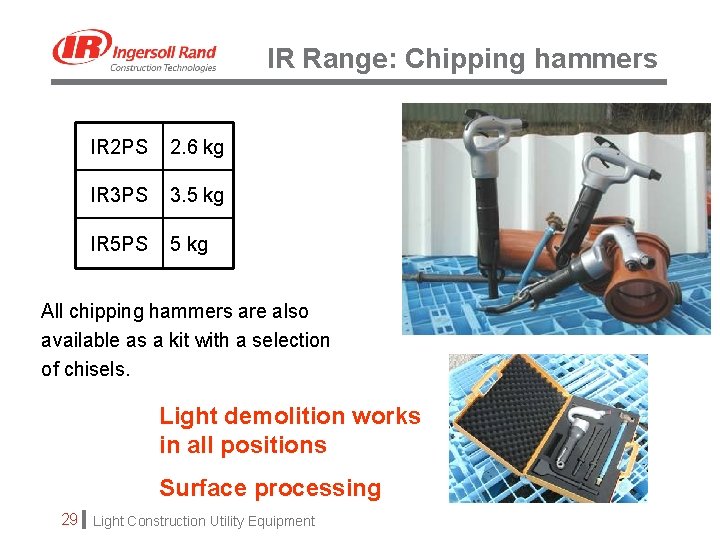
IR Range: Chipping hammers IR 2 PS 2. 6 kg IR 3 PS 3. 5 kg IR 5 PS 5 kg All chipping hammers are also available as a kit with a selection of chisels. Light demolition works in all positions Surface processing 29 Light Construction Utility Equipment
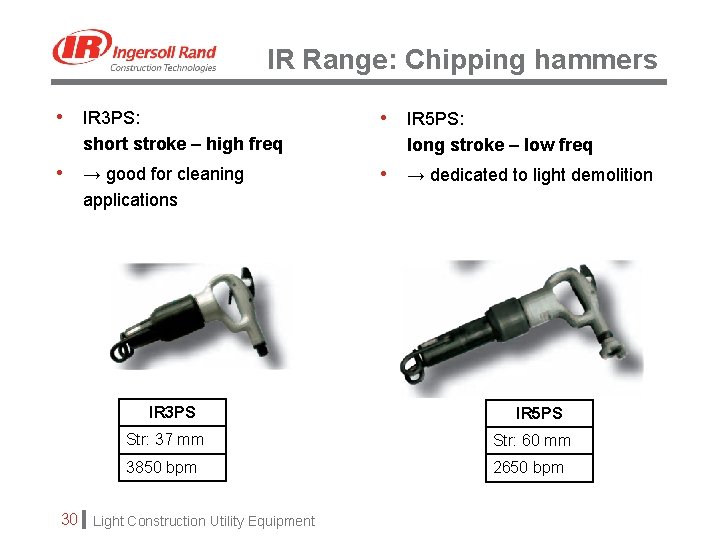
IR Range: Chipping hammers • IR 3 PS: • IR 5 PS: short stroke – high freq • → good for cleaning long stroke – low freq • → dedicated to light demolition applications IR 3 PS IR 5 PS Str: 37 mm Str: 60 mm 3850 bpm 2650 bpm 30 Light Construction Utility Equipment
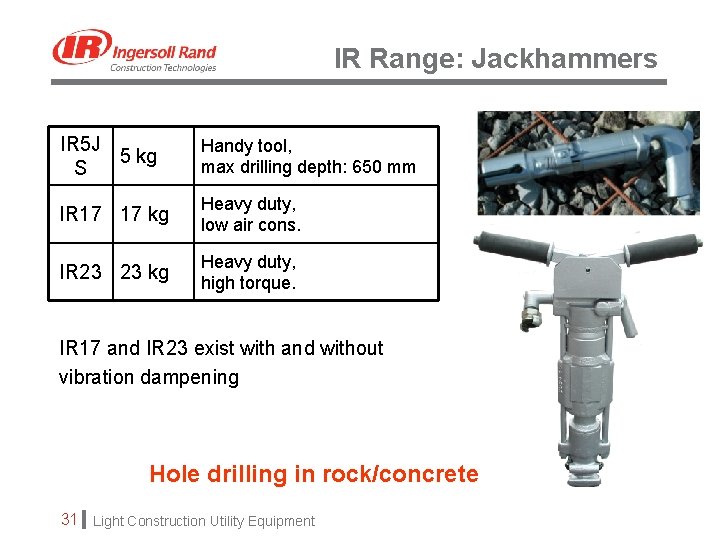
IR Range: Jackhammers IR 5 J 5 kg S Handy tool, max drilling depth: 650 mm IR 17 17 kg Heavy duty, low air cons. IR 23 23 kg Heavy duty, high torque. IR 17 and IR 23 exist with and without vibration dampening Hole drilling in rock/concrete 31 Light Construction Utility Equipment
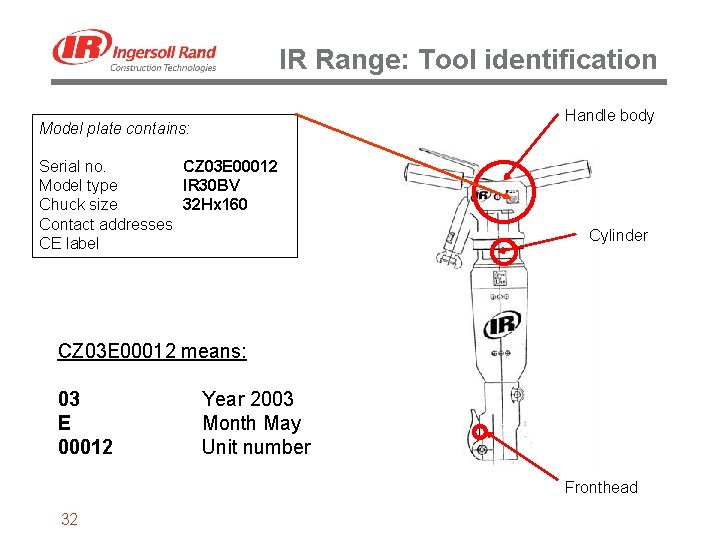
IR Range: Tool identification Handle body Model plate contains: Serial no. CZ 03 E 00012 Model type IR 30 BV Chuck size 32 Hx 160 Contact addresses CE label Cylinder CZ 03 E 00012 means: 03 E 00012 Year 2003 Month May Unit number Fronthead 32
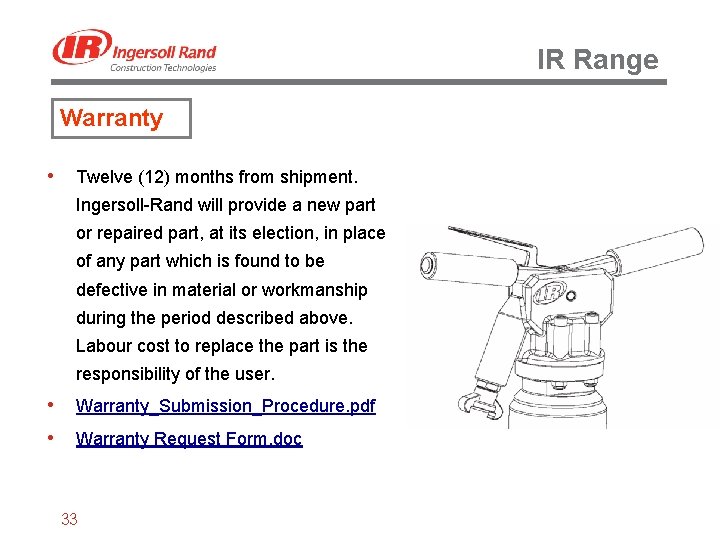
IR Range Warranty • Twelve (12) months from shipment. Ingersoll-Rand will provide a new part or repaired part, at its election, in place of any part which is found to be defective in material or workmanship during the period described above. Labour cost to replace the part is the responsibility of the user. • Warranty_Submission_Procedure. pdf • Warranty Request Form. doc 33
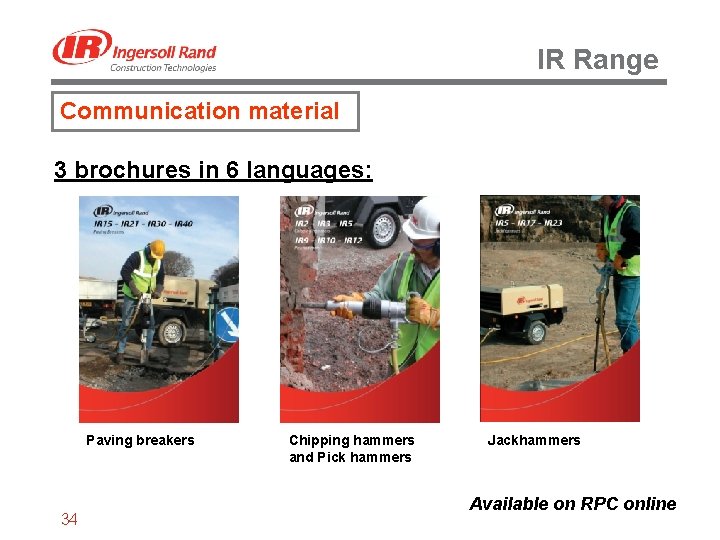
IR Range Communication material 3 brochures in 6 languages: Paving breakers 34 Chipping hammers and Pick hammers Jackhammers Available on RPC online
Table of contents • Application What are the tools used for? • Technology How a tool is working? • IR Range Ingersoll Rand tools specifications • Points & Chisels Points, chisels, cutters, drills… • Best practices Operation, safety, lubrication • Maintenance Typical service operations • Nuisances Coping with noise and vibrations 35
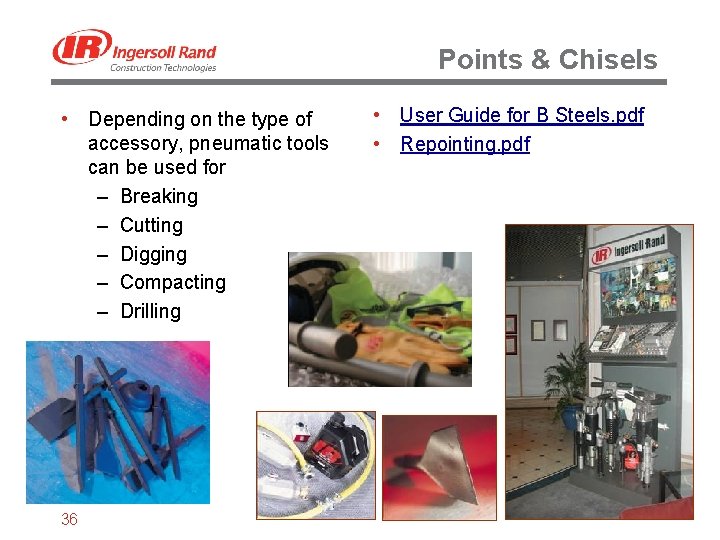
Points & Chisels • Depending on the type of accessory, pneumatic tools can be used for – Breaking – Cutting – Digging – Compacting – Drilling 36 • User Guide for B Steels. pdf • Repointing. pdf
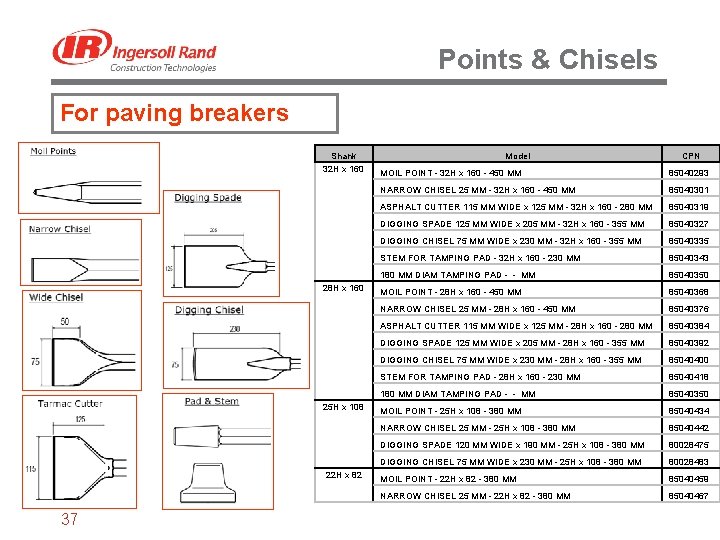
Points & Chisels For paving breakers Shank 32 H x 160 28 H x 160 25 H x 108 22 H x 82 37 Model CPN MOIL POINT - 32 H x 160 - 450 MM 85040293 NARROW CHISEL 25 MM - 32 H x 160 - 450 MM 85040301 ASPHALT CUTTER 115 MM WIDE x 125 MM - 32 H x 160 - 280 MM 85040319 DIGGING SPADE 125 MM WIDE x 205 MM - 32 H x 160 - 355 MM 85040327 DIGGING CHISEL 75 MM WIDE x 230 MM - 32 H x 160 - 355 MM 85040335 STEM FOR TAMPING PAD - 32 H x 160 - 230 MM 85040343 180 MM DIAM TAMPING PAD - - MM 85040350 MOIL POINT - 28 H x 160 - 450 MM 85040368 NARROW CHISEL 25 MM - 28 H x 160 - 450 MM 85040376 ASPHALT CUTTER 115 MM WIDE x 125 MM - 28 H x 160 - 280 MM 85040384 DIGGING SPADE 125 MM WIDE x 205 MM - 28 H x 160 - 355 MM 85040392 DIGGING CHISEL 75 MM WIDE x 230 MM - 28 H x 160 - 355 MM 85040400 STEM FOR TAMPING PAD - 28 H x 160 - 230 MM 85040418 180 MM DIAM TAMPING PAD - - MM 85040350 MOIL POINT - 25 H x 108 - 380 MM 85040434 NARROW CHISEL 25 MM - 25 H x 108 - 380 MM 85040442 DIGGING SPADE 120 MM WIDE x 190 MM - 25 H x 108 - 380 MM 80028475 DIGGING CHISEL 75 MM WIDE x 230 MM - 25 H x 108 - 380 MM 80028483 MOIL POINT - 22 H x 82 - 380 MM 85040459 NARROW CHISEL 25 MM - 22 H x 82 - 380 MM 85040467
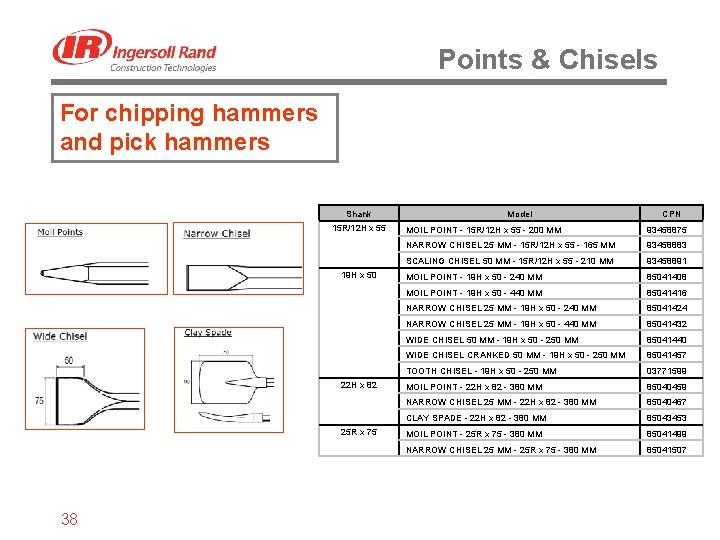
Points & Chisels For chipping hammers and pick hammers Shank 15 R/12 H x 55 19 H x 50 22 H x 82 25 R x 75 38 Model CPN MOIL POINT - 15 R/12 H x 55 - 200 MM 93458875 NARROW CHISEL 25 MM - 15 R/12 H x 55 - 165 MM 93458883 SCALING CHISEL 50 MM - 15 R/12 H x 55 - 210 MM 93458891 MOIL POINT - 19 H x 50 - 240 MM 85041408 MOIL POINT - 19 H x 50 - 440 MM 85041416 NARROW CHISEL 25 MM - 19 H x 50 - 240 MM 85041424 NARROW CHISEL 25 MM - 19 H x 50 - 440 MM 85041432 WIDE CHISEL 50 MM - 19 H x 50 - 250 MM 85041440 WIDE CHISEL CRANKED 50 MM - 19 H x 50 - 250 MM 85041457 TOOTH CHISEL - 19 H x 50 - 250 MM 03771599 MOIL POINT - 22 H x 82 - 380 MM 85040459 NARROW CHISEL 25 MM - 22 H x 82 - 380 MM 85040467 CLAY SPADE - 22 H x 82 - 380 MM 85043453 MOIL POINT - 25 R x 75 - 380 MM 85041499 NARROW CHISEL 25 MM - 25 R x 75 - 380 MM 85041507
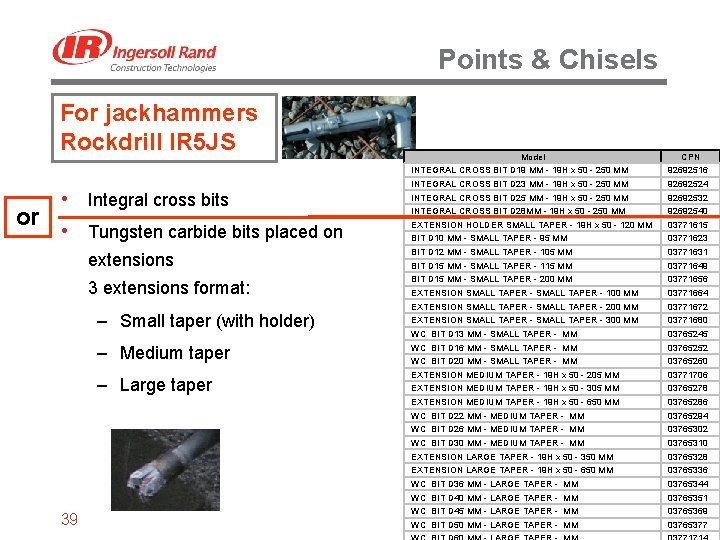
Points & Chisels For jackhammers Rockdrill IR 5 JS or CPN INTEGRAL CROSS BIT D 19 MM - 19 H x 50 - 250 MM 92692516 INTEGRAL CROSS BIT D 23 MM - 19 H x 50 - 250 MM 92692524 INTEGRAL CROSS BIT D 25 MM - 19 H x 50 - 250 MM 92692532 INTEGRAL CROSS BIT D 28 MM - 19 H x 50 - 250 MM 92692540 EXTENSION HOLDER SMALL TAPER - 19 H x 50 - 120 MM 03771615 BIT D 10 MM - SMALL TAPER - 95 MM 03771623 extensions BIT D 12 MM - SMALL TAPER - 105 MM 03771631 BIT D 15 MM - SMALL TAPER - 115 MM 03771649 3 extensions format: BIT D 15 MM - SMALL TAPER - 200 MM 03771656 EXTENSION SMALL TAPER - 100 MM 03771664 EXTENSION SMALL TAPER - 200 MM 03771672 EXTENSION SMALL TAPER - 300 MM 03771680 WC BIT D 13 MM - SMALL TAPER - MM 03765245 WC BIT D 16 MM - SMALL TAPER - MM 03765252 WC BIT D 20 MM - SMALL TAPER - MM 03765260 EXTENSION MEDIUM TAPER - 19 H x 50 - 205 MM 03771706 EXTENSION MEDIUM TAPER - 19 H x 50 - 305 MM 03765278 EXTENSION MEDIUM TAPER - 19 H x 50 - 650 MM 03765286 WC BIT D 22 MM - MEDIUM TAPER - MM 03765294 WC BIT D 26 MM - MEDIUM TAPER - MM 03765302 WC BIT D 30 MM - MEDIUM TAPER - MM 03765310 EXTENSION LARGE TAPER - 19 H x 50 - 350 MM 03765328 EXTENSION LARGE TAPER - 19 H x 50 - 650 MM 03765336 WC BIT D 36 MM - LARGE TAPER - MM 03765344 WC BIT D 40 MM - LARGE TAPER - MM 03765351 WC BIT D 45 MM - LARGE TAPER - MM 03765369 WC BIT D 50 MM - LARGE TAPER - MM 03765377 • Integral cross bits • Tungsten carbide bits placed on – Small taper (with holder) – Medium taper – Large taper 39 Model
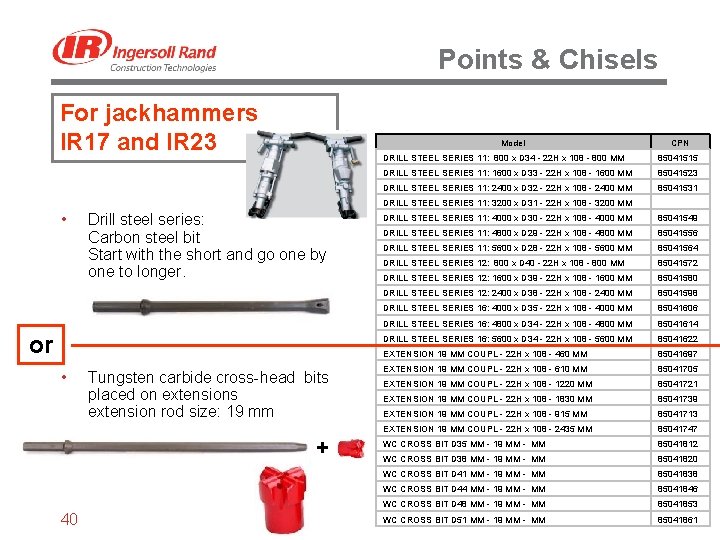
Points & Chisels For jackhammers IR 17 and IR 23 • Model Drill steel series: Carbon steel bit Start with the short and go one by one to longer. or • Tungsten carbide cross-head bits placed on extensions extension rod size: 19 mm + 40 CPN DRILL STEEL SERIES 11: 800 x D 34 - 22 H x 108 - 800 MM 85041515 DRILL STEEL SERIES 11: 1600 x D 33 - 22 H x 108 - 1600 MM 85041523 DRILL STEEL SERIES 11: 2400 x D 32 - 22 H x 108 - 2400 MM 85041531 DRILL STEEL SERIES 11: 3200 x D 31 - 22 H x 108 - 3200 MM DRILL STEEL SERIES 11: 4000 x D 30 - 22 H x 108 - 4000 MM 85041549 DRILL STEEL SERIES 11: 4800 x D 29 - 22 H x 108 - 4800 MM 85041556 DRILL STEEL SERIES 11: 5600 x D 28 - 22 H x 108 - 5600 MM 85041564 DRILL STEEL SERIES 12: 800 x D 40 - 22 H x 108 - 800 MM 85041572 DRILL STEEL SERIES 12: 1600 x D 39 - 22 H x 108 - 1600 MM 85041580 DRILL STEEL SERIES 12: 2400 x D 38 - 22 H x 108 - 2400 MM 85041598 DRILL STEEL SERIES 16: 4000 x D 35 - 22 H x 108 - 4000 MM 85041606 DRILL STEEL SERIES 16: 4800 x D 34 - 22 H x 108 - 4800 MM 85041614 DRILL STEEL SERIES 16: 5600 x D 34 - 22 H x 108 - 5600 MM 85041622 EXTENSION 19 MM COUPL - 22 H x 108 - 460 MM 85041697 EXTENSION 19 MM COUPL - 22 H x 108 - 610 MM 85041705 EXTENSION 19 MM COUPL - 22 H x 108 - 1220 MM 85041721 EXTENSION 19 MM COUPL - 22 H x 108 - 1830 MM 85041739 EXTENSION 19 MM COUPL - 22 H x 108 - 915 MM 85041713 EXTENSION 19 MM COUPL - 22 H x 108 - 2435 MM 85041747 WC CROSS BIT D 35 MM - 19 MM - MM 85041812 WC CROSS BIT D 38 MM - 19 MM - MM 85041820 WC CROSS BIT D 41 MM - 19 MM - MM 85041838 WC CROSS BIT D 44 MM - 19 MM - MM 85041846 WC CROSS BIT D 48 MM - 19 MM - MM 85041853 WC CROSS BIT D 51 MM - 19 MM - MM 85041861
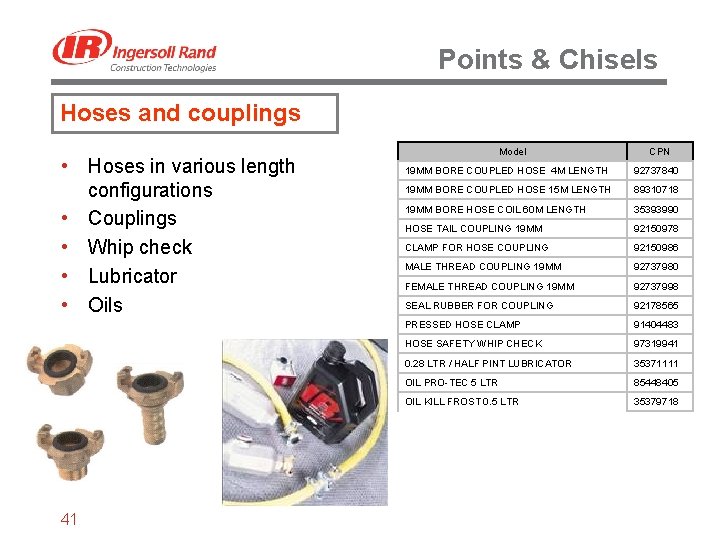
Points & Chisels Hoses and couplings • Hoses in various length • • 41 configurations Couplings Whip check Lubricator Oils Model CPN 19 MM BORE COUPLED HOSE 4 M LENGTH 92737840 19 MM BORE COUPLED HOSE 15 M LENGTH 89310718 19 MM BORE HOSE COIL 60 M LENGTH 35393990 HOSE TAIL COUPLING 19 MM 92150978 CLAMP FOR HOSE COUPLING 92150986 MALE THREAD COUPLING 19 MM 92737980 FEMALE THREAD COUPLING 19 MM 92737998 SEAL RUBBER FOR COUPLING 92178565 PRESSED HOSE CLAMP 91404483 HOSE SAFETY WHIP CHECK 97319941 0. 28 LTR / HALF PINT LUBRICATOR 35371111 OIL PRO-TEC 5 LTR 85448405 OIL KILL FROST 0. 5 LTR 35379718
Table of contents • Application What are the tools used for? • Technology How a tool is working? • IR Range Ingersoll Rand tools specifications • Points & Chisels Points, chisels, cutters, drills… • Best practices Operation, safety, lubrication • Maintenance Typical service operations • Nuisances Coping with noise and vibrations 42
Best practices Operating • Accessory installation: always • Do not operate the tool unless • • 43 turn off the air supply and disconnect the hose before installing, removing or adjusting any accessory. Before connecting the hose, clear it clean by blowing toward a safe area. Never drag the tool on the ground. The air port and other openings will become clogged with dirt and debris. Adopt a stable working position, so that you can deal with both normal and unexpected machine movements. • • the chisel is against the work, otherwise it will destroy the retainer and reduce the vibration isolation. On paving breakers, the recommended amount of downforce to apply to the tool is between 15 and 20 kg. For chipping hammers, the axial force applied to the tool should be around 5 – 10 kg. Always break the material to the point of “give”. Clear away rubble before starting again.
Best practices Operating • Adapt the hammering depth to • • 44 the size and resistance of the blocks. Don’t hammer too deep in one place as you might jam the accessory in the material. If the chisel is jammed, don’t pry on the tool as it might break the chisel. Disconnect it and use another chisel to free up the first one. For the best performance and safety, always work with well sharpened accessories. “Mushroom” shaped tips will increase the tool and operator fatigue while slowing work efficiency. • Check regularly to make sure • that the pneumatic breaker is well lubricated. In case of failure to start, check the following: – Air supply is failing. – The tool bit is not adapted to the shaft. – Exhaust blocked by dirt or ice. – Too much oil is drowning the inside mechanism. – Hose is too long. If >30 m, skip from 19 mm to 25 mm hose.
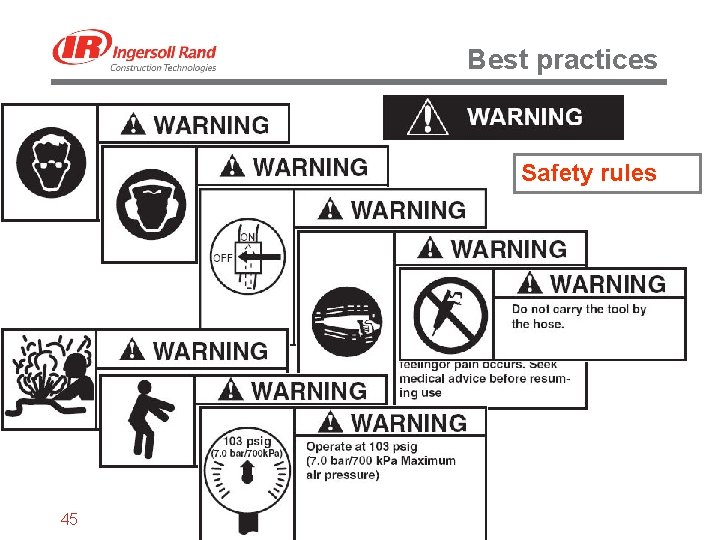
Best practices Safety rules 45
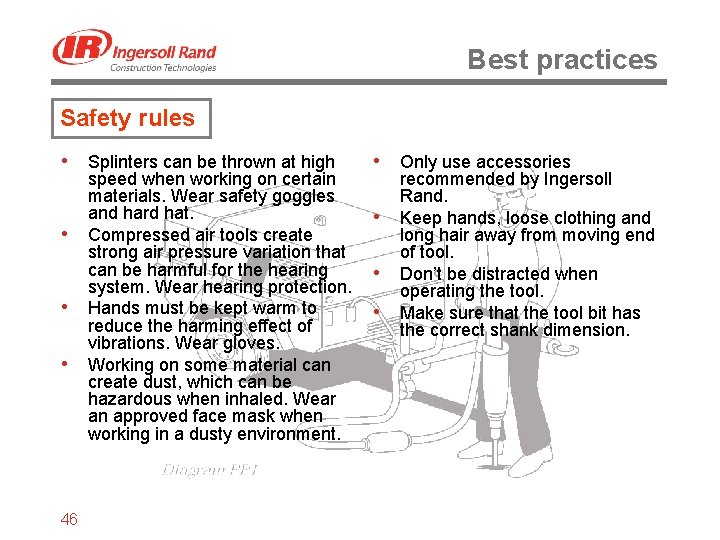
Best practices Safety rules • Splinters can be thrown at high • • • 46 speed when working on certain materials. Wear safety goggles and hard hat. Compressed air tools create strong air pressure variation that can be harmful for the hearing system. Wear hearing protection. Hands must be kept warm to reduce the harming effect of vibrations. Wear gloves. Working on some material can create dust, which can be hazardous when inhaled. Wear an approved face mask when working in a dusty environment. • Only use accessories • • • recommended by Ingersoll Rand. Keep hands, loose clothing and long hair away from moving end of tool. Don’t be distracted when operating the tool. Make sure that the tool bit has the correct shank dimension.
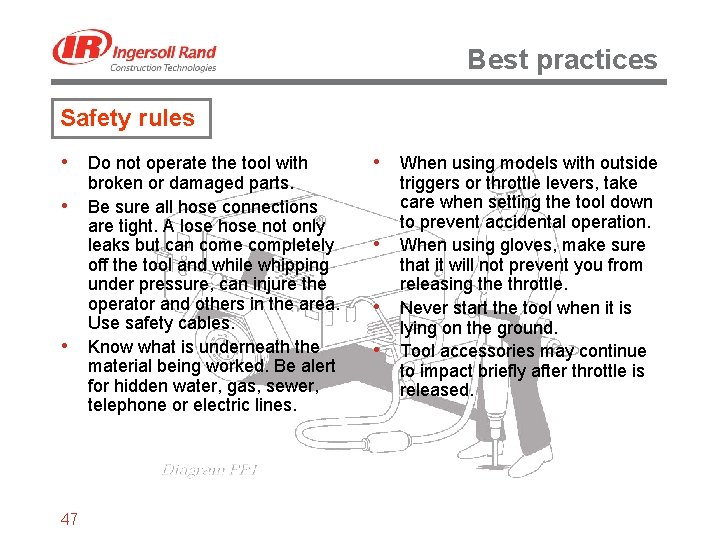
Best practices Safety rules • Do not operate the tool with • • 47 broken or damaged parts. Be sure all hose connections are tight. A lose hose not only leaks but can come completely off the tool and while whipping under pressure, can injure the operator and others in the area. Use safety cables. Know what is underneath the material being worked. Be alert for hidden water, gas, sewer, telephone or electric lines. • When using models with outside • • • triggers or throttle levers, take care when setting the tool down to prevent accidental operation. When using gloves, make sure that it will not prevent you from releasing the throttle. Never start the tool when it is lying on the ground. Tool accessories may continue to impact briefly after throttle is released.
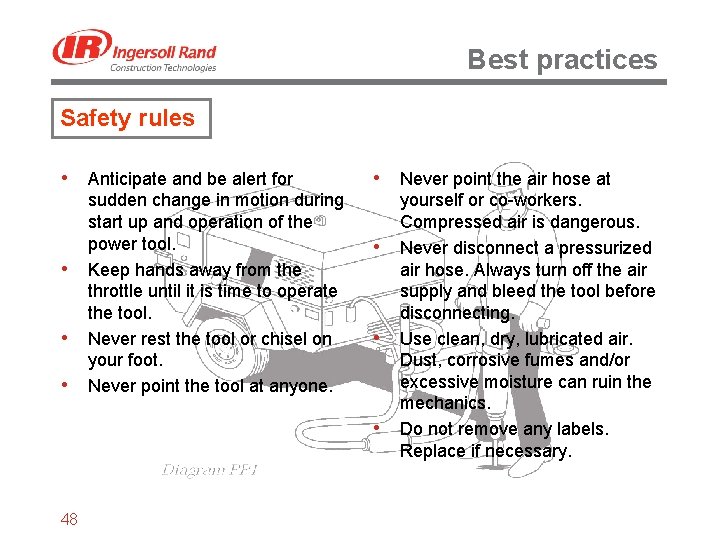
Best practices Safety rules • Anticipate and be alert for • • • sudden change in motion during start up and operation of the power tool. Keep hands away from the throttle until it is time to operate the tool. Never rest the tool or chisel on your foot. Never point the tool at anyone. • Never point the air hose at • • • 48 yourself or co-workers. Compressed air is dangerous. Never disconnect a pressurized air hose. Always turn off the air supply and bleed the tool before disconnecting. Use clean, dry, lubricated air. Dust, corrosive fumes and/or excessive moisture can ruin the mechanics. Do not remove any labels. Replace if necessary.
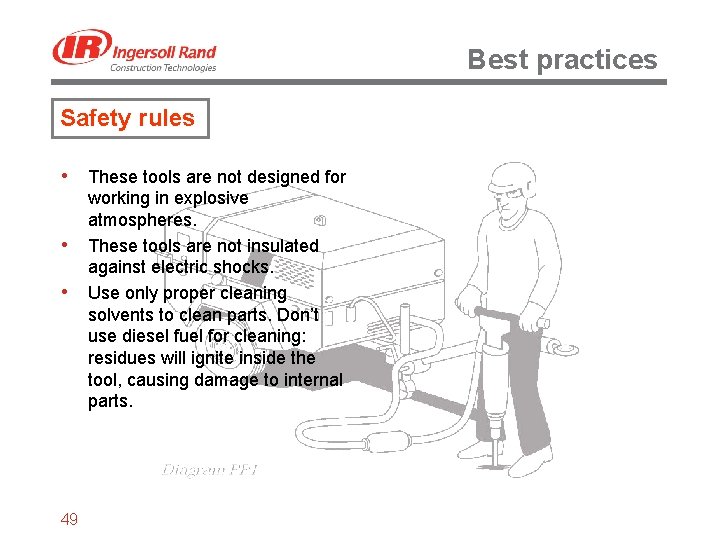
Best practices Safety rules • These tools are not designed for • • 49 working in explosive atmospheres. These tools are not insulated against electric shocks. Use only proper cleaning solvents to clean parts. Don’t use diesel fuel for cleaning: residues will ignite inside the tool, causing damage to internal parts.
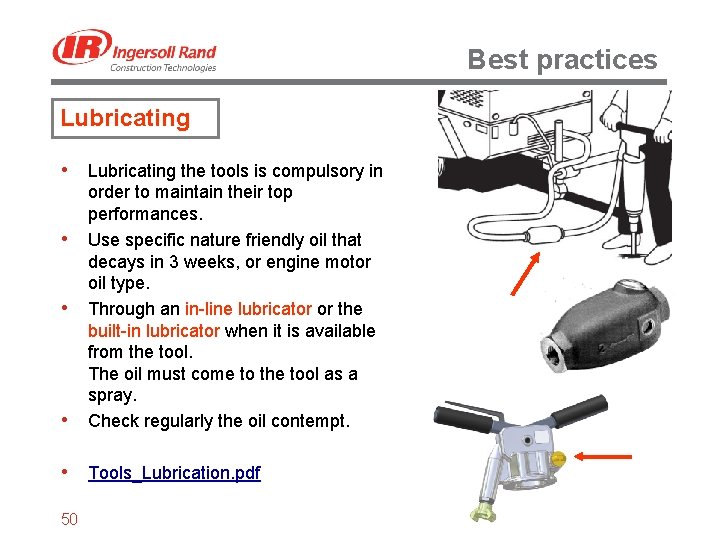
Best practices Lubricating • Lubricating the tools is compulsory in • • • order to maintain their top performances. Use specific nature friendly oil that decays in 3 weeks, or engine motor oil type. Through an in-line lubricator or the built-in lubricator when it is available from the tool. The oil must come to the tool as a spray. Check regularly the oil contempt. • Tools_Lubrication. pdf 50
Best practices Lubricating • Some compressors are equipped with a ‘lubricator’. This solution is not good in case the air pipe is longer than 10 m because the oil will condensate in the pipe before it reaches the tool. Liquid oil in the pipe will create a heavy flow drowning the tool. • Do not use flammable or volatile liquids such as kerosene, diesel or jet fuel. It will explode and damage the tool mechanics. 51 • If there are ice problems at the exhaust (cold temperatures with high moisture), use alcohol mixed with the oil or a specific oil called « frost killer » . Otherwise use an aftercooler mounted on the compressor: it will remove the moisture from the compressed air. • Do not use hydraulic oil: too thick.
Table of contents • Application What are the tools used for? • Technology How a tool is working? • IR Range Ingersoll Rand tools specifications • Points & Chisels Points, chisels, cutters, drills… • Best practices Operation, safety, lubrication • Maintenance Typical service operations • Nuisances Coping with noise and vibrations 52
Maintenance Workshop • Maintenance and service of Ingersoll Rand tools are made easier because: – There are few parts in the assemblies – Many parts are common to several models. – The tools are designed in such a way that they can be serviced in a workshop with little equipment 53 • Storage
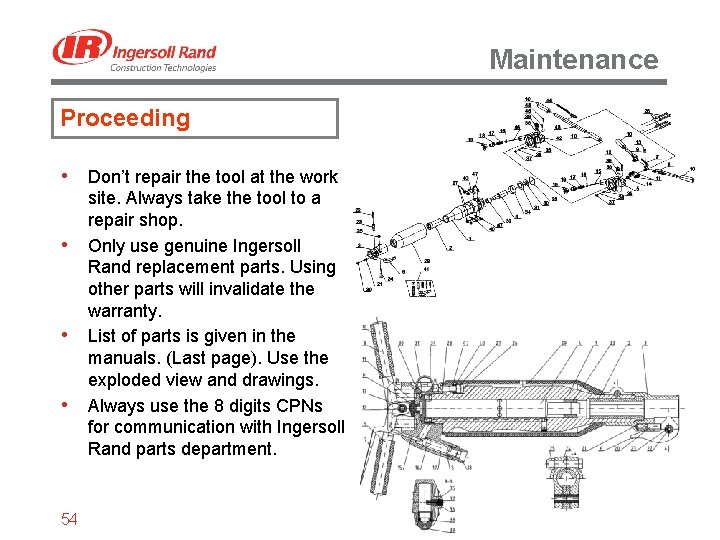
Maintenance Proceeding • Don’t repair the tool at the work • • • 54 site. Always take the tool to a repair shop. Only use genuine Ingersoll Rand replacement parts. Using other parts will invalidate the warranty. List of parts is given in the manuals. (Last page). Use the exploded view and drawings. Always use the 8 digits CPNs for communication with Ingersoll Rand parts department.
Maintenance Typical service operations • Removing the muffler: Use a screwdriver and 4 flat metal pieces for sliding the polyurethane muffler out of the groove. • Air coupling: The pipe coupling is glued with Loctite. In order to unscrew it, heat first at 200°C. • Piston seized: Instructions about how to solve it: TL-2006 -002_Seized_Piston_on_Breaker. pdf • Scratched piston: If there are scratches due to poor lubrication or dirt, they can be removed with a fine sandpaper 200. (More scratches on the front part of the piston as it gets hotter because of higher air compression in the bottom chamber. . ) 55 • Scratched cylinder: Use fine sand-paper 200 wrapped around a broomstick and remove the scratches. They are more important in the centre close to the exhaust. • Chuck or Nozzle: The chuck (chisel receptacle) is pressed into the cylinder. Replacement: TL-2006 -001_Chuck_replacement. pdf • Mushroomed piston: If the piston head is worn in the shape of a mushroom, grind it flat and make a 1 mm chamfer. The maximum thickness that can be removed is 0. 6 mm. TL-2006 -003_Musroomed_Piston. pdf
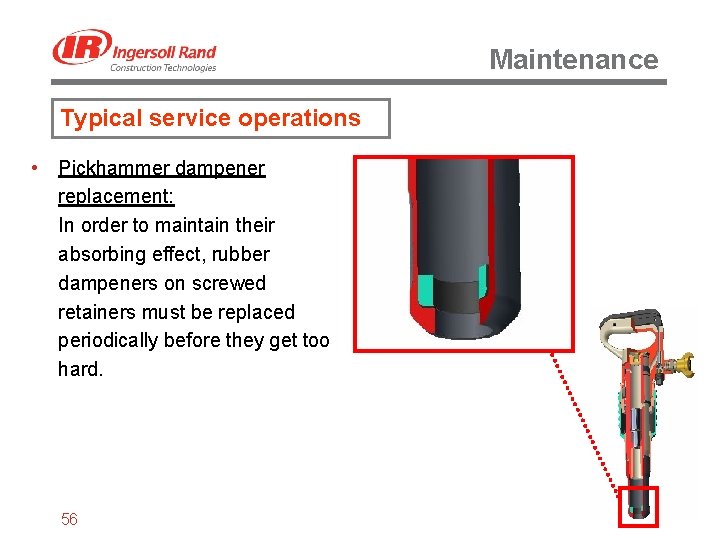
Maintenance Typical service operations • Pickhammer dampener replacement: In order to maintain their absorbing effect, rubber dampeners on screwed retainers must be replaced periodically before they get too hard. 56
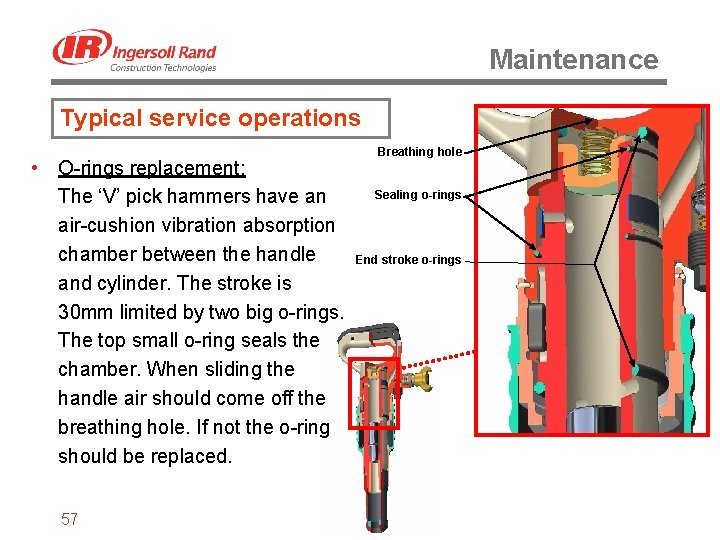
Maintenance Typical service operations • O-rings replacement: Breathing hole Sealing o-rings The ‘V’ pick hammers have an air-cushion vibration absorption chamber between the handle End stroke o-rings and cylinder. The stroke is 30 mm limited by two big o-rings. The top small o-ring seals the chamber. When sliding the handle air should come off the breathing hole. If not the o-ring should be replaced. 57
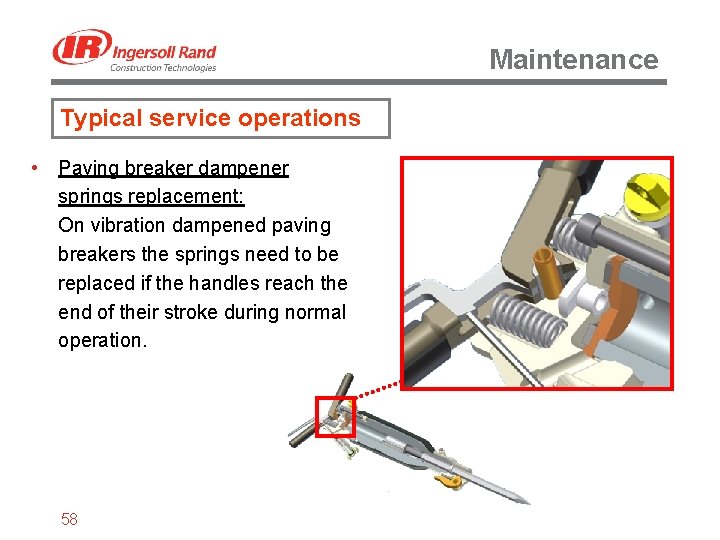
Maintenance Typical service operations • Paving breaker dampener springs replacement: On vibration dampened paving breakers the springs need to be replaced if the handles reach the end of their stroke during normal operation. 58
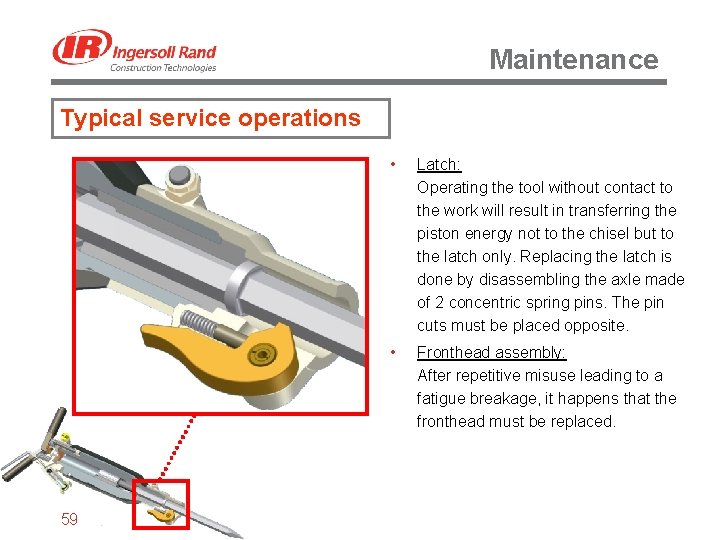
Maintenance Typical service operations 59 • Latch: Operating the tool without contact to the work will result in transferring the piston energy not to the chisel but to the latch only. Replacing the latch is done by disassembling the axle made of 2 concentric spring pins. The pin cuts must be placed opposite. • Fronthead assembly: After repetitive misuse leading to a fatigue breakage, it happens that the fronthead must be replaced.
Maintenance Typical service operations • Breaker Handle body – cylinder connection The bolts must be tighten in a cross-pattern way with a maximum torque of 90 N. m. 60 • Storage: Put a teaspoon of oil in the air pipe, connect and run the hammer for a few stroke in order to spread the oil. Store in a dry place.
Table of contents • Application What are the tools used for? • Technology How a tool is working? • IR Range Ingersoll Rand tools specifications • Points & Chisels Points, chisels, cutters, drills… • Best practices Operation, safety, lubrication • Maintenance Typical service operations • Nuisances Coping with noise and vibrations 61

Nuisance: Vibrations Coping with vibrations • • • HAV (Hand Arm Vibrations) are recognized to be responsible for major disabilities in many countries. Workers who have not been protected against high levels of vibrations are suffering today with ‘white fingers’ disease. • – Blood vessels damage – Nerves damage Vibrations can never be completely eliminated but can be reduced. • 2 ways: – Reducing working time • – Reduce the amount of vibrations on the tools 62 The CE authorities set up a process to limit the amount of HAV that a worker is undergoing. Vibration_Measurements_3_axis. pdf Workers should calculate their vibration exposure on a daily basis. Other information is found on the web: HSE_HAV_risk_control. pdf
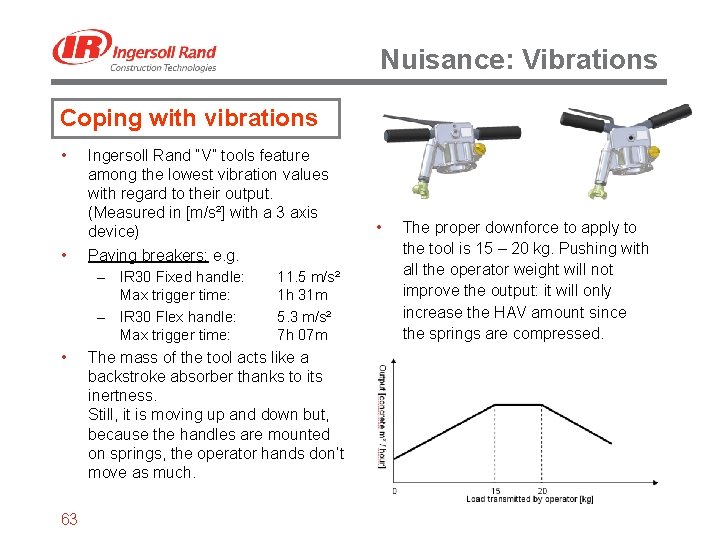
Nuisance: Vibrations Coping with vibrations • • Ingersoll Rand “V” tools feature among the lowest vibration values with regard to their output. (Measured in [m/s²] with a 3 axis device) Paving breakers: e. g. – IR 30 Fixed handle: 11. 5 m/s² Max trigger time: – IR 30 Flex handle: Max trigger time: • 63 1 h 31 m 5. 3 m/s² 7 h 07 m The mass of the tool acts like a backstroke absorber thanks to its inertness. Still, it is moving up and down but, because the handles are mounted on springs, the operator hands don’t move as much. • The proper downforce to apply to the tool is 15 – 20 kg. Pushing with all the operator weight will not improve the output: it will only increase the HAV amount since the springs are compressed.
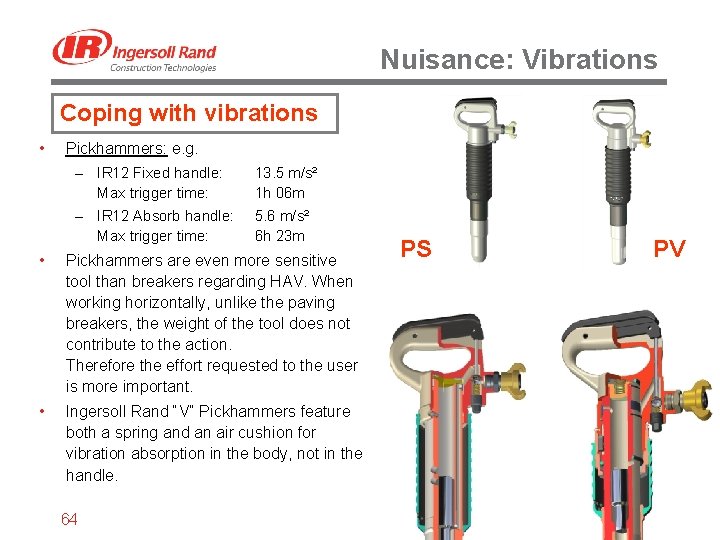
Nuisance: Vibrations Coping with vibrations • Pickhammers: e. g. – IR 12 Fixed handle: Max trigger time: 13. 5 m/s² 1 h 06 m – IR 12 Absorb handle: 5. 6 m/s² Max trigger time: 6 h 23 m • Pickhammers are even more sensitive tool than breakers regarding HAV. When working horizontally, unlike the paving breakers, the weight of the tool does not contribute to the action. Therefore the effort requested to the user is more important. • Ingersoll Rand “V” Pickhammers feature both a spring and an air cushion for vibration absorption in the body, not in the handle. 64 PS PV
Nuisance: Vibrations Effects that aggravate vibrations • Cold temperature: cold fingers are • Badly maintained equipment will more sensitive to HAV. Wearing gloves allows maintaining temperature. Blunt points: the accessory will rebound on the material instead of breaking it. The backstroke will be higher. Always use well sharpened accessories. Bad posture at work will increase the risk. Always stand firm holding the tool with both hands and pushing steadily. work less efficiently, thus increasing the exposure time. Worn out flex handles will not play their role anymore. Control the quality of the springs – air cushion from time to time. Always working in the same position tends to solicit some articulations. Alternate tasks • • 65 • •
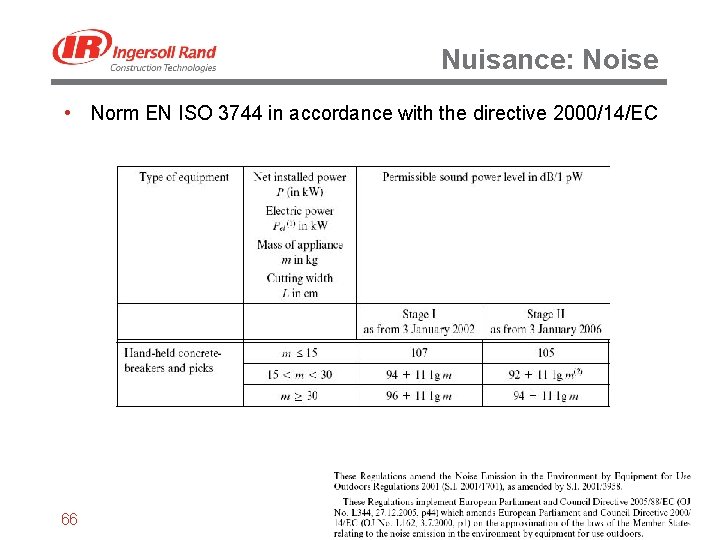
Nuisance: Noise • Norm EN ISO 3744 in accordance with the directive 2000/14/EC 66
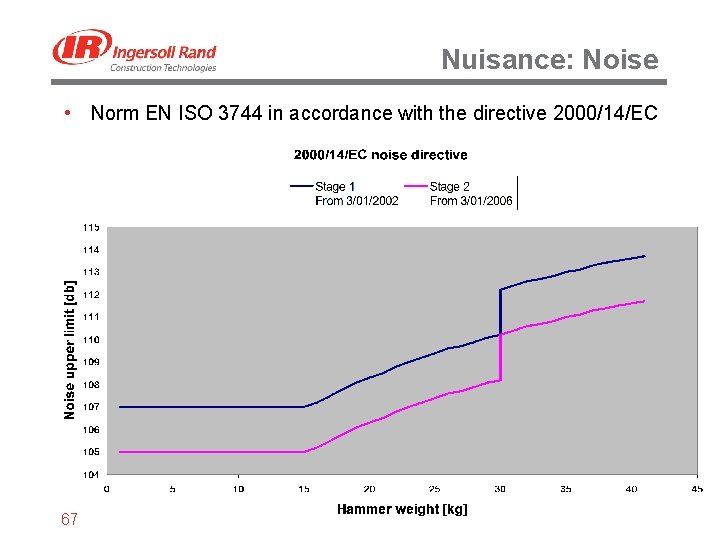
Nuisance: Noise • Norm EN ISO 3744 in accordance with the directive 2000/14/EC 67
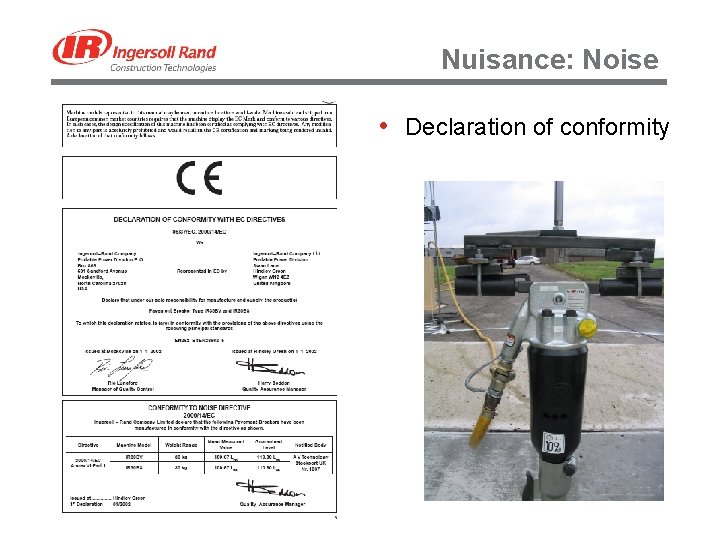
Nuisance: Noise • Declaration of conformity 68

- Slides: 69