PERSPECTIVE PROJECTION Department of Mechanical Engineering MRK Institute

- Slides: 13

PERSPECTIVE PROJECTION Department of Mechanical Engineering MRK Institute of Technology,

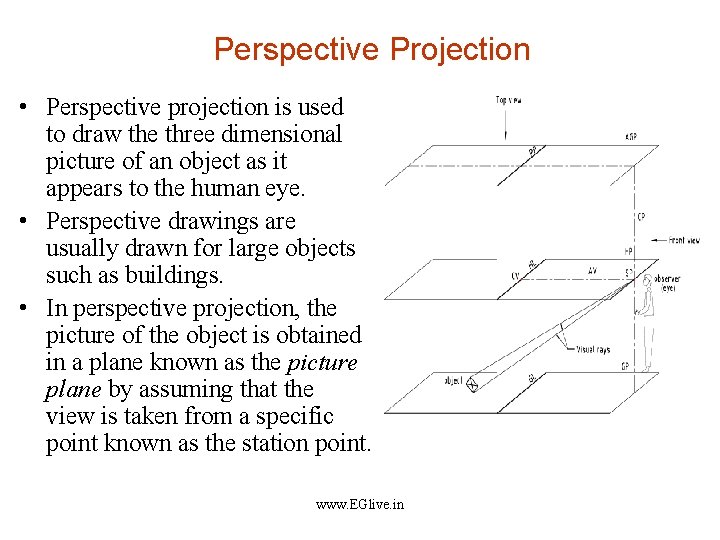
Perspective Projection • Perspective projection is used to draw the three dimensional picture of an object as it appears to the human eye. • Perspective drawings are usually drawn for large objects such as buildings. • In perspective projection, the picture of the object is obtained in a plane known as the picture plane by assuming that the view is taken from a specific point known as the station point. www. EGlive. in

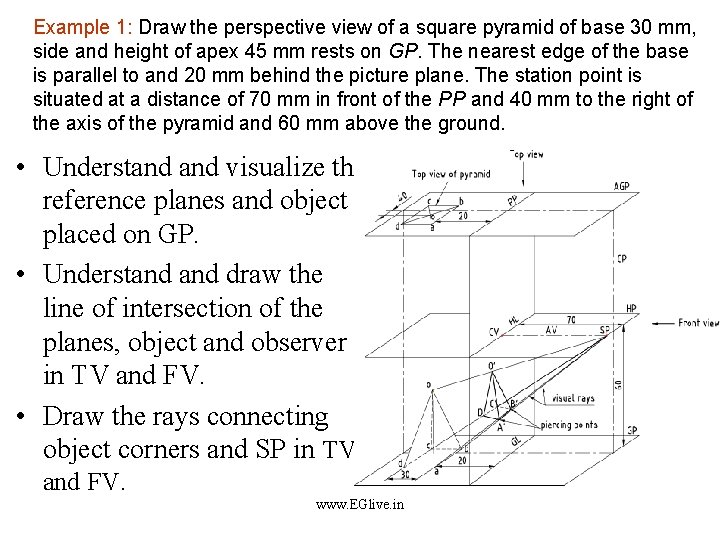
Perspective Nomenclature • Ground plane (GP) is a horizontal reference plane on which the object will be resting or placed. • Station point (SP) is the observer’s eye. • Picture plane (PP) is a vertical reference plane on which perspective view of the object is obtained when the object is viewed from the station point. • Ground line (GL) is the intersection line of PP and GP. • Horizon plane (HP) is also a horizontal reference plane which is parallel to GP and passing through the station point. • Horizon line (HL) is the intersection line of PP and HP. • Visual rays are imaginary lines drawn to join various corners of the object to the station point (SP) which pierce the picture plane. These piercing points are marked in top view and are projected to front view to get the perspective projection of an object. www. EGlive. in

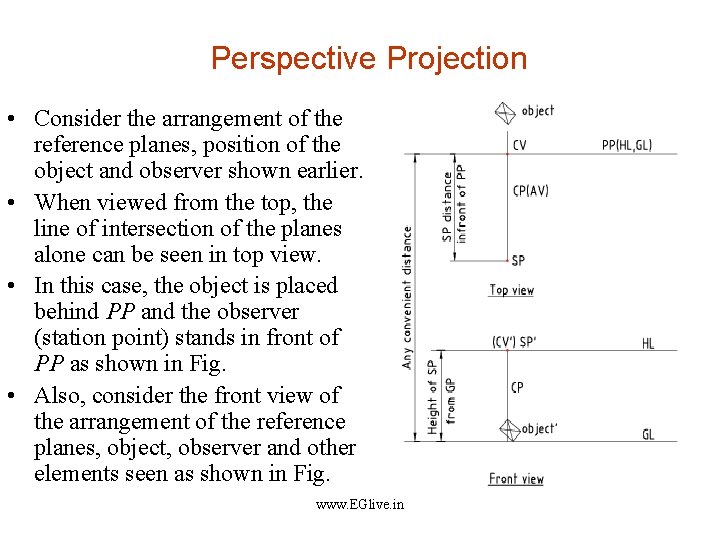
Perspective Projection • Consider the arrangement of the reference planes, position of the object and observer shown earlier. • When viewed from the top, the line of intersection of the planes alone can be seen in top view. • In this case, the object is placed behind PP and the observer (station point) stands in front of PP as shown in Fig. • Also, consider the front view of the arrangement of the reference planes, object, observer and other elements seen as shown in Fig. www. EGlive. in

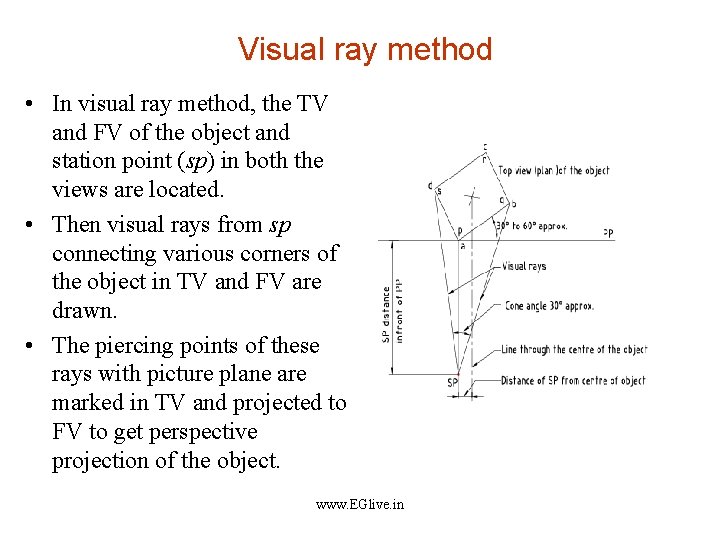
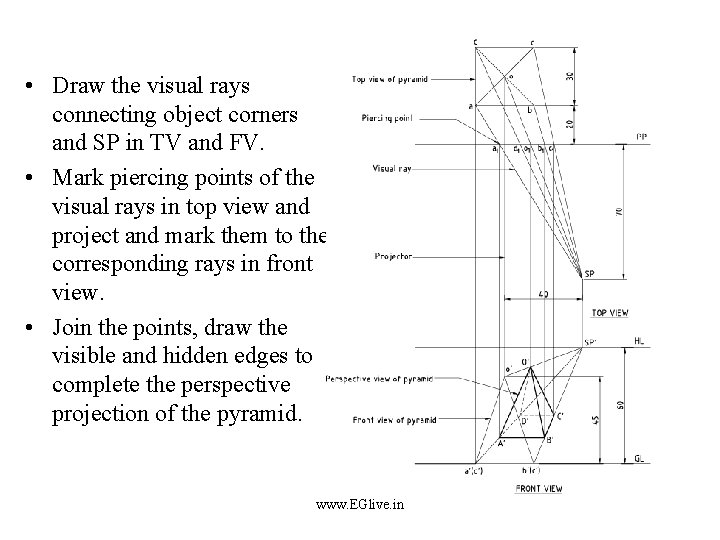
Visual ray method • In visual ray method, the TV and FV of the object and station point (sp) in both the views are located. • Then visual rays from sp connecting various corners of the object in TV and FV are drawn. • The piercing points of these rays with picture plane are marked in TV and projected to FV to get perspective projection of the object. www. EGlive. in

Example 1: Draw the perspective view of a square pyramid of base 30 mm, side and height of apex 45 mm rests on GP. The nearest edge of the base is parallel to and 20 mm behind the picture plane. The station point is situated at a distance of 70 mm in front of the PP and 40 mm to the right of the axis of the pyramid and 60 mm above the ground. • Understand visualize the reference planes and object placed on GP. • Understand draw the line of intersection of the planes, object and observer in TV and FV. • Draw the rays connecting object corners and SP in TV and FV. www. EGlive. in

• Draw the visual rays connecting object corners and SP in TV and FV. • Mark piercing points of the visual rays in top view and project and mark them to the corresponding rays in front view. • Join the points, draw the visible and hidden edges to complete the perspective projection of the pyramid. www. EGlive. in

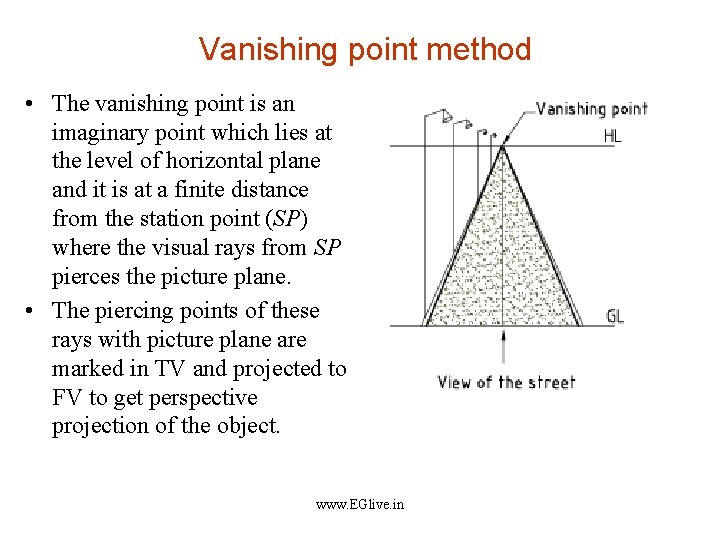
Vanishing point method • The vanishing point is an imaginary point which lies at the level of horizontal plane and it is at a finite distance from the station point (SP) where the visual rays from SP pierces the picture plane. • The piercing points of these rays with picture plane are marked in TV and projected to FV to get perspective projection of the object. www. EGlive. in

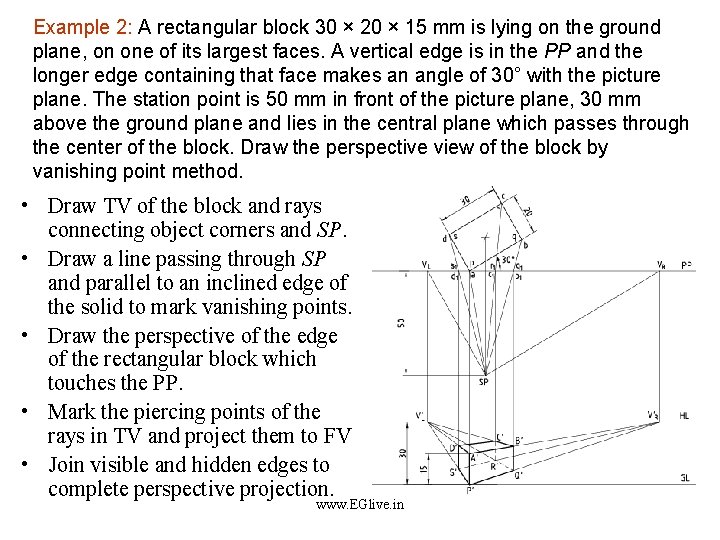
Example 2: A rectangular block 30 × 20 × 15 mm is lying on the ground plane, on one of its largest faces. A vertical edge is in the PP and the longer edge containing that face makes an angle of 30° with the picture plane. The station point is 50 mm in front of the picture plane, 30 mm above the ground plane and lies in the central plane which passes through the center of the block. Draw the perspective view of the block by vanishing point method. • Draw TV of the block and rays connecting object corners and SP. • Draw a line passing through SP and parallel to an inclined edge of the solid to mark vanishing points. • Draw the perspective of the edge of the rectangular block which touches the PP. • Mark the piercing points of the rays in TV and project them to FV • Join visible and hidden edges to complete perspective projection. www. EGlive. in

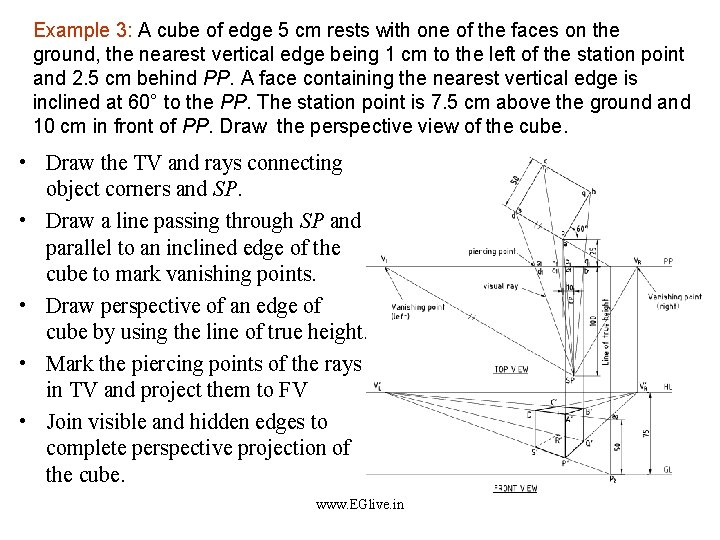
Example 3: A cube of edge 5 cm rests with one of the faces on the ground, the nearest vertical edge being 1 cm to the left of the station point and 2. 5 cm behind PP. A face containing the nearest vertical edge is inclined at 60° to the PP. The station point is 7. 5 cm above the ground and 10 cm in front of PP. Draw the perspective view of the cube. • Draw the TV and rays connecting object corners and SP. • Draw a line passing through SP and parallel to an inclined edge of the cube to mark vanishing points. • Draw perspective of an edge of cube by using the line of true height. • Mark the piercing points of the rays in TV and project them to FV • Join visible and hidden edges to complete perspective projection of the cube. www. EGlive. in

Tips to draw Perspective Projection • The visible and invisible edges are usually identified through visualization. • The visible edges are marked by considering the edges in the front portion of the solid which lie within the cone angle formed by the visual rays in top view with SP. • The details printed in figure are neglected by the users while preparing the fair drawing of perspective. • Complete the perspective projection by drawing dark lines for the visible portion of the object. www. EGlive. in

REFERENCE BOOKS 1. Jeyapoovan T, “Lesson Plans for Engineering Graphics”, 2010, Vikas Publishing House Pvt Ltd, New Delhi. 2. Jeyapoovan T, “Engineering Drawing and Graphics”, 2011, Vikas Publishing House Pvt Ltd, New Delhi. www. EGlive. in

End of Lesson 13 Thank You www. EGlive. in