Performance Based Budgeting Transformation and Automation Reform Training

Performance Based Budgeting Transformation and Automation Reform Training Manual for Line Agency Budget Officer

Training Manual for General Features

Preface Welcome to Line Agencies Budget Preparation Training Manual! Before you begin, please take a moment to review this section. The preface presents an overview of the following information: • Course objectives • Structure of the course • Course materials used in the class • Conventions used in the book Course Objective After completing this course, you should be able to: • Login and navigate around the Takhteet application on Oracle Hyperion Planning • Complete your budgeting tasks lists via task lists provided for you in all the budget preparation chapters • Submit your budget for review Course Structure • Line Agencies Budget Preparation Training training is a 3 -day, instructor-led training course consisting of lectures, demonstrations, and hands-on exercises. • In this course, the instructor presents a topic conceptually by explaining its purpose, demonstrating how it works, and then guiding the attendees through the exercises. Demonstrations and hands-on exercises reinforce the concepts and skills introduced during lectures. • This document is designed for end users in order for them to use it as a stand-alone reference. Course Materials There are two manuals that will be used in the classroom. These books will also be used by the end users as reference guides later on. • Line Agencies Budget Preparation End User Training Manual • General Features Manual 3

Shapes and Icons The following conventions are used in the document: In Electronic version of the document only, clicking on the home icon navigates users to the index section of the document. Hand icon is used in index to alert users that the context of the page is interactive and you can navigate to sections of the document by clicking on chapters. 1 Numbers in green circles represent the sequence number of the current activity. Users interact with the system following the sequence numbers as specified in the document. Application Icons are used to point users the exact icon that needs to be used during an activity. Process reference icon is used to specify the section of the Federal Budget handbook document for further reference about the budgeting process. Note icon is used to point out important notes about the section. 4

INDEX Setting Your Workspace Task Lists Using Data Forms Uploading Documents Running Reports Copying Version 5

Section 1 Setting Your Workspace 6

Setting Your Workspace Definition & Objectives Definition: Oracle Hyperion Workspace is the working area of end users. Using Oracle Hyperion Workspace, users access to their budget task lists, reports and budget related documents. Objectives: After completing this section, you should be able to; • Login to Oracle Hyperion Workspace • Open Hyperion Planning application • Set your personal parameters • Customize your password 7

Setting Your Workspace Logging In Use this web address to log onto the Hyperion Workspace for test and training. It is advisable to save this within ones favorites. 1 This screen will then open in a separate window (giving the user a maximized input area) 2 1. Enter your user name and password 2. Click on the “Log On” icon. 8

Setting Your Workspace Setting and Resetting the Password 1 2 1. Click on Tools 2. Click on Change Password 3. First enter your current password and then enter and confirm your new password. 4. Click on Save 3 4 9

Setting Your Workspace Opening Planning Application 1 2 3 4 1. Click on Navigate Button for Navigate Drop Down Menu. 2. Select Applications 3. Select Planning 4. Select an application You can open the applications that you have access to. Available applications are as below: • MUBADARA: New initiatives and new projects • TAKHTEET: Budget preparation • EDARA: Budget execution and monthly reporting 10

Setting Your Workspace Setting the Personal Preferences -1 3 1 2 When you are in an application, you can access the user preferences menu following the steps listed below 1. Select File from the menu at the top 2. Select Preferences 3. Preferences screen will be displayed 11

Setting Your Workspace Setting the Personal Preferences -2 2 Inputting or changing official e-mail 1 1. Select “Planning” 2. Enter your corporate e-mail address 3. Click Save to save your changes 4. Click “OK” to complete the set up. Yahoo, Gmail or other personal mail accounts should not be used. Mail accounts must be users’ official government e-mail accounts. 3 4 12

Setting Your Workspace Setting the Personal Preferences -3 Changing the Language 2 3 1. Select “Planning” 2. If you wish to use a different language from the default application setting, deselect Use Application Default 3. Select the language you would like to use in Alias Table 4. Click Save to save your changes 5. Click OK 1 4 5 13

Setting Your Workspace Setting the Personal Preferences -4 Out of Office Delegation 2 3 4 1. Select “Planning” 2. Select “I am currently out of the office” option 3. Select Delegate from list of actions 4. Select the person’s email from the list owners to whom you wish to delegate your responsibilities 5. Enter details about your absence in the annotation field 6. Click Save to save your changes 7. Click OK 1 5 6 7 Out of office assistant is primarily used during leaves such as annual vacations. It’s not advisable to use this feature during public holidays as the person you are delegating to may also be on vacation during the same period. 14

Setting Your Workspace Setting the Personal Preferences -5 Additional Language settings 2 3 1. Select “Planning” 2. Select User Variable Options tab 3. To change HR Organization display language, type one of the options below: 4 5 4. 1 5. 6 7 1. HR Organization – English 2. HR Organization – Arabic To change Employee Name display language, type one of the options below: 1. Employee Name – English 2. Employee Name – Arabic To change Sub Account display language, type one of the options below: 1. Sub Account Description – English 2. Sub Account Description – Arabic 6. Click Save to save your changes 7. Click OK 15

Setting Your Workspace List of User Variables and Usage -5 1 2 User variables are used to limit number of dimension members that display on a data form which increases performance by helping planning users focus on certain members. List of User Variables and their usage in Hyperion Planning; 1. USERVARCATEGORY: Indicates the selected asset category dimension member in asset forms. 2. USERVARHRORGANIZATION: Indicates the selected HR organization dimension member in human capital budget forms. Used to change HR Organization Name display language. 3. USERVARPROGRAM: Indicates the selected program dimension member in finance and human capital budget forms. 4. USERVARENTITY: Indicates the selected entity dimension member in finance and human capital budget forms. 5. USERVARLOCATION: Indicates selected location dimension member in finance and human capital budget forms. 6. USERVARLISTABLE: Used to change Employee Name display language in human capital budget forms. 7. USERVARSUBACCLN: Used to change Sub Account display language in finance data forms. 8. USERVARPOV: Indicates the selected Point of View dimension member in in finance and human capital budget forms. 16

Setting Your Workspace Setting the Personal Preferences -6 Reporting Settings 2 3 1 1. Select “Financial Reporting” 2. Selet PDF Preview on the Default Preview Mode selection 3. Select On on the User Point of View selection 4. Click OK 4 17

Setting Your Workspace Toolbar Buttons ‘Save’ – saves the data form. Comment – adds user comment to cell ‘Refresh’ – updates the form with the most recent data (any unsaved data will be lost). Document Attachments – to attach or review documents on the selected cell(s) ‘Print’ – prints the data form Supporting Detail – opens supporting detail pop-up screen. ‘Adjust’ – adjust data ‘Lock/Unlock Cells’ – disable cell (s) from data input until save is pressed. Open the form in Smart View for Excel Form Instructions – Instructions on the usage of currently open form Not applicable 18

Section 2 Task Lists 19

Task Lists Definition & Objectives Definition: Task Lists are sequentially organized list of tasks that are assigned to users for aiding them during various stages of budget planning, budget preparation, review, study and approval processes. All users are assigned with task list(s) depending on their roles in the budget processes. Task Lists are used for q Guiding users through the budgeting process q Navigation in the system step-by-step wizard Objectives: After completing this section, you should be able to; • View your Task List • Navigate in your Task List 20

Task Lists Displaying the Task List 1. On the left pane click on My Task List. This will display the task list(s) that are assigned to you 2. Click on the triangle next to Task List name to expand the Task List into tasks or task groups 1 2 21

Task Lists Viewing the Task List Status When you click on the task list, status of the task list is displayed 1. Completion Status. The pie chart displays the percentage of tasks that are Incomplete, Complete or Overdue 2. The second section of the Status screen displays key information related to your tasks: i. Type of task ii. Status of task iii. Start and End Dates as set by budget administrator iv. Alerts v. Completion Date vi. Instructions regarding to task 3. You can also launch the task by clicking on the launch button on the task row 1 2 3 22

Task Lists Navigating the Task List 2 3 1 4 5 6 1. Click on the first task under the task list 2. The first tab on the right pane displays the task item * 3. The second tab displays the instructions of the task 4. Please note that upon completion of a task you should click on Complete option in order to indicate the system that you have completed the task. Users receive alerts for the incomplete tasks beyond set due dates. 5. Click on Next Incomplete to navigate into next incomplete task in the Task List 6. Click on Next to navigate into next task in the Task List 7. Click on Task List Home to navigate back to status page of the Task List 7 * Types of task items that are made available to users are as below 1. URL: A document in workspace or an intranet or internet web site 2. Form: Planning data entry form 3. Business rule: A budget calculation 4. Workflow: Submission of budget 5. Descriptive: A task group with instructions regarding to tasks underneath 6. Copy version: Copying data between versions 23

Section 3 Using Data Forms 24

Using Data Forms Definition & Objectives Definition: Data forms in Hyperion are data collection spreadsheet templates which are used by end users for: • Entering data • Attaching descriptions and textual details • Uploading and downloading documents (please see Document Upload section for more details) Objectives: After completing this section, you should be able to; • Change the form scope • Enter and save data • Navigate between the forms via context menus • Run business rules via context menus • Enter Supporting Details • Enter Cell Text • Adjust Data 25

Using Data Forms Data Form Layout 4 5 2 1 3 Sections in a data form highlighted above are described below: 1. Row dimensions: Single or multiple dimensions may be displayed in the rows of data form. In the example above row dimensions are accounts and sub accounts 2. Column dimensions: Single or multiple dimensions may be displayed in the columns of data form. In the example above column dimensions are Year, Details and Scenario 3. Cells: Data is viewed/input on cells. Editable cells are displayed in a pale shade of yellow. Read only cells are displayed in a light shade of grey. Data that is changed but not saved is displayed in a bright shade of yellow. Cells with supporting details are displayed in a pale shade of turquoise. Cells with document attachment or cell text are displayed with a triangle on top corners 4. Page dimensions: Indicates the variable dimensions for which data is displayed and input. In the example above page dimensions are Versions (Draft 1), Program (PR 00000), Entity (36 -2201: Air Ports Sector) and Location (36 -000). Users are able to change the scope of the form by changing page dimension selections. 5. POV dimensions: Indicates the point of view dimension for which data is displayed or input. In the example above POV dimension is POV (Cash Data). POV dimensions are automatically updated while navigating between forms. Users are able to change the scope of the form by changing POV dimension selection too. 26

Using Data Forms Navigating Between Form Tabs 3 4 1 2 Various forms are combined in composite forms. Composite forms displays the forms in tabs. To navigate between the form tabs follow the steps listed below 1. Click on a tab. This will display the form in the selected tab. 2. Click on another tab. This will display the form in the selected tab. 3. Make your selections in the page and point of view dimensions section (please see Changing Form Scope Topic for details) 4. Click on arrow icon to refresh the form filtered with the selections. All tabs are filtered with the same selections 27

Using Data Forms Changing the Form Scope -1 1 5 2 4 3 6 To change the scope of a form using page dimensions follow the steps listed below 1. Click on the drop down icon next to page dimension. 2. Page dimension member selection box will be displayed with all dimension members that you have access to 3. If you are able to find the member you are looking for, you can choose the member by clicking on the member once. 4. You can alternatively search the member using the search box in the dialog box. The smart search will find and display all the members that fully or partially include the typed search criteria. In the example above, if you type “ 1” (w/o quotes) it will display Draft 1, Proposal 1 and Study 1. If you type “pos” it will display Proposal 1, 2 and 3 only. 5. Repeat steps 1 to 4 to choose desired members for all page dimensions and click on the arrow at the end of page dimensions section to refresh the form with the selected member combinations. 6. Form will be refreshed with the new selections and the data for the chosen member combinations will be displayed. If there is an unsaved data on the form, you will be given an option to discard or save the changes. 28

Using Data Forms Changing the Form Scope -2 1 5 4 2 3 6 To change the scope of a form using point of view dimension follow the steps listed below 1. Click on the point of view member that is displayed on the top section of the form. 2. Point of view dimension selection box will be displayed with all dimension members that you have access to 3. If you are able to find the member you are looking for, you can choose the member by clicking on the member once. 4. Alternatively you can search for the member by clicking on the arrow on the top left corner of Members box 5. Type the member you are looking for fully or partially and click on search icon. Select the desired member from the search results 6. Click on OK to complete your selection. Upon your selection form will be refreshed filtered with the selected member 29

Using Data Forms Inputting and Saving Data 1 2 1. You can only input in editable cells (pale yellow). When data is input the cell changes to a bright shade of yellow. 2. Upon save, a message is displayed showing whether the save and attached business rule was successful. Contact system administrator if you receive a failure message. You must save the form by clicking on save button to prevent losing your data. There are various data types in Planning that impact the way data is input in form cells. Below are the data types used in the application: a. Numeric cells: Type a numeric value b. Text cells: Type an alpha-numeric text in the cell. c. Smart list: Choose a value from a drop down menu d. Date: Choose a date from pop-up calendar Sub total rows and columns are automatically calculated upon saving the data form. Some error message are related to form validation. Read the message carefully and make changes in your inputs if necessary. 30

Using Data Forms Interacting with the Form Menus -1 Form menus that are available in various forms are used for various purposes. Primary uses of menus in the system are as below: a. Navigate to another form b. Run a business rule to perform budget activities c. Sort / Filter data in the form Below options are available only when right clicked on the form cells a. Display the history of the changes in data cells b. Adjust data with amount or percentages c. Edit data (Copy / Cut / Paste / Clear) d. View or edit document attachments in the cells e. View or edit cell texts f. View or edit supporting Details g. Lock / Unlock Cells h. Display validation messages 31

Using Data Forms Interacting with the Form Menus -2 In order to interact with the form menus follow the steps listed below 1. Right click on the form. Menu is displayed usually when right clicked on the row section of the form. 2 1 2. A menu will be displayed showing available options. Browse through the menu item and select the item you would like to launch 3 4 3. Some menus may require right clicking on certain dimensions to be displayed. For example, if you would like to navigate to details of an individual employee in Manage Existing Employee form, you should right click on the employee. 4. Selection of a menu item with a business rule displays a business rule prompt screen in which you are expected to respond to business rule parameters. Please see Running Business Rules topic for details. 32

Using Data Forms Interacting with the Form Menus -3 You are able to sort and filter data in the data forms following the steps listed below: To sort data: 1. Right click on column that you will sort the form based upon and choose Sort. You can choose to sort either ascending or descending. 1 2 2. To cancel the sorting select Cancel Sort option To filter data: 3. Right click on column that you will filter the form based upon and choose Filter. You can either hide rows without data or with 0 data by using the last 3 options. To filter based on a value choose Filter option 3 5 4 4. In the filtering dialog box make your selection to filter data. Keep option in the Type selection keeps the data that satisfies the filter condition. Exclude option removes the data that satisfies the filter condition. Select the logical operator in the Filter Compare option such as Greater Than, Equals, Less Than. Click on Filter Column to apply the filter. Form will be filtered based on the chosen conditions. 5. To cancel the filtering select Cancel Filter option 33

Using Data Forms Running Business Rules Business rules are actions and calculations that calculate and assign budget values based on the parameters supplied by users. They are used for a wide range of functionality from promoting employees to estimating revenue based on selected criteria. There are two types of business rule in the system: 1 1. On save business rules: These rules are attached to forms and automatically run every time you save a form taking the form scope and parameter data set in the form as rule parameters. 2. On demand business rules: These rules are run by users on demand when it’s required to calculate a budget element. Examples to this are promotion of employees, adding or deleting asset purchases etc. On demand business rules are run through form context menus. 2 To run a business rule through context menu follow the steps listed below: 3 1. Choose the business rule action that you would like to run on the right click menu. 2. Respond to the parameters listed on the business rule screen. 3. Click on the action button that is displayed with a contextual word such as OK, Add, Delete etc. 4 4. Wait until the business rule is run successfully and make sure you receive a success message. If you receive a failure message, contact to system administrator. Please note that on save business rule do not require a parameter input, they run automatically on save, If you receive a failure message, contact to system administrator. 34

Using Data Forms Using Supporting Details 1 Supporting Detail gives users the ability to enter further level of detail behind specific input cells within a data form. For example, if you want to break Allowance for Mission Abroad by the number of days multiply with the per day allowance and the number of days abroad, you can use supporting detail function. 3 1. After selecting the editable cells that you wish to input supporting details either right click and choose Supporting Details option or click on Supporting Detail button on the toolbar. 2. View the following pop-up screen. Enter breakdown of the account or calculation you need. You can add multiple lines by clicking ‘Add Sibling’ or ‘Add Child’, and you can then give specific names to each of the added rows. Input the data and specify the arithmetic function sign to be used. 3. Click on Save button to save your changes, entire data form will be saved. 4. Cells with supporting details show the calculation of supporting detail. You can view the supporting details by choosing these blue cells and selecting Supporting Details option. Cells with supporting details cannot be edited directly. You should either clear the cell or edit the supporting details to change the value of these cells. 2 4 Supporting details calculations work from bottom to top. For example, a multiplication operator next to a value multiplies the value with the value above. An addition operator adds the value to total. A subtraction operator subtracts the value from the value above. In the example above Number of Missionary Days (120) is multiplied by Per Diem Per Day (750) and Additional Cos is added to total. Please note that supporting details can be input in multiple cell across a single column or row but not in combination of rows and columns. 35

Using Data Forms Using Comments gives users the ability to enter a narrative behind specific input cells within a data form. Comments can be used for various purposes, such as passing a note to reviewer or justification of a large sum of budget item. 1 2 3 4 5 1. Unlike supporting detail, comments can be input to read only cells too. After selecting the cells that you wish to input comment, either right click and choose Comment option or click on Comment button on the toolbar. 2. In the Comments screen, click on plus sign to add comment. 3. Enter the comment in your preferred language. You can also format your inputs using various formatting options in the screen. 4. Click on Add button and close the dialog box. Multiple comments may be added to cells. 5. Please note the triangle in the top-right corner of the cell informing users that there is a comment in the cell. To view the comments in a cell, you can launch the comments screen following step 1 above. 36

Using Data Forms Adjusting Data 1 2 3 4 5 The Adjust feature is primarily used when data is already available in a cell or a range of cells. Data in the cells can be adjusted by either a value or a percentage. 1. After selecting the editable cells that you wish to adjust either right click and choose Adjust option or click on Adjust button on the toolbar. 2. Adjust Data pop-up screen will be displayed. You can select whether to adjust the data by a value or percentage 3. and whether to increase or decrease the value(s) 4. by the figure input in the value field. 5. After making selections and inputting the adjustment value, click on Adjust Data 6. Data in the selected cells will be automatically adjusted. However, data will not be saved until you save the data form. Click on Save button to save the data form. 6 37

Section 4 Uploading Documents 38

Uploading Documents Definition & Objectives Definition: You can upload and download documents related to budget data. These documents might include the following: • Budget Circular Document • Scanned signed papers • Feasibility analyses • Supporting Excel files, reports Objectives: After completing this section, you should be able to; • Upload a document to workspace • Attach uploaded document link to data forms 39

Uploading Documents to Workspace Documents can be attached to forms for various reasons. 1 2 3 1. To Attach a Document, click on Explore button on the toolbar 2. Select your agency’s folder 3. Right click on related the folder and select Import File selection 4. Click on browse button to upload a single file. You can also upload multiple files by clicking on Multiple Files button. 5. Browse and select the file you would like to upload into Workspace. Click on Finish to close the dialog box. 4 5 40

Uploading Documents Attaching Documents to Forms Only the documents that are uploaded to Workspace can be attached to data forms. 1 2 1. After selecting the cells that you wish to upload document, either right click and choose Attachments option or click on Document Attachments button on the toolbar. 2. Click on Plus sign to launch document attachment dialog box 3. Enter a description for the document that’s being attached 4. Click on Browse Workspace button 5. Browse the Workspace and select document that you’d like to upload 6. Click OK to attach the document 7. Select Apply to all selected cells option if you’d like to attach the selected document to multiple cells at the same time. Click on Close to close the dialog box 8. Cells with document attachments are displayed with a rectangular icon on right corner. To open or edit an already attached document follow the instructions in step 1 3 5 4 7 8 6 the 41

Section 5 Running Reports 42

Running Reports Definition & Objectives Definition: Reports are occasionally accessed by users to analyze and review budget and actual data. Reports are accessed through your Task List (Reports task group) or through Workspace explore menu. You can access and run reports any point of time. Objectives: After completing this section, you should be able to; • Navigate to reports folder in Workspace • Respond to prompts and run reports

Running Reports Navigating to Reports in Workspace To access the reports in Workspace follow the steps listed below: 1 1. You can access to reports from your task list reports task group or by clicking on explore “ ” icon in Workspace anytime 2. Browse and find the reports folder in Workspace 3. Find the report you would like to run in the list of reports 2 3

Running Reports To run a report follow the steps listed below. 1 2 1. Double click on the report or right click and select Open In PDF Preview 2. Reports prompts will be displayed. Choose the report parameters to run the report for and make sure you respond to all parameters. In this example report prompts are Year, Version and Entity. Make sure you select right parameters to ensure report is produced with the required data. 3. Click “OK” button to run the report. 4. Review the report on the screen. You can also print or download the report as PDF file using the buttons on the top right corner of the report screen. 3 4 Instead of selecting prompt member from member list, you may find typing easier. You can respond to prompts by typing instead of selecting. Please note that prompts are not case sensitive but you must type the exact member name in the prompt box

Running Reports Exporting Reports After you run a report, you are able to export the report as Microsoft Excel, Word or Power. Point file. To export the report follow the steps listed below: 1 1. Run the report as explained in the previous section. Go to File menu and choose Export and choose the file type you would like to export as 2 2. Choose to Open or Save the file. Due to variety of Microsoft Office and Internet browser versions, Open With option may behave unexpectedly. Therefore you are recommended to save the file before opening. 3. Browse and open the file you have exported. Please be advised that modifications done in the exported files are not stored in the system. 2 3 3 Exports to Power. Point and Word are not editable. It’s recommended to use Excel export option. PDF is not an export option. If you would like to save the report as PDF, use the save option as described in the previous section.

Section 6 Copying Versions 47

Copying Versions Definition & Objectives Definition: Versions are used for keeping several instances of data throughout budgeting process. Versions are grouped in three main categories as following: • • • Top Down Budget Planning versions – Estimates for budgetary estimates (Estimates) – Ceilings for setting line agency budget ceilings (Ceilings) Bottom Up Workflow versions – Draft Versions for line agency internal workflow (Draft 1 -3) – Proposal Versions for submission of data to DOF (Proposal 1 -3) Review and Study Versions – Review and Approval Versions (Review, Final, Approved) – Study Versions for DOF to study budget data (Estimates Study 1 -3, Study 1 -3) Objectives: After completing this section, you should be able to; • Understand the concept of working with versions • Copy from source version to target version

Copying Versions Budget Planning Versions Option 2 Option 3 Estimates Study 1 Estimates Study 2 Estimates Study 3 DOF Option 1 Budget Ceiling & Fiscal Space LINE AGENCIES Estimates Ceilings Proposal 1 Proposal 2 Proposal 3 Draft 1 Draft 2 Draft 3 Major Asset Acquisition, Asset Replacement and Ongoing Projects Read Only Editable LA Budget Preparation Draft 1 § Budget Planning stage is the stage where forward estimates are performed, business as usual and fiscal space ceilings are determined and system is prepared for budget preparation. § In this stage, line agencies use Draft versions for Major Asset Acquisition, Asset Replacement and Ongoing Projects. Submit the data in a proposal version. DOF copies the finalized Proposals to Estimates version § DOF prepares the forward estimates in Estimates Study versions and copy the finalized results into Estimates Version. Aggregate Resource Envelope and Fiscal Space components are determined in Estimates version. § Ceilings for BAU and Fiscal Space are set in Ceilings version § System setup data is copied to Draft 1 version and workflow is started for line agencies for budget preparation.

Copying Versions Budget Preparation and Review Versions Study 2 Study 3 DOF Study 1 Proposal n Proposal 1 Proposal 2 Proposal 3 Reviewed Final Approved § Budget Preparation stage is the stage where budget is prepared and reviewed by line agencies internally and submitted to DOF for review § Line agencies use Draft versions internally and copy their finalized data to the corresponding Proposal version before submission (i. e. Draft 1 to Proposal 1, Draft 2 to Proposal 2 etc. ) LINE AGENCIES § Budget Review stage follows Budget Preparation. Line Agency Budget submissions are reviewed by DOF Proposal 1 Proposal 2 Proposal 3 Draft 1 Draft 2 Draft 3 Read Only Editable § DOF may be able to simulate their studies in a Study version by copying the proposal version to a corresponding study version (i. e. Proposal 1 to Study 1. Proposal 2 to Study 2 etc. ) § DOF may reject and send the submitted proposals back to line agencies in which case line agencies will be able to copy rejected proposal into next draft version (i. e. Proposal 1 to Draft 2, Proposal 2 to Draft 3 etc. ) § After due reviews and negotiations, DOF finalizes a proposal version for each line agency and copies the data to Reviewed version. § Review version is presented to DOF management, TEC and SFC. Adjustments may be done in Reviewed version by DOF. Upon completion, data is copied to Final version to seek approval § Upon receiving approval, data is copied to Approved version at line item level only (Finance Plan Type). This task is performed by DOF Budget administrator.

Copying Versions Copy Version functionality is available to line agency budget officers through their LA Budget Management task list. To copy version follow the steps listed below: 1. Under LA Budget Management Task List, expand Submission and choose Copy Version 1 2. Select Scenario*, source version (Copy From) and target version (Copy To) 3. Move all cost centers to the Selected Entities section by clicking on Move All 2 4. Select Copy Account Annotations, Copy Comments, Copy Documents and Copy Supporting Details options 5. Click Copy Data button 6. Confirm the prompt to start copying version. Copying version may take time depending on the amount and variety of data input in source version. 4 7. Please wait until you receive successful completion message. 5 * Scenario selection depends on budget process stage: Ø Budget Planning scenario during budget planning Ø Budget scenario during budget preparation 6 Ø Mid Term scenario during mid term review 7

Training Manual for Line Agency Budget Officer

Preface Welcome to Line Agencies Budget Officer Training Manual! Before you begin, please take a moment to review this section. The preface presents an overview of the following information: • Course objectives • Structure of the course • Course materials used in the class • Conventions used in the book Course Objective After completing this course, you should be able to: • Login and navigate around the Takhteet application on Oracle Hyperion Planning • Complete your budgeting tasks lists via task lists provided for you in all the budget preparation chapters Course Structure • Line Agency Budget Officer Training is a instructor-led training course consisting of lectures, demonstrations, and hands-on exercises. • In this course, the instructor presents a topic conceptually by explaining its purpose, demonstrating how it works, and then guiding the attendees through the exercises. Demonstrations and hands-on exercises reinforce the concepts and skills introduced during lectures. • This document is designed for end users in order for them to use it as a stand-alone reference. Course Materials There are two manuals that will be used in the classroom. These books will also be used by the end users as reference guides later on. • Line Agencies Budget Officer End User Training Manual • General Features Manual 53

Shapes and Icons The following conventions are used in the document: In Electronic version of the document only, clicking on the home icon navigates users to the index section of the document. Hand icon is used in index to alert users that the context of the page is interactive and you can navigate to sections of the document by clicking on chapters. 1 Numbers in green circles represent the sequence number of the current activity. Users interact with the system following the sequence numbers as specified in the document. Application Icons are used to point users the exact icon that needs to be used during an activity. Note icon is used to point out important notes about the section. 54

INDEX Circular and Budget Management Cascade Ceiling Start LA Budget Chapter 1 Chapter 2 Chapter 3 Chapter 4 Chapter 5 LA Budget Review Submission 55

LA Budget Management Task List Circular and Budget Management Cascade Ceiling Start LA Budget Chapter 1 review and adjust 56

LA Budget Preparation Task List Chapter 2 General Expenses Chapter 2 review and adjust Chapter 3 Asset Replacement Long term asset replacement New asset request IT Projects Chapter 3 review and adjust Chapter 4 Projects Chapter 4 review and adjust 57

LA Budget Preparation Task List Chapter 5 Revenue Forecast LA Budget review Submission 58

LA Budget Management Circular and Budget Management 59

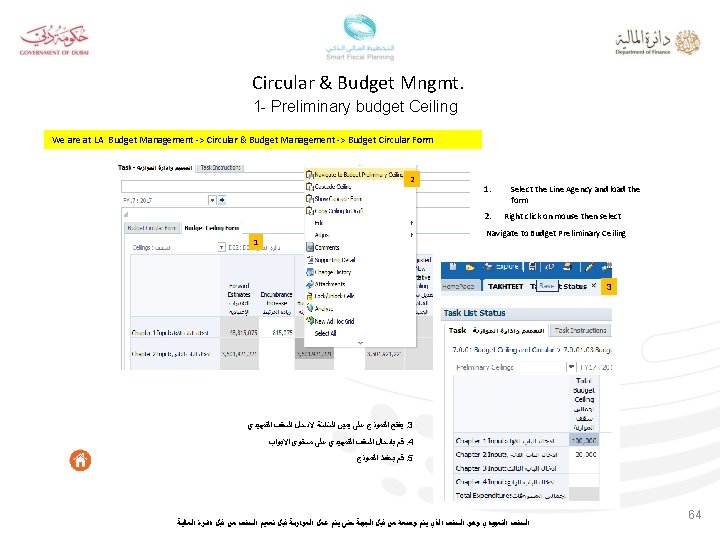
Circular & Budget Mngmt. Definition & Objectives Definition: Budget circulars are uploaded in Hyperion and attached to line agency ceiling forms at this process. Budget circular document will be prepared by PBD (offline) for each line agency and provided to budget administrator. Budget administrator will upload budget circular documents to line agency folders in Workspace and attach the document link to budget circular form which will be the first task in planner task list where planners will be able download the document and mark the document download date. Budget administrator will notify system administrator to setup the system for budget preparation, System administrator will notify Budget administrator about the completion of data and metadata updates, upon receiving notification from System Administrator Budget administrator will initiate the Budget Preparation stage. Line agency budget officer’s first task is to review the budget ceiling and download the budget circular from the system LA Budget officer will allocate line agency budget ceiling to sectors or divisions • If sectors are chosen, form will display sectors of the line agency, if divisions are chosen, form will display divisions of the line agency • Additionally, line agency budget officer will also be able to choose the initial method of cascade. The options that are available to budget officer will be as below: – By Last Year Actual: Cascade based on last year actual data – By Current Year Budget: Cascade based on current year budget data – Evenly: Cascade evenly – Manual: Do not allocate but make the form editable for manual cascading Objectives: After completing this section, you should be able to; • Calculate Budget Ceilings • Copy Ceilings to Budget Scenario 60

Circular & Budget Mngmt. Budget Circular We are at LA Budget Management -> Circular & Budget Management -> Budget Circular Form 2 1 1. Download the document present at the link specified in Document Description and Link 2. Select Acknowledged Status and Date 3. Save the form 61

Circular & Budget Mngmt. Definition & Objectives Definition: LA can start Budget Ceiling workflow before receiving ceiling from DOF. The Line agency budget officer’s will put the budget ceiling then will cascade it to cost centre LA Budget officer will allocate line agency budget ceiling to sectors or divisions • If sectors are chosen, form will display sectors of the line agency, if divisions are chosen, form will display divisions of the line agency • Additionally, line agency budget officer will also be able to choose the initial method of cascade. The options that are available to budget officer will be as below: – By Last Year Actual: Cascade based on last year actual data – By Current Year Budget: Cascade based on current year budget data – Evenly: Cascade evenly – Manual: Do not allocate but make the form editable for manual cascading Objectives: After completing this section, you should be able to; • Calculate Budget Ceilings by using Preliminary Ceiling • Copy Preliminary Ceilings to Budget Scenario 62

Budget Circular Preliminary Ceiling Definition: LA can start Budget Ceiling workflow before receiving ceiling from DOF. The Line agency budget officer’s will put the budget ceiling then will cascade it to cost centre LA Budget officer will allocate line agency budget ceiling to sectors or divisions • If sectors are chosen, form will display sectors of the line agency, if divisions are chosen, form will display divisions of • the line agency Additionally, line agency budget officer will also be able to choose the initial method of cascade. The options that are available to budget officer will be as below: – By Last Year Actual: Cascade based on last year actual data – By Current Year Budget: Cascade based on current year budget data – Evenly: Cascade evenly – Manual: Do not allocate but make the form editable for manual cascading Objectives: After completing this section, you should be able to; • Calculate Budget Ceilings by using Preliminary Ceiling • Copy Preliminary Ceilings to Budget Scenario 63

Circular & Budget Mngmt. 2 - Cascade Preliminary Budget Ceiling We are at LA Budget Management -> Circular & Budget Management -> Budget Ceiling Form 2 1. Right click to select Cascade Preliminary Ceiling 1 3 2. Select Cascade method 3. Then right click -> select show cascade Form Or you can check the cascade from task list “show cascade form” ﺍﻟﺴﻘﻒ ﺍﻟﺘﻤﻬﻴﺪﻱ ﻭﻫﻮ ﺍﻟﺴﻘﻒ ﺍﻟﺬﻱ ﻳﺘﻢ ﻭﺿﻌﻪ ﻣﻦ ﻗﺒﻞ ﺍﻟﺠﻬﺔ ﺣﺘﻰ ﻳﺘﻢ ﻋﻤﻞ ﺍﻟﻤﻮﺍﺯﻧﺔ ﻗﺒﻞ ﺗﻌﻤﻴﻢ ﺍﻟﺴﻘﻒ ﻣﻦ ﻗﺒﻞ ﺩﺍﺋﺮﺓ ﺍﻟﻤﺎﻟﻴﺔ 65

Circular & Budget Mngmt. 3 - Cascade Preliminary Budget Ceiling We are at LA Budget Management -> Circular & Budget Management -> Budget Ceiling Form 1 1. Enter adjustments for Budget Ceilings as Budget Ceiling Inputs and save the form 2. In the second tab, Enter Adjusted New Initiative Ceilings values and Save the form 2 ﺍﻟﺴﻘﻒ ﺍﻟﺘﻤﻬﻴﺪﻱ ﻭﻫﻮ ﺍﻟﺴﻘﻒ ﺍﻟﺬﻱ ﻳﺘﻢ ﻭﺿﻌﻪ ﻣﻦ ﻗﺒﻞ ﺍﻟﺠﻬﺔ ﺣﺘﻰ ﻳﺘﻢ ﻋﻤﻞ ﺍﻟﻤﻮﺍﺯﻧﺔ ﻗﺒﻞ ﺗﻌﻤﻴﻢ ﺍﻟﺴﻘﻒ ﻣﻦ ﻗﺒﻞ ﺩﺍﺋﺮﺓ ﺍﻟﻤﺎﻟﻴﺔ 66

Circular & Budget Mngmt. 4 - Copy Preliminary Budget Ceiling to Draft We are at LA Budget Management -> Circular & Budget Management -> Budget Ceiling Form 2 1 3 1. Right Click on the form and select Copy Ceiling to Draft 2. Select the Draft Version and run the copy rule to copy the Ceilings data for the line agency to selected Draft Version to initiate budget preparation. Preliminary ceiling is entered by LA before budget circular 67

Circular & Budget Mngmt. DOF Ceiling Notes: The system will consider only the budget circular by DOF, if the budget circular by DOF then: 1 - If the Preliminary budget less than DOF Budget: LA will increase the budget until reach DOF budget. 2 - If the Preliminary budget equal DOF Budget: then you can submit the budget as is it. 3 - If the Preliminary budget more than DOF Budget: LA will Decrease the budget until reach DOF budget. 4 - Re-cascade DOF budget and start from beginning 68

Circular & Budget Mngmt. 1 - DOF Ceiling We are at LA Budget Management -> Circular & Budget Mngmt. 1 Note: you cannot adjust the ceiling 69

Circular & Budget Mngmt. 2 - DOF Ceiling We are at LA Budget Management -> Circular & Budget Management -> Budget Ceiling Form 3 1 2 4 1. Right Click on Line Agency Selection Drop Down icon and select Cascade Ceiling 2. Select the Cascade Mode and Method of Cascade and run the Cascade Ceiling calculation 3. Select Cascade Mode and Method of Cascade and run the calculation 4. Right Click on Line Agency Selection Drop Down icon and select Show Cascade Form 5. Enter adjustments for Budget Ceilings as Budget Ceiling Inputs and save the form 6. In the second tab, Enter Adjusted New Initiative Ceilings values and Save the form 5 6 70

Circular & Budget Mngmt. 3 - DOF Ceiling We are at LA Budget Management -> Circular & Budget Management -> Budget Ceiling Form 7 8 7. Right Click on the form and select Copy Ceiling to Draft 8. Select the Draft Version and run the copy rule to copy the Ceilings data for the line agency to selected Draft Version to initiate budget preparation. 71

Start LA Budget 1 1. Select the scenario and draft version 2. You will see your LA 3. From view select Tree view 3 2 73

Start LA Budget 1 - the default is not started 2 - Select start to start the workflow 3 - you will see this message after click on start 1 3 2 74

HR Budget Review and Adjust Definition: Review and adjustment form will allowed budget preparation users to input the amount in account level Objectives: After completing this section, you should be able to; • Input the amount in account level • Print out report by exporting the form to Exel 76

Chapter 1 review and adjustment We are at LA Budget Management Chapter 1 Budget Preparation Review and adjustment 1 2 1. “Chapter 1 Review and Adjustment Data form displays all chapter 1 Accounts calculated during the HR Budget preparation. 2. Manual Adjustments are enabled on the account level by inputting data into the “Data Input” Column - Inputs in certain accounts are capped with a threshold that is a percentage of calculated amount. In case your input exceeds the threshold, you receive an error message informing about the violation - Rows are highlighted in red where the violation is done and your inputs are deleted automatically. You are recommended to review your inputs accordingly 77


General Expenses Definition & Objectives Definition: General Expenses budget is the budget that is defined with Chapter 2 accounts in the chart of accounts. It is comprised of 6 budget models: • Consumable Budget: Consumable item purchase budget directed to expense or inventory • Supplier Contracts Budget: Supplier contract expenditure with contractual details • Training Budget: training expenses with details • Events Budget: events expense with details • Business Travel Budget: Business travel expense with details. • Direct Input Budget: Direct input of operational expenditure budget Objectives: After completing this section, you should be able to; • Define Consumable budget • Define supplier contracts expenditure budget • Training expenditure budget • Events expenditure budget • Business Travel expenditure budget • Define operational expenditure input budget 79

General Expenses Consumable Item We are at LA Budget Management Chapter 2 general expenses 1 To entered Consumable budget follow the steps below: 2 1. Right Click and select add new consumable Item 2. Screen will open 80

General Expenses Consumable Item We are at LA Budget Management Chapter 2 general expenses 3. 4. 5. 3 Select the cost center and location Click on lunch Line item have been created 4 5 81

General Expenses Consumable Item We are at LA Budget Management Chapter 2 general expenses 6. 7. 8. Select the account from drop down list Select the account type “expense or inventory” To delete the account , right click and select delete item 6 8 7 82

General Expenses Supplier Contract We are at LA Budget Management Chapter 2 Supplier Contract To add supplier contract follow the steps below: 1 1. Right Click and select add supplier contract 2. Select the cost center and location 3. Click on Lunch 2 3 4 83

General Expenses Training We are at LA Budget Management Chapter 2 Training 1 4 To add training request follow the steps below: 2 3 1. Right Click and select add Training request 2. Select the cost center and location 3. Click on Lunch 4. Then continuo fill the row 84

General Expenses Events We are at LA Budget Management Chapter 2 Events 1 4 To add Events request follow the steps below: 2 3 1. Right Click and select add Event request 2. Select the cost center and location 3. Click on Lunch 4. Then continuo fill the row 85

General Expenses Business trips We are at LA Budget Management Chapter 2 business trips 4 1 To add business Trip request follow the steps below: 2 1. Right Click and select add Business Trip request 2. Select the cost center and location 3. Click on Lunch 4. Then continuo fill the row 3 86

Chapter 2 Review and Adjustment We are at LA Budget Management Chapter 2 Review and Adjustment 2 1 1. “Chapter 2 Review and Adjustment Data form displays all chapter 2 Accounts calculated during Chapter 2 Budget preparation. 2. Manual Adjustments are enabled on the account level by inputting data into the “Data Input” Column 87


Capital Ownership Budget Definition & Objectives Definition: Capital budget is the budget that is defined with Chapter 3 accounts in the chart of accounts. It is comprised of 4 budget models: • • Asset Replacement: input the details of assets to be replaced and budget for assets to be purchased for replacement Long Term Capital Purchase: budget estimate for major capital asset purchases that have been approved and recorded in GRP with an outstanding purchase order but not yet acquired New Asset Request: Budget for the purchase of New Asset Request IT Projects: Budget for ongoing and New IT projects Objectives: After completing this section, you should be able to; • Define Asset Replacement Budget • Define Long Term Capital Purchase budget • Define New Asset Request budget • Define IT Projects Budget 89

Capital Ownership Budget Add Asset Replacement We are at Budget Preparation Chapter 3 Asset Replacement 1 Asset Replacement budget details are initially input by the LAs during the budget planning process and enabled for review/updates again during the budget preparation process Asset Replacement budget input is made following the steps listed below: 1. Right Click and select Add Asset Replacement 2. Select a minor Asset Category and click Add to complete the addition of asset replacement. Based on your selections in the previous step a new line will be added in the form with an Asset Replacement Line Item code 2 4 3 5 3. When the rule is complete, a message will be displayed about successful completion. Input the details of the assets to be replaced (Quantity to be replaced, Year of Purchase, Historical Value, written down value, …. . etc. ) and the details of the asset to be purchased (Unit Price, Quantity, Expected Date of Purchase, Expected Date of Delivery and Payment % for each budget year) to calculate the Total Value of the Asset. (Total Value = Unit Price * Quantity) 4. To view the total calculated cost for the asset replacement, click on the Asset replacement cost 5. Review the calculated asset replacement cost • Please note that the Expected Date of Delivery should not be earlier than the budget Year (Can’t be FY 15 for FY 16 Budget) and must be after the Expected Date of Purchase • Incase the above rules is violated the Expected Date of Delivery cell will be highlighted in Red and a warning validation message will be displayed • Please note that if you choose a major Asset category, system will return an error message. • The minor item category defined in the business rule prompt determines the Clearing Asset account 90

Capital Ownership Budget Add Long Term Capital Purchase We are at Budget Preparation Chapter 3 Long Term Capital Purchase 1 Long Term Capital budget details are initially input by the LAs during the budget planning process and enabled for review/updates again during the budget preparation process Long Term Capital budget input is made following the steps listed below: 1. Right Click and select Add Long Term Capital Purchase 2. Select a minor Asset Category and click Add to complete the Long Term Asset addition. When the rule is complete, a message will be displayed about successful completion. Based on your selections in the previous step a new line will be added in the form with an Asset Line Item code 2 4 3 5 3. Input the details of the long term capital purchase Ex: (Asset Description, Unit Price, Quantity, Expected Date of Purchase, Expected Date of Delivery, Payment %, Total Approved Funding, To be Spent until end of current year to calculate Remaining Cost. (Remaining Cost = Total Approved Funding – To be Spent until end of Current Year) 4. To view the total calculated cost for the long term capital asset purchase, click on the Long Term Capital Cost tab 5. Review the calculated long term capital cost • Please note that the Expected Date of Delivery should not be earlier than the budget Year (Can’t be FY 15 for FY 16 Budget) and must be after the Expected Date of Purchase • Incase the above rules is violated the Expected Date of Delivery cell will be highlighted in Red and a warning validation message will be displayed • Please note that if you choose a major Asset category, system will return an error message. • The minor item category defined in the business rule prompt determines the Clearing Asset account 91

Capital Ownership Budget Add New Asset We are at Budget Preparation Chapter 3 New Asset Request 1 New Asset Request budget details are inputted/submitted by the LAs during the budget preparation. The request can be linked to a new initiative for Example (New Initiative 01), or the default selection PR 00000 if it is not linked to any new initiatives i. New Asset Request budget input by divisions/sectors New Asset budget input is made following the steps listed below: 1. Right Click on the rows and select Add Capital Asset Line Item 2 2. Select minor Asset Category and click Add to complete the Asset Addition. When the rule is complete, a message will be displayed about successful completion. Based on your selections in the previous step a new line will be added in the form with a new asset line item code 4 3 3. Input the details of the assets to be replaced Ex: (Asset Description, Quantity, Unit Price, Expected Date of Purchase, Expected Date of Delivery and Payment %. (Total Value = Quantity * Unit Price) 4. To view the total calculated cost for the new asset, click on the New Asset Cost tab 5. Review the calculated new asset cost • Please note that if you choose a major Asset category, system will 5 return an error message. • The minor item category defined in the business rule prompt determines the expense account for the consumable • Please note that the Expected Date of Delivery should not be earlier than the budget Year (Can’t be FY 15 for FY 16 Budget) and must be after the Expected Date of Purchase • Incase the above rules is violated the Expected Date of Delivery cell will be highlighted in Red and a warning validation message will be displayed • Please note that if you choose a major Asset category, system will return an error message. • The minor item category defined in the business rule prompt determines the Clearing Asset account 92

Capital Ownership Budget Delete Asset Line Items We are at Budget Preparation Planning Chapter 3 FE 3 Asset Replacement 1 2 If you would like to delete a previously added asset replacement line item follow the steps listed below: 1. Right click on the Asset line item 2. Choose Delete Asset Replacement option and Click Delete in the pop-up window. We are at Budget Preparation Chapter 3 Long Term Capital Purchase 1 2 If you would like to delete a previously added long term asset line item follow the steps listed below 1. Right click on the Asset line item 2. Choose Delete Long Term Capital Purchase option and Click Delete in the pop-up window. We are at Budget Preparation Chapter 3 New Asset Request 1 2 If you would like to delete a new asset follow the steps listed below: 1. If you would like to delete a previously added Asset line item, right click on that Asset line item and choose 2. Delete Capital Asset Line Item option and Click Delete in the pop-up window. 93

Capital Ownership Budget IT Projects We are at LA Budget Management Chapter 3 IT Projects 1. IT projects List form display the list of ongoing and New projects, a. Ongoing projects are loaded from GRP across the default program member (PR 00000). b. New IT projects are created in Mubadara and loaded in Takhteet. New IT projects are displayed with the new initiative they are assigned to. 1 2. Right Click the Project you want to budget for and select Enter New Project Details which directs to the Project Master Details Form 2 3 3. Input Project Details (Project Code, Name, Description, Type, Status, Strategic Objective, Projects Attachments …. etc. ). Some Fields are smart List fields which are not enabled for free text and the user has to select a value from the provided drop down list like (Geographical Location, Project Type, Project Status. . etc. ) After completing inputs, click on Save to save the input data 4. Browse to “IT Project Cost Distribution” data form tab and Input the Cost Value for License, Hardware, Consultancy Costs and the payment% per each year and click Save 5. Click on “IT Project Budget” tab to display the Project Cost allocated on the budget Years as per the previously inputted Payment % 4 • Please note that IT projects budget is input by the line agency budget officer 5 group. 94

Capital Ownership Budget Review & Adjustment We are at Budget Preparation Chapter 3 Review & Adjustment 1 2 3 4 1. “Chapter 3 Review and Adjustment Data form displays all chapter 3 Accounts calculated during the capital budget from the Asset Replacement, Long Term Capital Purchase, New Asset Requests and IT projects, where each Asset Category selected was automatically mapped to an asset clearing account 2. Manual Adjustments are enabled on the account level by inputting data into the “Data Input” Column 3. Inputs in certain accounts are capped with a threshold that is a percentage of calculated amount. In case your input exceeds the threshold, you receive an error message informing about the violation 4. Rows are highlighted in red where the violation is done and your inputs are deleted automatically. You are recommended to review your inputs accordingly 95

ﺍﺩﺍﺭﺓ ﺍﻟﻤﻮﺍﺯﻧﺔ LA Budget Management Chapter 4– Projects 96

Capital Projects Definition & Objectives Definition: Capital projects budget is prepared using a detailed capital projects model where both narrative and financial details of capital projects budget is captured. Financial details are captured in both accrual and cash terms and includes Construction, Consultancy, Land & acquisition, Finance Costs and Other Costs. Capital projects budget is prepared for: • Ongoing Projects: Budgeting against Default Program (PR 00000) during Budget preparation Stage (BAU) • New Projects: Budgeting for new project codes that are associated with New Initiatives (New Initiative 01, New Initiative 02) during Budget Planning Stage within Mubadara application Objectives: After completing this section, you should be able to; • Define Capital Projects Budget • Review Capital Projects Budget 97

Capital Projects Ongoing projects We are at LA Budget Management Chapter 4 Projects 1 1. The first data form in Capital Projects task is the project list. The form displays the list of ongoing and new projects and total chapter 4 budgets: a. Ongoing projects are loaded from GRP across the default program member (PR 00000) 2 2. To add details to the project click on project it will expand the master details 98

Capital Projects Project details We are at LA Budget Management Chapter 4 Projects 1 1. Navigate to “Project Master Details” form and input following details: a. English Name b. Arabic Name c. Geographical Location d. Project Type e. Project Status f. Unit of Measure g. Project Size h. Project Priority Ranking i. Internal Project Code j. Projects Attachments k. Executed by Click on Save. 99

Capital Projects New Projects We are at LA Budget Management Chapter 4 New Projects 1 1. To Add new project, right click then select Add New Projec 2. To add details to the project click on project it will expand the master details 2 100

Capital Projects Review and Adjustment We are at LA Budget Management Chapter 4 Review and Adjust 2 1 1. “Chapter 4 Review and Adjustment Data form displays all chapter 4 Accounts calculated during the capital budget preparation. 2. Manual Adjustments are enabled on the account level by inputting data into the “Data Input” Column 101


Revenue Forecast Definition & Objectives Definition: Revenue of line agency will be input centrally by line agency budget officer or depending on the workflow level chosen by line agency it may also be input by sector or division budget officers Revenue will either be calculated based on the drivers input or input manually • If "Manual" is selected in Calculation Method, the Calculated column will be empty and user will input the Revenue directly in the Data Input field • If "Driver Based" is selected in Calculation Method, the calculated column will be calculated by Unit price * ( Volume (Best Case) or Volume (Average) or Volume (Worst Case) based on the selection of Select case ) Objectives: After completing this section, you should be able to; • Input and review Revenue Forecast 103

Revenue Forecast Definition & Objectives We are at LA Budget Management Revenue Forecast Revenue forecast is made either driver based or as manual input. Follow the steps listed below to make your revenue forecast inputs 1 1. If you would like to add further details beyond sub account, right click on Sub Account 2 7 2. Select Add Revenue Detail to add a new revenue detail to breakdown sub account. 3. Input the Revenue Detail description and click on Add 4. Select type of input (manual or driver based) 3 a. If you choose Manual, driver based calculations will be ignored even if you input volume and unit price b. If you choose Driver Based, your unit price input will be multiplied with chosen type of vloume 4 5. Input unit price, worst and best volume expectations and unit of measure. Choose the type volume: 5 a. Best: Use the best volume expectation input 6 b. Average: Use the average of best and worst volume expectations c. Worst: Use the worst volume expectation input 6. Save the form and Review the calculated values in Data Total column 7. If you would like to delete a previously defined revenue detail, right click on the revenue detail and select Delete Revenue Detail option. 104

LA Budget Management LA Budget Review 105

LA Budget Review FRG Validation We are at LA Budget Management -> LA Budget Review -> FRG Validation You can view the status of Functional Review Group reviews in FRG Validation Task. In order to finalize the budget of the agency before it’s promoted to Budget Management Committee, all reviews for all divisions must be completed. Although this form is setup to allow functional review groups to approve or reject sub-budgets, Line Agency Budget Officer has the authority to approve or reject any status in this form. In order to approve or reject a sub-budget status follow the steps listed below: 1 1. , Line Agency Budget Officer will approve or reject any status in this form 2. Do right click , select approve status 3. Click on Save 4. You can navigate to cost center by selecting Navigate to Workflow Errors , it will allow you to check the error or the details 2 4 3 106

LA Budget Review and Adjustment We are at LA Budget Management -> LA Budget Review -> Budget Review and Adjustment 1. Line agency budget at all chapters, divisions, sectors, locations, programs and initiatives can be reviewed in the Review and Adjustment task. Please Adjustments can also be made at leaf levels of organization, account, location and program. Please follow the steps described in general features training manual to refresh the form with chosen filters for review and adjustment. 107

LA Budget Review New Initiatives Review, Reserve & Unreserved We are at LA Budget Management -> LA Budget Review -> New Initiatives Review, Reserve and Unreserved -> New Initiative List 1 New Initiatives Review, Reserve and Unreserve task is used for reviewing, reserving, unreserving new initiative budgets. 1 - select new initiative then right click to select Navigate to budget models, select the chapter and form to entered new initiative 108

LA Budget Review New Initiatives Review, Reserve & Unreserve We are at LA Budget Management -> LA Budget Review -> New Initiatives Review, Reserve and Unreserved -> New Initiative List 2 2 - add the amounts for the new initiative then click on Save 109

LA Budget Review New Initiatives Review, Reserve & Unreserved We are at LA Budget Management -> LA Budget Review -> New Initiatives Review, Reserve and Unreserved -> New Initiative List 3 3 - Then add the details for the new initiative 4 5 4 - To reserve a new initiatve, right click on the new initiative and choose Reserve new initiative option. Confirm the message. Please note that this action may take a few moments. 5 - To unreserve a new initiatve, right click on the new initiative and choose Unreserve new initiative option. Confirm the message. Please note that this action may take a few moments. 110

LA Budget Review Validate Ceiling We are at LA Budget Management -> LA Budget Review -> Validate Ceiling -> Business As Usual Ceiling Validation You can validate the business as usual ceilings of divisions, sectors and line agency at Business As Usual Ceiling Validation task. Budget that is above the ceiling is displayed in red. You can submit your budget to DOF if the ceiling is exceeded for second and third years of budget. However, submission is not allowed if the first budget year ceiling is exceeded. 111

LA Budget Review Validate Ceiling We are at LA Budget Management -> LA Budget Review -> Validate Ceiling -> Business As Usual Ceiling Validation You can validate the new intiiative ceilings of divisions, sectors and line agency at New Initiatives Validation task. Budget that is above the ceiling is displayed in red. You can submit your budget to DOF if the ceiling is exceeded for second and third years of budget. However, submission is not allowed if the first budget year ceiling is exceeded. 112

LA Budget Management Submission 113

Submission Copy Version We are at LA Budget Management -> Submission -> Copy Version In order to submit your line agency budget to DOF you have to copy your draft budget to a proposal version. Please follow the steps that are detailed in General Features document. 114

Submission Review and Finalize Submission We are at LA Budget Management -> Submission -> Review and Finalize Submission -> Summary of Proposal Before submitting your budget proposal, you need to calculate your proposal. To calculate your budget proposal, right click on the form and select Calculate Proposal option. Summary of Proposal form will display chapter level totals of your proposal for both Business As Usual and New Initiatives. 115

Submission Review and Finalize Submission We are at LA Budget Management -> Submission -> Review and Finalize Submission -> Chapter 1 Proposal Review You can review Chapter 1 budget proposal data at leaf level at Chapter 1 Proposal Review tab. 116

Submission Review and Finalize Submission We are at LA Budget Management -> Submission -> Review and Finalize Submission -> Chapter 2 Proposal Review You can review Chapter 2 budget proposal data at leaf level at Chapter 2 Proposal Review tab. 117

Submission Review and Finalize Submission We are at LA Budget Management -> Submission -> Review and Finalize Submission -> Chapter 2 Proposal Review You can review Chapter 2 budget proposal data at leaf level at Chapter 2 Proposal Review tab. 118

Submission Review and Finalize Submission We are at LA Budget Management -> Submission -> Review and Finalize Submission -> Chapter 3 Proposal Review You can review Chapter 2 budget proposal data at leaf level at Chapter 2 Proposal Review tab. 119

Submission Review and Finalize Submission We are at LA Budget Management -> Submission -> Review and Finalize Submission -> Chapter 4 Proposal Review You can review Chapter 4 budget proposal data at leaf level at Chapter 4 Proposal Review tab. 120

Submission Review and Finalize Submission We are at LA Budget Management -> Submission -> Proposal Justifications The form at Proposal Justifications task displays total budget at the account level. You can input justifications at account level in Justifications column. This helps justifying your budget at line item level. 121

Submission Review and Finalize Submission We are at LA Budget Management -> Submission -> Submit to DOF Upon completion of your review of proposal, you should submit your budget to DOF. Choose the scenario and proposal version that you would like to submit and click on Go button. For details of workflow submission, please refer to General Features document. 122

Thank You
- Slides: 123