pcdmis version 4 2 Reporting Training Slide 1



- Slides: 154

pc-dmis version 4. 2 Reporting Training Slide 1

Topics to Discuss • Changes to the User Interface • One-Touch Reporting • Customizing a Report • Examining Standard Report Templates • Examining Standard Label Templates • Creating a Report Template • Creating a Label Template • Custom Reports • Legacy Reports Slide 2

Slide 3

Report Window is now separate from Edit Window Slide 4

Report Window Toolbar and Standard windows controls to minimize, restore and close. Starting with PC-DMIS version 4 the Report and Edit Windows are separate. Slide 5

New Menu for Reporting Version 3. 7 Slide 6 Version 4. 2

New Menu for Reporting Version 3. 7 Version 4. 2 Access to Template and Custom Report Editors Slide 7

Menu for Insert Report Command Differences in Menu: 1. Hyperview Report has been replaced by Custom Report, Template Report and Legacy Report 2. Menu list is now alphabetized for English. Slide 8 3. Menu item “Screen Capture” has been added.

Edit Window Layout Dialog Version 3. 7 Version 4. 2 Hyper-Reports can no longer be created starting with v 4! Now done in the Report Window Slide 9 Reflects that Edit Window and Report Window have been separated

Slide 10

Six Standard Reports • TEXTONLY. RTP • Text reporting with labels • Default template unless registry entry specifies another template • CADONLY. RTP • Entire report based on Cad Object with labels • Page orientation is Portrait • TEXTANDCAD. RTP • Top half Cad (Cad Object) with labels • Bottom half text (Text object) with labels Slide 11

Six Standard Reports • GRAPHICALANALYSIS. RTP • Feature information is presented in the Graphical Analysis chart • CADONLY_LANDSCAPE. RTP • Like CADONLY. RTP, the entire report based on Cad Object with labels • Page orientation is Landscape • PPAP. RTP • Production Part Approval Process report • Concise tabulated report Slide 12

Standard Reports Header 1 -Touch Reporting TEXTONLY Feature Also the default report format Slide 13 Dimension

Standard Reports 1 -Touch Reporting CAD TEXTANDCAD Text Note that labels on CAD and Text match Slide 14 # of pages is determined by format and amount of data

Standard Reports 1 -Touch Reporting CADONLY # of dimensions per page is your choice Slide 15

Standard Reports 1 -Touch Reporting GRAPHICALANALYSIS Graphs for Circularity, Cylindricity, Flatness and Straightness Slide 16

Standard Reports 1 - Touch Reporting CADONLY_LANDSCAPE CADONLY report in Landscape instead of Portrait orientation Slide 17

Standard Reports 1 -Touch Reporting PPAP Slide 18 Quickly determine acceptance or rejection

Standard Reports View. Sets are not new What is new is their effect on the Report. Slide 19

Standard Reports New page and new CAD view View. Sets allow different CAD views in the Report Slide 20

Status Window Also works in Command Mode Slide 21 Status Window shows report for current command

Slide 22

Ways to Customize a Report Right click in the text section of a report and select: 1. “Edit Object” to specify what data is to be included in the report (e. g. Features, Alignments, etc. ) 2. “Duplicate Page” to make a copy in the Report Window of the current page 3. “Add Object on Page / Section Cut Profile” to add a cut-away view of the CAD model 4. “Add Object on Page / Custom Label” to add a label to the page based on a selected label template 5. “Remove Object Modifications” to Undo modifications to an object Slide 23

Ways to Customize a Report 6. Right click on a label and select “Edit Object” to specify what data is to be included in a label 7. Right click on a label and select “Change Template” to change the formatting of that data 8. Right click on a CAD label and select “Hide Selected Labels” to make the label not visible 9. Right click on a CAD image that has hidden labels and select “Show Hidden Labels” to make the hidden labels visible 10. Double-click on a CAD image to modify the zoom and orientation of the image Slide 24

Ways to Customize a Report 11. Double-click on a CAD label to reposition the label 12. Right click on a CAD image and select “Edit Object” to access the Label Layout Wizard 13. Right click the Graphical. Analysis object and change its properties 14. Double click Graphical. Analysis object and change zoom and orientation 15. File | Reporting | Clear Template Associated Data Slide 25

Customizing a Generated Report Clear Template Associated Data – – Slide 26 Removes all report customizing used in the current part program with the current selected report template Does not affect other part programs that use this report template.

What Template is Used? New part program (order of precedence): 1. The report template specified as the default report template in the registry, File. Man | Default. Report. Template If registry entry does not exist, it returns TEXTONLY. RTP. 2. default. rtp, if it can be found, 3. default. rtp, which PC-DMIS creates. Slide 27

What Template is Used? Existing part program (order of precedence): 1. the default report template for this part program, if one has been established by clicking the "Set as Default Template" button, 2. the report template specified as the default report template in the registry. The default value is TEXTONLY. RTP, 3. default. rtp, if it can be found, 4. default. rtp, which PC-DMIS creates. Slide 28

Slide 29

Report Window PC-DMIS includes template name / path in the Report Window Title Bar Slide 30

Report Window Toolbar Save Layout Set Report as Default Redraw the Report Template Selection Dialog Slide 31 Print the Report Custom Report Selection Dialog Report Magnificatio n Full Report Mode Last Execution Report Mode Saved Custom Reports Saved Report Templates including 6 standard report templates

Template Selection Dialog When you click on the Template Selection Dialog icon you get a list of Report Templates Slide 32

Template Selection Dialog Click to add your report template to this list Slide 33 Remove from List Close Dialog

Template Selection Dialog Image preview directly from template unless specified by user Slide 34 Click on template then click Open to use this template in the Report Window

Change Previews Can change preview for report and label templates Slide 35

Change Previews Slide 36 Any. bmp or. jpg file can be used. Make proportions about 1: 1

New PC-DMIS Font • • • New font Loaded with PC-DMIS Provides GD&T symbols ����� ⌡��� Slide 37

Slide 38

Examining Standard Templates y l n t. O Tex Slide 39

Examining Standard Templates Font TEXTONLY. RTP in the Report Template editor Object Docked Toolbars Layout Slide 40 Properties for selected object Docked Property Sheet

Examining Standard Templates Toolbars and Property Sheet can also float (i. e. be undocked) Slide 41 Just “Grab & Drag”

Examining Standard Templates Text. Report. Object The Rule Tree specifies what data is to be presented and in what format Cad. Report. Object Label Slide 42 Three objects present data and have a Rule Tree

Examining Standard Templates Group Toggle Ruler Toggle Grid Property Sheet View Snap Points Align Center Zoom in Ungroup Zoom 1: 1 To Front / Back Align Edges Zoom Out Regroup Undo Space Make Same Size Layout Bar – some have menus Slide 43 Redo

Examining Standard Templates Click Rules Slide 44 TEXTONLY. RPT in the Report Template editor

Examining Standard Templates When to Report Data Rules exist if BOLD Data format Report Expression Language Slide 45 Rule for Dimension Location We will talk more about Rules and the Rule Tree Editor later

Standard Report Templates • Questions: 1. What happens if I delete a report template that I have set as my default for a part program? – If the report template is not found, “default. rtp” is used. If it is not found, PC-DMIS creates it. It is a Text. Report. Object with no rules. 2. What happens if I modify my report template? – Whenever you click the Redraw button in the Report Window, or when you run the part program, PC-DMIS will notice that the report template has been updated and will use that updated report template. – This is a VERY handy feature! Slide 46

Examining Standard Templates Several text objects Text. Report. Object with rules Slide 47 PPAP. RTP in the Report Template editor

Examining Standard Templates Label Layout CADReport. Object with rules Slide 48 CADOnly. RTP in the Report Template editor

Examining Standard Templates # of Labels per page and Layout Style Leader Lines point to Measured or Nominal? 2 leader lines? Feature centroid? Color ball on leader line? Border? Auto-Zoom CAD image? Slide 49 CADonly. RTP / click on Labels Layout in Property Sheet

Slide 50

Standard Label Templates • 33 Current Standard Label Templates • File_Header. lbl • Reference_ID. lbl • Legacy_Dimension_CAD. lbl Slide 51

Standard Label Templates • FCF_Label. lbl • Line 1. lbl Slide 52

Standard Label Templates • Line 2. lbl • Line 3. lbl Slide 53

Standard Label Templates • Line 1, Line 2 and Line 3 refer to lines or rows in the Feature Control Frame Table • Line 2 is the FCF primary dimension • In some cases, e. g. True Position of a Circle, Line 1 presents the size information • Line 3 is for a secondary tolerance type or a secondary dimension Slide 54

Label Templates How to view / edit a label template Slide 55

Label Templates File header template in Label Template Editor Slide 56

Label Templates Double click in label to put in Edit mode Click to select a single cell Right click same cell to bring up Grid Properties dialog Cell expression s l Cel rtie e p pro Slide 57

Label Templates How to change the File header label bitmap itm b Ch ap ge n a Templates are installed with the Read-only attribute set Slide 58 Click Select and browse to new image. Save or Save As to rename.

Label Templates Line 1_Size. lbl Here is the Property Page for Row 3. Notice that the Repeating Group checkbox is checked. Slide 59 COUNT(LINE 1_ FEATNAME) # of times to repeat row.

Slide 60

Creating a Report Template Open the Report Template Editor for a new Template Slide 61 1

Creating a Report Template Report Properties Portrait or Landscape 2 Slide 62 Other Page Size options depend on installed printer drivers; such as, A 3, A 4, A 5, B 4, B 5

Creating a Report Template Section Properties Section Height and Width 3 Slide 63 Section Name

Creating a Report Template 4 Slide 64 Click the Text icon, drop onto the editor. Right mouse or click Property icon to get the Property Page Note: always in Edit mode. Can’t put it in Run mode.

New Item in Report Template Editor Section Cut Profile New in v 4. 2 Slide 65

Creating a Report Template Properties for: • Font • Colors • Alignment • Size • Location • Orientation • Text 5 Slide 66

Creating a Report Template Add a bitmap Modify properties 6 Slide 67

Creating a Report Template Not e of “ corre Sho la w” tion item s 7 Add a Text. Report. Object Slide 68

Creating a Report Template Rules allow you to define how your data will be presented Click Text. Report. Object 8 Slide 69

Creating a Report Template 3 1 Click to specify when rules apply 2 Slide 70 Specify the rules

Creating a Report Template Set the condition when rule will apply What label or labels do you want to use? You can have many labels. Slide 71 What additional text or text expression should be included in the report? After you select a label template, you can change the table format

Exporting / Importing Rules Slide 72

Copy / Paste Rules Does not use System Copy buffer / e. g. can’t paste into Note. Pad Slide 73

Creating a Report Template • User Assigned Properties: – The ability to create a template now but have the user specify supplemental data later user later But When? • • Slide 74 Prompt when the user selects template – In the Template Selection Dialog, when the user selects Open, the user is prompted for this information – Select this for data specific to a part type but does not change with each part that is measured Prompt when executing report – Each time the part program is run, the user is prompted for this data – Select this for data specific to the individual part; such as, some type of part identification – Select this for ancillary information about the run; such as, operator name, CMM ID, etc.

Creating a Report Template Click checkbox. Specify when user will be prompted. Slide 75

Creating a Report Template Note prompt Prompted once when template selected, unless user chooses to clear template associated data Prompted each time the report is executed Slide 76

Creating a Report Template Prompt at execution Entered in Property Sheet Operator enters name at [Put Name Here]. Slide 77 Name appears in report in Text Object.

Creating a Report Template Can I modify the Yes, in the Editor. order of the User Assigned No, at execution. Properties List? Slide 78 Note: I’m in the Report Template Editor with the template open.

Creating a Report Template Move down Delete 2 lists to modify: 1. When template selected 2. When report executed Move up Slide 79

Creating a Report Template • Sections • Ability to divide a report into sub-reports • Each sub-report acts as if it has its own separate report template • Sections print out in the order that they are defined • Data is made available to all sections based on two properties: • Command Set • Maximum Number of Pages • Rules determine if section displays the data Slide 80

Creating a Report Template • Sections • Possible Report Outline: • Cover sheet • Title page • Summary Report • Detailed data section Slide 81

Creating a Report Template Section properties Properties that control data selection Right click to add a section Section name Multi-section report Slide 82

New Section Properties All Commands - The setting will process the entire command set in the current section (Page tab). This is the default value. Continue from Previous Section - This setting continues to process the command set from the previous section, continuing where the Defines the Maximum Number of Pages that will use the design of the current last section stop processing. Page tab in the report. Same as Previous Section - This setting will cause the section For example, if you set this value to 2, but you have easily enough dimensions in (Page tab) to take exactly the same command set as the previous section. your part program to fill five pages, the section will not process commands once The head section and all subsequent sections with this setting will form a the number of pages for that section reaches the specified maximum of two mini-group. All subsequent sections in the mini group will create one page with the head pages. The current process command will need a newly created section (Page tab) in order to display additional information. The default value of 0 means there is no maximum and so all pages will be Slide 83 displayed.

Example 1 of "Command Set" & "Maximum Number of Pages" In the following examples suppose that your report template has four sections named A, B, C, and D and that each contains a Text. Report. Object. Additionally, suppose that your part program has enough dimensions to display three pages of dimensions per section. Section Max. # of Pages Command Set A 0 All Commands B 0 All Commands C 0 All Commands D 0 All Commands PC-DMIS would display the pages in the final report like this: A 1, A 2, A 3, B 1, B 2, B 3, C 1, C 2, C 3, D 1, D 2, D 3 Slide 84

Example 2 of "Command Set" & "Maximum Number of Pages" In the following examples suppose that your report template has four sections named A, B, C, and D and that each contains a Text. Report. Object. Additionally, suppose that your part program has enough dimensions to display three pages of dimensions per section. Section Max. # of Pages Command Set A 1 All Commands B 0 All Commands C 0 All Commands D 1 All Commands PC-DMIS would display the pages in the final report like this: A 1, B 2, B 3, C 1, C 3, D 1 Slide 85

Example 3 of "Command Set" & "Maximum Number of Pages" In the following examples suppose that your report template has four sections named A, B, C, and D and that each contains a Text. Report. Object. Additionally, suppose that your part program has enough dimensions to display three pages of dimensions per section. Section Max. # of Pages Command Set A 1 All Commands B 0 All Commands C 0 Same as Previous Section D 1 All Commands PC-DMIS would display the pages in the final report like this: A 1, B 1, C 1, B 2, C 2, B 3, C 3, D 1 Slide 86

Example 4 of "Command Set" & "Maximum Number of Pages" In the following examples suppose that your report template has four sections named A, B, C, and D and that each contains a Text. Report. Object. Additionally, suppose that your part program has enough dimensions to display three pages of dimensions per section. Section Max. # of Pages Command Set A 1 All Commands B 0 Continue From Previous Section C 0 Same as Previous Section D 1 All Commands PC-DMIS would display the pages in the final report like this: Slide 87 A 1, B 2, C 2, B 3, C 3, D 1

Slide 88

Label Templates Object Toolbar • Similar to Report Template Editor Object Toolbar, except: – – No Cad. Report. Object No Label Object No Text. Report. Object No Leaderline • But it does include: – – Slide 89 Command. Text. Object Analysis. Object Chart. Object CADImage. Object Command. Text. Object Chart. Object Analysis. Object

Label Templates There about 100 pixels per inch. Therefore, a width of 200 is about 2 inches. This is also true in the Report Template Editor. Slide 90 Resize

Example Label Templates Text Object 1 with Shadow. Style property Command. Text. Object Text Object 2 Slide 91

Label Templates Grid Control Another Example Label Slide 92 Set size, # of columns and rows, table format

Creating a Report Template Legacy_Dimension. lbl in Edit Mode Formulas are used to define what data is to be displayed in each cell Slide 93

Creating a Report Template Could be multiple cells, entire row or entire column Note the Property Page for this cell at Row 1, Column 2. You put the formula in the Cell Expression area. There are many properties here to allow you to tailor each cell Slide 94

Label Templates Legacy_Dimension. lbl is a Grid Control Slide 95 Merge multiple cells as one

Creating a Report Template A cell can contain text (including an expression), an image or an Active. X control. Slide 96

Label Templates This equation determines how many times to repeat this row Slide 97

Label Templates Rule for Dimension Location is: USE TEMPLATE "legacy_dimension. lbl" 3 Rows Point Sphere 4 Rows 5 Rows Slide 98 Cone Same Label Template

Label Templates List Tab based le s elec on ted Slide 99

Slide 100

Rule Tree Editor Main categories of Rules Slide 101

Rule Tree Editor Specify to what the label shall apply. Here Features are highlighted. Slide 102 Click Add to add rule

Rule uses Label Template Already filled in for you. This rule applies to all Features Check here Enter Label Template file name Slide 103 Which rows & columns of this label template should be displayed … or browse For the label template

Rule Uses Text Expression Check here Message goes to the report for each feature IF Command Type = Features Then DISPLAY TEXT EXPRESSION “Message for features" Slide 104

Create a Report Template Conditionally outputting text Conditionally Using a Label Only if the reference command for Dimension Circularity has more than 5 hits will the text or label be output to the Report Slide 105 {1} = Reference Command #1

Create a Report Template Both rules added to the Rule Tree Slide 106 Reference Command has more than 5 hits

What if Rules Conflict? All apply? None? Which one? Rule Here Child overrules Parent ! What if there was a rule here? Slide 107

Rules about Rules Rule Tree Rules Slide 108 • Can have multiple rules per command • Can be applied unconditionally or conditionally • A rule can put out text directly or provide information based on the format of a label template • Can use conditional expressions using the Reporting Expression Language • Can use a text expression using the Reporting Expression Language • You can specify an initial grid format (label template) • You can specify order that the rules are applied • Parent node rule applies to a child node only if the child node has no rule

Slide 109

Report Expression Language • See the Help File • Table of Contents • PC-DMIS 4 Core Help File • Reporting Measurement Results • Creating Custom Reports • About Report Expressions • See the Edit Window • Pop-up can provide data type name used in report expressions • Report Expression Language can also be used in properties Slide 110

Report Expression Language From Help: THEO_X Slide 111

Typical Report Language Expressions =ID - This displays the feature or dimension ID. =DIM_MEASURED: N - This displays a dimension's measured value. What is “N”? =UNIT_TYPE - This displays the unit of measurement for the feature or dimension. =LOADSTR - This loads a string from a table of stored strings within PCDMIS. =AXIS: N - This displays the current axis name (XAXIS, YAXIS, or ZAXIS). The “N” =NOMINAL: N - This displays the nominal data for a feature. expression evaluates =F_PLUS_TOL: N - This displays a feature's plus tolerance. to the current =F_MINUS_TOL: N - This displays a feature's minus tolerance. iteration value of a =DIM_OUTTOL: N - This displays the out of tolerance value for a repeating row or dimension. column. =DIM_MAX: N - This displays the maximum possible in-tolerance upper value for a dimension. =DIM_MIN: N - This displays the minimum possible in-tolerance lower value for a dimension. Slide 112

Report Expression Language Legacy_Dimension. lbl =TOL(AXIS: N, DIM_OUTTOL: N, 0. 0) =LOADSTR(-572) =GDT_SYMBOL Slide 113 [loads string from resources]

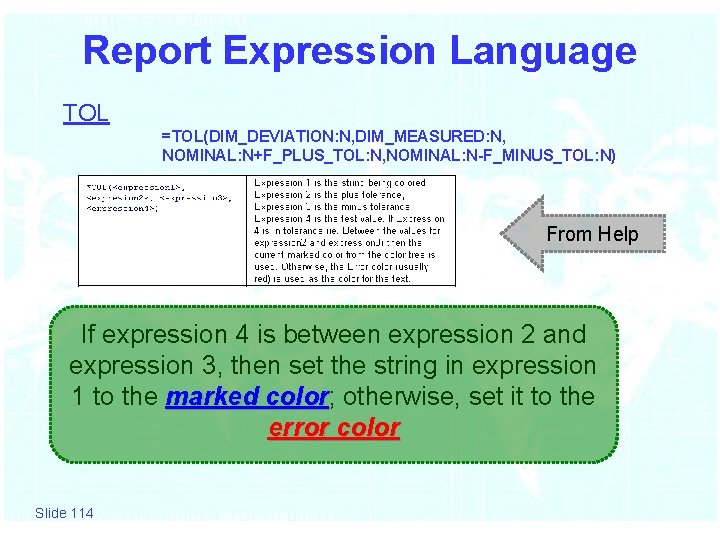
Report Expression Language TOL =TOL(DIM_DEVIATION: N, DIM_MEASURED: N, NOMINAL: N+F_PLUS_TOL: N, NOMINAL: N-F_MINUS_TOL: N) From Help If expression 4 is between expression 2 and expression 3, then set the string in expression 1 to the marked color; otherwise, set it to the color error color Slide 114

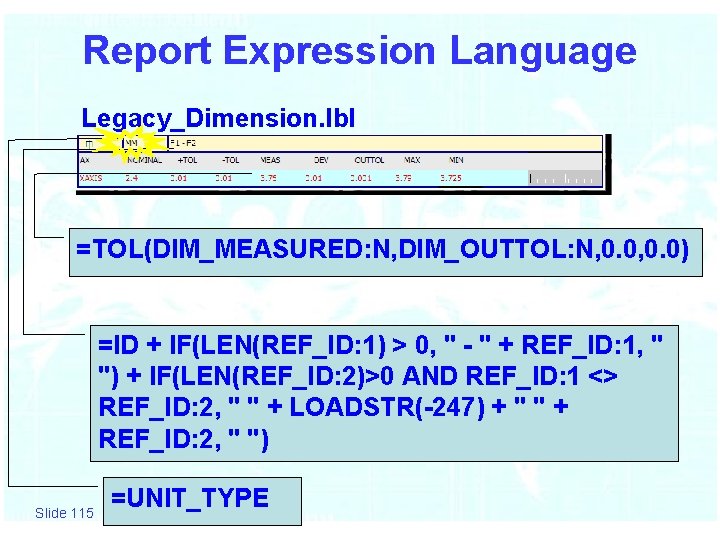
Report Expression Language Legacy_Dimension. lbl =TOL(DIM_MEASURED: N, DIM_OUTTOL: N, 0. 0) =ID + IF(LEN(REF_ID: 1) > 0, " - " + REF_ID: 1, " ") + IF(LEN(REF_ID: 2)>0 AND REF_ID: 1 <> REF_ID: 2, " " + LOADSTR(-247) + " " + REF_ID: 2, " ") Slide 115 =UNIT_TYPE

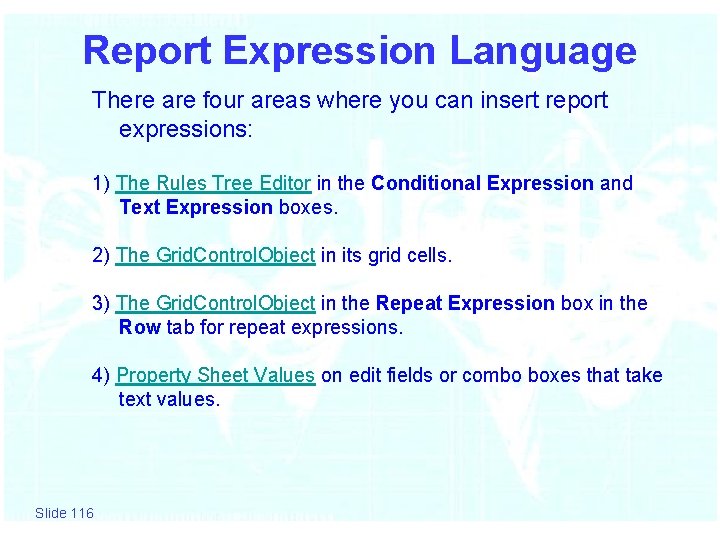
Report Expression Language There are four areas where you can insert report expressions: 1) The Rules Tree Editor in the Conditional Expression and Text Expression boxes. 2) The Grid. Control. Object in its grid cells. 3) The Grid. Control. Object in the Repeat Expression box in the Row tab for repeat expressions. 4) Property Sheet Values on edit fields or combo boxes that take text values. Slide 116

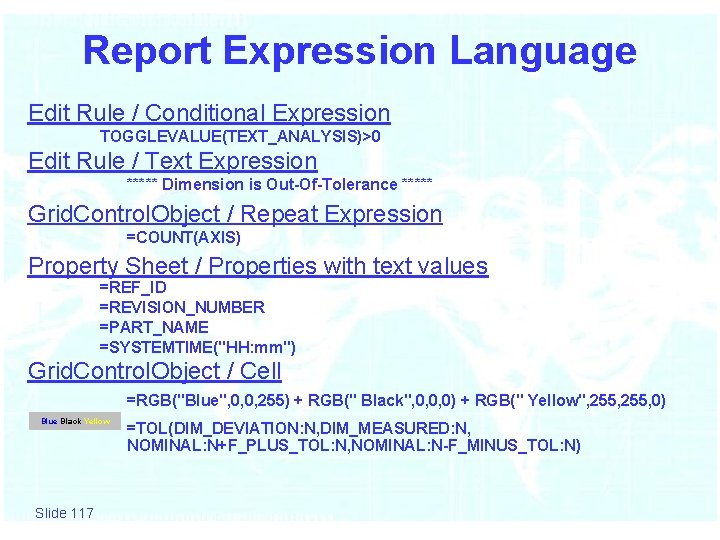
Report Expression Language Edit Rule / Conditional Expression TOGGLEVALUE(TEXT_ANALYSIS)>0 Edit Rule / Text Expression ***** Dimension is Out-Of-Tolerance ***** Grid. Control. Object / Repeat Expression =COUNT(AXIS) Property Sheet / Properties with text values =REF_ID =REVISION_NUMBER =PART_NAME =SYSTEMTIME("HH: mm") Grid. Control. Object / Cell =RGB("Blue", 0, 0, 255) + RGB(" Black", 0, 0, 0) + RGB(" Yellow", 255, 0) Blue Black Yellow Slide 117 =TOL(DIM_DEVIATION: N, DIM_MEASURED: N, NOMINAL: N+F_PLUS_TOL: N, NOMINAL: N-F_MINUS_TOL: N)

Active. X Controls • Can be added: • Directly to a Label Template • To a cell of a Grid Control • Directly to a Report Template • 6 Active. X controls ship with PC-DMIS • If used to reflect an individual dimension, use in a Label Template • Active. X controls have 2 sets of properties • Properties common to all Active. X controls • e. g. This. Left • Properties unique to a control (. X) • e. g. This. X. Event. Report. Data Slide 118

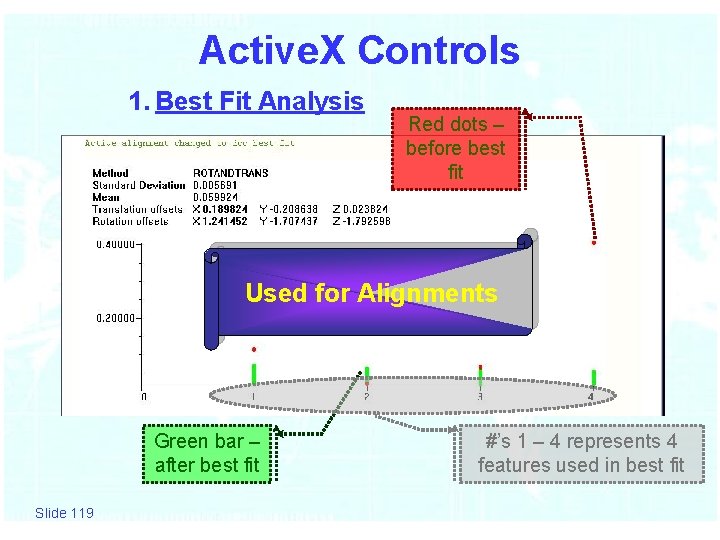
Active. X Controls 1. Best Fit Analysis Red dots – before best fit Used for Alignments Green bar – after best fit Slide 119 #’s 1 – 4 represents 4 features used in best fit

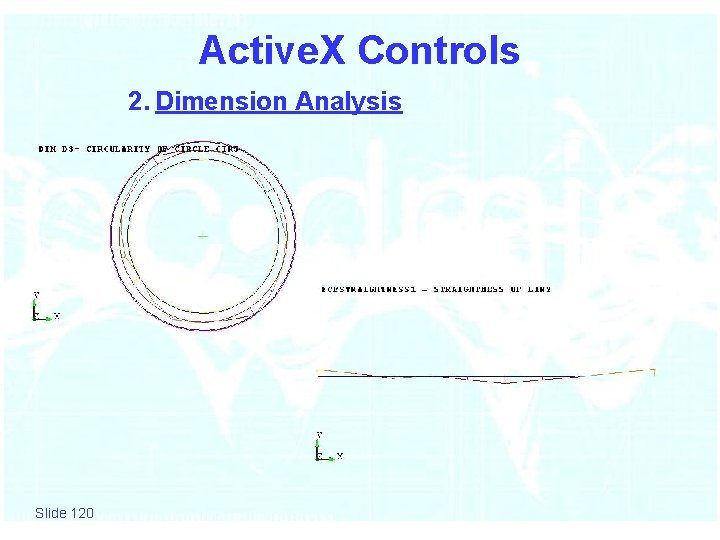
Active. X Controls 2. Dimension Analysis Slide 120

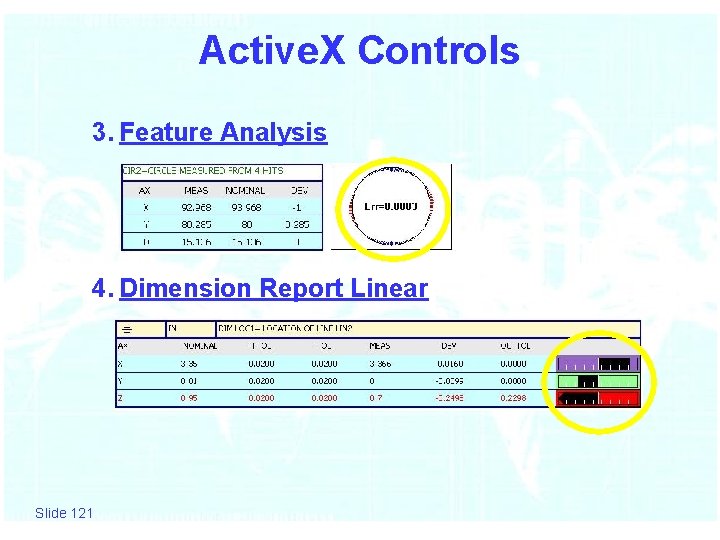
Active. X Controls 3. Feature Analysis 4. Dimension Report Linear Slide 121

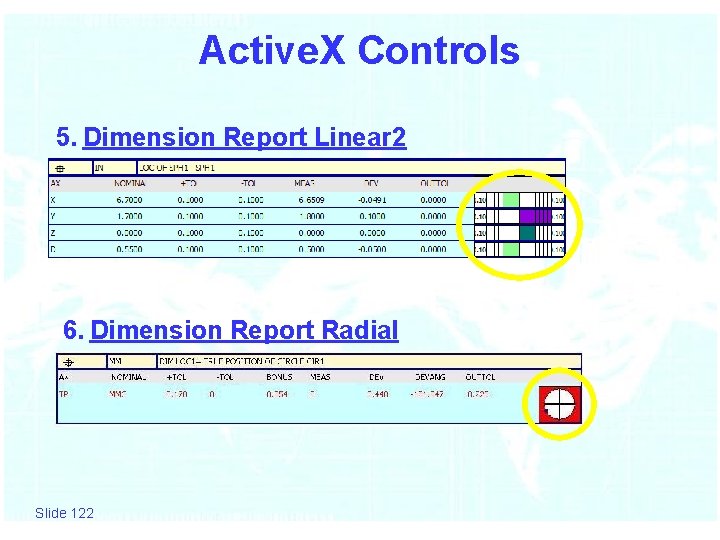
Active. X Controls 5. Dimension Report Linear 2 6. Dimension Report Radial Slide 122

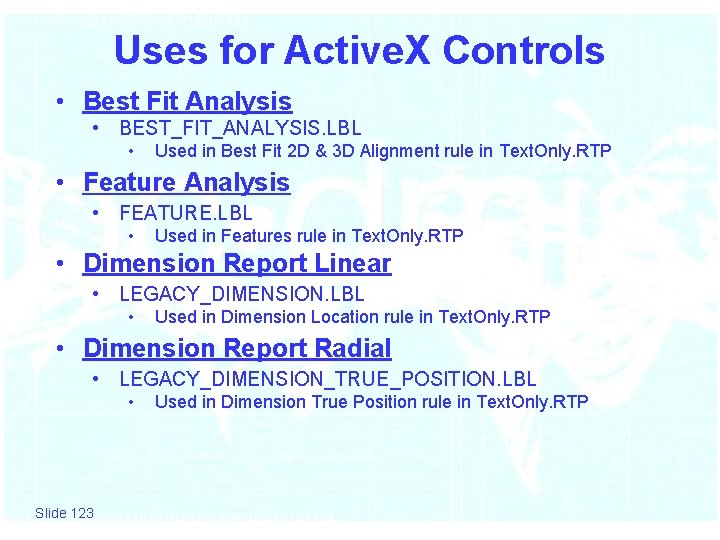
Uses for Active. X Controls • Best Fit Analysis • BEST_FIT_ANALYSIS. LBL • Used in Best Fit 2 D & 3 D Alignment rule in Text. Only. RTP • Feature Analysis • FEATURE. LBL • Used in Features rule in Text. Only. RTP • Dimension Report Linear • LEGACY_DIMENSION. LBL • Used in Dimension Location rule in Text. Only. RTP • Dimension Report Radial • LEGACY_DIMENSION_TRUE_POSITION. LBL • Slide 123 Used in Dimension True Position rule in Text. Only. RTP

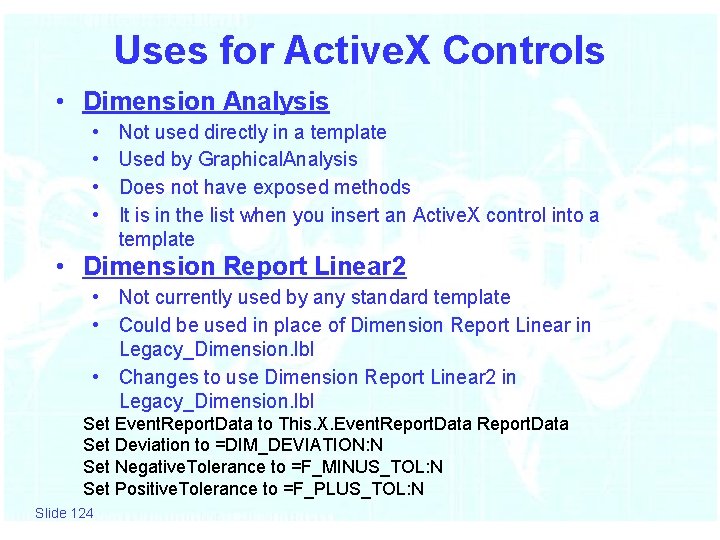
Uses for Active. X Controls • Dimension Analysis • • Not used directly in a template Used by Graphical. Analysis Does not have exposed methods It is in the list when you insert an Active. X control into a template • Dimension Report Linear 2 • Not currently used by any standard template • Could be used in place of Dimension Report Linear in Legacy_Dimension. lbl • Changes to use Dimension Report Linear 2 in Legacy_Dimension. lbl Set Event. Report. Data to This. X. Event. Report. Data Set Deviation to =DIM_DEVIATION: N Set Negative. Tolerance to =F_MINUS_TOL: N Set Positive. Tolerance to =F_PLUS_TOL: N Slide 124

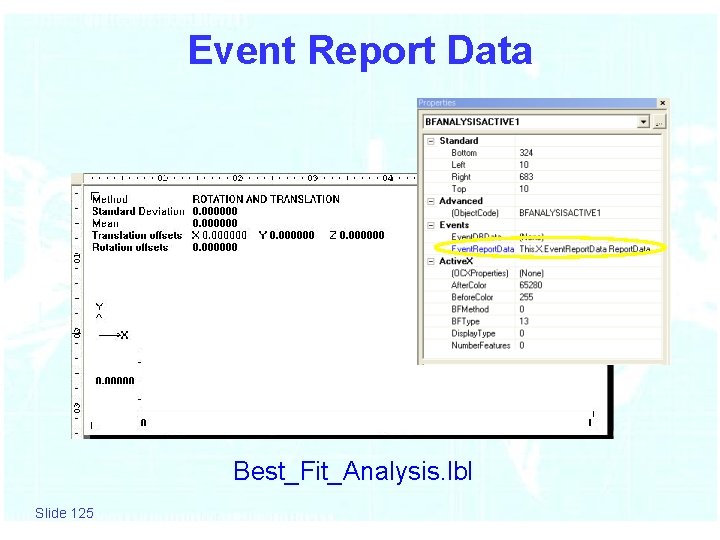
Event Report Data Best_Fit_Analysis. lbl Slide 125

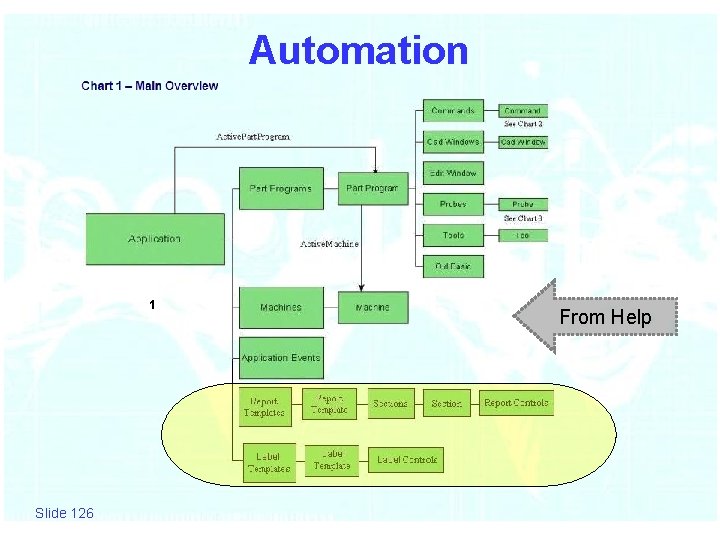
Automation 1 Slide 126 From Help

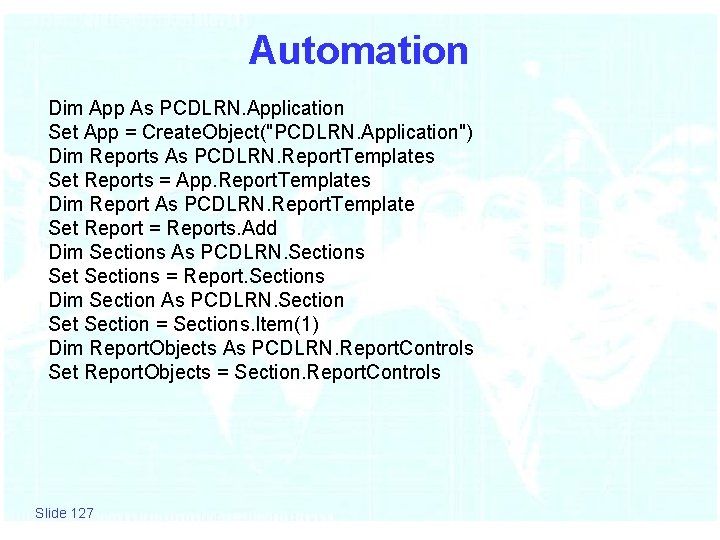
Automation Dim App As PCDLRN. Application Set App = Create. Object("PCDLRN. Application") Dim Reports As PCDLRN. Report. Templates Set Reports = App. Report. Templates Dim Report As PCDLRN. Report. Template Set Report = Reports. Add Dim Sections As PCDLRN. Sections Set Sections = Report. Sections Dim Section As PCDLRN. Section Set Section = Sections. Item(1) Dim Report. Objects As PCDLRN. Report. Controls Set Report. Objects = Section. Report. Controls Slide 127

Slide 128

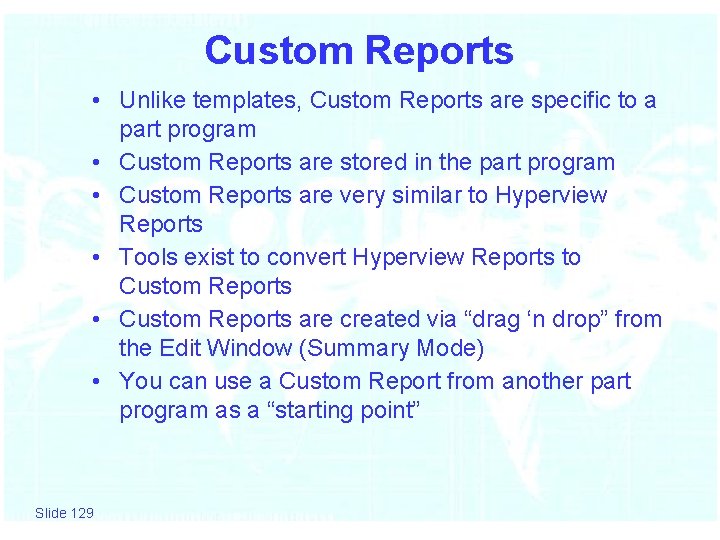
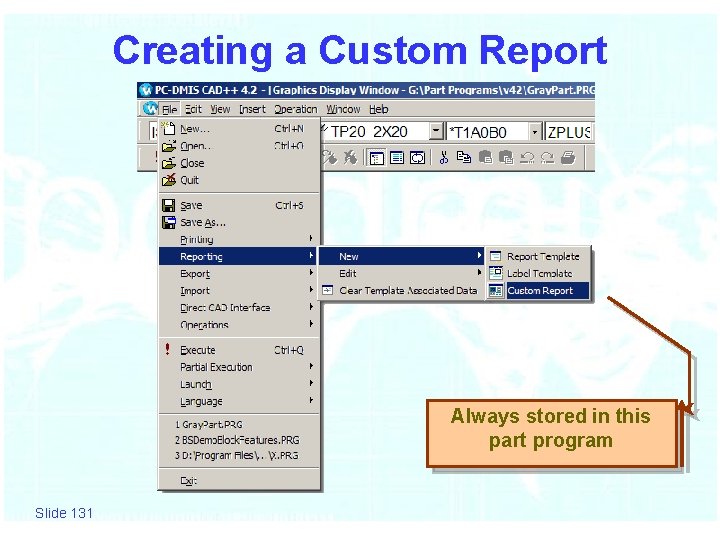
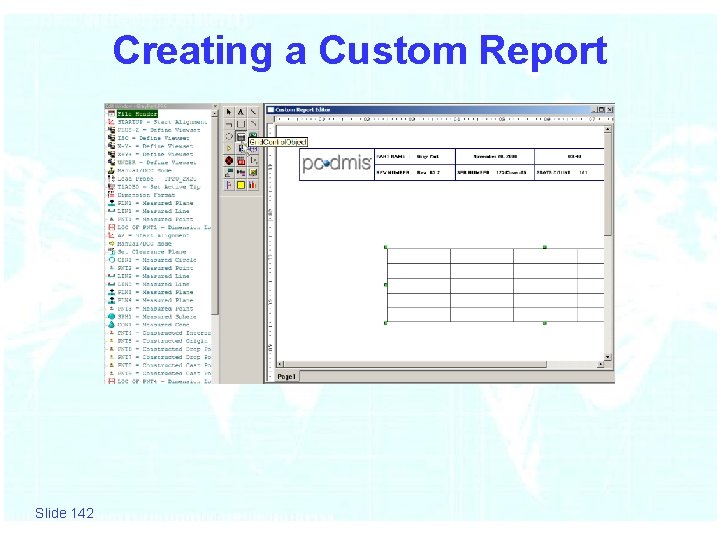
Custom Reports • Unlike templates, Custom Reports are specific to a part program • Custom Reports are stored in the part program • Custom Reports are very similar to Hyperview Reports • Tools exist to convert Hyperview Reports to Custom Reports • Custom Reports are created via “drag ‘n drop” from the Edit Window (Summary Mode) • You can use a Custom Report from another part program as a “starting point” Slide 129

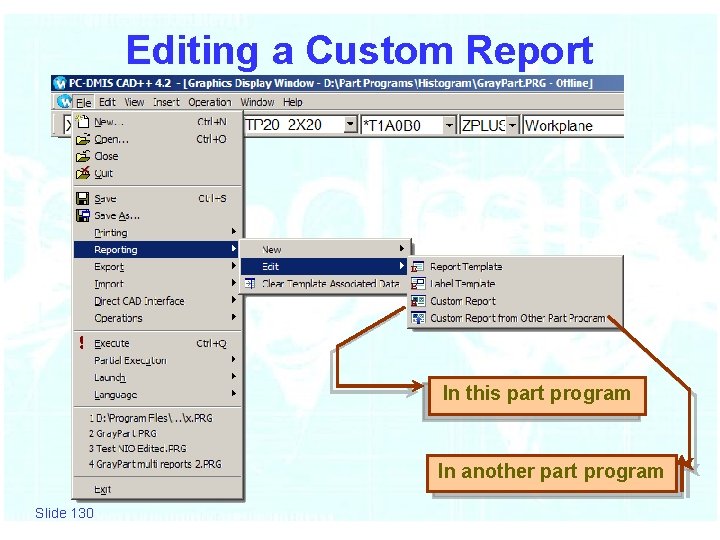
Editing a Custom Report In this part program In another part program Slide 130

Creating a Custom Report Always stored in this part program Slide 131

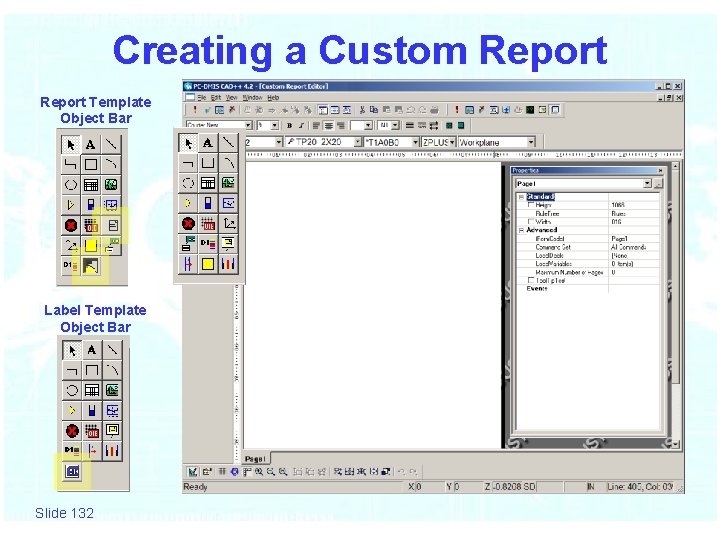
Creating a Custom Report Template Object Bar Label Template Object Bar Slide 132

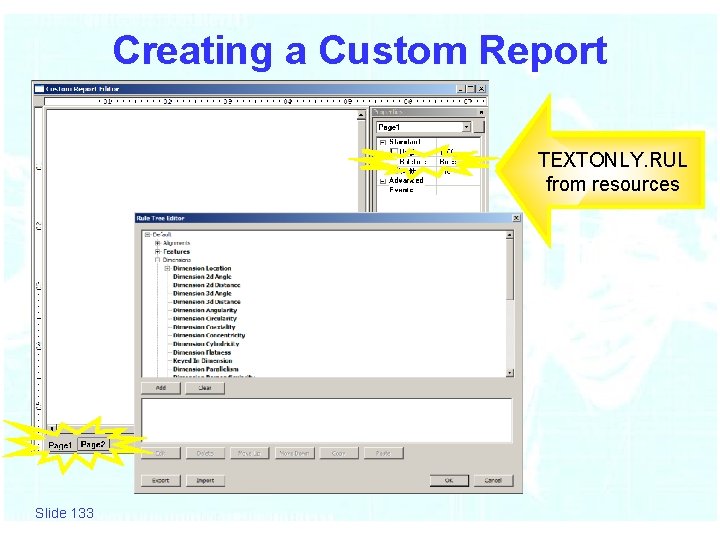
Creating a Custom Report Each Page has its TEXTONLY. RUL own Rule Tree from resources Slide 133

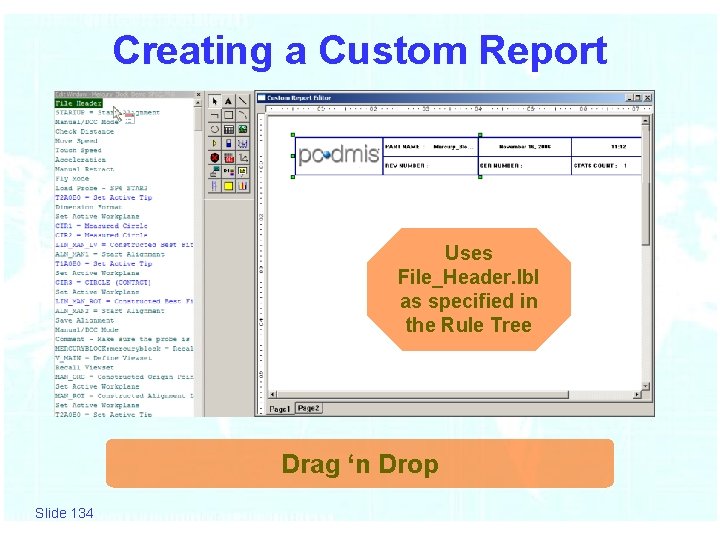
Creating a Custom Report Uses File_Header. lbl as specified in the Rule Tree Drag ‘n Drop Slide 134

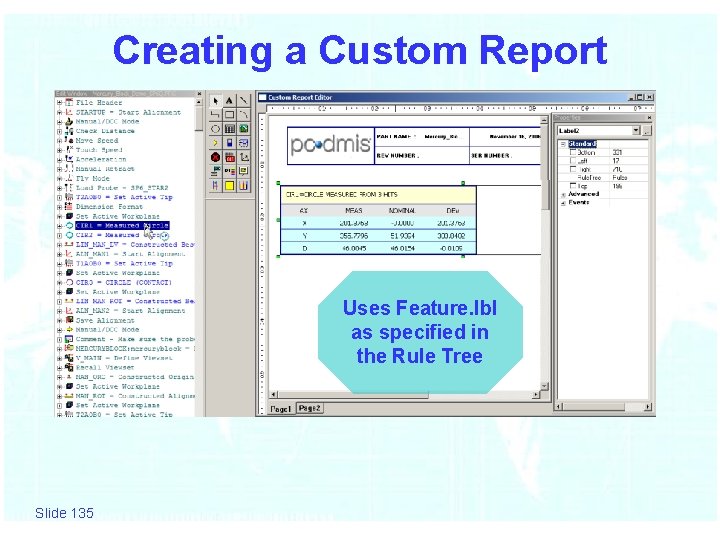
Creating a Custom Report Uses Feature. lbl as specified in the Rule Tree Slide 135

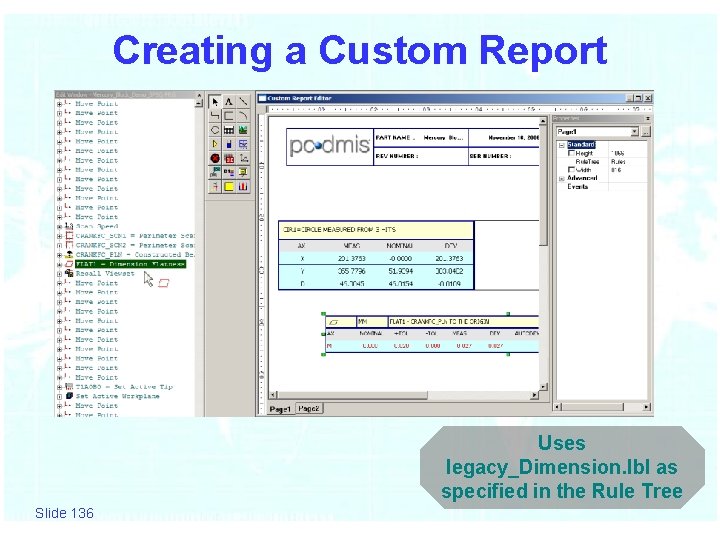
Creating a Custom Report Uses legacy_Dimension. lbl as specified in the Rule Tree Slide 136

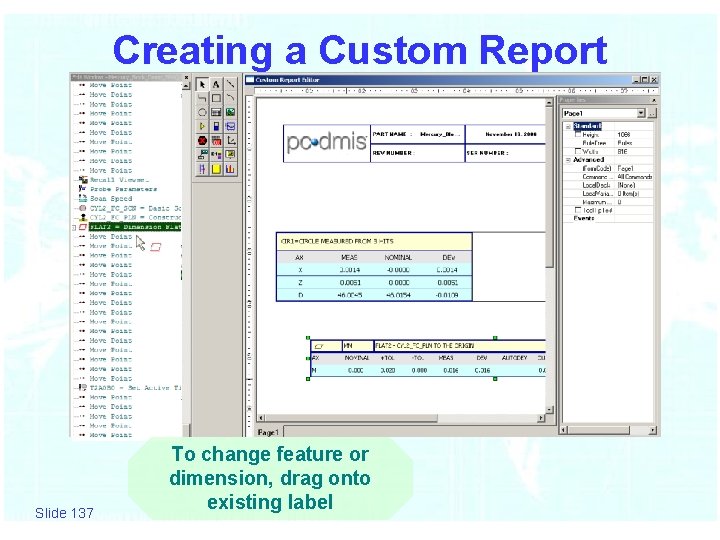
Creating a Custom Report Slide 137 To change feature or dimension, drag onto existing label

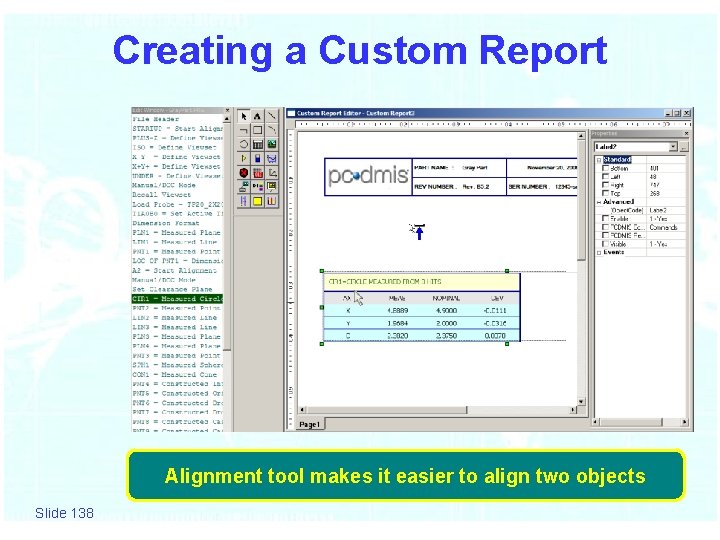
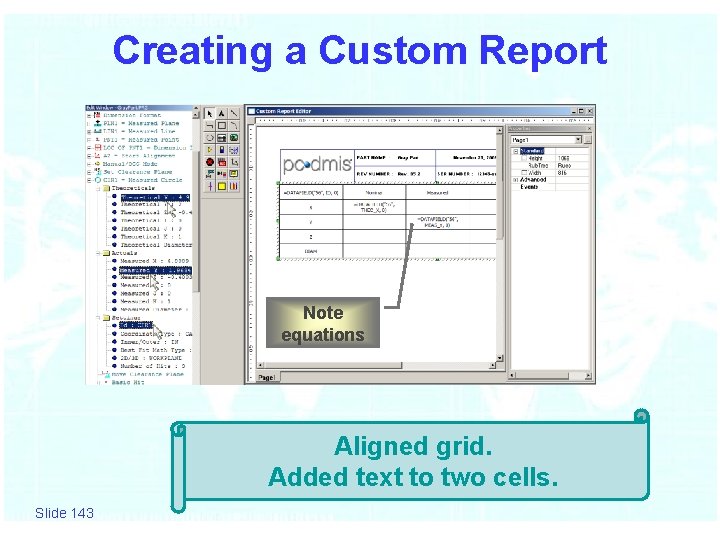
Creating a Custom Report Alignment tool makes it easier to align two objects Slide 138

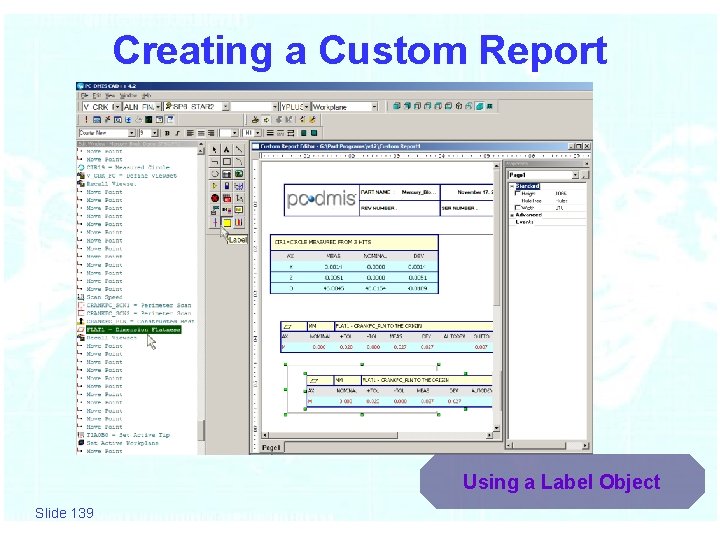
Creating a Custom Report Using a Label Object Slide 139

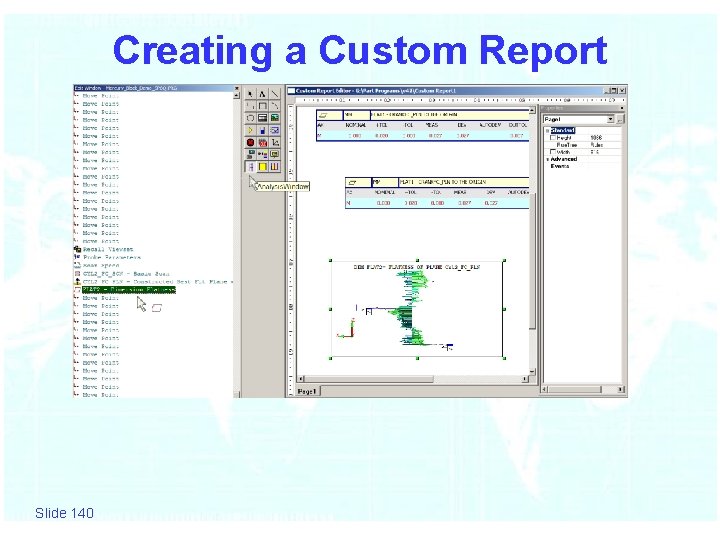
Creating a Custom Report Slide 140

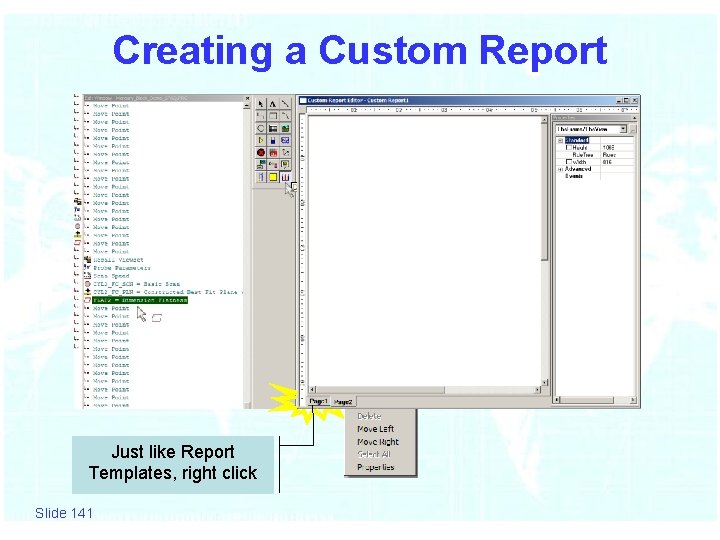
Creating a Custom Report Just like Report Templates, right click Slide 141

Creating a Custom Report Slide 142

Creating a Custom Report Note equations Aligned grid. Added text to two cells. Slide 143

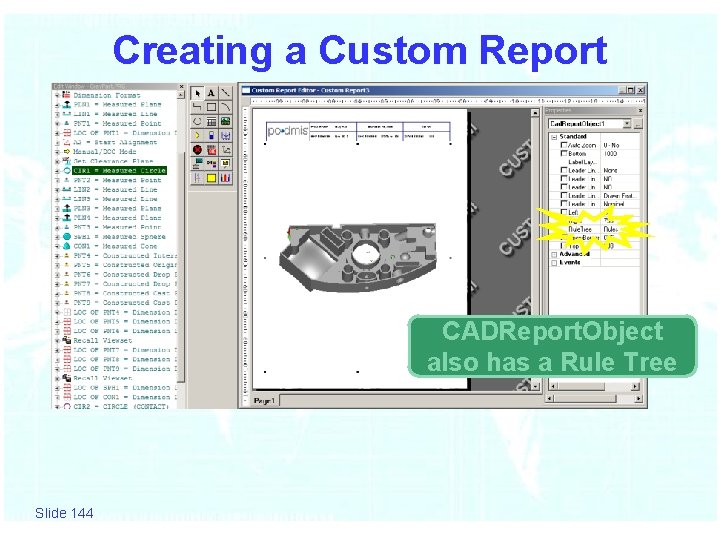
Creating a Custom Report CADReport. Object also has a Rule Tree Slide 144

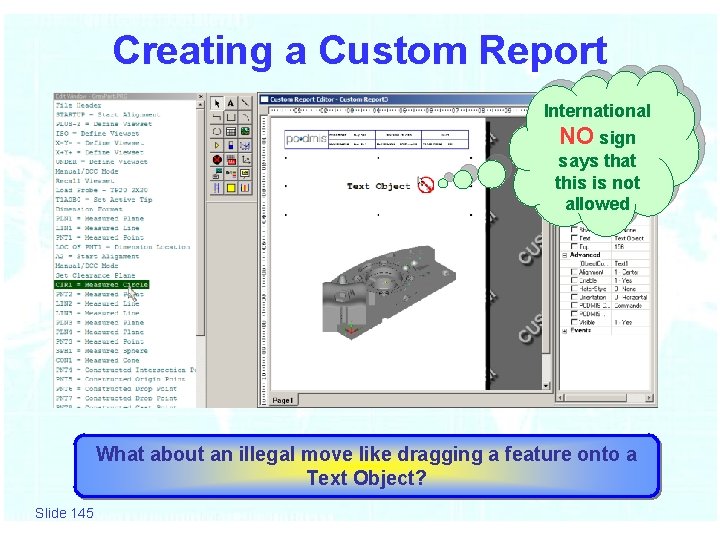
Creating a Custom Report International NO sign says that this is not allowed What about an illegal move like dragging a feature onto a Text Object? Slide 145

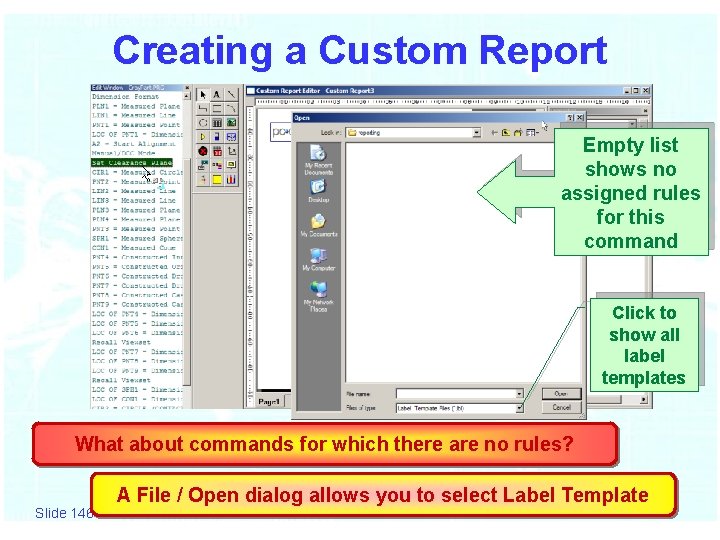
Creating a Custom Report Empty list shows no assigned rules for this command Click to show all label templates What about commands for which there are no rules? Slide 146 A File / Open dialog allows you to select Label Template

Rules About Rules • Like Templates, Custom Reports use a Rule Tree to determine what Label Templates should be used in your report. • A default set of rules is automatically included, so you only need to change the default rules if you want your data formatted differently. • A blank custom report defaults to Text. Only. RUL in the root directory • CADReport. Object uses CAD. RUL in the root directory • Label Object is only a container and does not have a rule tree. You will be prompted for a Label Template Slide 147

Extra Drag ‘n Drop Features While performing the drop of a command (such as a feature or dimension), if you hold down the SHIFT or CTRL keys and you release the button, PCDMIS does the following: • SHIFT key - PC-DMIS will insert a Command. Text. Object for that item. • CTRL key - PC-DMIS will display an Open dialog box allowing you to select a different label template for the item. Slide 148

Slide 149

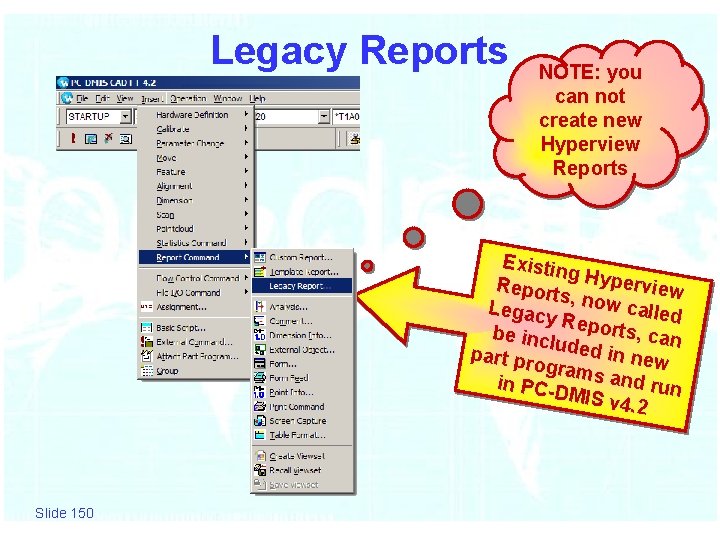
Legacy Reports NOTE: you can not create new Hyperview Reports Existin g Hype r Repor ts, now view c Legac y Repo alled rts, ca be inc n l part pr uded in new ogram s and in PCrun DMIS v 4. 2 Slide 150

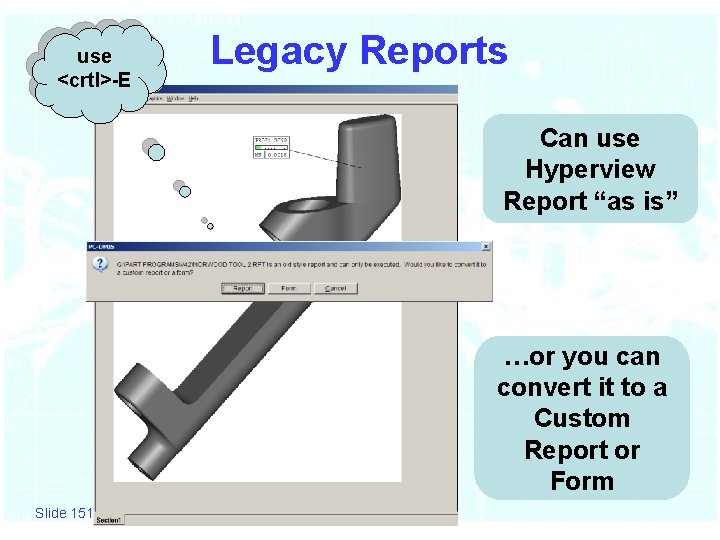
use <crtl>-E Legacy Reports Can use Hyperview Report “as is” …or you can convert it to a Custom Report or Form Slide 151

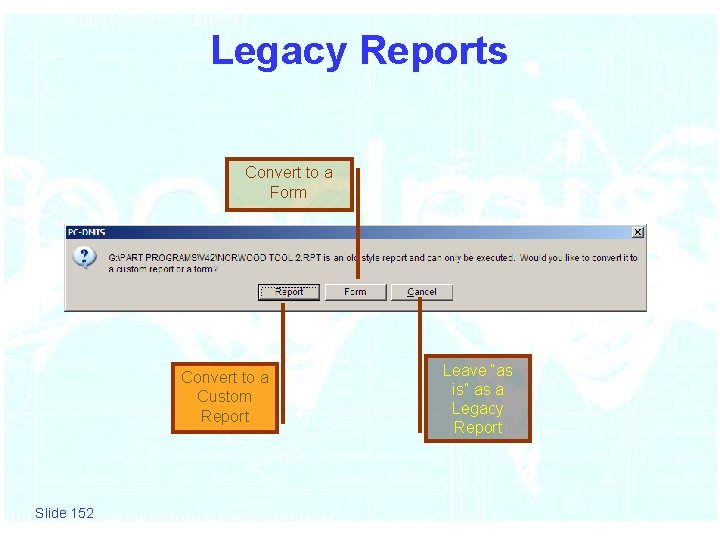
Legacy Reports Convert to a Form Convert to a Custom Report Slide 152 Leave “as is” as a Legacy Report

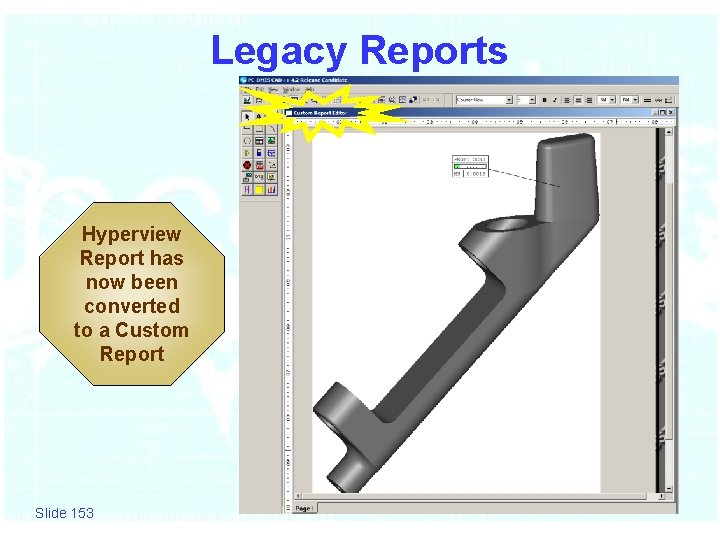
Legacy Reports Hyperview Report has now been converted to a Custom Report Slide 153

Questions? Slide 154