P 15665 GLEASON GEAR JAW METRICS SYSTEM DESIGN



- Slides: 45

P 15665 GLEASON GEAR JAW METRICS SYSTEM DESIGN REVIEW 10/2/14 KATIE BALDWIN JOSH SMITH DOUG PERRY EVAN MOLONY

THE TEAM MEMBER ROLE Katie Baldwin IE/Team Leader Josh Smith ME/Budget & Supplies Doug Perry ME/Edge Evan Molony ME/Customer Liaison

AGENDA ➢Project Summary Review ➢Engineering Requirements ➢Functional Decomposition ➢Systems Architecture ➢Concept Options ➢Concept Selection ➢Risk Analysis ➢Project Plan

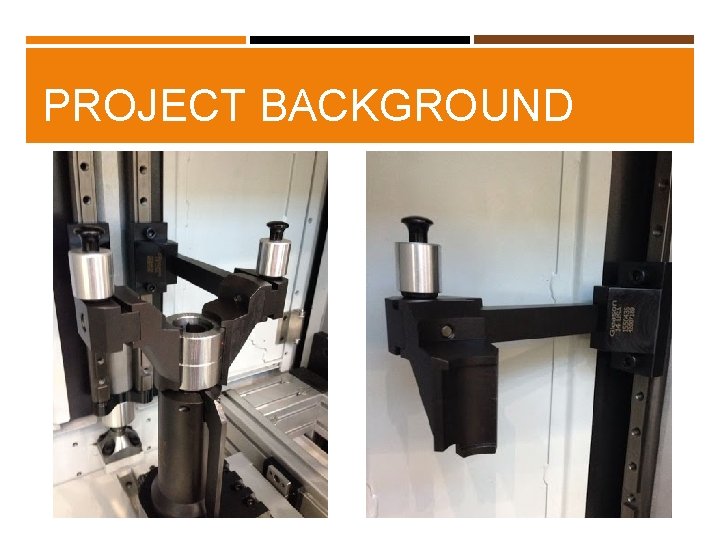
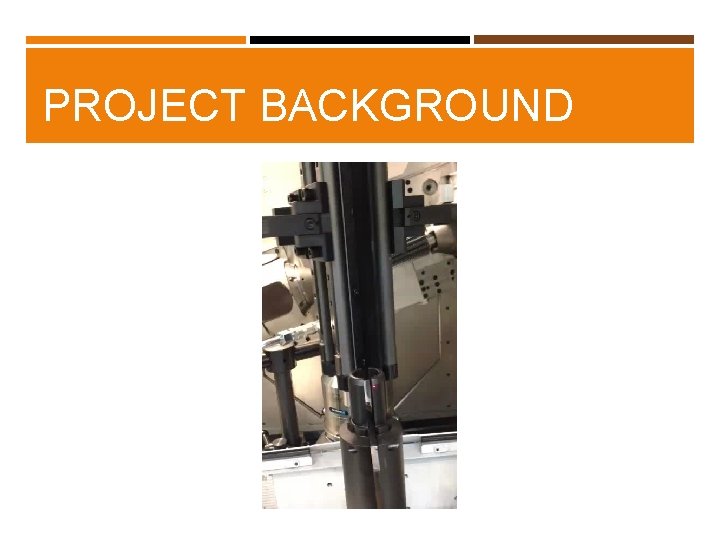
PROJECT BACKGROUND A gear loader jaw assembly is responsible for holding a gear blank while being transferred in and out of the work chamber of the Gleason machine. This is typically part of an automation option for high production use at companies like Ford and GM. Currently Gleason inspects individual components of the gear jaws but doesn't inspect the final assemblies. This has led to machining errors at the customer level due to tolerance stacks and other factors.

PROJECT BACKGROUND

PROJECT BACKGROUND

PROBLEM STATEMENT Detail components of gear positioning assemblies are not adequately inspected or toleranced, causing out-of-spec assemblies to produce non-conforming gears.

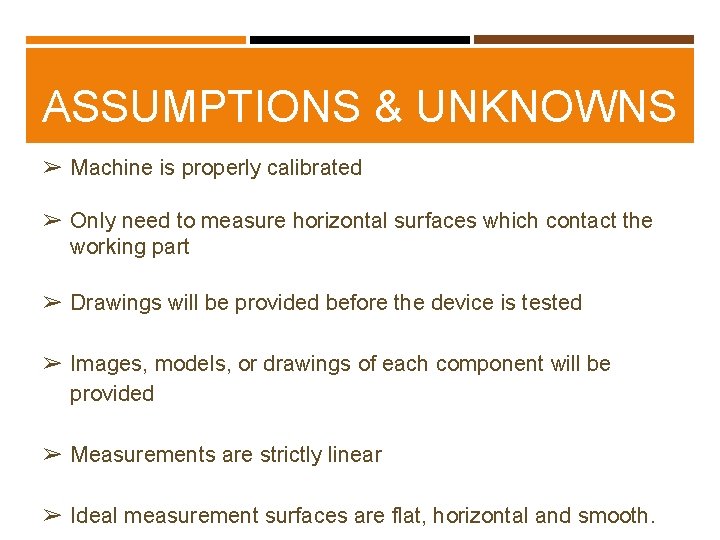
ASSUMPTIONS & UNKNOWNS ➢ Machine is properly calibrated ➢ Only need to measure horizontal surfaces which contact the working part ➢ Drawings will be provided before the device is tested ➢ Images, models, or drawings of each component will be provided ➢ Measurements are strictly linear ➢ Ideal measurement surfaces are flat, horizontal and smooth.

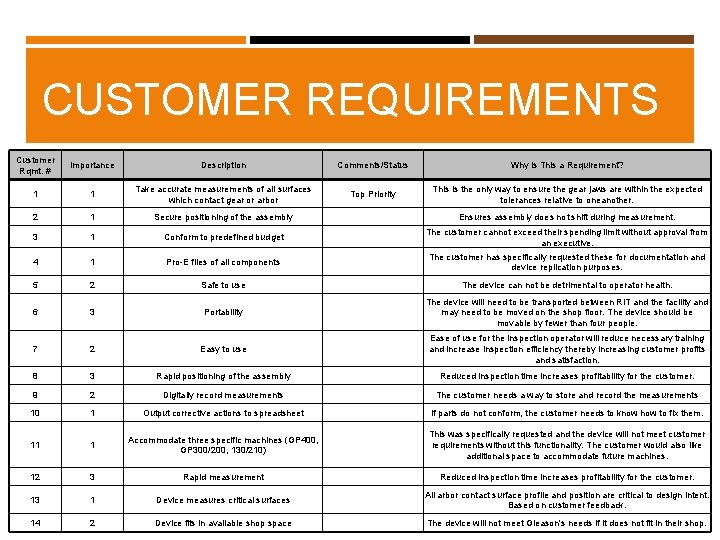
CUSTOMER REQUIREMENTS Customer Rqmt. # Importance Description Comments/Status Why is This a Requirement? 1 1 Take accurate measurements of all surfaces which contact gear or arbor Top Priority This is the only way to ensure the gear jaws are within the expected tolerances relative to oneanother. 2 1 Secure positioning of the assembly Ensures assembly does not shift during measurement. 3 1 Conform to predefined budget The customer cannot exceed their spending limit without approval from an executive. 4 1 Pro-E files of all components The customer has specifically requested these for documentation and device replication purposes. 5 2 Safe to use The device can not be detrimental to operator health. 6 3 Portability The device will need to be transported between RIT and the facility and may need to be moved on the shop floor. The device should be movable by fewer than four people. 7 2 Easy to use Ease of use for the inspection operator will reduce necessary training and increase inspection efficiency thereby increasing customer profits and satisfaction. 8 3 Rapid positioning of the assembly Reduced inspection time increases profitability for the customer. 9 2 Digitally record measurements The customer needs a way to store and record the measurements 10 1 Output corrective actions to spreadsheet If parts do not conform, the customer needs to know how to fix them. 11 1 Accommodate three specific machines (GP 400, GP 300/200, 130/210) This was specifically requested and the device will not meet customer requirements without this functionality. The customer would also like additional space to accommodate future machines. 12 3 Rapid measurement Reduced inspection time increases profitability for the customer. 13 1 Device measures critical surfaces All arbor contact surface profile and position are critical to design intent. Based on customer feedback. 14 2 Device fits in available shop space The device will not meet Gleason's needs if it does not fit in their shop.

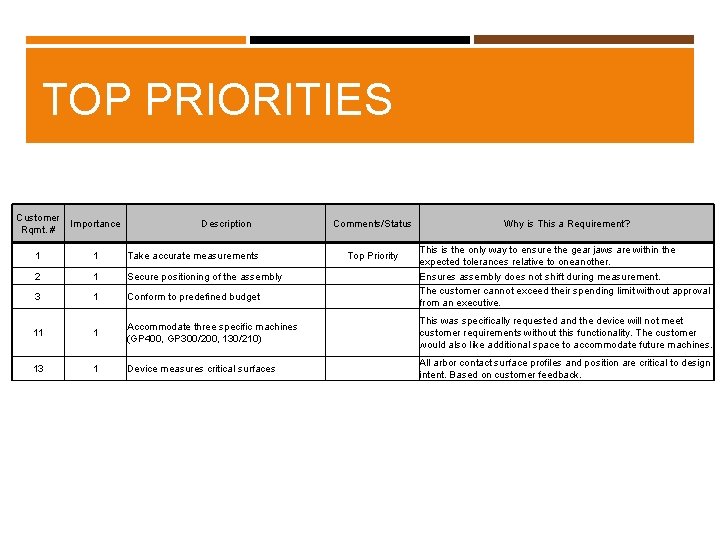
TOP PRIORITIES Customer Importance Rqmt. # Description Comments/Status 1 1 Take accurate measurements Top Priority 2 1 Secure positioning of the assembly 3 1 Conform to predefined budget 11 1 Accommodate three specific machines (GP 400, GP 300/200, 130/210) 13 1 Device measures critical surfaces Why is This a Requirement? This is the only way to ensure the gear jaws are within the expected tolerances relative to oneanother. Ensures assembly does not shift during measurement. The customer cannot exceed their spending limit without approval from an executive. This was specifically requested and the device will not meet customer requirements without this functionality. The customer would also like additional space to accommodate future machines. All arbor contact surface profiles and position are critical to design intent. Based on customer feedback.

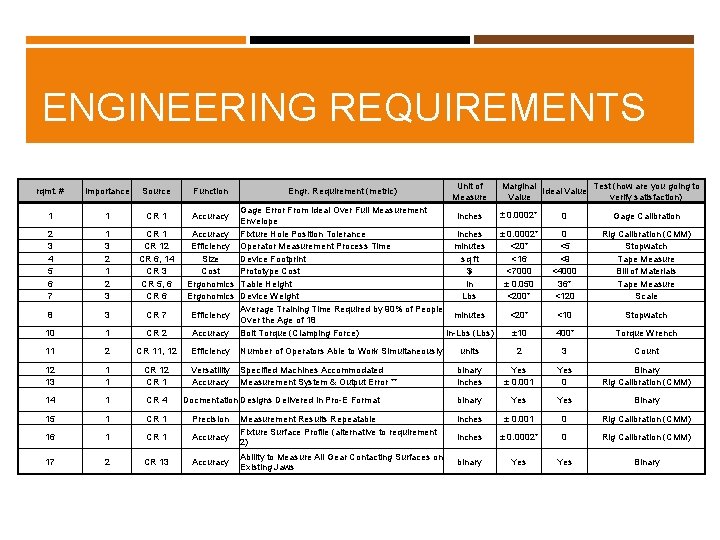
ENGINEERING REQUIREMENTS rqmt. # Importance Source Function Engr. Requirement (metric) 1 1 CR 1 2 3 4 5 6 7 1 3 2 1 2 3 CR 12 CR 6, 14 CR 3 CR 5, 6 CR 6 8 3 CR 7 10 1 CR 2 11 2 CR 11, 12 Efficiency Number of Operators Able to Work Simultaneously 12 13 1 1 CR 12 CR 1 Versatility Accuracy Specified Machines Accommodated Measurement System & Output Error ** 14 1 CR 4 15 1 CR 1 Precision 16 1 CR 1 Accuracy 17 2 CR 13 Accuracy Unit of Measure Marginal Test (how are you going to Ideal Value verify satisfaction) Gage Error From Ideal Over Full Measurement ± 0. 0002* inches Envelope Accuracy Fixture Hole Position Tolerance inches ± 0. 0002* Efficiency Operator Measurement Process Time minutes <20* Size Device Footprint sq ft <16 Cost Prototype Cost $ <7000 Ergonomics Table Height in ± 0. 050 Ergonomics Device Weight Lbs <200* Average Training Time Required by 90% of People Efficiency minutes <20* Over the Age of 18 Accuracy Bolt Torque (Clamping Force) In-Lbs (Lbs) ± 10 Accuracy Docmentation Designs Delivered in Pro-E Format Measurement Results Repeatable Fixture Surface Profile (alternative to requirement 2) Ability to Measure All Gear Contacting Surfaces on Existing Jaws 0 Gage Calibration 0 <5 <9 <4000 36* <120 Rig Calibration (CMM) Stopwatch Tape Measure Bill of Materials Tape Measure Scale <10 Stopwatch 400* Torque Wrench units 2 3 Count binary inches Yes ± 0. 001 Yes 0 Binary Rig Calibration (CMM) binary Yes Binary inches ± 0. 001 0 Rig Calibration (CMM) inches ± 0. 0002* 0 Rig Calibration (CMM) binary Yes Binary

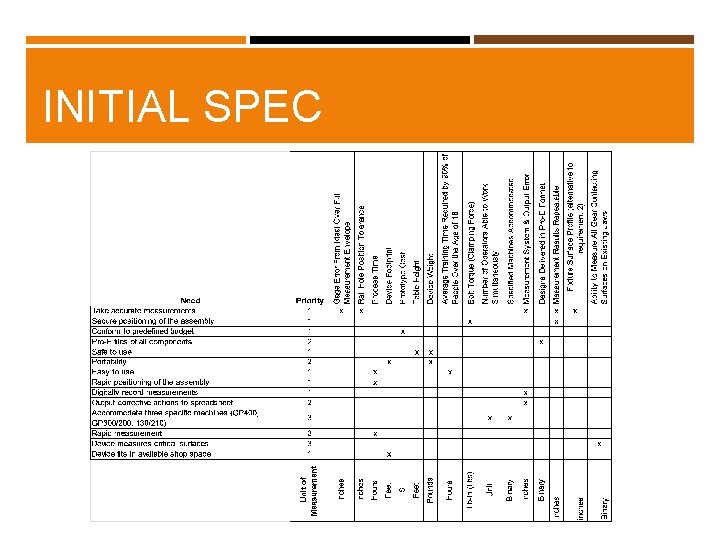
INITIAL SPEC

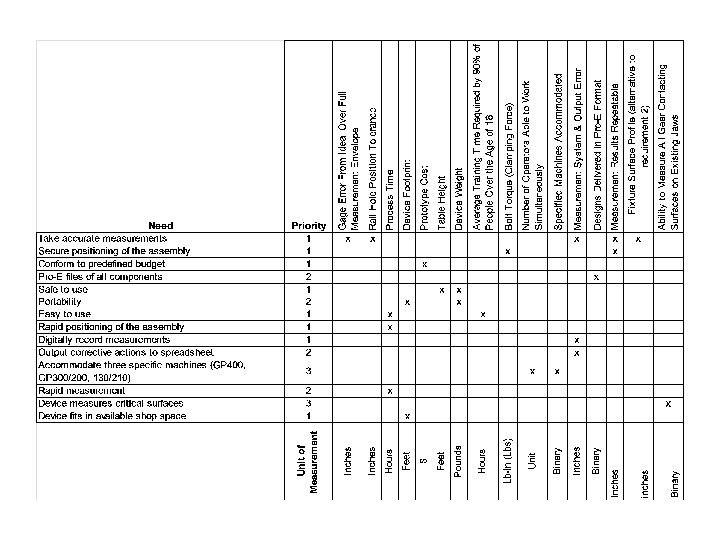
INITIAL SPEC

DESIGN REVIEW OBJECTIVES ➢ Are there any risks that we’ve overlooked? ➢ Are there any additional design ideas that we haven’t thought of? ➢ What do you think the best ideas are?

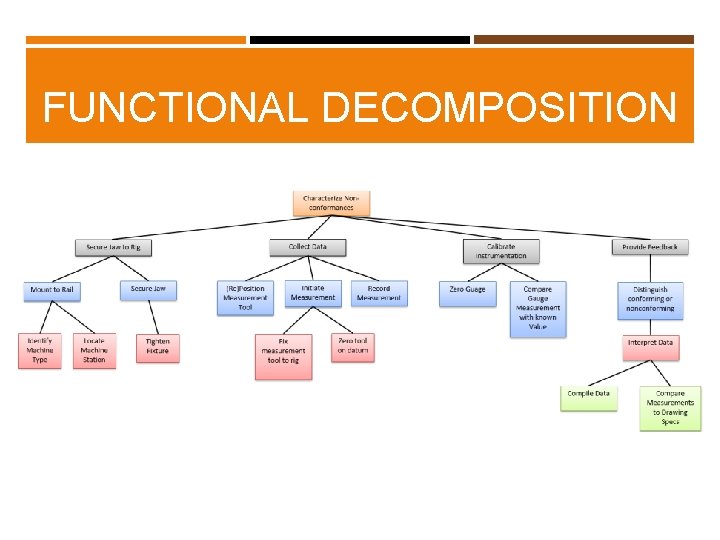
FUNCTIONAL DECOMPOSITION

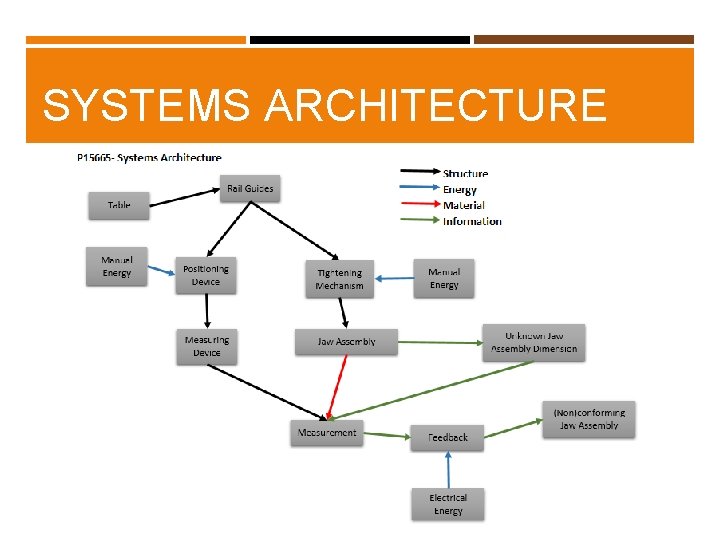
SYSTEMS ARCHITECTURE

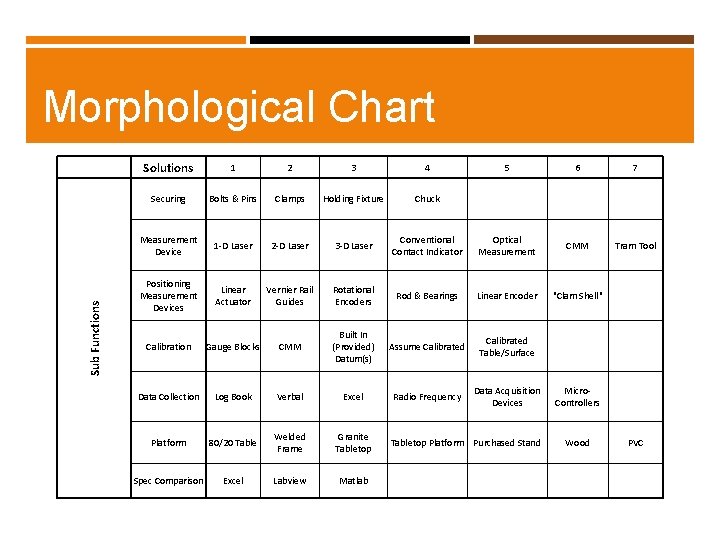
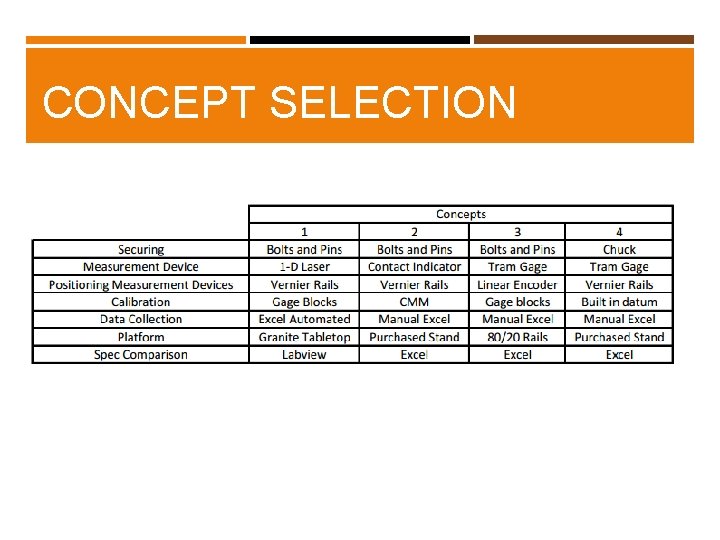
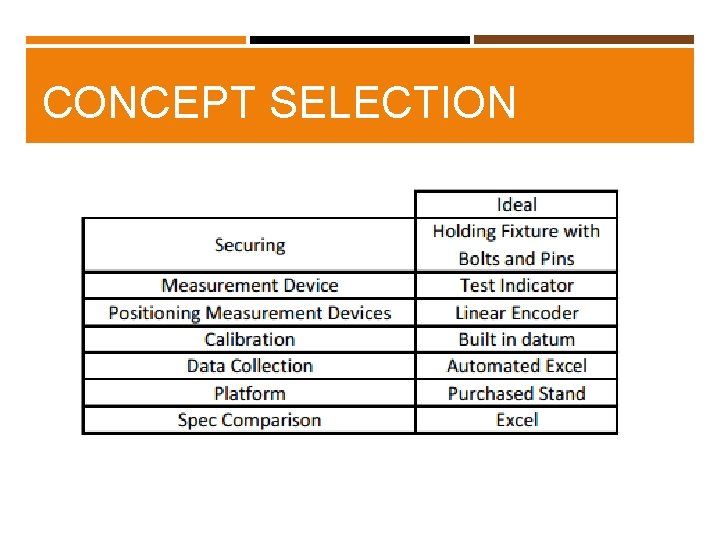
Morphological Chart Sub Functions Solutions 1 2 3 4 5 6 7 Securing Bolts & Pins Clamps Holding Fixture Chuck Measurement Device 1 -D Laser 2 -D Laser 3 -D Laser Conventional Contact Indicator Optical Measurement CMM Tram Tool Positioning Measurement Devices Linear Actuator Vernier Rail Guides Rotational Encoders Rod & Bearings Linear Encoder "Clam Shell" Calibration Gauge Blocks CMM Built In (Provided) Datum(s) Assume Calibrated Table/Surface Data Collection Log Book Verbal Excel Radio Frequency Data Acquisition Devices Micro. Controllers Platform 80/20 Table Welded Frame Granite Tabletop Wood PVC Spec Comparison Excel Labview Matlab Tabletop Platform Purchased Stand

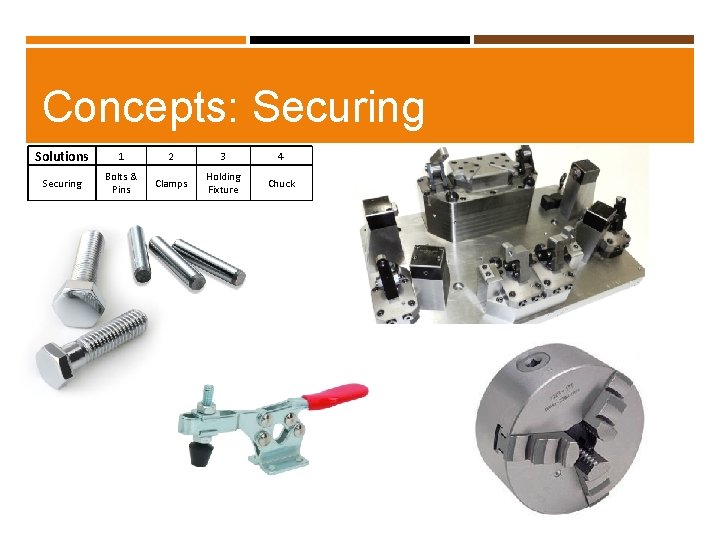
Concepts: Securing Solutions 1 2 3 4 Securing Bolts & Pins Clamps Holding Fixture Chuck

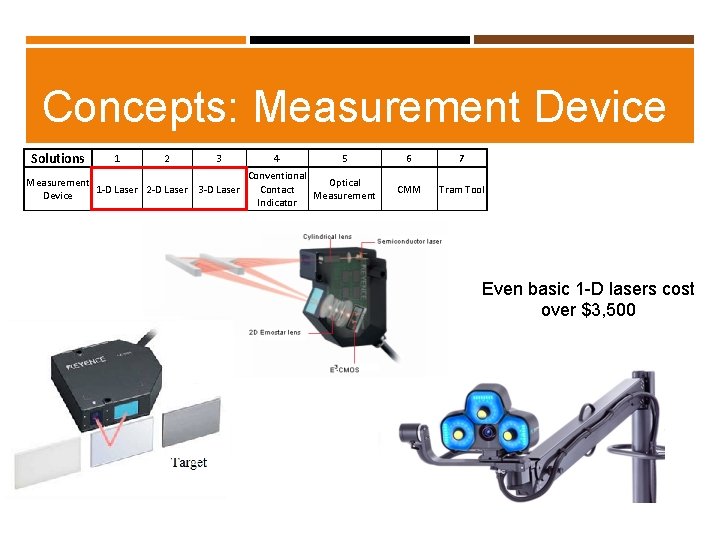
Concepts: Measurement Device Solutions 1 2 3 Measurement 1 -D Laser 2 -D Laser 3 -D Laser Device 4 5 Conventional Optical Contact Measurement Indicator 6 7 CMM Tram Tool Even basic 1 -D lasers cost over $3, 500

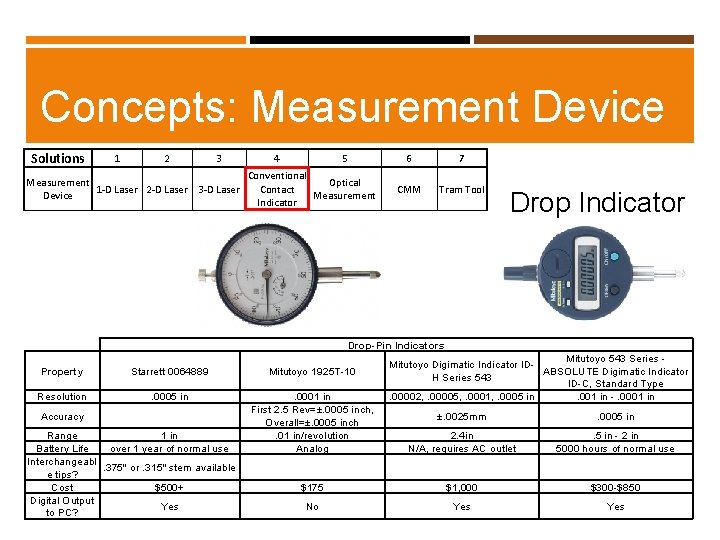
Concepts: Measurement Device Solutions 1 2 3 Measurement 1 -D Laser 2 -D Laser 3 -D Laser Device 4 5 Conventional Optical Contact Measurement Indicator 6 7 CMM Tram Tool Drop Indicator Drop-Pin Indicators Property Starrett 0064889 Mitutoyo 1925 T-10 Resolution . 0005 in Accuracy . 0001 in First 2. 5 Rev=±. 0005 inch, Overall=±. 0005 inch. 01 in/revolution Analog Range 1 in Battery Life over 1 year of normal use Interchangeabl. 375" or. 315" stem available e tips? Cost $500+ Digital Output Yes to PC? Mitutoyo 543 Series - Mitutoyo Digimatic Indicator IDABSOLUTE Digimatic Indicator H Series 543 ID-C, Standard Type. 00002, . 00005, . 0001, . 0005 in. 001 in -. 0001 in ±. 0025 mm . 0005 in 2. 4 in N/A, requires AC outlet . 5 in - 2 in 5000 hours of normal use $175 $1, 000 $300 -$850 No Yes

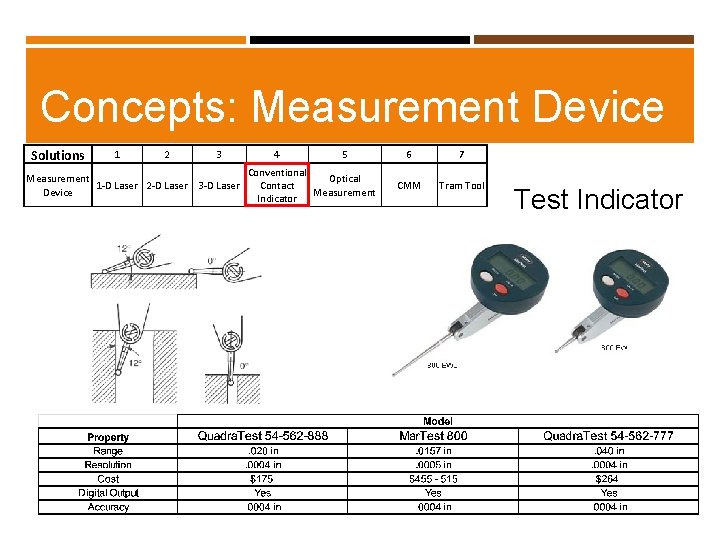
Concepts: Measurement Device Solutions 1 2 3 Measurement 1 -D Laser 2 -D Laser 3 -D Laser Device 4 5 Conventional Optical Contact Measurement Indicator 6 7 CMM Tram Tool Test Indicator

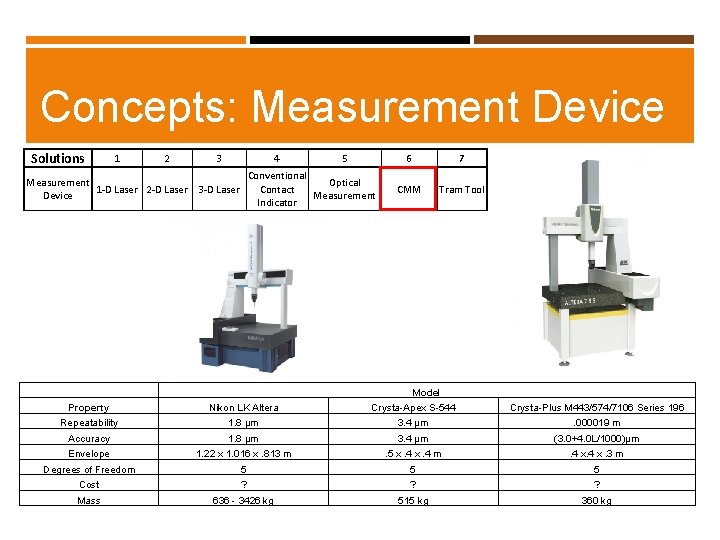
Concepts: Measurement Device Solutions 1 2 3 4 5 Conventional Optical Contact Measurement Indicator Measurement 1 -D Laser 2 -D Laser 3 -D Laser Device 6 7 CMM Tram Tool Model Property Nikon LK Altera Crysta-Apex S-544 Crysta-Plus M 443/574/7106 Series 196 Repeatability 1. 8 μm 3. 4 μm . 000019 m Accuracy 1. 8 μm 3. 4 μm (3. 0+4. 0 L/1000)μm Envelope 1. 22 x 1. 016 x. 813 m . 5 x. 4 m . 4 x. 3 m Degrees of Freedom 5 5 5 Cost ? ? ? Mass 636 - 3426 kg 515 kg 360 kg

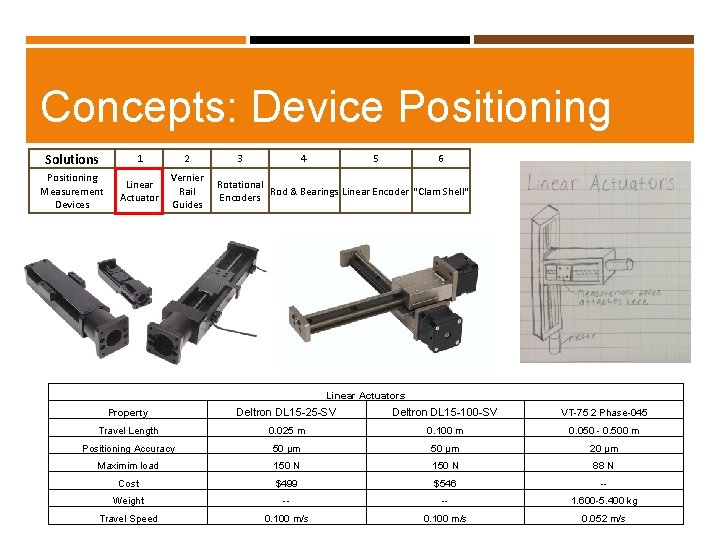
Concepts: Device Positioning Solutions 1 Positioning Measurement Devices Linear Actuator 2 3 4 5 6 Vernier Rotational Rail Rod & Bearings Linear Encoder "Clam Shell" Encoders Guides Linear Actuators Property Deltron DL 15 -25 -SV Deltron DL 15 -100 -SV VT-75 2 Phase-045 Travel Length 0. 025 m 0. 100 m 0. 050 - 0. 500 m Positioning Accuracy 50 μm 20 μm Maximim load 150 N 88 N Cost $499 $546 -- Weight -- -- 1. 600 -5. 400 kg Travel Speed 0. 100 m/s 0. 052 m/s

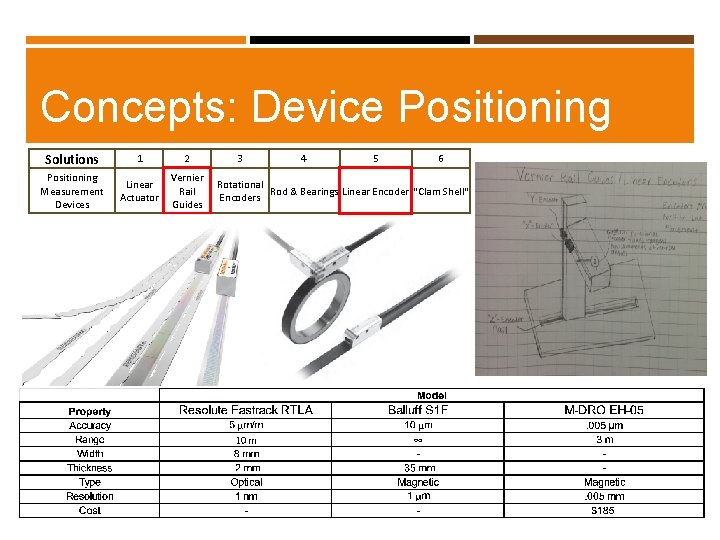
Concepts: Device Positioning Solutions 1 Positioning Measurement Devices Linear Actuator 2 3 4 5 6 Vernier Rotational Rail Rod & Bearings Linear Encoder "Clam Shell" Encoders Guides

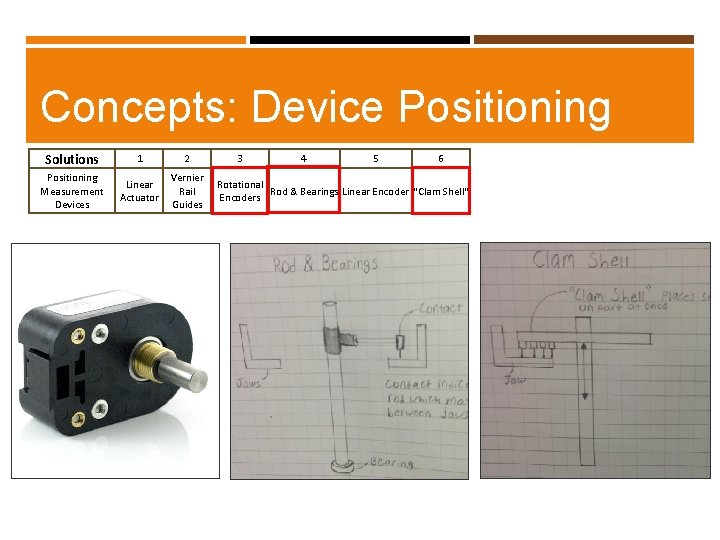
Concepts: Device Positioning Solutions 1 Positioning Measurement Devices Linear Actuator 2 3 4 5 6 Vernier Rotational Rail Rod & Bearings Linear Encoder "Clam Shell" Encoders Guides

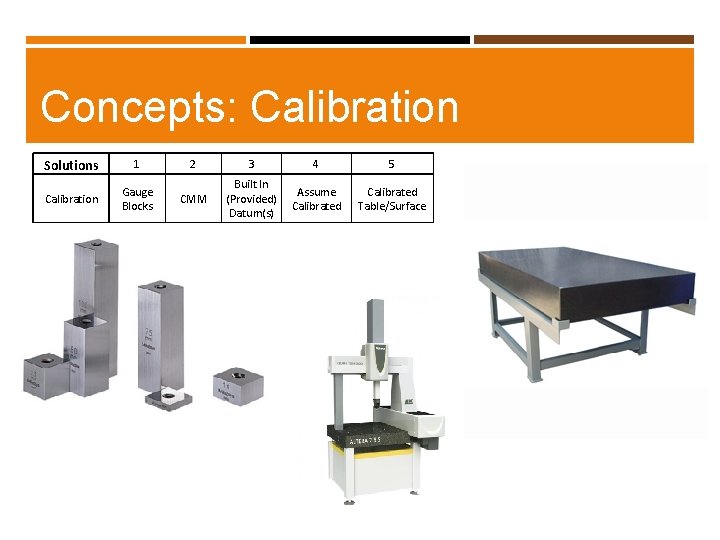
Concepts: Calibration Solutions 1 2 Calibration Gauge Blocks CMM 3 4 Built In Assume (Provided) Calibrated Datum(s) 5 Calibrated Table/Surface

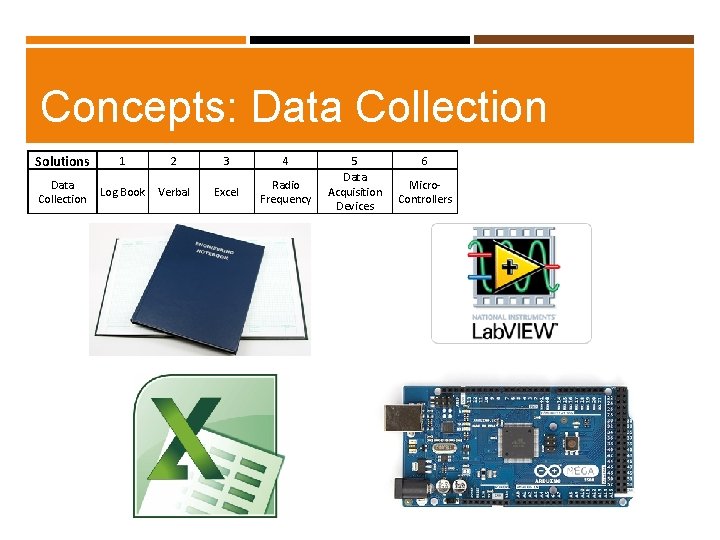
Concepts: Data Collection Solutions 1 2 3 4 Data Collection Log Book Verbal Excel Radio Frequency 5 Data Acquisition Devices 6 Micro. Controllers

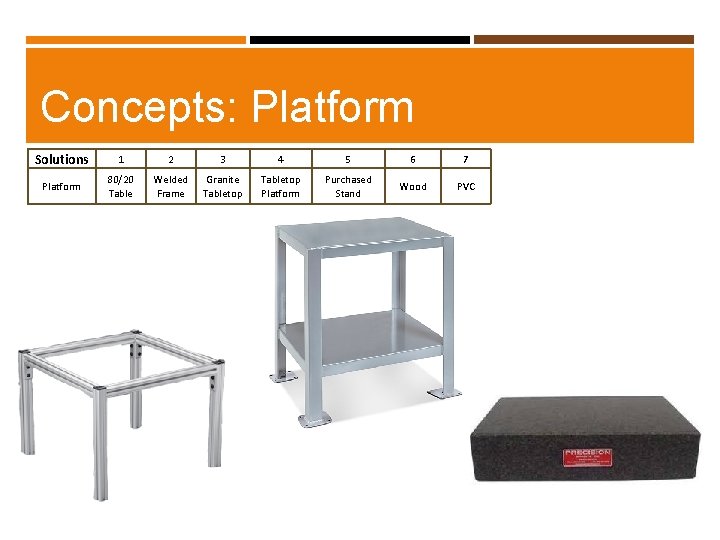
Concepts: Platform Solutions 1 2 3 4 5 6 7 Platform 80/20 Table Welded Frame Granite Tabletop Platform Purchased Stand Wood PVC

CONCEPT SELECTION

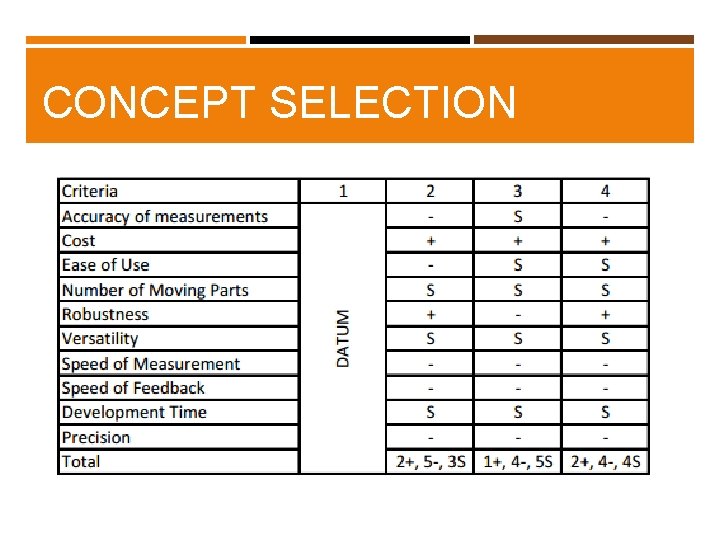
CONCEPT SELECTION

CONCEPT SELECTION

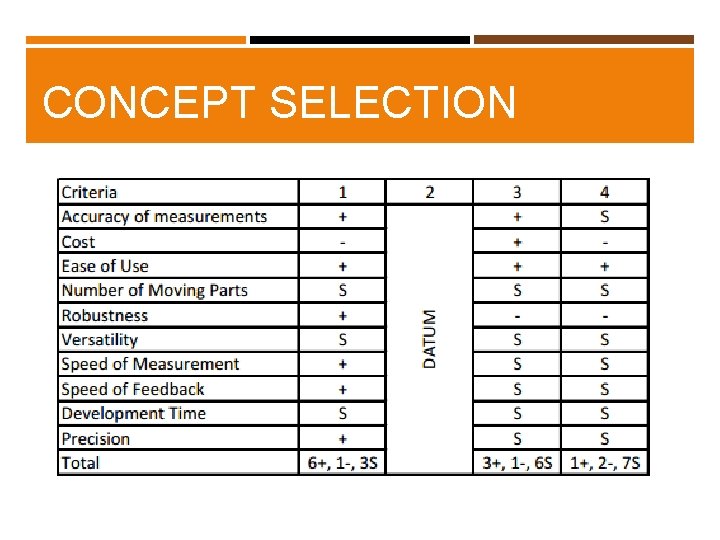
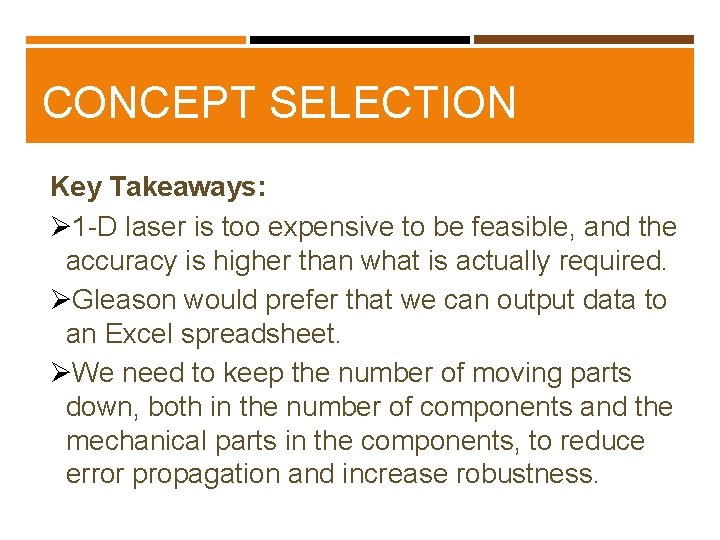
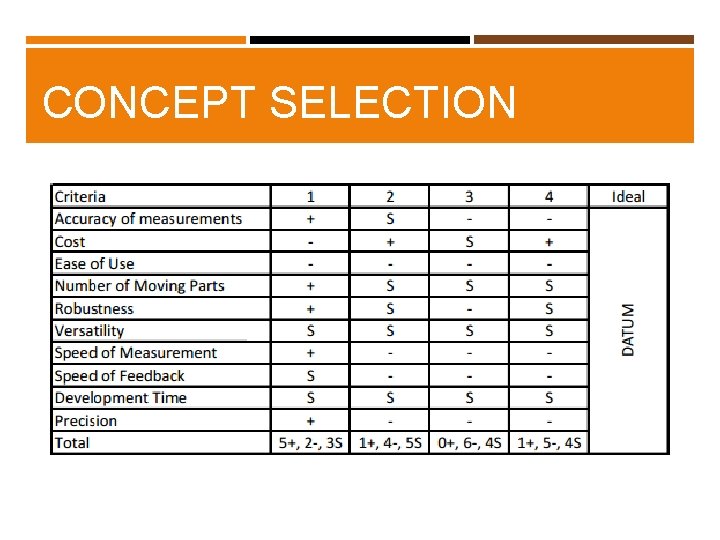
CONCEPT SELECTION Key Takeaways: Ø 1 -D laser is too expensive to be feasible, and the accuracy is higher than what is actually required. ØGleason would prefer that we can output data to an Excel spreadsheet. ØWe need to keep the number of moving parts down, both in the number of components and the mechanical parts in the components, to reduce error propagation and increase robustness.

CONCEPT SELECTION

CONCEPT SELECTION

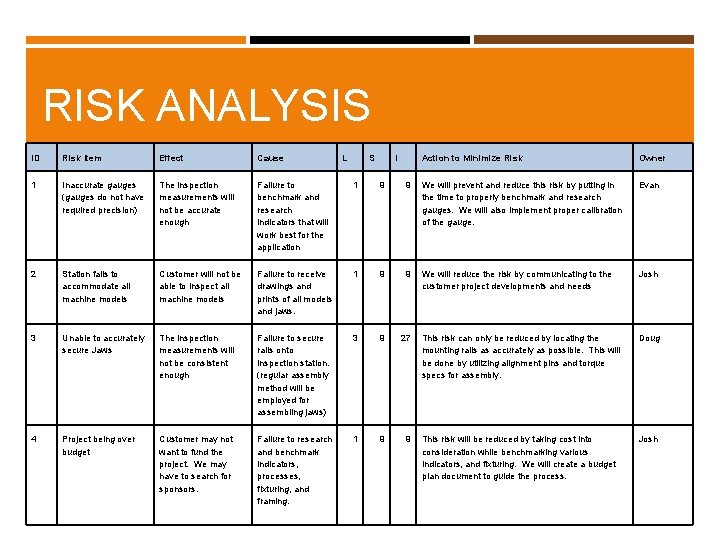
RISK ANALYSIS ID Risk Item Effect Cause L S I Action to Minimize Risk Owner 1 Inaccurate gauges (gauges do not have required precision) The inspection measurements will not be accurate enough Failure to benchmark and research indicators that will work best for the application 1 9 9 We will prevent and reduce this risk by putting in the time to properly benchmark and research gauges. We will also implement proper calibration of the gauge. Evan 2 Station fails to accommodate all machine models Customer will not be able to inspect all machine models Failure to receive drawings and prints of all models and jaws. 1 9 9 We will reduce the risk by communicating to the customer project developments and needs Josh 3 Unable to accurately secure Jaws The inspection measurements will not be consistent enough Failure to secure rails onto inspection station. (regular assembly method will be employed for assembling jaws) 3 9 27 This risk can only be reduced by locating the mounting rails as accurately as possible. This will be done by utilizing alignment pins and torque specs for assembly. Doug 4 Project being over budget Customer may not want to fund the project. We may have to search for sponsors. Failure to research and benchmark indicators, processes, fixturing, and framing. 1 9 9 This risk will be reduced by taking cost into consideration while benchmarking various indicators, and fixturing. We will create a budget plan document to guide the process. Josh

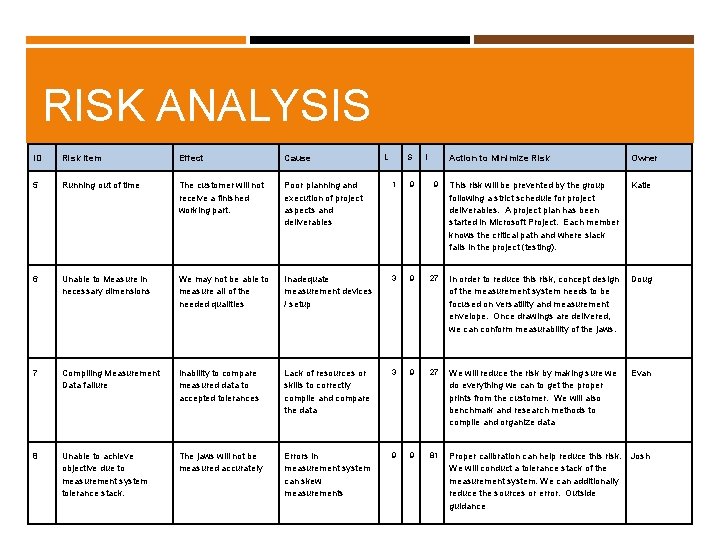
RISK ANALYSIS L S ID Risk Item Effect Cause 5 Running out of time The customer will not receive a finished working part. Poor planning and execution of project aspects and deliverables 1 9 6 Unable to Measure in necessary dimensions We may not be able to measure all of the needed qualities Inadequate measurement devices / setup 3 7 Compiling Measurement Data failure Inability to compare measured data to accepted tolerances Lack of resources or skills to correctly compile and compare the data 8 Unable to achieve objective due to measurement system tolerance stack. The jaws will not be measured accurately Errors in measurement system can skew measurements I Action to Minimize Risk Owner 9 This risk will be prevented by the group following a strict schedule for project deliverables. A project plan has been started in Microsoft Project. Each member knows the critical path and where slack falls in the project (testing). Katie 9 27 In order to reduce this risk, concept design of the measurement system needs to be focused on versatility and measurement envelope. Once drawings are delivered, we can conform measurability of the jaws. Doug 3 9 27 We will reduce the risk by making sure we do everything we can to get the proper prints from the customer. We will also benchmark and research methods to compile and organize data Evan 9 9 81 Proper calibration can help reduce this risk. Josh We will conduct a tolerance stack of the measurement system. We can additionally reduce the sources or error. Outside guidance

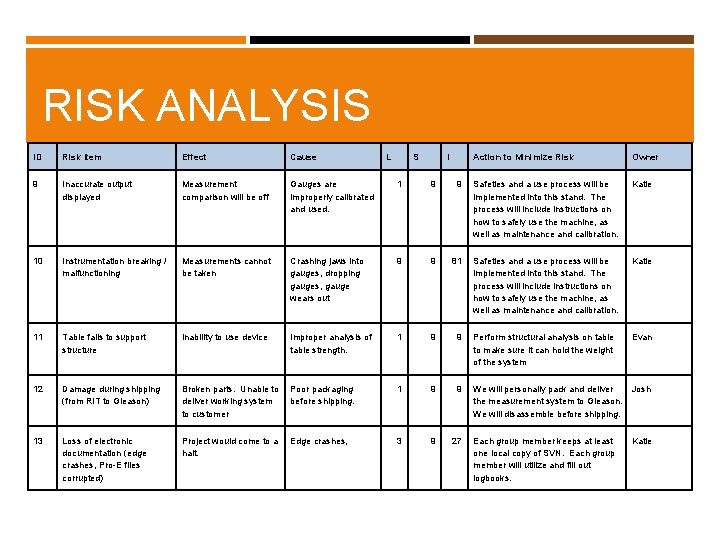
RISK ANALYSIS ID Risk Item Effect Cause L S I Action to Minimize Risk Owner 9 Inaccurate output displayed Measurement comparison will be off Gauges are improperly calibrated and used. 1 9 9 Safeties and a use process will be implemented into this stand. The process will include instructions on how to safely use the machine, as well as maintenance and calibration. Katie 10 Instrumentation breaking / malfunctioning Measurements cannot be taken Crashing jaws into gauges, dropping gauges, gauge wears out 9 9 81 Safeties and a use process will be implemented into this stand. The process will include instructions on how to safely use the machine, as well as maintenance and calibration. Katie 11 Table fails to support structure Inability to use device Improper analysis of table strength. 1 9 9 Perform structural analysis on table to make sure it can hold the weight of the system Evan 12 Damage during shipping (from RIT to Gleason) Broken parts. Unable to deliver working system to customer Poor packaging before shipping. 1 9 9 We will personally pack and deliver Josh the measurement system to Gleason. We will disassemble before shipping. 13 Loss of electronic documentation (edge crashes, Pro-E files corrupted) Project would come to a halt. Edge crashes, 3 9 27 Each group member keeps at least one local copy of SVN. Each group member will utilize and fill out logbooks. Katie

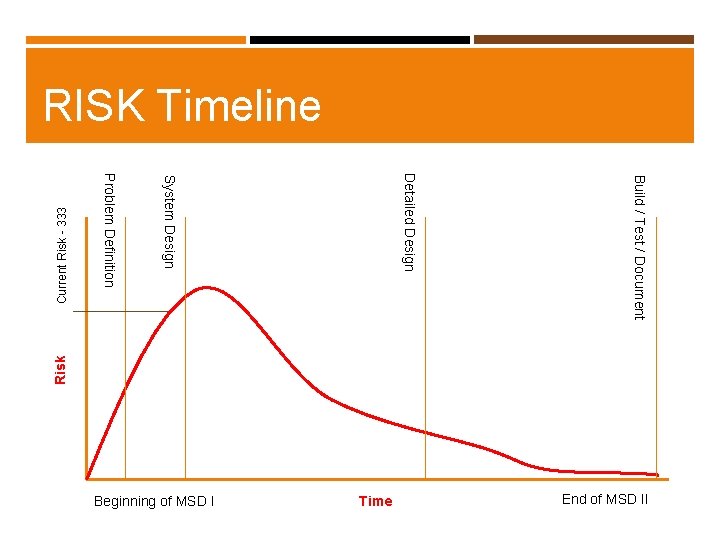
Build / Test / Document End of MSD II Time Beginning of MSD I Detailed Design System Design Current Risk - 333 Problem Definition Risk RISK Timeline

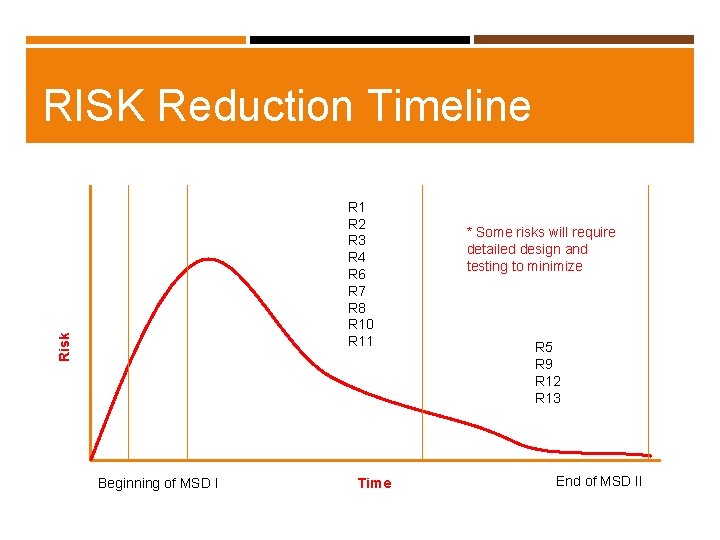
RISK Reduction Timeline Risk R 1 R 2 R 3 R 4 R 6 R 7 R 8 R 10 R 11 Beginning of MSD I Time * Some risks will require detailed design and testing to minimize R 5 R 9 R 12 R 13 End of MSD II

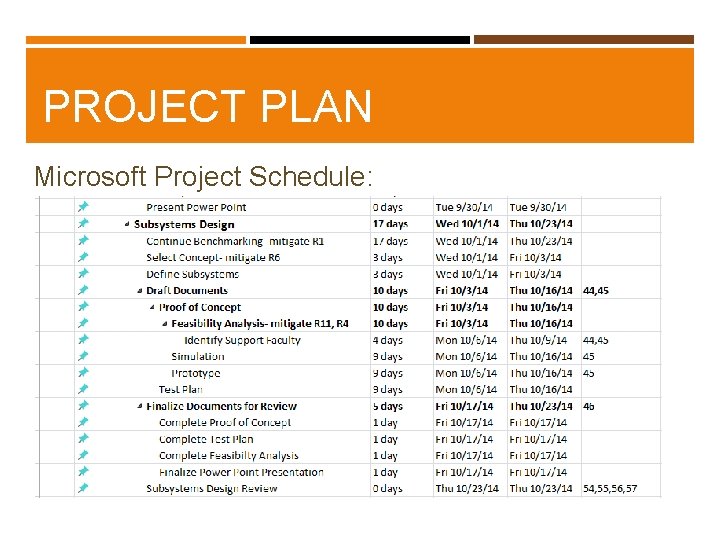
PROJECT PLAN Microsoft Project Schedule:

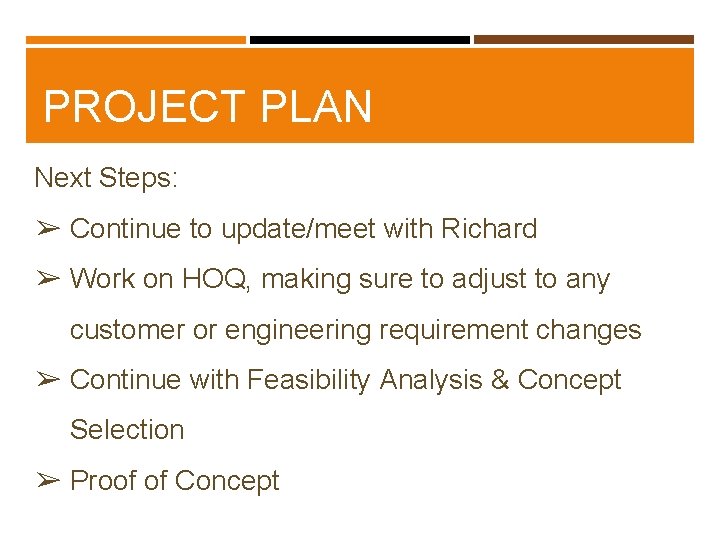
PROJECT PLAN Next Steps: ➢ Continue to update/meet with Richard ➢ Work on HOQ, making sure to adjust to any customer or engineering requirement changes ➢ Continue with Feasibility Analysis & Concept Selection ➢ Proof of Concept

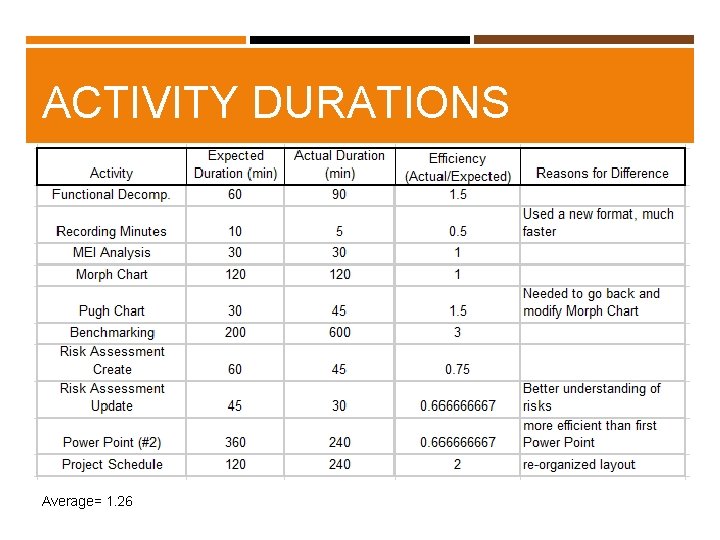
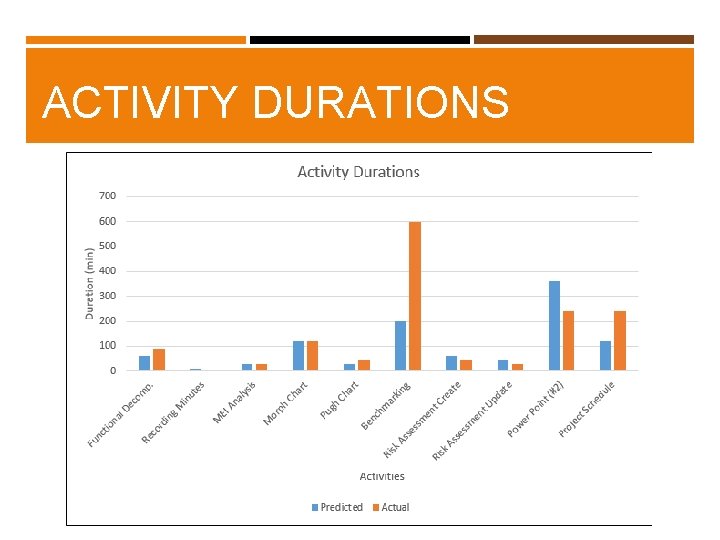
ACTIVITY DURATIONS Average= 1. 26

ACTIVITY DURATIONS

Questions ➢ Are there any risks that we’ve overlooked? ➢ Are there any additional design ideas that we haven’t thought of? ➢ What do you think the best ideas are?

THANK YOU